Spring Boot 2.4.x の Web アプリを 2.5.x へバージョンアップする ( その2 )( Spring Boot を 2.4.3 → 2.4.10 へ、Gradle を 6.8.3 → 6.9.1 へバージョンアップする )
概要
記事一覧はこちらです。
Spring Boot 2.4.x の Web アプリを 2.5.x へバージョンアップする ( その1 )( 概要 ) の続きです。
- 今回の手順で確認できるのは以下の内容です。
- Spring Boot のバージョンを 2.4 系の最新バージョンである 2.4.10 へ、Gradle のバージョンを 6.x 系の最新バージョンである 6.9.1 に上げて build できることを確認します。
- 今回は問題がなければライブラリはバージョンアップしません。
参照したサイト・書籍
目次
手順
2.5.x ブランチの作成
master から 2.5.x ブランチを、2.5.x から feature/137-issue ブランチを作成します。
Spring Boot を 2.4.3 → 2.4.10 にバージョンアップする
build.gradle の以下の点を変更します。
buildscript {
    ext {
        group "ksbysample"
        version "2.4.10"
    }
    repositories {
        mavenCentral()
        maven { url "https://repo.spring.io/release/" }
        gradlePluginPortal()
    }
    dependencies {
        // for doma-codegen-plugin
        classpath "org.postgresql:postgresql:42.2.19"
    }
}

plugins {
    id "java"
    id "eclipse"
    id "idea"
    id "org.springframework.boot" version "2.4.10"
    id "io.spring.dependency-management" version "1.0.11.RELEASE"
    id "groovy"
    id "checkstyle"
    id "com.github.spotbugs" version "4.6.1"
    id "pmd"
    id "net.ltgt.errorprone" version "1.3.0"
    id "com.gorylenko.gradle-git-properties" version "2.2.4"
    id "org.seasar.doma.codegen" version "1.2.1"
}

..........
- buildscript block の以下の点を変更します。
version "2.4.3"→version "2.4.10"
- plugins block の以下の点を変更します。
id "org.springframework.boot" version "2.4.3"→id "org.springframework.boot" version "2.4.10"
Gradle Tool Window の左上にある「Refresh all Gradle projects」ボタンをクリックして更新します。
Gradle を 6.8.3 → 6.9.1 にバージョンアップする
build.gradle の wrapper タスクの記述を以下のように変更します。
wrapper {
    gradleVersion = "6.9.1"
    distributionType = Wrapper.DistributionType.ALL
}
gradleVersion = "6.8.3"→gradleVersion = "6.9.1"に変更します。
コマンドプロンプトから gradlew wrapper --gradle-version=6.9.1、gradlew --version コマンドを実行します。
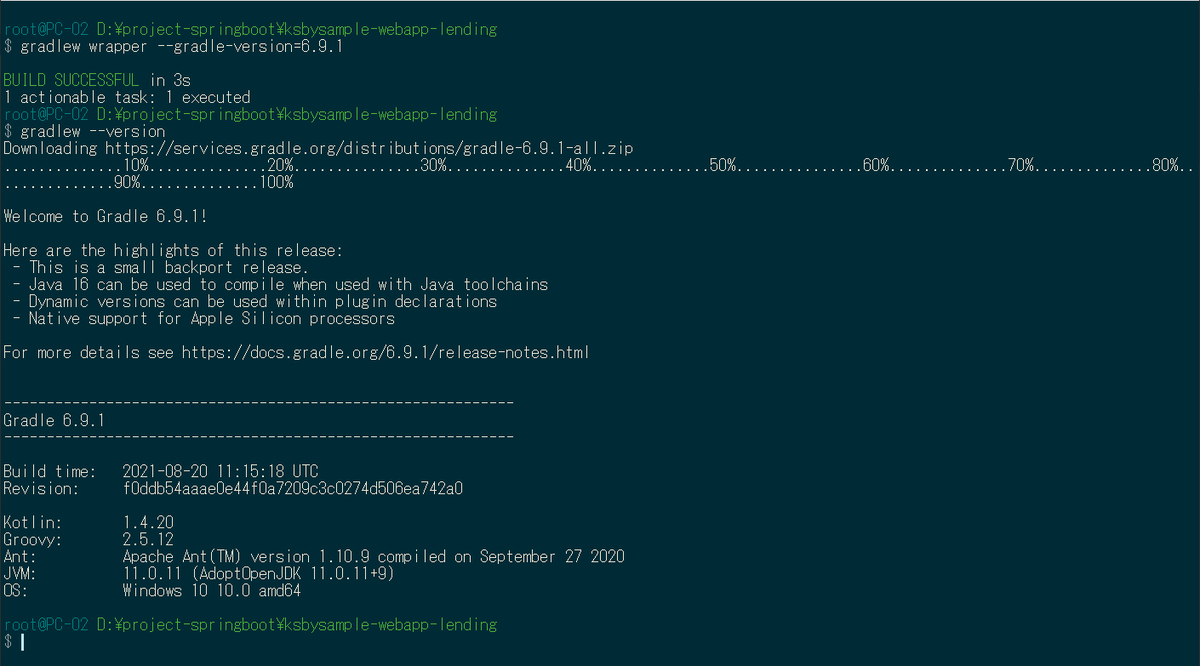
gradle/wrapper/gradle-wrapper.properties は以下の内容になります。
distributionBase=GRADLE_USER_HOME
distributionPath=wrapper/dists
distributionUrl=https\://services.gradle.org/distributions/gradle-6.9.1-all.zip
zipStoreBase=GRADLE_USER_HOME
zipStorePath=wrapper/dists
Gradle Tool Window の左上にある「Refresh all Gradle projects」ボタンをクリックして更新します。
.gradle ディレクトリの下にバージョン番号のディレクトリがあるので、6.9.1 以外を削除します。
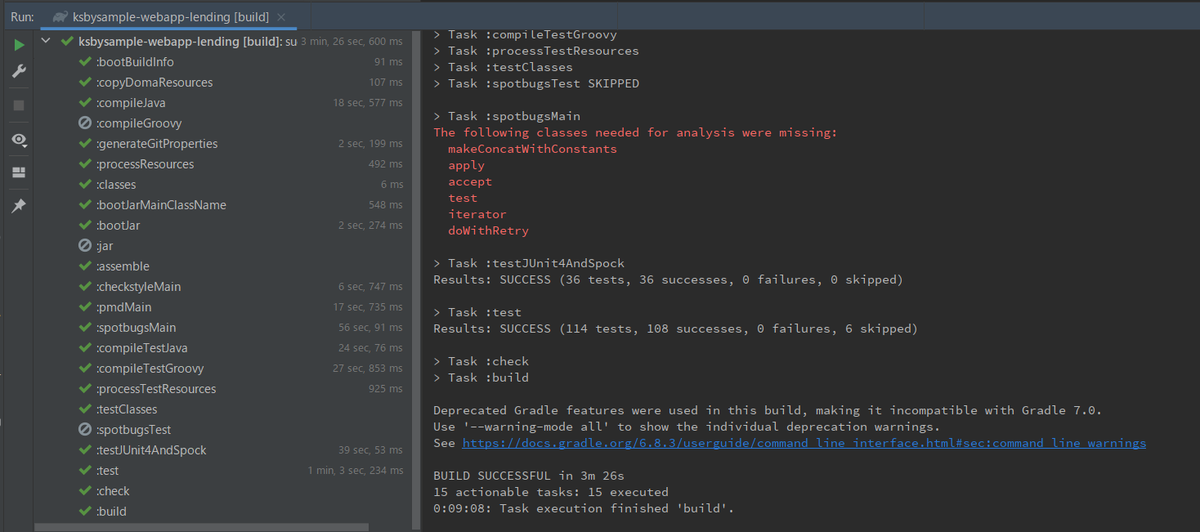
clean タスク実行 → Rebuild Project 実行 → build タスクを実行すると "BUILD SUCCESSFUL" のメッセージが出力されました。

履歴
2021/08/21
初版発行。
Spring Boot 2.4.x の Web アプリを 2.5.x へバージョンアップする ( その1 )( 概要 )
概要
記事一覧はこちらです。
- 「Spring Boot で書籍の貸出状況確認・貸出申請する Web アプリケーションを作る」で作成した Web アプリケーション ( ksbysample-webapp-lending ) の Spring Boot のバージョンを 2.4.3 → 2.5.x へバージョンアップします。
- 進め方は以下の方針とします。
- Git のブランチは 2.5.x を作成して、そちらで作業します。Spring Boot のバージョンと合わせます。
- Spring Boot のバージョンを 2.4 系の最新バージョンである 2.4.10 へ、Gradle のバージョンを 6.x 系の最新バージョンである 6.9.1 に上げて build できることを確認します。この時点ではライブラリはバージョンアップしません。
- Spring Boot のバージョンを 2.5.x にします。
- Spring Initializr で 2.5.x のプロジェクトを作成して、修正した方がよさそうな点があれば反映します。
- ライブラリは最新バージョンにアップデートします。ただし、この時点では Spock, checkstyle, spotbugs, pmd, Error Prone のバージョンは上げません。
- プロジェクトを build し直してエラーが出る点があれば修正し、まずはここまでで動くようにします。
- Gradle のバージョンを 7系の最新バージョンにします。
- Spock を 2系にバージョンアップします。
- その後で 2.5 系ではこう書くべきという点があるか確認し、変更した方がよいところを変更します。
- checkstyle, spotbugs, pmd, Error Prone を1つずつ最新バージョンに上げます。変更した方がよいところがあれば変更します。
- docker-compose で使用している image を最新バージョンに上げます。
2.5 の Release Notes はこちらです。
Spring Boot 2.5 Release Notes
https://github.com/spring-projects/spring-boot/wiki/Spring-Boot-2.5-Release-Notes
履歴
2021/08/21
初版発行。
Spring Boot 2.4.x の Web アプリを 2.5.x へバージョンアップする ( 大目次 )
- その1 ( 概要 )
- その2 ( Spring Boot を 2.4.3 → 2.4.10 へ、Gradle を 6.8.3 → 6.9.1 へバージョンアップする )
- その3 ( Spring Boot を 2.4.10 → 2.5.4 へバージョンアップする )
- その4 ( Gradle を 6.9.1 → 7.2 へバージョンアップする )
- その5 ( Spock を 1.3-groovy-2.5 → 2.0-groovy-3.0 へバージョンアップする )
- その6 ( Release Notes を見て必要な箇所を変更する。。。ことがなさそうなので Checkstyle を 8.41 → 9.0 へバージョンアップする )
- その7 ( PMD を 6.32.0 → 6.38.0 へバージョンアップする )
- その8 ( Error Prone を 2.5.1 → 2.9.0 へバージョンアップする )
- その9 ( SpotBugs を 4.2.1 → 4.4.0 へバージョンアップする )
- その10 ( Docker コンテナの image をバージョンアップする )
- その11 ( Docker で複数の Tomcat を起動して動作確認する )
- 感想
- その12 ( build.gradle から --add-opens=.....=ALL-UNNAMED の記述を削除する )
- その13 ( Spring Boot を 2.5.4 → 2.5.5 へ、Eclipse Adoptium OpenJDK(Eclipse Temurin) を 11.0.12+7 → 17+35 へバージョンアップする )
- その14 ( google_checks.xml に Record に関する定義を反映する+bootBuildImage タスクで Java 17 ベースの Docker Image を作成して動作確認する )
- その15 ( JUnit 4 を依存関係から削除する+他3点の気づいた点を変更する )
IntelliJ IDEA を 2021.1.2 → 2021.1.3 へ、Git for Windows を 2.31.0 → 2.32.0.2 へバージョンアップ
IntelliJ IDEA を 2021.1.2 → 2021.1.3 へバージョンアップする
IntelliJ IDEA の 2021.1.3 がリリースされているのでバージョンアップします。
- IntelliJ IDEA 2021.1.3 Is Available
https://blog.jetbrains.com/idea/2021/06/intellij-idea-2021-1-3/
※ksbysample-webapp-lending プロジェクトを開いた状態でバージョンアップしています。
IntelliJ IDEA のメインメニューから「Help」-「Check for Updates...」を選択します。
「IntelliJ IDEA and Plugin Updates」ダイアログが表示されます。右下に「Update and Restart」ボタンが表示されていますので、「Update and Restart」ボタンをクリックします。

Plugin の update も表示されました。このまま「Update and Restart」ボタンをクリックします。

Patch がダウンロードされて IntelliJ IDEA が再起動します。
IntelliJ IDEA が起動すると画面下部に「Indexing」のメッセージが表示されますので、終了するまで待機します。
IntelliJ IDEA のメインメニューから「Help」-「About」を選択し、2021.1.3 へバージョンアップされていることを確認します。
clean タスク実行 → Rebuild Project 実行 → build タスクを実行して、"BUILD SUCCESSFUL" のメッセージが出力されることを確認します。

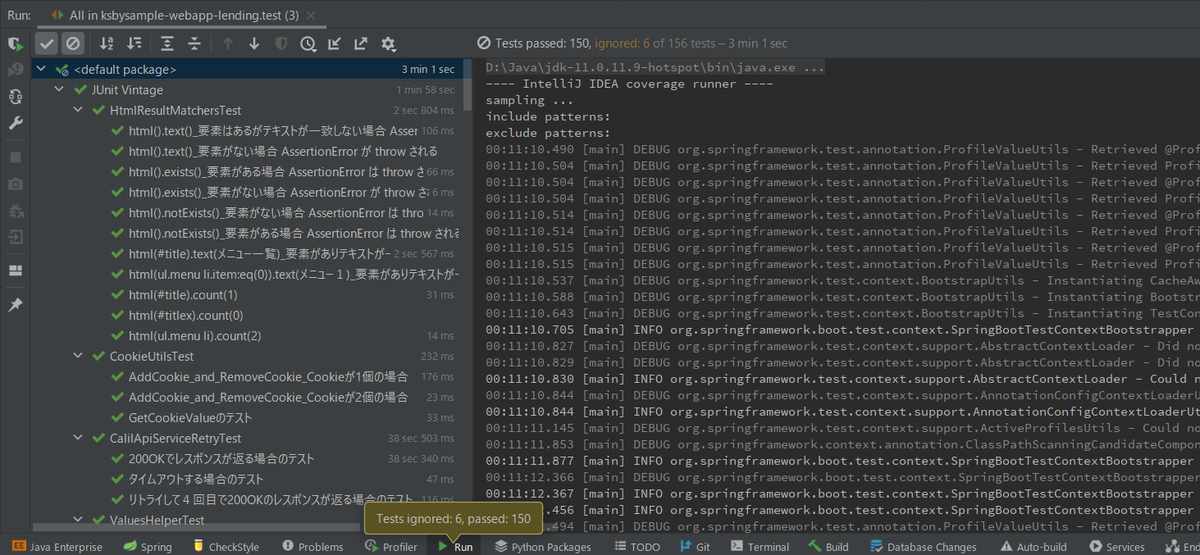
Project Tool Window で src/test でコンテキストメニューを表示して「More Run/Debug」-「Run 'All Tests' with Coverage」を選択し、テストが全て成功することを確認します。

Git for Windows を 2.31.0 → 2.32.0.2 へバージョンアップする
Git for Windows の 2.32.0.2 がリリースされていたのでバージョンアップします。
https://gitforwindows.org/ の「Download」ボタンをクリックして Git-2.32.0.2-64-bit.exe をダウンロードします。
Git-2.32.0.2-64-bit.exe を実行します。
「Git 2.32.0.2 Setup」ダイアログが表示されます。インストーラーの画面を一通り見たいので「Only show new options」のチェックを外してから [Next >] ボタンをクリックします。
「Select Components」画面が表示されます。「Git LFS(Large File Support)」だけチェックした状態で [Next >]ボタンをクリックします。
「Choosing the default editor used by Git」画面が表示されます。「Use Vim (the ubiquitous text editor) as Git's default editor」が選択された状態で [Next >]ボタンをクリックします。
「Adjusting the name of the initial branch in new repositories」画面が表示されます。「Let Git decide」が選択されていることを確認後、[Next >]ボタンをクリックします。
「Adjusting your PATH environment」画面が表示されます。中央の「Git from the command line and also from 3rd-party software」が選択されていることを確認後、[Next >]ボタンをクリックします。
「Choosing HTTPS transport backend」画面が表示されます。「Use the OpenSSL library」が選択されていることを確認後、[Next >]ボタンをクリックします。
「Configuring the line ending conversions」画面が表示されます。一番上の「Checkout Windows-style, commit Unix-style line endings」が選択されていることを確認した後、[Next >]ボタンをクリックします。
「Configuring the terminal emulator to use with Git Bash」画面が表示されます。「Use Windows'default console window」が選択されていることを確認した後、[Next >]ボタンをクリックします。
「Choose the default behavior of
git pull」画面が表示されます。「Default (fast-forward or merge)」が選択されていることを確認した後、[Next >]ボタンをクリックします。「Choose a credential helper」画面が表示されます。「None」が選択されていることを確認した後、[Next >]ボタンをクリックします。
「Configuring extra options」画面が表示されます。「Enable file system caching」だけがチェックされていることを確認した後、[Next >]ボタンをクリックします。
「Configuring experimental options」画面が表示されます。何もチェックせずに [Install]ボタンをクリックします。
インストールが完了すると「Completing the Git Setup Wizard」のメッセージが表示された画面が表示されます。中央の「View Release Notes」のチェックを外した後、[Next >]ボタンをクリックしてインストーラーを終了します。
コマンドプロンプトを起動して
git --versionを実行し、git のバージョンがgit version 2.32.0.windows.2になっていることを確認します。
特に問題はないようですので、2.32.0.2 で作業を進めたいと思います。
AdoptOpenJDK を 11.0.10+9 → 11.0.11+9 へ、IntelliJ IDEA を 2020.3.3 → 2020.3.4 → 2021.1.2 へバージョンアップ
AdoptOpenJDK を 11.0.10.1+1 → 11.0.11+9 へバージョンアップする
※ksbysample-webapp-lending プロジェクトを開いた状態でバージョンアップしています。
https://adoptopenjdk.net/ を見ると 11.0.11+9 がダウンロードできるようになっていましたので、11.0.11+9 へバージョンアップします。

インストール時に削除されるかもしれないので D:\Java\jdk-11.0.10.9-hotspot → D:\Java\jdk-11.0.10.9-hotspotx にリネームします。
OpenJDK11U-jdk_x64_windows_hotspot_11.0.11_9.msi をダウンロードして D:\Java\jdk-11.0.11.9-hotspot へインストールした後、環境変数 JAVA_HOME のパスを D:\Java\jdk-11.0.10.9-hotspot へ変更します。
コマンドプロンプトから
java -versionを実行し、11.0.11に変更されていることを確認します。
D:\Java\jdk-11.0.10.9-hotspotx → D:\Java\jdk-11.0.10.9-hotspot に戻します。
IntelliJ IDEA を再起動します。
「Welcome to IntelliJ IDEA」ダイアログで ksbysample-webapp-lending プロジェクトを開いて、プロジェクトが使用する JDK を 11.0.11+9 に変更します。
IntelliJ IDEA のメイン画面が開いたら、メニューから「File」-「Project Structure...」を選択します。
「Project Structure」ダイアログが表示されます。「Project SDK」で D:\Java\jdk-11.0.11.9-hotspot を選択します。

「Project SDK」の「Edit」ボタンをクリックします。

「Project Structure」ダイアログが表示されます。画面左側で「Platform Settings」-「SDKs」を選択して、中央のリストから「11.0.10.9」を選択した後、リストの上の「-」ボタンをクリックして削除します。

中央のリストから「11」を選択した後、"11" → "11.0.11.9" へ変更します。

「OK」ボタンをクリックして「Project Structure for New Projects」ダイアログを閉じます。
メイン画面に戻ると画面右下に「Indexing...」の表示が出るので、終了するまで待ちます。
Gradle Tool Window の左上にある「Refresh all Gradle projects」ボタンをクリックして更新します。
clean タスク実行 → Rebuild Project 実行 → build タスクを実行して、"BUILD SUCCESSFUL" のメッセージが出力されることを確認します。

Project Tool Window で src/test でコンテキストメニューを表示して「More Run/Debug」-「Run 'All Tests' with Coverage」を選択し、テストが全て成功することを確認します。

特に問題は発生しませんでした。11.0.11+9 で開発を進めます。
IntelliJ IDEA を 2020.3.3 → 2020.3.4 → 2021.1.2 へバージョンアップする
IntelliJ IDEA の 2021.1.2 がリリースされているのでバージョンアップします。2021.1.2 へのバージョンアップ前に 2020.3.3 → 2020.3.4 へのバージョンアップも実行していますが、今回この手順は書きません。
- IntelliJ IDEA 2021.1 is Out!
https://blog.jetbrains.com/idea/2021/04/intellij-idea-2021-1/ - What’s New in IntelliJ IDEA 2021.1
https://www.jetbrains.com/idea/whatsnew/
※ksbysample-webapp-lending プロジェクトを開いた状態でバージョンアップしています。
IntelliJ IDEA のメインメニューから「Help」-「Check for Updates...」を選択します。
「IDE and Plugin Updates」ダイアログが表示されます。右下に「Update and Restart」ボタンが表示されていますので、「Update and Restart」ボタンをクリックします。

Plugin の update も表示されました。このまま「Update and Restart」ボタンをクリックします。

Patch がダウンロードされて IntelliJ IDEA が再起動します。
IntelliJ IDEA が起動すると画面下部に「Indexing」のメッセージが表示されますので、終了するまで待機します。

IntelliJ IDEA のメインメニューから「Help」-「About」を選択し、2021.1.2 へバージョンアップされていることを確認します。
clean タスク実行 → Rebuild Project 実行 → build タスクを実行して、"BUILD SUCCESSFUL" のメッセージが出力されることを確認します。
Project Tool Window で src/test でコンテキストメニューを表示して「More Run/Debug」-「Run 'All Tests' with Coverage」を選択し、テストが全て成功することを確認します。
Gradle multi-project 内に React アプリ(frontend-app)と Spring Boot アプリ(backend-app)を作成する
概要
記事一覧はこちらです。
Gradle multi-project 内に React+Typescript+Tailwind CSS+React Query 構成の frontend 用アプリと、Sping Boot+springdoc-openapi 構成の REST API を提供する backend 用アプリを作成し、以下の内容を実現します。
- Spring Boot の REST API には @CrossOrigin を付与しません。
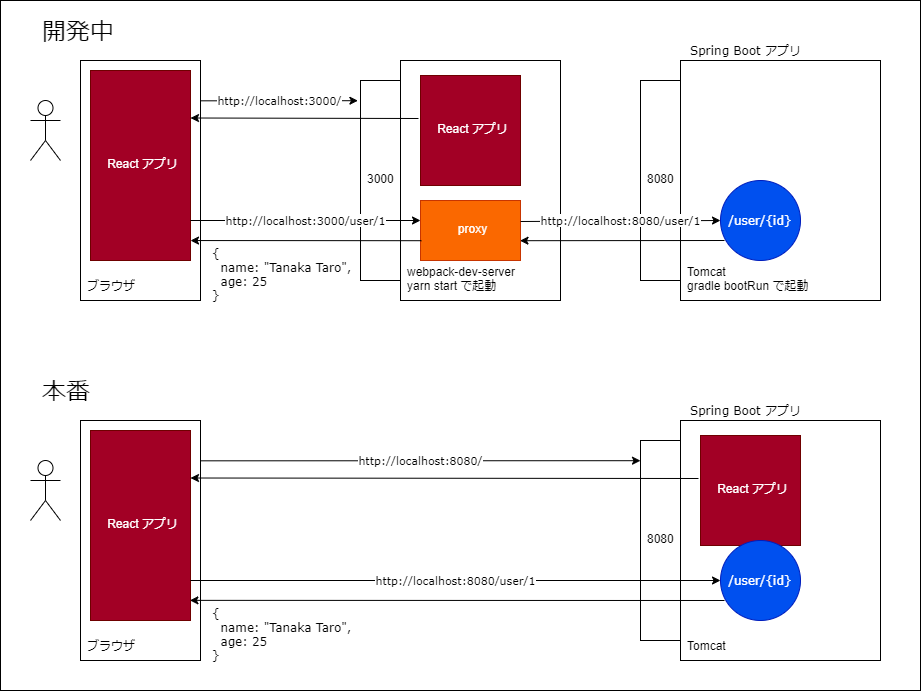
- 開発中も本番も frontend から backend の REST API を呼び出す時の URL はパス名のみの
/user/1にします(http://localhost:8080/user/1のようにホスト名等は記述しません)。 - 開発中は CRACO で
yarn startで起動する webpack-dev-server に proxy を設定して、webpack-dev-server 経由で backend 用アプリの REST API にアクセスします。 ※Configuring the Proxy Manually に記述されている src/setupProxy.js を作成・設定する方法もありますが、Tailwind CSS を使う時に CRACO を入れているので今回は CRACO を使う方法を採用しています。 - build タスク実行時に
yarn buildコマンドを実行 → React アプリのファイルを Spring Boot アプリへコピーしてから、Spring Boot アプリの jar ファイルを生成します。
今回作成したソースは ksbysample-react-springboot に置いています。
参照したサイト・書籍
React Query
https://react-query.tanstack.com/CRACO - Configuration
https://github.com/gsoft-inc/craco/blob/master/packages/craco/README.mdwebpack - DevServer - devServer.proxy
https://webpack.js.org/configuration/dev-server/#devserverproxyCreate React App - Proxying API Requests in Development
https://create-react-app.dev/docs/proxying-api-requests-in-development/node-gradle / gradle-node-plugin - Usage
https://github.com/node-gradle/gradle-node-plugin/blob/master/docs/usage.md
目次
- ksbysample-react-springboot レポジトリを作成して clone する
- Spring Initializr でサンプルプロジェクトを作成して Gradle Wrapper のファイルをコピーする
gradlew initを実行し、build.gradle があるサブプロジェクトを自動認識するよう settings.gradle を変更する- backend-app サブプロジェクトを作成し、REST API を実装する
npx create-react-app frontend-app --template typescriptを実行して frontend-app サブプロジェクトを作成する- Tailwind CSS、CRACO をインストールする
- React Query をインストールする
- frontend-app に REST API を呼び出して取得したデータを表示する処理を実装する
- craco.config.js を変更し webpack-dev-server に proxy の設定を追加する
- Spring Boot アプリを IDEA から起動、React アプリを
yarn startで起動して動作確認する - frontend-app サブプロジェクトで Gradle の build タスクが実行されるようにし、かつ build タスク実行時に
yarn buildコマンドが実行されるように設定する - backend-app サブプロジェクトで build タスク実行時に frontend-app の build 下のファイルを backend-app/src/main/resources/static にコピーされるように設定する
- プロジェクトのルートディレクトリで Gradle の build タスクを実行する
- 生成された jar ファイルで Spring Boot アプリを起動して動作確認する
手順
ksbysample-react-springboot レポジトリを作成して clone する
ksbysample-react-springboot レポジトリ を作成し、D:\project-react\ksbysample-react-springboot に clone します。
Spring Initializr でサンプルプロジェクトを作成して Gradle Wrapper のファイルをコピーする
適当なディレクトリに Spring Initializr で Spring Boot のプロジェクトを作成し(Gradle を指定する)、Gradle Wrapper の以下のファイルを D:\project-react\ksbysample-react-springboot の下にコピーします。
- gradle ディレクトリ
- gradlew
- gradlew.bat
gradlew init を実行し、build.gradle があるサブプロジェクトを自動認識するよう settings.gradle を変更する
gradlew init を実行します。
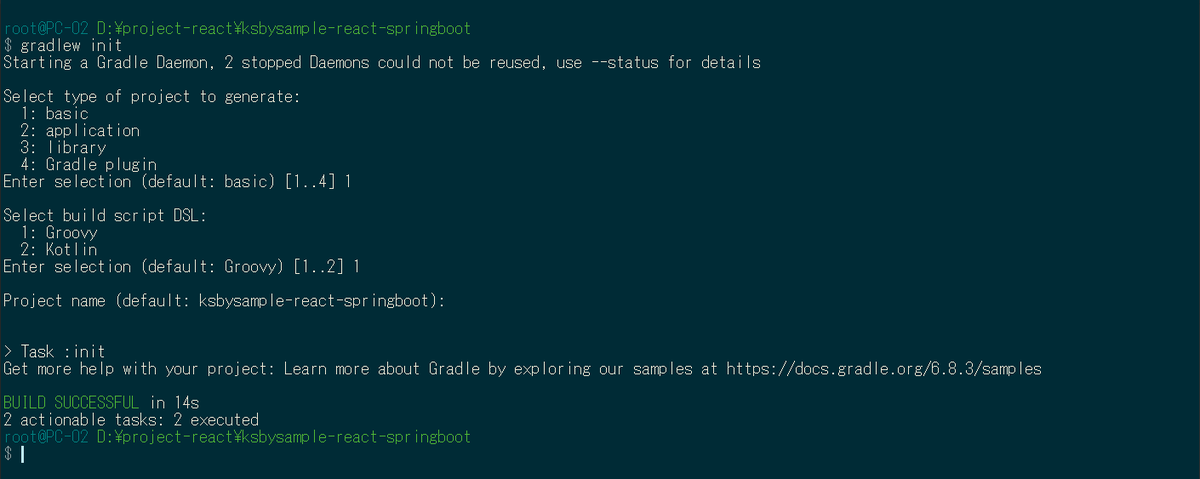
build.gradle があるサブプロジェクトを自動的に認識してくれるよう settings.gradle を以下の内容に変更します。
rootProject.name = 'ksbysample-react-springboot'

rootDir.eachFileRecurse { f ->
    if (f.name == "build.gradle") {
        String relativePath = f.parentFile.absolutePath - rootDir.absolutePath
        String projectName = relativePath.replaceAll("[\\\\\\/]", ":")
        if (projectName != ":buildSrc") {
            include projectName
        }
    }
}
IntelliJ IDEA で D:\project-react\ksbysample-react-springboot を開きます。
backend-app サブプロジェクトを作成し、REST API を実装する
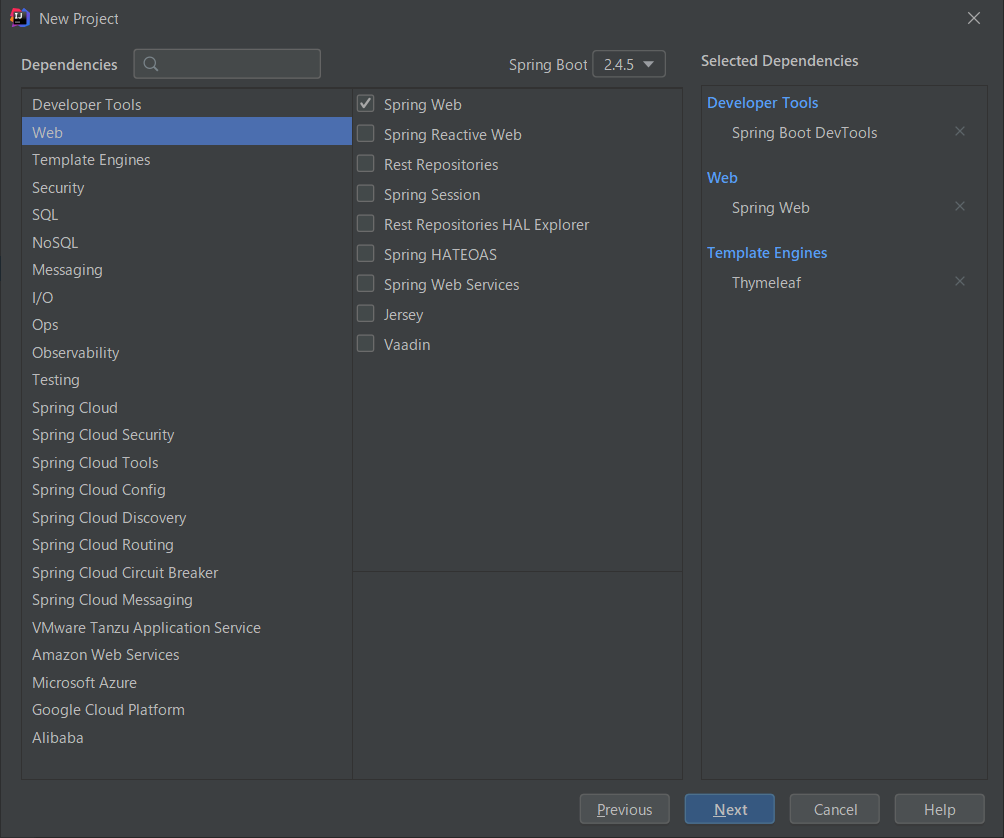
Spring Initializr で D:\project-react\ksbysample-react-springboot の下に backend-app サブプロジェクトを作成します。

D:\project-react\ksbysample-react-springboot\backend-app の下は src ディレクトリ、build.gradle 以外のディレクトリ、ファイルを削除します。
build.gradle を以下の内容に変更します。
plugins {
    id 'org.springframework.boot' version '2.4.5'
    id 'io.spring.dependency-management' version '1.0.11.RELEASE'
    id 'java'
}

group = 'ksbysample'
version = '0.0.1-SNAPSHOT'

sourceCompatibility = JavaVersion.VERSION_11
targetCompatibility = JavaVersion.VERSION_11

[compileJava, compileTestJava]*.options*.encoding = "UTF-8"
[compileJava, compileTestJava]*.options*.compilerArgs = ["-Xlint:all,-options,-processing,-path"]

configurations {
    compileOnly.extendsFrom annotationProcessor

    // annotationProcessor と testAnnotationProcessor、compileOnly と testCompileOnly を併記不要にする
    testAnnotationProcessor.extendsFrom annotationProcessor
    testImplementation.extendsFrom compileOnly
}

repositories {
    mavenCentral()
}

dependencies {
    def lombokVersion = "1.18.20"

    implementation 'org.springframework.boot:spring-boot-starter-thymeleaf'
    implementation 'org.springframework.boot:spring-boot-starter-web'
    developmentOnly 'org.springframework.boot:spring-boot-devtools'
    testImplementation 'org.springframework.boot:spring-boot-starter-test'

    // for lombok
    // testAnnotationProcessor、testCompileOnly を併記しなくてよいよう configurations で設定している
    annotationProcessor("org.projectlombok:lombok:${lombokVersion}")
    compileOnly("org.projectlombok:lombok:${lombokVersion}")
}

test {
    useJUnitPlatform()
}
backend-app/src/main/java/ksbysample/backendapp/User.java を作成し、以下の内容を記述します。
package ksbysample.backendapp;

import lombok.AllArgsConstructor;
import lombok.Builder;
import lombok.Data;
import lombok.NoArgsConstructor;

@Data
@NoArgsConstructor
@AllArgsConstructor
@Builder
public class User {

    private String name;

    private int age;

}
backend-app/src/main/java/ksbysample/backendapp/UserApiController.java を作成し、以下の内容を記述します。
package ksbysample.backendapp;

import org.springframework.web.bind.annotation.GetMapping;
import org.springframework.web.bind.annotation.PathVariable;
import org.springframework.web.bind.annotation.RequestMapping;
import org.springframework.web.bind.annotation.RestController;

@RestController
@RequestMapping("/user")
public class UserApiController {

    @GetMapping("/{id}")
    public User findById(@PathVariable String id) {
        return User.builder()
                .name(String.format("Tanaka Taro No.%s", id))
                .age(25)
                .build();
    }

}
npx create-react-app frontend-app --template typescript を実行して frontend-app サブプロジェクトを作成する
D:\project-react\ksbysample-react-springboot で npx create-react-app frontend-app --template typescript コマンドを実行し、frontend-app サブプロジェクトを作成します。


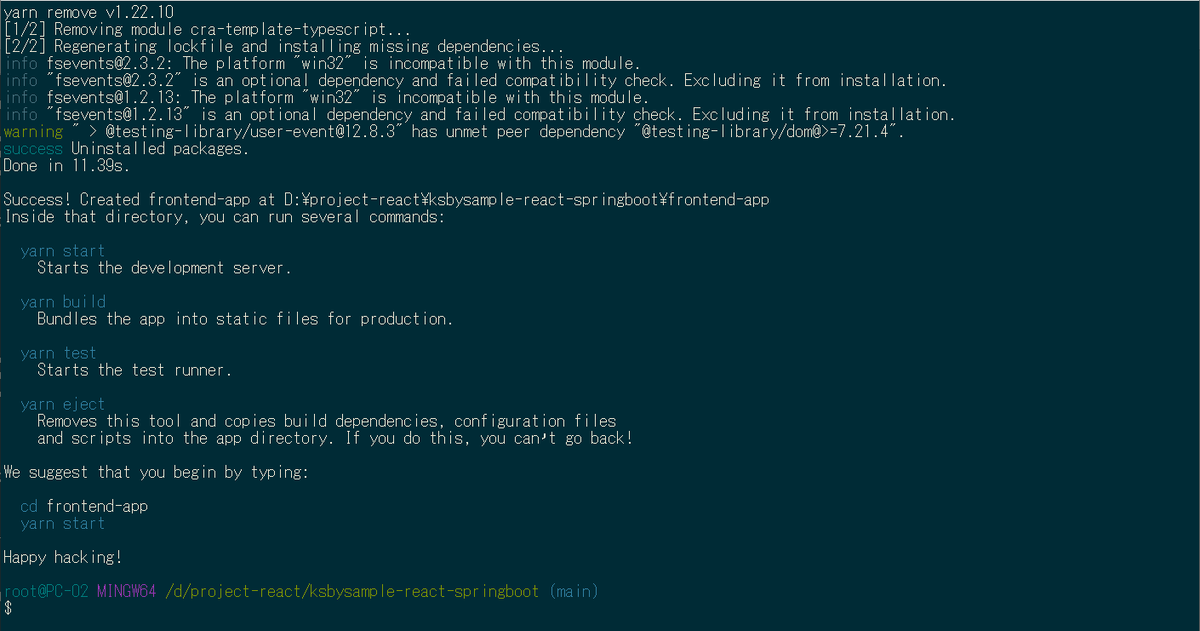
cd /d/project-react/ksbysample-react-springboot/frontend-app した後 yarn start コマンドを実行し、画面が表示されることを確認します。
Tailwind CSS、CRACO をインストールする
以下のコマンドを実行し Tailwind CSS、CRACO をインストールします(React アプリと Spring Boot アプリを連携するのに Tailwind CSS は必須ではありません)。
yarn add tailwindcss@npm:@tailwindcss/postcss7-compat @tailwindcss/postcss7-compatyarn add -D postcss@^7 autoprefixer@^9yarn add @tailwindcss/formsyarn add -D @craco/craco
package.json 内の scripts で react-scripts → craco に変更します。
  "scripts": {
    "start": "craco start",
    "build": "craco build",
    "test": "craco test",
    "eject": "craco eject"
  },
プロジェクトのルートディレクトリ直下に craco.config.js を作成し、以下の内容を記述します。
module.exports = {
  style: {
    postcss: {
      plugins: [
        require('tailwindcss'),
        require('autoprefixer'),
      ],
    },
  },
}
npx tailwindcss init -p を実行して tailwind.config.js、postcss.config.js を作成した後、tailwind.config.js を以下の内容に変更します。
module.exports = {
  purge: ['./src/**/*.{js,jsx,ts,tsx}', './public/index.html'],
  darkMode: false, // or 'media' or 'class'
  theme: {
    extend: {},
  },
  variants: {
    extend: {},
  },
  plugins: [
    require('@tailwindcss/forms'),
  ],
}
frontend-app/src/index.css を以下の内容に変更します。
@tailwind base;
@tailwind components;
@tailwind utilities;
@tailwind forms;
ここに書いた内容については React+Tailwind CSS+Storybook のプロジェクトを作成する 参照。
React Query をインストールする
React アプリから Spring Boot アプリの REST API を呼び出すのに React Query を使用します。yarn add react-query コマンドを実行してインストールします。
frontend-app に REST API を呼び出して取得したデータを表示する処理を実装する
frontend-app/src/index.tsx を以下のように変更します。
import React from 'react';
import ReactDOM from 'react-dom';
import { QueryClient, QueryClientProvider } from 'react-query';

import './index.css';
import App from './App';
import reportWebVitals from './reportWebVitals';

const queryClient = new QueryClient();

ReactDOM.render(
  <React.StrictMode>
    <QueryClientProvider client={queryClient}>
      <App />
    </QueryClientProvider>
  </React.StrictMode>,
  document.getElementById('root')
);

// If you want to start measuring performance in your app, pass a function
// to log results (for example: reportWebVitals(console.log))
// or send to an analytics endpoint. Learn more: https://bit.ly/CRA-vitals
reportWebVitals();
- 以下の行を追加します。
import { QueryClient, QueryClientProvider } from 'react-query';const queryClient = new QueryClient();
<App />の前後に<QueryClientProvider client={queryClient}> ... </QueryClientProvider>を追加します。
frontend-app/src/App.tsx を以下の内容に変更します。REST API を呼び出す時の URL は /user/1 固定です。
import { FC } from 'react';
import { useQuery } from 'react-query';

type User = {
  name: string;
  age: number;
};

const getUser = async () => (await fetch('/user/1')).json();

const App: FC = () => {
  const { data: user } = useQuery<User>(['user', 1], () => getUser());

  return (
    <div className="pt-4 pl-4 text-red-600 text-4xl font-extrabold">
      {user?.name} は {user?.age} 歳です。
    </div>
  );
};

export default App;
craco.config.js を変更し webpack-dev-server に proxy の設定を追加する
frontend-app/craco.config.js に devServer: { ... } を追加して、/user/... でアクセスされたら Spring Boot アプリに転送するようにします。
module.exports = {
  style: {
    postcss: {
      plugins: [require('tailwindcss'), require('autoprefixer')],
    },
  },
  devServer: {
    proxy: [
      {
        context: ['/user'],
        target: 'http://localhost:8080',
        changeOrigin: true,
      },
    ],
  },
};
Spring Boot アプリを IDEA から起動、React アプリを yarn start で起動して動作確認する
Spring Boot アプリを IDEA から起動します。
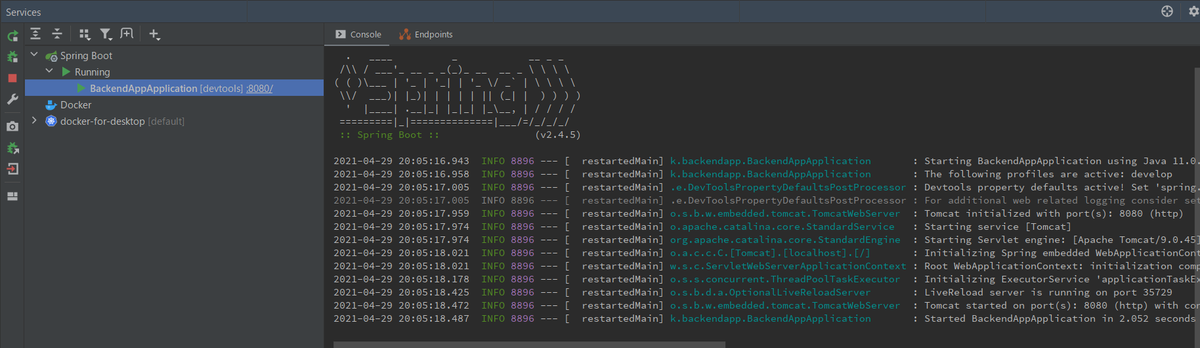
React アプリを yarn start コマンドで起動すると、


ブラウザ上に REST API から取得したデータが表示されました。

Spring Boot アプリ、React アプリを停止します。
frontend-app サブプロジェクトで Gradle の build タスクが実行されるようにし、かつ build タスク実行時に yarn build コマンドが実行されるように設定する
サブプロジェクトに build.gradle を作成すれば Gradle multi-project のサブプロジェクトとして認識されるので、frontend-app の直下に build.gradle を作成し、以下の内容を記述します。
plugins {
    id "base"
    id "com.github.node-gradle.node" version "3.0.1"
}

task yarnBuild(type: YarnTask) {
    args = ["build"]
}
build.dependsOn yarnBuild
- base プラグインを追加し、frontend-app サブプロジェクトで build、clean タスクが実行できるようにします。
- gradle-node-plugin プラグインを追加し、build タスク実行時に
yarn buildコマンドが実行されるようにします。
IDEA の Gradle Tool Window で Reload ボタンをクリックすると frontend-app が Gradle のサブプロジェクトとして認識・表示され、その下に build、clean タスクが表示されます。

backend-app サブプロジェクトで build タスク実行時に frontend-app の build 下のファイルを backend-app/src/main/resources/static にコピーされるように設定する
backend-app/build.gradle の一番下に以下の記述を追加します。
..........

clean.delete fileTree("src/main/resources/static").include("**/*")
task copyToStatic(type: Copy) {
    from project(":frontend-app").file("build")
    into "src/main/resources/static"
}
copyToStatic.dependsOn ":frontend-app:build"
processResources.dependsOn copyToStatic
- clean タスク実行時に src/main/resources/static の下をクリアするように設定します。
- build タスク実行時に、processResources タスクの前で copyToStatic タスクを実行し、frontend-app の build ディレクトリの下にあるディレクトリ・ファイル一式を backend-app/src/main/resources/static の下にコピーします。
IDEA の Gradle Tool Window で Reload ボタンをクリックしておきます。
プロジェクトのルートディレクトリで Gradle の build タスクを実行する
IDEA の Gradle Tool Window から clean → build タスクを実行すると、

:frontend-app:yarnBuild タスクの後に :backend-app:copyToStatic タスクが実行されて、
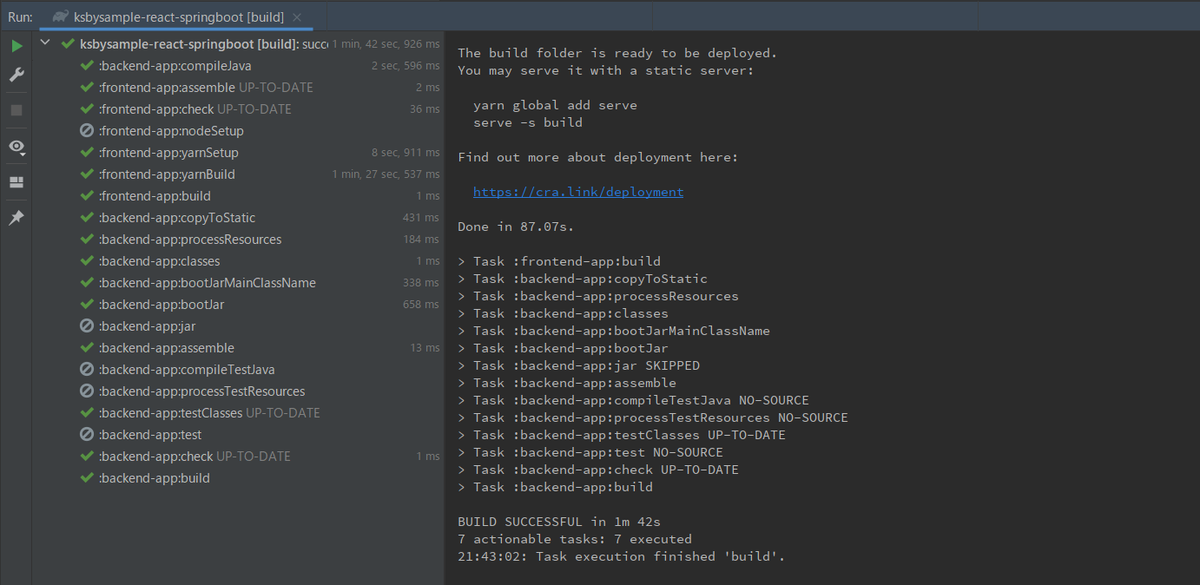
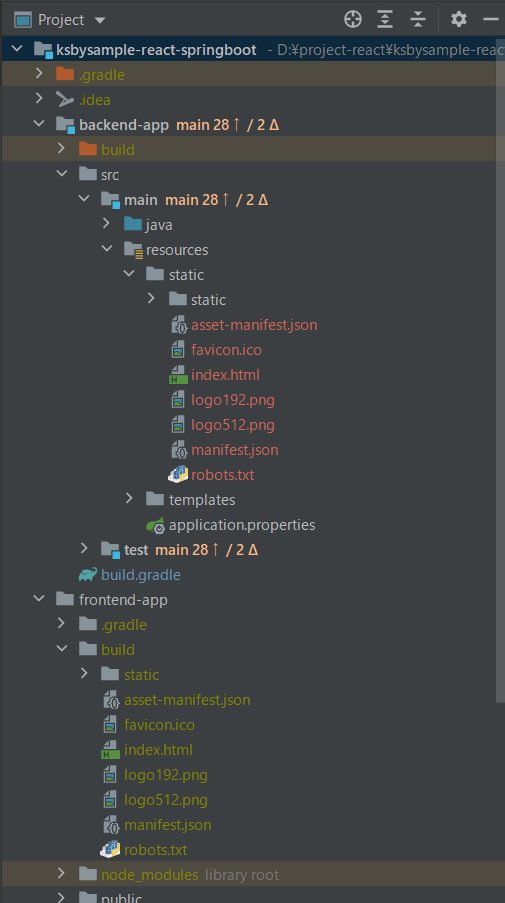
backend-app/src/main/resources/static の下に React アプリのファイルがコピーされています。
生成された jar ファイルで Spring Boot アプリを起動して動作確認する
コマンドプロンプトで backend-app/build/libs の下に移動してから java -jar backend-app-0.0.1-SNAPSHOT.jar コマンドを実行して Spring Boot アプリを起動した後、
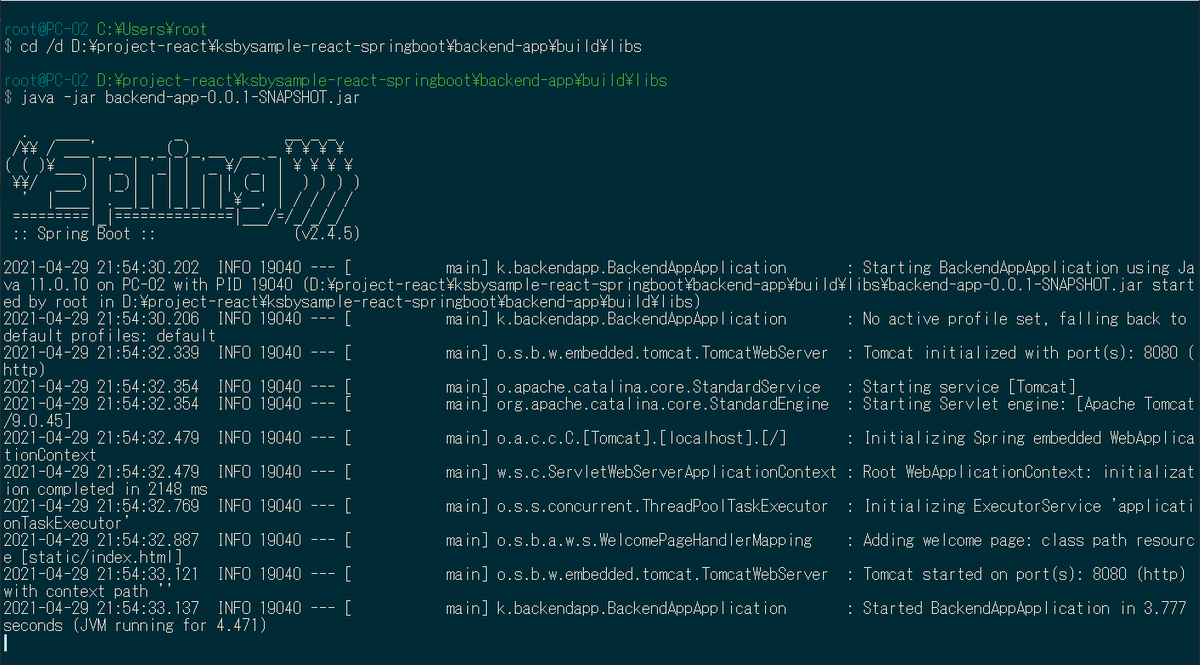
ブラウザから http://localhost:8080/ にアクセスすると REST API から取得したデータが表示されました。

履歴
2021/04/29
初版発行。
React+Tailwind CSS+Storybook のプロジェクトを作成する(Typescript 版)
概要
記事一覧はこちらです。
React+Tailwind CSS+Storybook のプロジェクトを作成する の Typescript 版を作成します。React+Tailwind CSS+Storybook のプロジェクトを作成する からの差分だけ記述します。
GitHub はこちら
https://github.com/ksby/react-ts-taiwindcss-storybook-sample
参照したサイト・書籍
Storybook - TypeScript
https://storybook.js.org/docs/react/configure/typescriptReact Typescript storybook implement customized Input component with onChange callBack then setState value backTo Input
https://stackoverflow.com/questions/64719744/react-typescript-storybook-implement-customized-input-component-with-onchange-ca.stories.tsxの書き方はこの QA を参考にしました。
目次
create-react-app ... --template typescriptで react-ts-taiwindcss-storybook-sample プロジェクトを作成する- 「Tailwind CSS をインストールする」~「src/index.css を変更する」は同じ
- src/App.tsx を変更する
- 「npx sb init コマンドを実行して Storybook をインストールする」~「src/stories を削除する」は同じ
- Typescript で component のサンプルを作成して Storybook 上に表示する+Storybook 用の .stories.tsx も Typescript で記述する
手順
create-react-app で react-ts-taiwindcss-storybook-sample プロジェクトを作成する
以下のコマンドを実行し react-ts-taiwindcss-storybook-sample プロジェクトを作成します。
npx create-react-app react-ts-taiwindcss-storybook-sample --template typescript
「Tailwind CSS をインストールする」~「src/index.css を変更する」は同じ
以下の手順は同じです。
- Tailwind CSS をインストールする
- CRACO をインストール・設定する
- npx tailwindcss init -p コマンドを実行して tailwind.config.js、postcss.config.js を作成する
- src/index.css を変更する
src/App.tsx を変更する
src/App.tsx を以下のように変更します。
import { FC } from 'react';

import './App.css';

const App: FC = () => (
  <div className="pt-4 pl-4 text-red-600 text-4xl font-extrabold">
    React+Tailwind CSS
  </div>
);

export default App;
「npx sb init コマンドを実行して Storybook をインストールする」~「src/stories を削除する」は同じ
以下の手順は同じです。
- npx sb init コマンドを実行して Storybook をインストールする
- babel-loader が 8.2.2 にバージョンアップされて yarn start 実行時にエラーが出るので 8.1.0 にバージョンダウンする
- .storybook/preview.js、.storybook/main.js を変更する
- src/stories を削除する
Typescript で component のサンプルを作成して Storybook 上に表示する+Storybook 用の .stories.tsx も Typescript で記述する
Storybook - TypeScript を読むと Storybook は built-in で Typescript をサポートしており、特に追加で設定する必要はない模様。
React Typescript storybook implement customized Input component with onChange callBack then setState value backTo Input を参考に component のサンプルを実装します。
まずは src/components/sample/ListItem.tsx から。
import { FC } from 'react';

export type ListItemProps = {
  image: string;
  title: string;
  author: string;
};

const ListItem: FC<ListItemProps> = ({ image, title, author }) => (
  <article className="p-2 flex space-x-4">
    <img className="flex-none w-16 h-16 rounded-lg" src={image} alt="" />
    <div>
      <dl>
        <div>
          <dt className="sr-only">Title</dt>
          <dd className="text-2xl font-bold">{title}</dd>
        </div>
        <div className="mt-0.5">
          <dt className="sr-only">Author</dt>
          <dd className="text-sm font-semibold text-indigo-500">By {author}</dd>
        </div>
      </dl>
    </div>
  </article>
);

export default ListItem;
src/components/sample/ListItem.stories.tsx は以下の内容を記述します。
import React from 'react';
import { Story } from '@storybook/react';

import ListItem, { ListItemProps } from './ListItem';
import dog from './dog.jpg';

export default {
  title: 'sample/ListItem',
  component: ListItem,
};

const Template: Story<ListItemProps> = (args: ListItemProps) => (
  <ListItem image={args.image} title={args.title} author={args.author} />
);

export const Default: Story<ListItemProps> = Template.bind({});
Default.args = {
  image: dog,
  title: 'サンプルブック1',
  author: '作者は犬',
};
次は src/components/sample/List.tsx。
import React, { FC } from 'react';

import ListItem, { ListItemProps } from './ListItem';

export type ListProps = {
  items: ListItemProps[];
};

const List: FC<ListProps> = ({ items }) => (
  <ul className="divide-y divide-gray-600">
    {items.map((item) => (
      <ListItem
        key={item.title}
        image={item.image}
        title={item.title}
        author={item.author}
      />
    ))}
  </ul>
);

export default List;
src/components/sample/List.stories.tsx は以下の内容を記述します。
import React from 'react';
import { Story } from '@storybook/react';

import List, { ListProps } from './List';
import dog from './dog.jpg';
import cat from './cat.jpg';
import tiger from './tiger.jpg';

export default {
  title: 'sample/List',
  component: List,
};

const Template: Story<ListProps> = (args: ListProps) => (
  <List items={args.items} />
);

export const Default: Story<ListProps> = Template.bind({});
Default.args = {
  items: [
    {
      image: dog,
      title: 'サンプルブック1',
      author: '作者は犬',
    },
    {
      image: cat,
      title: 'サンプルブック2',
      author: '作者は猫',
    },
    {
      image: tiger,
      title: 'サンプルブック3',
      author: '作者はトラ',
    },
  ],
};
履歴
2021/04/20
初版発行。