Grooy スクリプトをそのまま渡して実行する Spring Boot+Picocli ベースのコマンドラインアプリを作成する ( その5 )( CSV ファイルのデータをテーブルに登録する Groovy スクリプトを作成する )
概要
記事一覧はこちらです。
参照したサイト・書籍
目次
手順
CSV ファイルのデータを MySQL の testdb の book テーブルに登録する
groovy-script-executor/src/main/groovy/sample の下に CsvFileToBookTable.groovy を新規作成し、以下のコードを記述します。
- 今回は commit を明記する方式にします。トランザクションの処理が始まる前に
sql.connection.autoCommit = falseを記述して AutoCommit を OFF にします。 - CSV ファイルの publications.csv は PublicationsTableToFileUsingUnivocityParsers.groovy が出力したファイルを使用します。ただしそのままだと全部で 154,729件あって多いので、先頭から 20件だけ使用します。
- publications.csv の title_author には title だけか、
/を区切り文字として title と authror が入っているので、/で分割して author はデータがある時だけセットします。
package sample

import com.univocity.parsers.annotations.Parsed
import com.univocity.parsers.common.processor.BeanListProcessor
import com.univocity.parsers.csv.CsvParserSettings
import com.univocity.parsers.csv.CsvRoutines
import groovy.sql.Sql

class CsvFileToBookTable {

    static class CsvRecord {
        @Parsed(index = 0, field = "isbm")
        String isbm
        @Parsed(index = 1, field = "title_author")
        String title_author
    }

    static void main(args) {
        def sql = Sql.newInstance("jdbc:mysql://localhost:3306/testdb?sslMode=DISABLED&characterEncoding=utf8",
                "testdb_user",
                "xxxxxxxx",
                "org.mariadb.jdbc.Driver")
        sql.connection.autoCommit = false

        CsvParserSettings settings = new CsvParserSettings()
        settings.format.lineSeparator = "\r\n"
        settings.headerExtractionEnabled = true
        BeanListProcessor<CsvRecord> rowProcessor = new BeanListProcessor<>(CsvRecord)
        settings.processor = rowProcessor

        sql.execute("truncate table book")

        new File("publications.csv").withReader { reader ->
            CsvRoutines csvRoutines = new CsvRoutines(settings)
            for (CsvRecord csvRecord : csvRoutines.iterate(CsvRecord, reader)) {
                String[] titleAndAuthor = csvRecord.title_author.split(" / ")
                sql.execute("""
                                insert into book (isbm, title, author)
                                values (:isbm, :title, :author)
                            """,
                        isbm: csvRecord.isbm,
                        title: titleAndAuthor[0],
                        author: titleAndAuthor.size() == 2 ? titleAndAuthor[1] : null)
            }
        }

        sql.commit()
        sql.close()
    }

}
CsvFileToBookTable.groovy を D:\tmp にコピーし gse CsvFileToBookTable.groovy を実行すると book テーブルにデータが登録されます。

履歴
2021/11/07
初版発行。
Grooy スクリプトをそのまま渡して実行する Spring Boot+Picocli ベースのコマンドラインアプリを作成する ( その4 )( テーブルのデータを CSV フォーマットで出力する Groovy スクリプトを作成する )
概要
記事一覧はこちらです。
- 今回の手順で確認できるのは以下の内容です。
- PostgreSQL の sampledb の publications テーブルのデータを CSV フォーマットで出力する Groovy スクリプトを作成します。
参照したサイト・書籍
Connecting to an Amazon Aurora DB cluster
https://docs.aws.amazon.com/AmazonRDS/latest/AuroraUserGuide/Aurora.Connecting.htmlDependency management with Grape
http://docs.groovy-lang.org/latest/html/documentation/grape.htmlGroovy - File I/O
https://www.tutorialspoint.com/groovy/groovy_file_io.htm
目次
- groovy-script-executor.jar に PostgreSQL、MariaDB の JDBC Driver を入れる
- PostgreSQL の sampledb の publications テーブルのデータを CSV フォーマットで出力する
- groovy-script-executor.jar 内に作成したクラスを Groovy スクリプトから呼び出せるのか?
手順
groovy-script-executor.jar に PostgreSQL、MariaDB の JDBC Driver を入れる
JDBC Driver は @Grab(Dependency management with Grape 参照)で指定するのではなく groovy-script-executor.jar に入れます。
build.gradle を以下のように変更します。
dependencies {
    def postgresqlJdbcDriver = "org.postgresql:postgresql:42.3.1"
    def mariadbJdbcDriver = "org.mariadb.jdbc:mariadb-java-client:2.7.4"
    def groovyVersion = "3.0.9"
    ..........

    // dependency-management-plugin によりバージョン番号が自動で設定されないもの、あるいは最新バージョンを指定したいもの
    runtimeOnly("${postgresqlJdbcDriver}")
    runtimeOnly("${mariadbJdbcDriver}")
    implementation("com.univocity:univocity-parsers:2.9.1")
    ..........
- dependencies block に以下の行を追加します。
def postgresqlJdbcDriver = "org.postgresql:postgresql:42.3.1"def mariadbJdbcDriver = "org.mariadb.jdbc:mariadb-java-client:2.7.4"runtimeOnly("${postgresqlJdbcDriver}")runtimeOnly("${mariadbJdbcDriver}")
Gradle Tool Window の左上にある「Refresh all Gradle projects」ボタンをクリックして更新します。
build タスクを実行し、生成した groovy-script-executor.jar を D:\tmp にコピーします。
PostgreSQL の sampledb の publications テーブルのデータを CSV フォーマットで出力する
標準出力にカンマ区切りで出力する
groovy-script-executor/src/main/groovy/sample の下に PublicationsTableToSystemOutInCSV.groovy を新規作成し、以下のコードを記述します。
- Windows のコンソールに出力するので、出力時の文字コードに windows-31j を指定しています。
- isbm は NULL のデータが存在し、そのままでは
NULLと出力されるため、coalesce 関数で NULL の場合には空文字列を取得するようにしています。 - select 文を実行するのに
sql.query(...) { resultSet -> }、sql.eachRow(...) { row -> }のメソッドも存在しますが、row.values().join(",")が使用したいのでsql.rows(...)メソッドを使用しています。
package sample

import groovy.sql.Sql

class PublicationsTableToSystemOutInCSV {

    static void main(args) {
        def sql = Sql.newInstance("jdbc:postgresql://localhost:5432/sampledb",
                "sampledb_user",
                "xxxxxxxx",
                "org.postgresql.Driver")

        try (Writer writer = System.out.newWriter("windows-31j")) {
            def rows = sql.rows("""\
                select coalesce(isbm, ''),
                       title_author
                from publications
            """)
            rows.each { row ->
                writer.println(row.values().join(","))
            }
        }

        sql.close()
    }

}
PublicationsTableToSystemOutInCSV.groovy を D:\tmp にコピーし gse PublicationsTableToSystemOutInCSV.groovy を実行すると取得したデータが出力されます。

ファイルにカンマ区切りで出力する
groovy-script-executor/src/main/groovy/sample の下に PublicationsTableToFileInCSV.groovy を新規作成し、以下のコードを記述します。
package sample

import groovy.sql.Sql

class PublicationsTableToFileInCSV {

    static void main(String[] args) {
        def sql = Sql.newInstance("jdbc:postgresql://localhost:5432/sampledb",
                "sampledb_user",
                "xxxxxxxx",
                "org.postgresql.Driver")

        new File("publications.csv").withWriter { writer ->
            def rows = sql.rows("""\
                select coalesce(isbm, ''),
                       title_author
                from publications
            """)
            rows.each { row ->
                writer.println(row.values().join(","))
            }
        }

        sql.close()
    }

}
PublicationsTableToFileInCSV.groovy を D:\tmp にコピーし gse PublicationsTableToFileInCSV.groovy を実行すると取得したデータがファイルに出力されます。

univocity-parsers を使用してファイルに出力する
groovy-script-executor/src/main/groovy/sample の下に PublicationsTableToFileUsingUnivocityParsers.groovy を新規作成し、以下のコードを記述します。
package sample

import com.univocity.parsers.annotations.Parsed
import com.univocity.parsers.common.processor.BeanWriterProcessor
import com.univocity.parsers.csv.CsvWriter
import com.univocity.parsers.csv.CsvWriterSettings
import groovy.sql.Sql

class PublicationsTableToFileUsingUnivocityParsers {

    static class CsvRecord {
        @Parsed(index = 0, field = "isbm")
        String isbm
        @Parsed(index = 1, field = "title_author")
        String title_author
    }

    static void main(args) {
        def sql = Sql.newInstance("jdbc:postgresql://localhost:5432/sampledb",
                "sampledb_user",
                "xxxxxxxx",
                "org.postgresql.Driver")

        CsvWriterSettings settings = new CsvWriterSettings()
        settings.setQuoteAllFields(true)
        BeanWriterProcessor<CsvRecord> writerProcessor = new BeanWriterProcessor<>(CsvRecord)
        settings.setRowWriterProcessor(writerProcessor)
        CsvWriter writer = new CsvWriter(new File("publications.csv"), settings)

        writer.writeHeaders()

        CsvRecord publications = new CsvRecord()
        sql.eachRow("select * from publications") { row ->
            publications.isbm = row.isbm
            publications.title_author = row.title_author
            writer.processRecord(publications)
        }

        writer.close()
        sql.close()
    }

}
PublicationsTableToFileInCSV.groovy を D:\tmp にコピーし gse PublicationsTableToFileUsingUnivocityParsers.groovy を実行すると取得したデータがファイルに出力されます。

groovy-script-executor.jar 内に入れている univocity-parsers のモジュールを問題なく呼び出すことが出来ています。
groovy-script-executor.jar 内に作成したクラスを Groovy スクリプトから呼び出せるのか?
groovy-script-executor.jar 内に共通ライブラリとして利用するクラスを作成して Groovy スクリプトから呼び出せるのか試してみます。
groovy-script-executor/src/main/groovy の下に ksby.util パッケージを作成し、その下に DbUtils.groovy を作成して以下のコードを記述します。
package ksby.util

import groovy.sql.Sql

class DbUtils {

    static Sql connectSampleDb() {
        return Sql.newInstance("jdbc:postgresql://localhost:5432/sampledb",
                "sampledb_user",
                "xxxxxxxx",
                "org.postgresql.Driver")
    }

}
groovy-script-executor/src/main/groovy/sample/PublicationsTableToSystemOutInCSV.groovy の DB への接続処理を Sql.newInstance(...) → DbUtils.connectSampleDb() に変更します。
package sample

import ksby.util.DbUtils

class PublicationsTableToSystemOutInCSV {

    static void main(args) {
        def sql = DbUtils.connectSampleDb()

        try (Writer writer = System.out.newWriter("windows-31j")) {
            def rows = sql.rows("""\
                select coalesce(isbm, ''),
                       title_author
                from publications
            """)
            rows.each { row ->
                writer.println(row.values().join(","))
            }
        }

        sql.close()
    }

}
build タスクを実行して生成された groovy-script-executor.jar と PublicationsTableToSystemOutInCSV.groovy を D:\tmp へコピーした後、gse PublicationsTableToSystemOutInCSV.groovy を実行すると取得したデータが出力されました。

groovy-script-executor.jar 内に入っているクラスを Groovy スクリプトから問題なく呼び出すことが出来ました。
履歴
2021/11/03
初版発行。
Grooy スクリプトをそのまま渡して実行する Spring Boot+Picocli ベースのコマンドラインアプリを作成する ( その3 )( サンプルの Groovy スクリプトをプロジェクト内に置く+PostgreSQL、MySQL を起動するための docker-compose.yml を作成してデータベース・テーブルを作成する )
概要
記事一覧はこちらです。
- 今回の手順で確認できるのは以下の内容です。
- サンプルの Groovy スクリプトを置く場所を決めます。
- サンプルの Groovy スクリプト で利用する PostgreSQL、MySQL を起動するための docker-compose.yml を作成します。
- PostgreSQL に sampledb、MySQL に testdb を作成します。
- Flyway でテーブルを作成してデータを入れます。
参照したサイト・書籍
Exclude file from jar using Gradle
https://stackoverflow.com/questions/53394850/exclude-file-from-jar-using-gradlenew collation (ja_JP.UTF-8) is incompatible with the collation of the template database (C)
https://symfoware.blog.fc2.com/blog-entry-1737.htmlロケール(国際化と地域化)
https://lets.postgresql.jp/documents/technical/text-processing/2国立国会図書館 - オープンデータセット
https://www.ndl.go.jp/jp/dlib/standards/opendataset/index.html
目次
- groovy-script-executor/src/main/groovy の下に sample パッケージを作成し、その下にサンプルの Groovy スクリプトを置く
- サンプルの Groovy スクリプト で利用する PostgreSQL、MySQL を起動するための docker-compose.yml を作成する+PostgreSQL に sampledb、MySQL に testdb を作成する
- PostgreSQL の sampledb にテーブルを作成する
- MySQL の testdb にテーブルを作成する
手順
groovy-script-executor/src/main/groovy の下に sample パッケージを作成し、その下にサンプルの Groovy スクリプトを置く
groovy-script-executor/src/main/groovy の下にサンプルの Groovy スクリプトを置くと jar ファイルを作成した時にサンプルの Groovy スクリプトの class ファイルが入ってしまうと思っていたのですが、Exclude file from jar using Gradle のページを見つけて build.gradle に設定すれば jar ファイルに入らないようにできることが分かりました。
groovy-script-executor/src/main/groovy の下に sample パッケージを作成して、その下にサンプルの Groovy スクリプトを置くことにします。まずは Hello, World を出力する簡単な Groovy スクリプトを作成して動作確認する で作成した HelloWorld.groovy を置きます。
jar ファイル作成時に sample パッケージの下の *.groovy が入らないよう build.gradle に設定を追加します。
[compileJava, compileTestGroovy, compileTestJava]*.options*.encoding = "UTF-8"
[compileJava, compileTestGroovy, compileTestJava]*.options*.compilerArgs = ["-Xlint:all,-options,-processing,-path"]
sourceSets {
    main {
        compileGroovy {
            exclude 'sample/*.groovy'
        }
    }
}
..........
sourceSets { ... }の設定を追加します。
sourceSets { ... } の設定がないと生成された jar ファイルの中に HelloWorld.class が入りますが、

sourceSets { ... } の設定があると入りません。

また groovy-script-executor/src/main/groovy/sample の下に置いた Groovy スクリプトは、クラス名か main メソッドの左側に表示されている矢印アイコンをクリックして表示される「Run 'HelloWorld.main()'」メニューを選択する(あるいは Ctrl+Shift+F10 を押す)ことで、

実行して結果を確認することが出来ます。

サンプルの Groovy スクリプト で利用する PostgreSQL、MySQL を起動するための docker-compose.yml を作成する+PostgreSQL に sampledb、MySQL に testdb を作成する
プロジェクトの root ディレクトリ直下に .env を作成し、以下の内容を記述します。PostgreSQL、MySQL のバージョンは AWS の Aurora でサポートされているバージョンにします(PostgreSQL は LTS の 11.9、MySQL は version 2 の 5.7)。
- Aurora PostgreSQL long-term support (LTS) releases
- Database engine updates for Amazon Aurora MySQL version 2
POSTGRESQL_VERSION=11.9
PGADMIN4_VERSION=6.1

MYSQL_VERSION=5.7.35
ADMINER_VERSION=4.8.1
PostgreSQL には sampledb、MySQL には testdb という名前のデータベースを作成します。
root ディレクトリ直下に docker/flyway/db/init ディレクトリを作成し(この次に Flyway でテーブルを作成するので docker/flyway ディレクトリの下に SQL ファイルを置いています)、その下に create_database_postgresql.sql を作成して以下の内容を記述します。
CREATE USER sampledb_user PASSWORD 'xxxxxxxx';
GRANT pg_read_server_files TO sampledb_user;
CREATE DATABASE sampledb OWNER sampledb_user ENCODING 'UTF8' LC_COLLATE 'ja_JP.UTF-8' LC_CTYPE 'ja_JP.UTF-8';
同じ場所に create_database_mysql.sql を作成して以下の内容を記述します。
create database if not exists testdb character set utf8mb4;

create user 'testdb_user'@'%' identified by 'xxxxxxxx';
grant all privileges ON testdb.* to 'testdb_user'@'%' with grant option;
grant select ON performance_schema.user_variables_by_thread to 'testdb_user'@'%';
flush privileges;
root ディレクトリ直下に docker-compose.yml を作成し、以下の内容を記述します。
# docker-compose build --no-cache
# docker-compose up -d
# docker-compose down
version: '3'

services:
  #############################################################################
  # PostgreSQL
  #
  postgresql:
    image: postgres:${POSTGRESQL_VERSION}-alpine
    container_name: postgresql
    ports:
      - "5432:5432"
    environment:
      - TZ=Asia/Tokyo
      - LANG=ja_JP.UTF-8
      - POSTGRES_PASSWORD=xxxxxxxx
    volumes:
      - ./docker/flyway/db/init/create_database_postgresql.sql:/docker-entrypoint-initdb.d/create_database.sql
      - ./docker/flyway/db/migration/postgresql_sampledb/jm2020.csv:/docker-entrypoint-initdb.d/jm2020.csv

  #############################################################################
  # pgAdmin 4
  #
  # URL
  # http://localhost:12000/
  pgadmin4:
    build:
      context: ./docker/pgadmin4
      args:
        - PGADMIN4_VERSION=${PGADMIN4_VERSION}
    image: dpage/pgadmin4:${PGADMIN4_VERSION}-custom
    container_name: pgadmin4
    ports:
      - "12000:80"
    environment:
      # TZ=Asia/Tokyo を設定してみたが日本時間に変わらなかったのでコメントアウトしておく
      # - TZ=Asia/Tokyo
      # PGADMIN_DEFAULT_EMAIL には接続する PostgreSQL の ユーザ名を設定する(サーバを追加する時楽なため)
      - PGADMIN_DEFAULT_EMAIL=postgres@example.com
      - PGADMIN_DEFAULT_PASSWORD=xxxxxxxx
      # PGADMIN_CONFIG_CONSOLE_LOG_LEVEL は debug 用
      # 設定値は https://www.pgadmin.org/docs/pgadmin4/development/config_py.html の CONSOLE_LOG_LEVEL 参照
      - PGADMIN_CONFIG_CONSOLE_LOG_LEVEL=10
      - PGADMIN_CONFIG_SESSION_DB_PATH='/var/lib/pgadmin_session'
    volumes:
      - ./docker/pgadmin4/data:/var/lib/pgadmin

  #############################################################################
  # MySQL
  #
  mysql:
    image: mysql:${MYSQL_VERSION}
    container_name: mysql
    command: --default-authentication-plugin=mysql_native_password
    ports:
      - 3306:3306
    environment:
      - TZ=Asia/Tokyo
      - MYSQL_ROOT_PASSWORD=xxxxxxxx
    volumes:
      - ./docker/flyway/db/init/create_database_mysql.sql:/docker-entrypoint-initdb.d/create_database.sql

  #############################################################################
  # Adminer
  #
  # URL
  # http://localhost:13000/
  adminer:
    image: adminer:${ADMINER_VERSION}
    container_name: adminer
    ports:
      - 13000:8080
    environment:
      - TZ=Asia/Tokyo
      - ADMINER_DEFAULT_SERVER=mysql
docker-compose up -d コマンドを実行します。

http://localhost:12000/ にアクセス・ログインして pgAdmin 4 で sampledb が作成されていることを確認します。

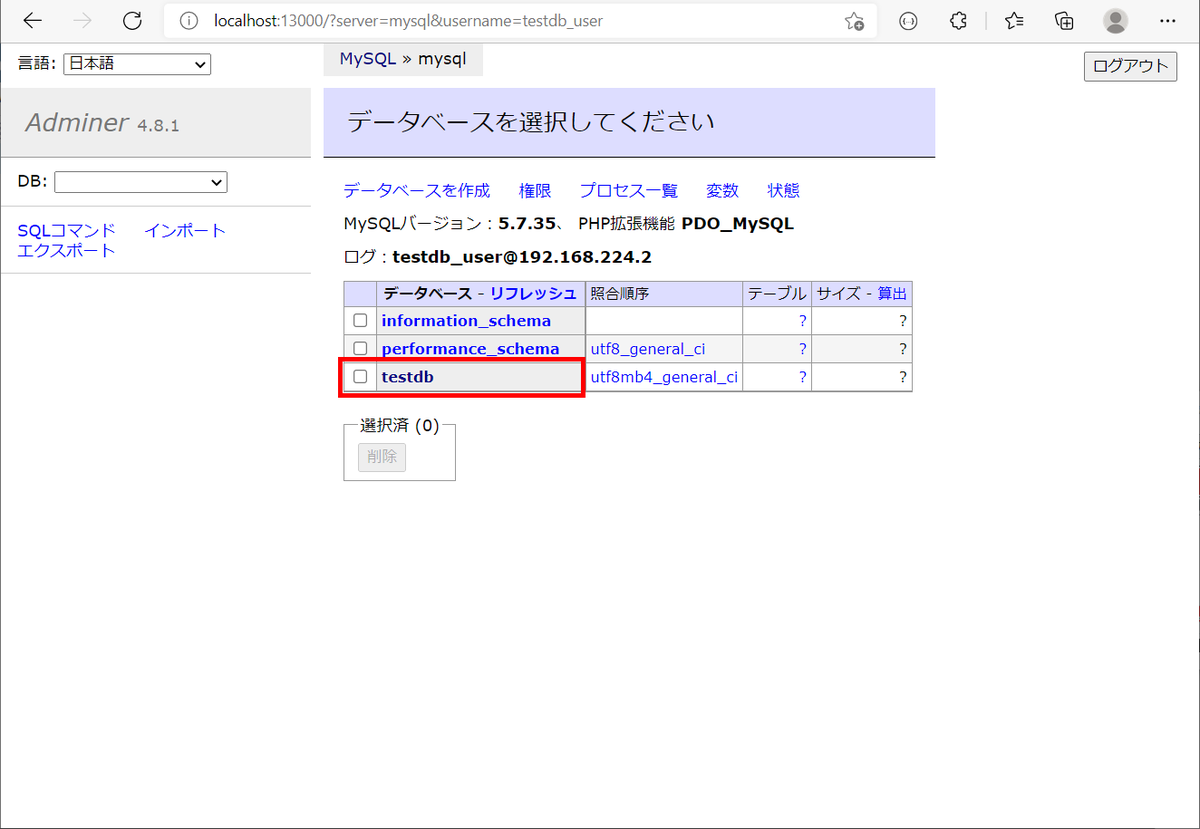
http://localhost:13000/ にアクセス・ログインして Adminer で testdb が作成されていることを確認します。
docker-compose down コマンドを実行します。
PostgreSQL の sampledb にテーブルを作成する
国立国会図書館の オープンデータセット の「国内刊行出版物の書誌情報 2020年分(tsv形式)」を取り込んだテーブルを作成します。
.env に FLYWAY_VERSION と sampledb に接続するための URL、USER、PASSWORD を記述します。
POSTGRESQL_VERSION=11.9
PGADMIN4_VERSION=6.1

MYSQL_VERSION=5.7.35
ADMINER_VERSION=4.8.1

FLYWAY_VERSION=8.0.2
SAMPLEDB_URL=jdbc:postgresql://postgresql/sampledb
SAMPLEDB_USER=sampledb_user
SAMPLEDB_PASSWORD=xxxxxxxx
docker/flyway/db の下に migration/postgresql_sampledb ディレクトリを作成し、その下に V1_0_0__create_publications.sql を作成して以下の内容を記述します。
create table publications
(
    id                bigserial constraint publications_pk primary key,
    url               text,
    fmt               text,
    book_number       text,
    isbm              text,
    issn              text,
    title_author      text,
    edition_indicates text,
    series            text,
    publication       text,
    remarks           text
);
docker-compose.yml の一番下に flyway_sampledb を追加します。
  ..........

  #############################################################################
  # Flyway for postgresql@sampledb
  #
  flyway_sampledb:
    image: flyway/flyway:${FLYWAY_VERSION}-alpine
    container_name: flyway_sampledb
    environment:
      - TZ=Asia/Tokyo
    volumes:
      - ./docker/flyway/db/migration/postgresql_sampledb:/flyway/sql
    command: -url="${SAMPLEDB_URL}" -user=${SAMPLEDB_USER} -password=${SAMPLEDB_PASSWORD} -connectRetries=60 migrate
    depends_on:
      - postgresql
    # 下の3行は debug 用
    # うまく動かない時はコメントアウトを解除した後、
    # docker exec -it flyway_sampledb /bin/sh
    # で接続してから
    # flyway <command に記述した文字列>
    # を実行してみる
    #
    # entrypoint: /bin/sh
    # stdin_open: true
    # tty: true
docker-compose up -d コマンドを実行します。
IntelliJ IDEA の Database Tool Window を設定して publications テーブルが作成されていることを確認します。

国内刊行出版物の書誌情報(直近年1年分) から jm2020.txt をダウンロードし、Database Tool Window で import します。import できないデータが数十件出ますが、それらは無視します。


データが import できたので今度は CSV ファイル(jm2020.csv)に export します。


export した jm2020.csv を docker/flyway/db/migration/postgresql_sampledb の下に移動した後、docker-compose.yml を以下のように変更します。
  postgresql:
    image: postgres:${POSTGRESQL_VERSION}-alpine
    container_name: postgresql
    ports:
      - "5432:5432"
    environment:
      - TZ=Asia/Tokyo
      - LANG=ja_JP.UTF-8
      - POSTGRES_PASSWORD=xxxxxxxx
    volumes:
      - ./docker/flyway/db/init/create_database_postgresql.sql:/docker-entrypoint-initdb.d/create_database.sql
      - ./docker/flyway/db/migration/postgresql_sampledb/jm2020.csv:/docker-entrypoint-initdb.d/jm2020.csv
- postgresql の volumes に
- ./docker/flyway/db/migration/postgresql_sampledb/jm2020.csv:/docker-entrypoint-initdb.d/jm2020.csvを追加します。
docker/flyway/db/migration/postgresql_sampledb/V1_0_0__create_publications.sql を以下のように変更します。
create table publications
(
    ..........
);

COPY publications
FROM '/docker-entrypoint-initdb.d/jm2020.csv'
WITH CSV;
COPY publications FROM '/docker-entrypoint-initdb.d/jm2020.csv' WITH CSV;を追加します。
docker-compose down、docker-compose up -d コマンドを実行し、publications テーブルにデータが取り込まれることを確認します。

MySQL の testdb にテーブルを作成する
.env に testdb に接続するための URL、USER、PASSWORD を記述します。
..........

FLYWAY_VERSION=8.0.2
SAMPLEDB_URL=jdbc:postgresql://postgresql/sampledb
SAMPLEDB_USER=sampledb_user
SAMPLEDB_PASSWORD=xxxxxxxx
TESTDB_URL=jdbc:mysql://mysql:3306/testdb?sslMode=DISABLED&characterEncoding=utf8
TESTDB_USER=testdb_user
TESTDB_PASSWORD=xxxxxxxx
docker/flyway/db/migration の下に mysql_testdb ディレクトリを作成し、その下に V1_0_0__create_book.sql を作成して以下の内容を記述します。
create table book
(
    id     bigint auto_increment primary key,
    isbm   text null,
    title  text null,
    author text null
);
docker-compose.yml の一番下に flyway_testdb を追加します。
  ..........

  #############################################################################
  # Flyway for mysql@testdb
  #
  flyway_testdb:
    image: flyway/flyway:${FLYWAY_VERSION}-alpine
    container_name: flyway_testdb
    environment:
      - TZ=Asia/Tokyo
    volumes:
      - ./docker/flyway/db/migration/mysql_testdb:/flyway/sql
    command: -url="${TESTDB_URL}" -user=${TESTDB_USER} -password=${TESTDB_PASSWORD} -connectRetries=60 migrate
    depends_on:
      - mysql
    # 下の3行は debug 用
    # うまく動かない時はコメントアウトを解除した後、
    # docker exec -it flyway_testdb /bin/sh
    # で接続してから
    # flyway <command に記述した文字列>
    # を実行してみる
    #
    # entrypoint: /bin/sh
    # stdin_open: true
    # tty: true
docker-compose down、docker-compose up -d コマンドを実行します。
IntelliJ IDEA の Database Tool Window を設定して book テーブルが作成されていることを確認します。。。が、作成されていませんね?

flyway_testdb コンテナのログを見ると ERROR: Flyway Teams Edition or MySQL upgrade required: MySQL 5.7 is no longer supported by Flyway Community Edition, but still supported by Flyway Teams Edition. のログが出力されていました。

Flyway のバージョンを 7 系の最新(7.15.0)に変更します。.env で FLYWAY_VERSION=8.0.2 → FLYWAY_VERSION=7.15.0 に変更します。
..........

FLYWAY_VERSION=7.15.0
SAMPLEDB_URL=jdbc:postgresql://postgresql/sampledb
SAMPLEDB_USER=sampledb_user
SAMPLEDB_PASSWORD=xxxxxxxx
TESTDB_URL=jdbc:mysql://mysql:3306/testdb?sslMode=DISABLED&characterEncoding=utf8
TESTDB_USER=testdb_user
TESTDB_PASSWORD=xxxxxxxx
docker-compose down、docker-compose up -d コマンドを実行すると今度は book テーブルが作成されました。MySQL 5.7 のサポートが終了したのは Flyway 8 からでした。

履歴
2021/10/31
初版発行。
Grooy スクリプトをそのまま渡して実行する Spring Boot+Picocli ベースのコマンドラインアプリを作成する ( その2 )( groovy-script-executor.jar を作成する )
概要
記事一覧はこちらです。
Grooy スクリプトをそのまま渡して実行する Spring Boot+Picocli ベースのコマンドラインアプリを作成する ( その1 )( 概要 ) の続きです。
- 今回の手順で確認できるのは以下の内容です。
参照したサイト・書籍
- picocli - a mighty tiny command line interface
https://picocli.info/
目次
- https://github.com/ksby/groovy-script-executor を clone して Gradle の Multi-project を作成する
- groovy-script-executor サブプロジェクトを作成して実装する
- Hello, World を出力する簡単な Groovy スクリプトを作成して動作確認する
- 起動時オプションで
-Dfile.encoding=UTF-8等を指定したいので gse.bat を作成する
手順
https://github.com/ksby/groovy-script-executor を clone して Gradle の Multi-project を作成する
https://github.com/ksby/groovy-script-executor を clone した後、Spring Initializr で demo プロジェクトを作成してから以下のファイルをコピーします。
- gradle ディレクトリ
- gradlew
- gradlew.bat
gradlew init コマンドを実行します。

settings.gradle を以下の内容に書き替えます。
rootProject.name = 'groovy-script-executor'

rootDir.eachFileRecurse { f ->
    if (f.name == "build.gradle") {
        String relativePath = f.parentFile.absolutePath - rootDir.absolutePath
        String projectName = relativePath.replaceAll("[\\\\\\/]", ":")
        if (projectName != ":buildSrc") {
            include projectName
        }
    }
}
groovy-script-executor サブプロジェクトを作成して実装する
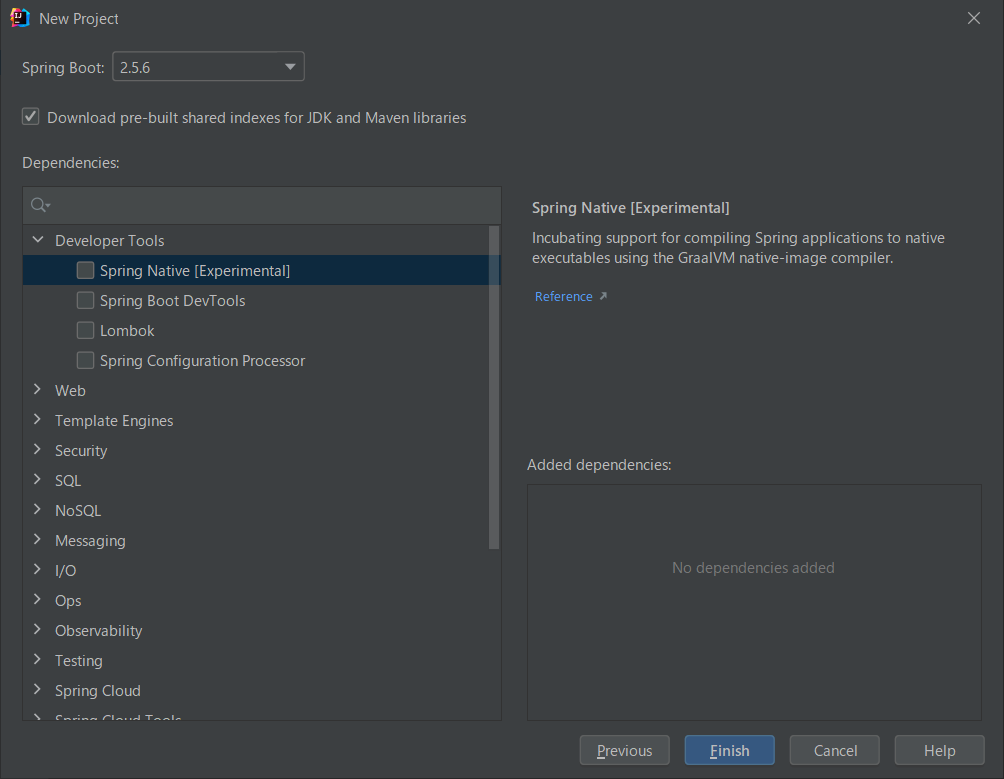
IntelliJ IDEA のメインメニューから「File」-「New」-「Project...」を選択して「New Project」ダイアログを表示した後、以下の値を入力します。Dependencies では何も選択せず「Finish」ボタンをクリックします。

作成されたサブプロジェクトの以下の点を変更します。
- src ディレクトリ、build.gradle 以外のディレクトリ・ファイルを削除します。
- GroovyScriptExecutorApplication クラスの名前を Application に変更します。
- src/test の下をクリアした後、その下に .gitkeep を作成します。
build.gradle を以下の内容にします。
buildscript {
    ext {
        group "ksby"
        version "1.0.0-RELEASE"
    }
    repositories {
        mavenCentral()
        gradlePluginPortal()
    }
}

plugins {
    id 'java'
    id 'groovy'
    id 'org.springframework.boot' version '2.5.6'
    id 'io.spring.dependency-management' version '1.0.11.RELEASE'
}

sourceCompatibility = JavaVersion.VERSION_17
targetCompatibility = JavaVersion.VERSION_17

[compileJava, compileTestGroovy, compileTestJava]*.options*.encoding = "UTF-8"
[compileJava, compileTestGroovy, compileTestJava]*.options*.compilerArgs = ["-Xlint:all,-options,-processing,-path"]
bootJar {
    duplicatesStrategy = DuplicatesStrategy.INCLUDE
}
jar {
    enabled = false
}

springBoot {
    buildInfo()
}

configurations {
    compileOnly.extendsFrom annotationProcessor

    // annotationProcessor と testAnnotationProcessor、compileOnly と testCompileOnly を併記不要にする
    testAnnotationProcessor.extendsFrom annotationProcessor
    testImplementation.extendsFrom compileOnly

    // JUnit 4 が依存関係に入らないようにする
    all {
        exclude group: "junit", module: "junit"
    }
}

repositories {
    mavenCentral()
}

dependencyManagement {
    imports {
        // bomProperty に指定可能な property は以下の URL の BOM に記述がある
        // https://repo1.maven.org/maven2/org/springframework/boot/spring-boot-dependencies/2.5.6/spring-boot-dependencies-2.5.6.pom
        mavenBom(org.springframework.boot.gradle.plugin.SpringBootPlugin.BOM_COORDINATES) {
            // Spring Boot の BOM に定義されているバージョンから変更する場合には、ここに以下のように記述する
            // bomProperty "thymeleaf.version", "3.0.9.RELEASE"
        }
        mavenBom("org.junit:junit-bom:5.8.1")
    }
}

dependencies {
    def groovyVersion = "3.0.9"
    def picocliVersion = "4.6.1"
    def lombokVersion = "1.18.22"
    def spockVersion = "2.0-groovy-3.0"

    // dependency-management-plugin によりバージョン番号が自動で設定されるもの
    // Dependency Versions ( https://docs.spring.io/spring-boot/docs/current/reference/html/dependency-versions.html#dependency-versions ) 参照
    implementation("org.springframework.boot:spring-boot-starter")
    implementation("org.apache.commons:commons-lang3")
    testImplementation("org.springframework.boot:spring-boot-starter-test")

    // dependency-management-plugin によりバージョン番号が自動で設定されないもの、あるいは最新バージョンを指定したいもの
    implementation("com.univocity:univocity-parsers:2.9.1")
    testImplementation("org.assertj:assertj-core:3.21.0")

    // for Groovy
    implementation("org.codehaus.groovy:groovy-all:${groovyVersion}")

    // for Picocli
    implementation("info.picocli:picocli-spring-boot-starter:${picocliVersion}")

    // for lombok
    // testAnnotationProcessor、testCompileOnly を併記しなくてよいよう configurations で設定している
    annotationProcessor("org.projectlombok:lombok:${lombokVersion}")
    compileOnly("org.projectlombok:lombok:${lombokVersion}")

    // for JUnit 5
    // junit-jupiter で junit-jupiter-api, junit-jupiter-params, junit-jupiter-engine の3つが依存関係に追加される
    testImplementation("org.junit.jupiter:junit-jupiter")
    testRuntimeOnly("org.junit.platform:junit-platform-launcher")

    // for Spock
    testImplementation("org.spockframework:spock-core:${spockVersion}")
    testImplementation("org.spockframework:spock-spring:${spockVersion}")
}

def jvmArgsForTask = [
        "-ea",
        "-Dfile.encoding=UTF-8",
        "-XX:TieredStopAtLevel=1",
        "-Dspring.main.lazy-initialization=true"
]
def printTestCount = { desc, result ->
    if (!desc.parent) { // will match the outermost suite
        println "Results: ${result.resultType} (${result.testCount} tests, ${result.successfulTestCount} successes, ${result.failedTestCount} failures, ${result.skippedTestCount} skipped)"
    }
}

bootRun {
    jvmArgs = jvmArgsForTask
}

clean {
    doLast {
        project.file("out").deleteDir()
        project.file("src/main/generated").deleteDir()
        project.file("src/test/generated_tests").deleteDir()
    }
}

test {
    jvmArgs = jvmArgsForTask

    // for JUnit 5
    useJUnitPlatform()

    testLogging {
        afterSuite printTestCount
    }
}
Gradle Tool Window の左上にある「Refresh all Gradle projects」ボタンをクリックして更新します。
ksby.cmdapp.groovyscriptexecutor の下に command パッケージを作成した後、GroovyScriptExecutorCommand クラスを新規作成して以下のコードを記述します。
package ksby.cmdapp.groovyscriptexecutor.command;

import groovy.lang.Binding;
import groovy.lang.GroovyShell;
import org.springframework.beans.factory.annotation.Autowired;
import org.springframework.boot.info.BuildProperties;
import org.springframework.stereotype.Component;

import java.io.File;
import java.io.IOException;
import java.util.concurrent.Callable;

import static picocli.CommandLine.*;

@Component
@Command(name = "groovy-script-executor", mixinStandardHelpOptions = true,
        versionProvider = GroovyScriptExecutorCommand.class,
        description = "Groovyスクリプトを実行するコマンド")
public class GroovyScriptExecutorCommand
        implements Callable<Integer>, IExitCodeExceptionMapper, IVersionProvider {

    @Autowired
    private BuildProperties buildProperties;

    @Parameters(index = "0", paramLabel = "Groovyスクリプト",
            description = "実行する Groovyスクリプトを指定する")
    private File groovyScript;

    @Parameters(index = "1..*", paramLabel = "引数",
            description = "Groovyスクリプトに渡す引数を指定する")
    private String[] args;

    @Override
    public Integer call() throws IOException {
        Binding binding = new Binding();
        GroovyShell shell = new GroovyShell(binding);
        shell.run(groovyScript, args);
        return ExitCode.OK;
    }

    @Override
    public int getExitCode(Throwable exception) {
        if (exception instanceof Exception) {
            return 1;
        }

        return ExitCode.OK;
    }

    @Override
    public String[] getVersion() {
        return new String[]{buildProperties.getVersion()};
    }

}
src/main/java/ksby/cmdapp/groovyscriptexecutor/Application.java を以下のコードに書き替えます。
package ksby.cmdapp.groovyscriptexecutor;

import ksby.cmdapp.groovyscriptexecutor.command.GroovyScriptExecutorCommand;
import org.springframework.boot.CommandLineRunner;
import org.springframework.boot.ExitCodeGenerator;
import org.springframework.boot.SpringApplication;
import org.springframework.boot.autoconfigure.SpringBootApplication;
import picocli.CommandLine;

import static picocli.CommandLine.IFactory;

@SpringBootApplication
public class Application implements CommandLineRunner, ExitCodeGenerator {

    private int exitCode;

    private final GroovyScriptExecutorCommand groovyScriptExecutorCommand;

    private final IFactory factory;

    public Application(GroovyScriptExecutorCommand groovyScriptExecutorCommand,
                       IFactory factory) {
        this.groovyScriptExecutorCommand = groovyScriptExecutorCommand;
        this.factory = factory;
    }

    public static void main(String[] args) {
        System.exit(SpringApplication.exit(SpringApplication.run(Application.class, args)));
    }

    @Override
    public void run(String... args) throws Exception {
        exitCode = new CommandLine(groovyScriptExecutorCommand, factory)
                .setExitCodeExceptionMapper(groovyScriptExecutorCommand)
                .execute(args);
    }

    @Override
    public int getExitCode() {
        return exitCode;
    }

}
src/main/resources/application.properties に以下の内容を記述します。
spring.main.banner-mode=off
logging.level.root=OFF
clean タスク実行 → Rebuild Project 実行 → build タスクを実行します。
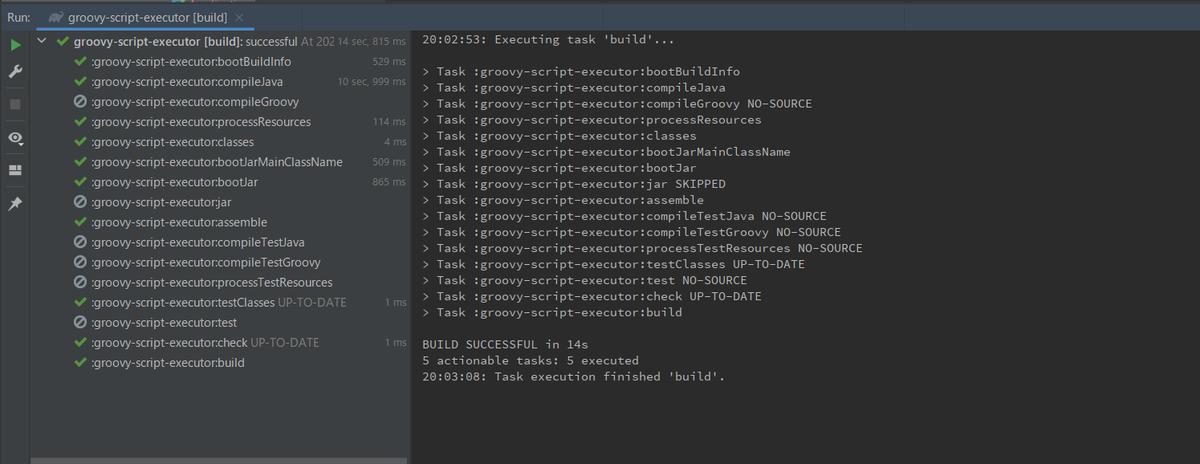
build/libs/groovy-script-executor-1.0.0-RELEASE.jar が生成されるので D:\tmp の下にコピーした後、java -jar groovy-script-executor-1.0.0-RELEASE.jar -H、java -jar groovy-script-executor-1.0.0-RELEASE.jar -V が動作することを確認します。

Hello, World を出力する簡単な Groovy スクリプトを作成して動作確認する
src/main の下に groovy ディレクトリを新規作成し、その下に .gitkeep を作成します。
src/main/groovy の下に HelloWorld.groovy を新規作成した後、以下のコードを記述します。
class HelloWorld {

    static void main(args) {
        println "Hello, World"
    }

}
src/main/groovy/HelloWorld.groovy を D:\tmp の下に移動した後、java -jar groovy-script-executor-1.0.0-RELEASE.jar HelloWorld.groovy を実行すると Hello, World が出力されました。コマンド実行直後は build しているので、Hello, World が出力されるまでに 4~5 秒程度かかります。

起動時オプションで -Dfile.encoding=UTF-8 等を指定したいので gse.bat を作成する
D:\tmp の下に gse.bat を新規作成し、以下のコードを記述します。
@echo off

java -Dfile.encoding=UTF-8 ^
     -XX:TieredStopAtLevel=1 ^
     -Dspring.main.lazy-initialization=true ^
     -jar groovy-script-executor-1.0.0-RELEASE.jar ^
     %*
gse HelloWorld.groovy を実行すると java -jar groovy-script-executor-1.0.0-RELEASE.jar HelloWorld.groovy と同様に Hello, World が出力されます。

履歴
2021/10/26
初版発行。
Grooy スクリプトをそのまま渡して実行する Spring Boot+Picocli ベースのコマンドラインアプリを作成する ( その1 )( 概要 )
概要
記事一覧はこちらです。
- CSVファイルを読み込んで DB のテーブルを更新したり、DB のテーブルのデータを CSVファイルに出力したりするちょっとした Groovy スクリプトを build せずにそのまま実行したいと思ったので、作成してみることにします。
- Groovy スクリプトは Groovy をインストールすれば groovy コマンドでそのまま実行出来ますが、今回は以下の内容で実現します。
- @SpringBootApplication アノテーションを付与した Groovy スクリプトのアプリケーションも実行できるといいな。。。 実行できれば Spring Integeration の SFTP Adapters を利用してファイルのアップロード・ダウンロードができるかもしれません。コマンドラインアプリを作成してから試してみることにします。
- GraalVM で Windows の exe ファイル作成にもチャレンジしてみることにします。
Grooy スクリプトをそのまま渡して実行する Spring Boot+Picocli ベースのコマンドラインアプリを作成する ( 大目次 )
GitHub は https://github.com/ksby/groovy-script-executor
- その1 ( 概要 )
- その2 ( groovy-script-executor.jar を作成する )
- その3 ( サンプルの Groovy スクリプトをプロジェクト内に置く+PostgreSQL、MySQL を起動するための docker-compose.yml を作成してデータベース・テーブルを作成する )
- その4 ( テーブルのデータを CSV フォーマットで出力する Groovy スクリプトを作成する )
- その5 ( CSV ファイルのデータをテーブルに登録する Groovy スクリプトを作成する )
- その6 ( Groovy スクリプトからログをコンソールやファイルに出力する )
- その7 ( @SpringBootApplication アノテーションを付与した Groovy スクリプトで SFTP クライアントを作成する )
- その8 ( @SpringBootApplication アノテーションを付与した Groovy スクリプトで REST API サーバを作成する )
- 番外編 ( ConEmu 上で WSL 2 の Ubuntu-20.04 の bash を起動する+Ubuntu-20.04 の別インスタンスを作成する )
- その9 ( Gradle を 7.2 → 7.3.3 へ、Spring Boot を 2.5.6 → 2.6.2 へバージョンアップする )
- その10 ( GraalVM で groovy-script-executor の Windows 版 Native Image を作成する )
Spring Boot 2.4.x の Web アプリを 2.5.x へバージョンアップする ( その15 )( JUnit 4 を依存関係から削除する+他3点の気づいた点を変更する )
概要
記事一覧はこちらです。
- 今回の手順で確認できるのは以下の内容です。
- Spring Boot を 2.5系にバージョンアップしても JUnit 4 が依存関係に残ることに気づいたので除去します。
- IntelliJ IDEA で Rebuild Project した時に生成される out ディレクトリが Gradle の clean タスクを実行しても残ることに気づいたので削除されるようにします。
- Mockito.mockStatic を使用するテストでは try-with-resources 構文を使用してリソースが close されるようにしないといけないことに気づいたので修正します。
- JDK 17 がサポートされた Lombok 1.18.22 がリリースされていたのでバージョンアップします。
参照したサイト・書籍
How to exclude Gradle dependencies
https://tomgregory.com/how-to-exclude-gradle-dependencies/@StandardException annotation for generating exception constructors
https://github.com/projectlombok/lombok/pull/2702
目次
- 依存関係から JUnit 4 を除去する
- JUnit 4 のモジュールを利用しているクラスを変更・削除する
- src/test/java/ksbysample/common/test/extension/db/TestDataExtension.java
- src/test/java/ksbysample/common/test/extension/mail/MailServerExtension.java
- src/test/java/ksbysample/common/test/extension/mockmvc/SecurityMockMvcExtension.java
- src/test/java/ksbysample/common/test/helper/DescriptionWrapper.java
- src/test/groovy/ksbysample/webapp/lending/SampleHelperTest.groovy
- clean タスクで out ディレクトリが削除されるようにする
- Mockito.mockStatic を呼び出しているテストで try-with-resources 構文を使用してリソースが close されるようにする
- Lombok を 1.18.20 → 1.18.22 にバージョンアップする
- WebApplicationRuntimeException クラスを Lombok の @StandardException を利用して書き直す
- build タスクでエラーが出ないことを確認する
手順
依存関係から JUnit 4 を除去する
Spring Boot + npm + Geb で入力フォームを作ってテストする ( その100 )( Gradle を 6.9.1 → 7.2 へ、Spring Boot を 2.4.10 → 2.5.4 へ、Geb を 4.1 → 5.0 へバージョンアップする2 ) の作業で Spring Boot を 2.5系にバージョンアップしても JUnit 4 が依存関係に残っていることに気づいたので、除去することにします。
今回は個々のモジュールに exclude を記述して除外するのではなく configurations block に exclude を記述する方法を採用します。build.gradle を以下のように変更します。
configurations {
    compileOnly.extendsFrom annotationProcessor

    // annotationProcessor と testAnnotationProcessor、compileOnly と testCompileOnly を併記不要にする
    testAnnotationProcessor.extendsFrom annotationProcessor
    testImplementation.extendsFrom compileOnly

    // JUnit 4 が依存関係に入らないようにする
    all {
        exclude group: "junit", module: "junit"
    }

    // for SpotBugs
    spotbugsStylesheets { transitive = false }
}
all { exclude group: "junit", module: "junit" }を追加します。
JUnit 4 のモジュールを利用しているクラスを修正する
src/test/java/ksbysample/common/test/extension/db/TestDataExtension.java
@Component
public class TestDataExtension implements BeforeEachCallback, AfterEachCallback {

    ..........

    @Override
    public void beforeEach(ExtensionContext context) {
        before(new ExtensionContextWrapper(context));
    }

    @Override
    public void afterEach(ExtensionContext context) {
        after(new ExtensionContextWrapper(context));
    }

    ..........
extends TestWatcherを削除します。- 以下のメソッドを削除します。
protected void starting(Description description) { ... }protected void finished(Description description) { ... }
src/test/java/ksbysample/common/test/extension/mail/MailServerExtension.java
@Component
public class MailServerExtension implements BeforeEachCallback, AfterEachCallback {

    private GreenMail greenMail = new GreenMail(new ServerSetup(25, "localhost", ServerSetup.PROTOCOL_SMTP));

    @Override
    public void beforeEach(ExtensionContext context) {
        greenMail.start();
    }

    @Override
    public void afterEach(ExtensionContext context) {
        greenMail.stop();
    }

    ..........
extends ExternalResourceを削除します。- 以下のメソッドを削除します。
protected void before() { ... }protected void after() { ... }
- beforeEach メソッド内の
before();→greenMail.start();に変更します。 - afterEach メソッド内の
after();→greenMail.stop();に変更します。
src/test/java/ksbysample/common/test/extension/mockmvc/SecurityMockMvcExtension.java
@Component
@ConditionalOnWebApplication
public class SecurityMockMvcExtension implements BeforeEachCallback {

    ..........

    @Override
    public void beforeEach(ExtensionContext context) {
        // 認証ユーザ用MockMvc ( user = tanaka.taro@sample.com )
        UserDetails userDetailsTanakaTaro = userDetailsService.loadUserByUsername(MAILADDR_TANAKA_TARO);
        this.authTanakaTaro = MockMvcBuilders.webAppContextSetup(this.context)
                .defaultRequest(get("/").with(user(userDetailsTanakaTaro)))
                .apply(springSecurity())
                .build();

        // 認証ユーザ用MockMvc ( user = suzuki.hanako@test.co.jp )
        UserDetails userDetailsSuzukiHanako = userDetailsService.loadUserByUsername(MAILADDR_SUZUKI_HANAKO);
        this.authSuzukiHanako = MockMvcBuilders.webAppContextSetup(this.context)
                .defaultRequest(get("/").with(user(userDetailsSuzukiHanako)))
                .apply(springSecurity())
                .build();

        // 認証ユーザ用MockMvc ( user = ito.aoi@test.co.jp )
        UserDetails userDetailsItoAoi = userDetailsService.loadUserByUsername(MAILADDR_ITO_AOI);
        this.authItoAoi = MockMvcBuilders.webAppContextSetup(this.context)
                .defaultRequest(get("/").with(user(userDetailsItoAoi)))
                .apply(springSecurity())
                .build();

        // 非認証ユーザ用MockMvc
        this.noauth = MockMvcBuilders.webAppContextSetup(this.context)
                .apply(springSecurity())
                .build();
    }

}
extends ExternalResourceを削除します。- before メソッド内のコードを beforeEach メソッドへ移動します。
- 以下のメソッドを削除します。
protected void before() { ... }
src/test/java/ksbysample/common/test/helper/DescriptionWrapper.java
このファイルは使用されなくなったので削除します。
src/test/groovy/ksbysample/webapp/lending/SampleHelperTest.groovy
@RunWith(Enclosed) が記述されていたので削除します。
clean タスクで out ディレクトリが削除されるようにする
build.gradle の clean block を以下のように変更します。
clean {
    doLast {
        rootProject.file("out").deleteDir()
        rootProject.file("src/main/generated").deleteDir()
        rootProject.file("src/test/generated_tests").deleteDir()
    }
}
rootProject.file("out").deleteDir()を追加します。
Mockito.mockStatic を呼び出しているテストで try-with-resources 構文を使用してリソースが close されるようにする
src/test/groovy/ksbysample/webapp/lending/SampleHelperTest.groovy で以下のように書いているテストを、
    @SpringBootTest
    static class 異常処理のテスト {

        @Autowired
        private SampleHelper sampleHelper

        @Test
        void "SampleHelper_encryptを呼ぶとRuntimeExceptionをthrowする"() {
            // setup:
            Mockito.mockStatic(BrowfishUtils)
            Mockito.when(BrowfishUtils.encrypt(Mockito.any()))
                    .thenThrow(new NoSuchPaddingException())

            // expect:
            assertThatThrownBy(() -> {
                sampleHelper.encrypt("test")
            }).isInstanceOf(RuntimeException)
        }

    }
try-with-resources 構文を使用してリソースが close されるよう書き直します。
    @SpringBootTest
    static class 異常処理のテスト {

        @Autowired
        private SampleHelper sampleHelper

        @Test
        void "SampleHelper_encryptを呼ぶとRuntimeExceptionをthrowする"() {
            try (MockedStatic mockedBrowfishUtils = Mockito.mockStatic(BrowfishUtils)) {
                // setup:
                Mockito.when(BrowfishUtils.encrypt(Mockito.any()))
                        .thenThrow(new NoSuchPaddingException())

                // expect:
                assertThatThrownBy(() -> {
                    sampleHelper.encrypt("test")
                }).isInstanceOf(RuntimeException)
            }
        }

    }
Lombok を 1.18.20 → 1.18.22 にバージョンアップする
IntelliJ IDEA で build.gradle を見ていたら org.projectlombok:lombok: のところの色が変わっていて、マウスオーバーすると 1.8.22 がリリースされていることが分かりました。Alt+Enter を押すとバージョンも書き替えることも出来ます。この機能、すごい便利じゃないですか。。。

https://projectlombok.org/changelog を見ると v1.18.22 で PLATFORM: JDK17 support added. とのことなので、バージョンアップします。
build.gradle の以下の点を変更します。
dependencies {
    def spockVersion = "2.0-groovy-3.0"
    def jdbcDriver = "org.postgresql:postgresql:42.2.24"
    def domaVersion = "2.49.0"
    def lombokVersion = "1.18.22"
    def errorproneVersion = "2.9.0"

    ..........
def lombokVersion = "1.18.20"→def lombokVersion = "1.18.22"に変更します。
Gradle Tool Window の左上にある「Refresh all Gradle projects」ボタンをクリックして更新します。
WebApplicationRuntimeException クラスを Lombok の @StandardException を利用して書き直す
https://projectlombok.org/changelog の v1.18.22 のところを見ると @StandardException というアノテーションが追加されたとの記載があり、https://github.com/projectlombok/lombok/pull/2702 を見ると Exception クラスを継承して作成する時の基本的なコンストラクタを4つ自動生成してくれるとのこと。
便利そうなので WebApplicationRuntimeException クラスを @StandardException を利用して書き直してみます。
src/main/java/ksbysample/webapp/lending/exception/WebApplicationRuntimeException.java は現在以下のように実装していますが、
package ksbysample.webapp.lending.exception;

public class WebApplicationRuntimeException extends RuntimeException {

    @SuppressWarnings("PMD.FieldNamingConventions")
    private static final long serialVersionUID = 3845674924872653036L;

    public WebApplicationRuntimeException() {
        super();
    }

    public WebApplicationRuntimeException(String message) {
        super(message);
    }

    public WebApplicationRuntimeException(String message, Throwable cause) {
        super(message, cause);
    }

    public WebApplicationRuntimeException(Throwable cause) {
        super(cause);
    }

}
@StandardException を利用して書き直すと以下のようになります。@SuppressWarnings("PMD.FieldNamingConventions") も build 時に PMD が警告を出さないことに気づいたので削除します。
package ksbysample.webapp.lending.exception;

import lombok.experimental.StandardException;

import java.io.Serial;

@StandardException
public class WebApplicationRuntimeException extends RuntimeException {

    @Serial
    private static final long serialVersionUID = 3845674924872653036L;

}
build タスクでエラーが出ないことを確認する
最後に clean タスク実行 → Rebuild Project 実行 → build タスクを実行して、"BUILD SUCCESSFUL" のメッセージが出力されることを確認します。

履歴
2021/10/20
初版発行。