Spring Boot で Doma 2 を使用するには
最近開発で使用するために記事を読み返していて、Spring Boot + Doma 2 の使用方法について内容がきちんとまとまっておらず自分でも分かりにくかったので、まとめ直すことにしました。
簡単に試せるように Project のテンプレートを作成して GitHub に上げました。以下の記事を参考に作成しています。
- Spring Boot で書籍の貸出状況確認・貸出申請する Web アプリケーションを作る ( その4 )( Project の作成 )
- Spring Boot でメール送信する Web アプリケーションを作る ( 番外編 )( IntelliJ IDEA の Spring MVC View に URL 一覧を表示する )
参照したサイト・書籍
Welcome to Doma
http://doma.readthedocs.org/ja/stable/Welcome to Doma-Gen
http://doma-gen.readthedocs.org/ja/stable/
目次
- Spring Boot で Doma 2 を使用するにあたっての方針
- Project テンプレートの構成
- DomaConfig クラス
- ComponentAndAutowiredDomaConfig @interface
- SelectOptionsUtils クラス
- build.gradle の domaGen タスク
- Project テンプレートからサンプル Project を作成してみる
- GitHub から git clone する
- Project の各種設定を行う
- Project Structure ダイアログから設定して Spring View を使用可能にする
- build.gradle の dependencies タスクに JDBC ドライバを記述する
- build.gradle の domaGen タスクで Entity クラス、Dao インターフェースを自動生成する
- application.properties の doma.dialect を設定する
- application-develop.properties, application-unittest.properties, application-product.properties に spring.datasource の設定を記述する
- Database View を設定する
- user_info テーブルを select する
- user_info テーブルを select する ( ページングあり )
- user_info テーブルに insert する
- 例外発生時に rollback されるのか?
- user_info テーブルのデータを update する ( SQL ファイルは使わない場合 )
- user_info テーブルのデータを update する ( SQL ファイルを使う場合 )
- 開発中に SQL ファイルを修正したら Tomcat を再起動しなくても反映されるのか?
- テーブルにカラムを追加後、domaGen タスクを実行して Entity クラスに反映する
- 最後に
説明
Spring Boot で Doma 2 を使用するにあたっての方針
以下の方針で開発する想定です。
- Entity クラス、Dao インターフェースは Doma-Gen で自動生成します。
- Dao インターフェースに Spring Boot で DI するのに必要なアノテーションも Doma-Gen を実行する Gradle タスク ( 以降、domaGen タスクと呼びます ) で自動的に付加します。
- Entity クラスのソースには手を加えません。完全に Doma-Gen 任せです。
- Doma は lombok と相性が悪いという記事を見かけるので、生成したソースには lombok のアノテーションは使用しません。
- カラムを追加する等テーブルのレイアウトを変更したり、テーブルを追加する等した場合には domaGen タスクを再実行すれば良いだけにします。
- domaGen タスクを実行しても Dao インターフェースに追加したメソッドが消えないようにします。
- 自動生成した Entity クラス、Dao インターフェースのファイルは domaGen タスク実行時に git add します。
- DataSource Bean は Spring Boot が自動生成するものを利用します。Project 内では定義しません。
- profile は develop ( 開発用 )、unittest ( ユニットテスト用 )、product ( 本番用 ) の3つを使用する想定です。
- 開発中 ( spring.profiles.active=develop ) は SQL ファイルを修正したら即座に反映されるようにします ( Doma の SQL ファイルのキャッシュを無効にします )。
- DataSource の AutoConfiguration と Spring Data の Pageable インターフェースを利用したいので build.gradle の dependencies タスクに
compile("org.springframework.boot:spring-boot-starter-data-jpa")を記述します。ただし JPA は使用しませんので、Application クラスには@SpringBootApplication(exclude={JpaRepositoriesAutoConfiguration.class, HibernateJpaAutoConfiguration.class})を記述して JPA の AutoConfiguration を無効にします。
Project テンプレートの構成
Project テンプレートのディレクトリ構成は以下の通りです。


この中で Doma 2 を使用するために必要となるファイルは以下の4つです。
- DomaConfig クラス
- ComponentAndAutowiredDomaConfig @interface
- SelectOptionsUtils クラス
- build.gradle の domaGen タスク
DomaConfig クラス
DomaConfig クラスは Doma 2 の設定を行うクラスです。Dao インターフェースの実装クラスに DI されるので @Component アノテーションを付加しています。
@Configuration アノテーションでも動作は同じなのですが、以下の理由から @Component アノテーションにしました。
package project.webapp.config;

import org.apache.commons.lang3.StringUtils;
import org.seasar.doma.jdbc.Config;
import org.seasar.doma.jdbc.GreedyCacheSqlFileRepository;
import org.seasar.doma.jdbc.NoCacheSqlFileRepository;
import org.seasar.doma.jdbc.SqlFileRepository;
import org.seasar.doma.jdbc.dialect.Dialect;
import org.springframework.beans.factory.annotation.Autowired;
import org.springframework.beans.factory.annotation.Value;
import org.springframework.jdbc.datasource.TransactionAwareDataSourceProxy;
import org.springframework.stereotype.Component;

import javax.sql.DataSource;

@Component
public class DomaConfig implements Config {

    private DataSource dataSource;

    private Dialect dialect;

    private SqlFileRepository sqlFileRepository;

    public DomaConfig() {
    }

    @SuppressWarnings("SpringJavaAutowiringInspection")
    @Autowired
    public void setDataSource(DataSource dataSource) {
        this.dataSource = new TransactionAwareDataSourceProxy(dataSource);
    }

    @Autowired
    public void setDialect(@Value("${doma.dialect}") String domaDialect)
            throws ClassNotFoundException, IllegalAccessException, InstantiationException {
        this.dialect = (Dialect) Class.forName(domaDialect).newInstance();
    }

    @Autowired
    public void setSqlFileRepository(@Value("${spring.profiles.active}") String springProfilesActive) {
        // develop モードの時は SQL ファイルがキャッシュされないようにする
        if (StringUtils.equals(springProfilesActive, "develop")) {
            this.sqlFileRepository = new NoCacheSqlFileRepository();
        } else {
            this.sqlFileRepository = new GreedyCacheSqlFileRepository();
        }
    }

    @Override
    public DataSource getDataSource() {
        return this.dataSource;
    }

    @Override
    public Dialect getDialect() {
        return this.dialect;
    }

    @Override
    public SqlFileRepository getSqlFileRepository() {
        return this.sqlFileRepository;
    }

}
- dataSource Bean は Setter メソッドに @Autowired を付加して、メソッド内で TransactionAwareDataSourceProxy に渡して Spring のトランザクション管理下に入るようにします。
- Dialect は application.properties の
doma.dialectに設定したクラスで生成します。application.properties にはdoma.dialect=org.seasar.doma.jdbc.dialect.PostgresDialectのように記述します。 - sqlFileRepository も Setter メソッドに @Autowired を付加して Tomcat 起動時に呼び出されるようにし、起動時の spring.profiles.active の設定が "develop" の場合には SQL ファイルがキャッシュされないようにします。開発時は、Tomcat 起動中に SQL ファイルを修正すれば Tomcat を再起動することなしに即反映されます。
ComponentAndAutowiredDomaConfig @interface
ComponentAndAutowiredDomaConfig @interface は、Dao クラスを DI できるようにするために Doma-Gen により自動生成された Dao インターフェースに付加するアノテーションを @ComponentAndAutowiredDomaConfig 1つだけにするためのものです。DomaConfig クラスを Dao インターフェースの実装クラスのコンストラクタに DI する役割もあります。
Doma のドキュメントの http://doma.readthedocs.org/ja/stable/config/?highlight=annotatewith#id22 を参考にして作成しています。
package project.webapp.util.doma;

import org.seasar.doma.AnnotateWith;
import org.seasar.doma.Annotation;
import org.seasar.doma.AnnotationTarget;
import org.springframework.beans.factory.annotation.Autowired;
import org.springframework.stereotype.Component;

@AnnotateWith(annotations = {
        @Annotation(target = AnnotationTarget.CLASS, type = Component.class),
        @Annotation(target = AnnotationTarget.CONSTRUCTOR, type = Autowired.class)
})
public @interface ComponentAndAutowiredDomaConfig {
}
SelectOptionsUtils クラス
SelectOptionsUtils クラスは Spring Data の Pageable インターフェースを元に Doma 2 の SelectOptions クラスを生成するためのユーティリティクラスです。select 文でページング処理を行う時に使用します。
package project.webapp.util.doma;

import org.seasar.doma.jdbc.SelectOptions;
import org.springframework.data.domain.Pageable;

public class SelectOptionsUtils {

    public static SelectOptions get(Pageable pageable, boolean countFlg) {
        int offset = pageable.getPageNumber() * pageable.getPageSize();
        int limit = pageable.getPageSize();

        SelectOptions selectOptions;
        if (countFlg) {
            selectOptions = SelectOptions.get().offset(offset).limit(limit).count();
        }
        else {
            selectOptions = SelectOptions.get().offset(offset).limit(limit);
        }

        return selectOptions;
    }

}
build.gradle の domaGen タスク
domaGen タスクは Doma-Gen のドキュメントに書かれているものに以下の処理を追加しています。
- 生成される Dao インターフェースに @ComponentAndAutowiredDomaConfig を自動付加します。
- 再実行した時に Dao インターフェースに追加していたメソッドが消えないようにします。
- Doma-Gen 実行後に生成された Entity クラス、Dao インターフェースを自動で git add します ( よく追加するのを忘れたのでこの処理を追加しています )。
注意事項として Project 直下に /work ディレクトリを作成して処理を行い、処理後に /work ディレクトリを削除しています。ディレクトリ名を変更したい場合には domaGen タスク内の workDirPath 変数に設定している文字列を変更してください。
buildscript {
    ext {
        springBootVersion = '1.2.7.RELEASE'
    }
    repositories {
        jcenter()
        maven { url "http://repo.spring.io/repo/" }
    }
    dependencies {
        classpath("org.springframework.boot:spring-boot-gradle-plugin:${springBootVersion}")
        classpath("io.spring.gradle:dependency-management-plugin:0.5.3.RELEASE")
        // for Grgit
        classpath("org.ajoberstar:grgit:1.4.1")
    }
}

apply plugin: 'java'
apply plugin: 'eclipse'
apply plugin: 'idea'
apply plugin: 'spring-boot'
apply plugin: 'io.spring.dependency-management'

sourceCompatibility = 1.8
targetCompatibility = 1.8

compileJava.options.compilerArgs = ['-Xlint:all']

// for Doma 2
// JavaクラスとSQLファイルの出力先ディレクトリを同じにする
processResources.destinationDir = compileJava.destinationDir
// コンパイルより前にSQLファイルを出力先ディレクトリにコピーするために依存関係を逆転する
compileJava.dependsOn processResources

jar {
    baseName = 'springboot-doma2-template'
    version = '0.0.1-SNAPSHOT'
}

eclipse {
    classpath {
        containers.remove('org.eclipse.jdt.launching.JRE_CONTAINER')
        containers 'org.eclipse.jdt.launching.JRE_CONTAINER/org.eclipse.jdt.internal.debug.ui.launcher.StandardVMType/JavaSE-1.8'
    }
}

idea {
    module {
        inheritOutputDirs = false
        outputDir = file("$buildDir/classes/main/")
    }
}

configurations {
    domaGenRuntime
}

repositories {
    jcenter()
}

dependencies {
    def jdbcDriver = "org.postgresql:postgresql:9.4-1204-jdbc41"
    def domaVersion = "2.5.1"

    // spring-boot-gradle-plugin によりバージョン番号が自動で設定されるもの
    // Appendix E. Dependency versions ( http://docs.spring.io/spring-boot/docs/current/reference/html/appendix-dependency-versions.html ) 参照
    compile("org.springframework.boot:spring-boot-starter-web")
    compile("org.springframework.boot:spring-boot-starter-thymeleaf")
    compile("org.springframework.boot:spring-boot-starter-data-jpa")
    compile("org.codehaus.janino:janino")
    testCompile("org.springframework.boot:spring-boot-starter-test")

    // spring-boot-gradle-plugin によりバージョン番号が自動で設定されないもの
    compile("${jdbcDriver}")
    compile("org.seasar.doma:doma:${domaVersion}")
    compile("org.bgee.log4jdbc-log4j2:log4jdbc-log4j2-jdbc4.1:1.16")
    compile("org.apache.commons:commons-lang3:3.4")
    compile("org.projectlombok:lombok:1.16.6")
    testCompile("org.dbunit:dbunit:2.5.1")
    testCompile("org.assertj:assertj-core:3.2.0")
    testCompile("org.jmockit:jmockit:1.19")

    // for Doma-Gen
    domaGenRuntime("org.seasar.doma:doma-gen:${domaVersion}")
    domaGenRuntime("${jdbcDriver}")
}

bootRun {
    jvmArgs = ['-Dspring.profiles.active=develop']
}

test {
    jvmArgs = ['-Dspring.profiles.active=unittest']
}

// for Doma-Gen
task domaGen << {
    // まず変更が必要なもの
    def rootPackageName  = 'project.webapp'
    def daoPackagePath   = 'src/main/java/project/webapp/dao'
    def dbUrl            = 'jdbc:postgresql://localhost/ksbylending'
    def dbUser           = 'ksbylending_user'
    def dbPassword       = 'xxxxxxxx'
    def tableNamePattern = '.*'
    // おそらく変更不要なもの
    def importOfComponentAndAutowiredDomaConfig = "${rootPackageName}.util.doma.ComponentAndAutowiredDomaConfig"
    def workDirPath      = 'work'
    def workDaoDirPath   = "${workDirPath}/dao"

    // 作業用ディレクトリを削除する
    clearDir("${workDirPath}")

    // 現在の Dao インターフェースのバックアップを取得する
    copy() {
        from "${daoPackagePath}"
        into "${workDaoDirPath}/org"
    }

    // Dao インターフェース、Entity クラスを生成する
    ant.taskdef(resource: 'domagentask.properties',
            classpath: configurations.domaGenRuntime.asPath)
    ant.gen(url: "${dbUrl}", user: "${dbUser}", password: "${dbPassword}", tableNamePattern: "${tableNamePattern}") {
        entityConfig(packageName: "${rootPackageName}.entity", useListener: false)
        daoConfig(packageName: "${rootPackageName}.dao")
        sqlConfig()
    }

    // 生成された Dao インターフェースを作業用ディレクトリにコピーし、
    // @ComponentAndAutowiredDomaConfig アノテーションを付加する
    copy() {
        from "${daoPackagePath}"
        into "${workDaoDirPath}/replace"
        filter {
            line -> line.replaceAll('import org.seasar.doma.Dao;', "import ${importOfComponentAndAutowiredDomaConfig};\nimport org.seasar.doma.Dao;")
                    .replaceAll('@Dao', '@Dao\n@ComponentAndAutowiredDomaConfig')
        }
    }

    // @ComponentAndAutowiredDomaConfig アノテーションを付加した Dao インターフェースを
    // dao パッケージへ戻す
    copy() {
        from "${workDaoDirPath}/replace"
        into "${daoPackagePath}"
    }

    // 元々 dao パッケージ内にあったファイルを元に戻す
    copy() {
        from "${workDaoDirPath}/org"
        into "${daoPackagePath}"
    }

    // 作業用ディレクトリを削除する
    clearDir("${workDirPath}")

    // 自動生成したファイルを git add する
    addGit()
}

void clearDir(String dirPath) {
    delete dirPath
}

void addGit() {
    def grgit = org.ajoberstar.grgit.Grgit.open(dir: project.projectDir)
    grgit.add(patterns: ['.'])
}
Project テンプレートを git clone して使ってみる
GitHub の Project テンプレートを clone してから Doma 2 を実際に使ってみます。DB は ksbysample-webapp-lending で使用している PostgreSQL 9.4 の ksbylending データベースを使用します。
GitHub から git clone する
IntelliJ IDEA の Welcome ダイアログから「Check out from Version Control」->「GitHub」を選択します。

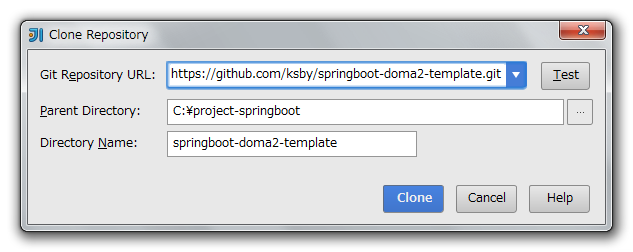
「Clone Repository」ダイアログが表示されたら以下の画像の値を入力して「Clone」ボタンをクリックします。
以下のダイアログが表示されたら「Yes」ボタンをクリックします。

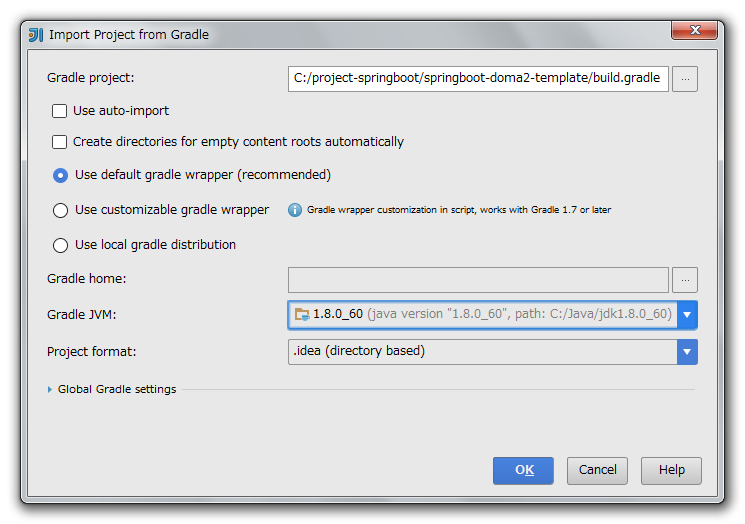
「Import Project from Gradle」ダイアログが表示されます。以下の設定を変更後、「OK」ボタンをクリックします。
git clone した Project が IntelliJ IDEA に読み込まれて表示されます。

Project の各種設定を行う
Spring Boot で書籍の貸出状況確認・貸出申請する Web アプリケーションを作る ( その4 )( Project の作成 ) の中の以下の記述の設定をします。
- Settings ダイアログでの設定変更
- Project language level を設定する
- JUnit によるテスト実行時の spring.profiles.active と文字コードを設定する
Project Structure ダイアログから設定して Spring View を使用可能にする
設定しないと Project を表示する度にダイアログが表示されるので設定します。
IntelliJ IDEA のメインメニューから「File」->「Project Structure...」を選択します。

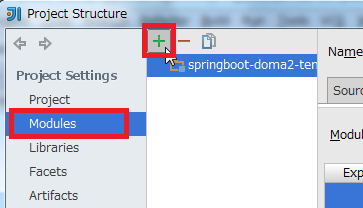
「Project Structure」ダイアログが表示されます。画面左側から「Project Settings」->「Modules」を選択した後、画面中央上の「+」ボタンをクリックします。
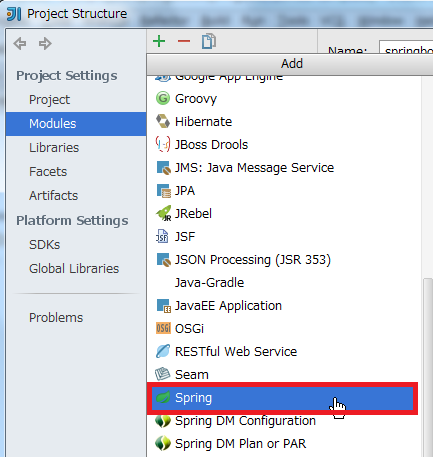
ドロップダウンメニューが表示されたら「Spring」を選択します。
下の画像の画面に切り替わったら、赤枠の「+」ボタンをクリックします。

「New Application Context」ダイアログが表示されたら「springboot-doma2-template」の左側のチェックボックスをチェックした後、「OK」ボタンをクリックします。
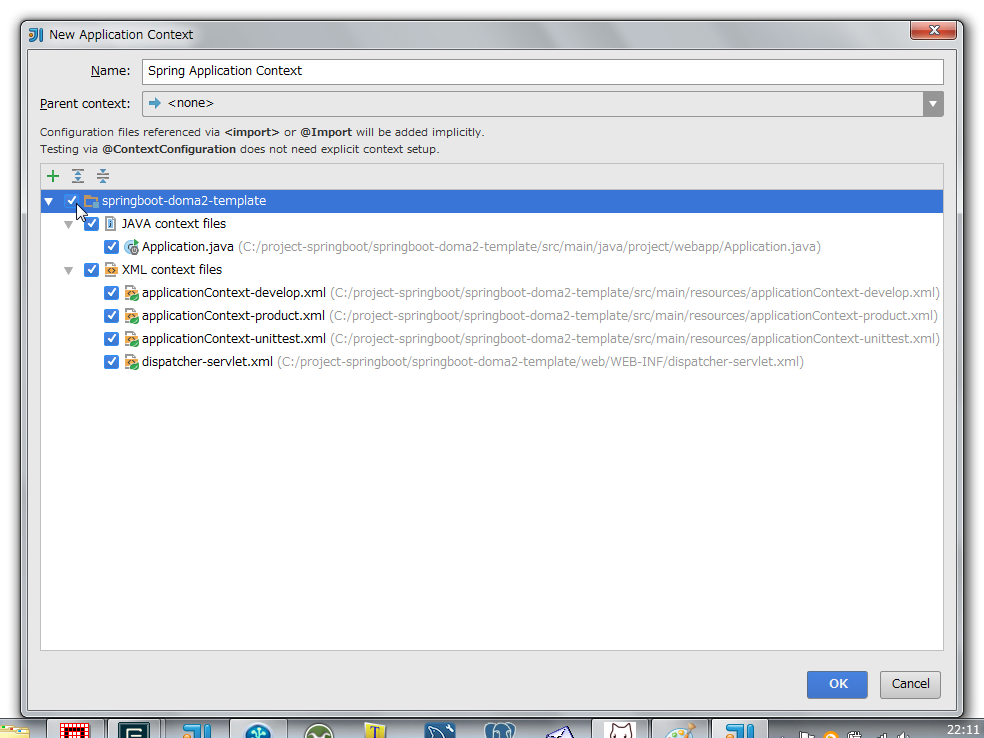
「Project Structure」ダイアログに戻ったら「OK」ボタンをクリックしてダイアログを閉じます。IntelliJ IDEA のメイン画面に戻ると画面下に「Spring」のメニューが表示され、クリックすると Spring View が表示されます。

※Spring Boot でメール送信する Web アプリケーションを作る ( 番外編 )( IntelliJ IDEA の Spring MVC View に URL 一覧を表示する ) の設定も行えば、Spring View の中の MVC View が表示されるようになります。
build.gradle の dependencies タスクに JDBC ドライバを記述する
dependencies タスクの jdbcDriver 変数に使用する JDBC ドライバを記述します。
dependencies {
    def jdbcDriver = "org.postgresql:postgresql:9.4-1204-jdbc41"

    // spring-boot-gradle-plugin によりバージョン番号が自動で設定されるもの
    // Appendix E. Dependency versions ( http://docs.spring.io/spring-boot/docs/current/reference/html/appendix-dependency-versions.html ) 参照
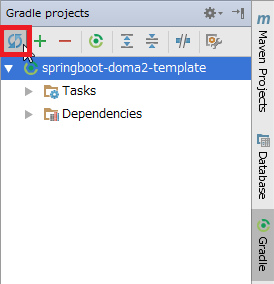
設定後、Gradle projects View の下の画像の赤枠のボタンをクリックして更新します。
build.gradle の domaGen タスクで Entity クラス、Dao インターフェースを自動生成する
最初に domaGen タスク内の変数 rootPackageName, daoPackagePath, dbUrl, dbUser, dbPassword, tableNamePattern に環境に応じた値を設定します。
tableNamePattern には正規表現で Doma-Gen で自動生成の対象にするテーブル名を指定できます。例えば user_info, user_role の2つのテーブルだけを対象にしたい場合には def tableNamePattern = 'user_info|user_role' のように記述します。
// for Doma-Gen
task domaGen << {
    // まず変更が必要なもの
    def rootPackageName  = 'project.webapp'
    def daoPackagePath   = 'src/main/java/project/webapp/dao'
    def dbUrl            = 'jdbc:postgresql://localhost/ksbylending'
    def dbUser           = 'ksbylending_user'
    def dbPassword       = 'xxxxxxxx'
    def tableNamePattern = '.*'
    // おそらく変更不要なもの
    def importOfComponentAndAutowiredDomaConfig = "${rootPackageName}.util.doma.ComponentAndAutowiredDomaConfig"
    def workDirPath      = 'work'
    def workDaoDirPath   = "${workDirPath}/dao"

    // 作業用ディレクトリを削除する
    clearDir("${workDirPath}")
次に Gradle projects View から domaGen タスクを実行します。

domaGen タスクが実行され "BUILD SUCCESSFUL" のログが出れば完了です。
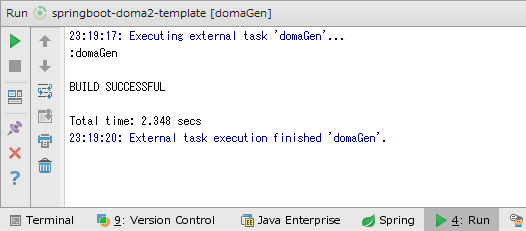
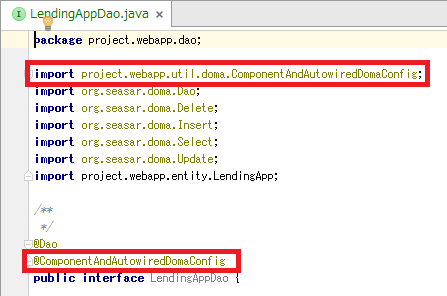
src/main/java/project/webapp/dao の下に Dao インターフェースが、 src/main/java/project/webapp/entity の下に Entity クラスが生成されます。

Dao インターフェースには @ComponentAndAutowiredDomaConfig アノテーションが付加されています。
application.properties の doma.dialect を設定する
使用するデータベースに対応した Dialect を設定します。Ultimate Edition だと候補一覧が表示されます。

今回は PostgreSQL を使用しますので、org.seasar.doma.jdbc.dialect.PostgresDialect を設定します。
doma.dialect=org.seasar.doma.jdbc.dialect.PostgresDialect
application-develop.properties, application-unittest.properties, application-product.properties に spring.datasource の設定を記述する
spring.datasource.url, spring.datasource.username, spring.datasource.password, spring.datasource.driverClassName を設定します。
application-develop.properties では log4jdbc で SQL がログに出力されるよう spring.datasource.url に ":log4jdbc" の文字列を途中に入れています。また spring.datasource.driverClassName には net.sf.log4jdbc.sql.jdbcapi.DriverSpy を設定しています。
■application-develop.properties
spring.datasource.url=jdbc:log4jdbc:postgresql://localhost/ksbylending
spring.datasource.username=ksbylending_user
spring.datasource.password=xxxxxxxx
spring.datasource.driverClassName=net.sf.log4jdbc.sql.jdbcapi.DriverSpy
■application-unittest.properties
spring.datasource.url=jdbc:postgresql://localhost/ksbylending
spring.datasource.username=ksbylending_user
spring.datasource.password=xxxxxxxx
spring.datasource.driverClassName=org.postgresql.Driver
■application-product.properties
spring.datasource.url=jdbc:postgresql://localhost/ksbylending
spring.datasource.username=ksbylending_user
spring.datasource.password=xxxxxxxx
spring.datasource.driverClassName=org.postgresql.Driver
Database View を設定する
データベースのデータを確認できるよう Database View を設定します。
画面右側の「Database」メニューをクリックした後、Database View の左上の「+」->「Data Source」->「PostgreSQL」を選択します。

「Data Sources and Drivers」ダイアログが表示されたら下の画像の設定を入力した後、「OK」ボタンをクリックします。

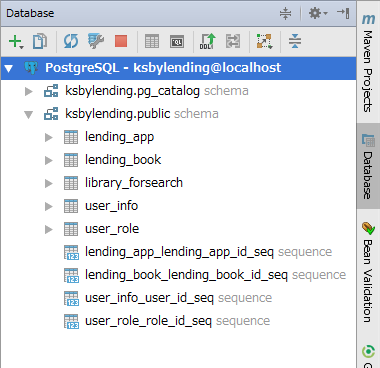
Database View 上にデータベースのテーブルが表示されます。
user_info テーブルを select する
src/main/java/project/webapp/dao の下の UserInfoDao.java に selectByMailAddress メソッドを追加します。
@Dao
@ComponentAndAutowiredDomaConfig
public interface UserInfoDao {

    /**
     * @param userId
     * @return the UserInfo entity
     */
    @Select
    UserInfo selectById(Long userId);

    @Select
    List<UserInfo> selectByMailAddress(String mailAddress);
src/main/resources/META-INF/project/webapp/dao/UserInfoDao の下にメソッド名と同じ名前の SQL ファイル selectByMailAddress.sql を作成します。
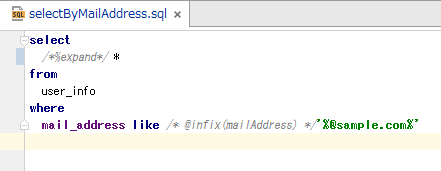
selectByMailAddress.sql には user_info.mail_address を中間一致検索で検索する select 文を記述します。@infix(...) は Doma 2 で使用できる式言語です。式言語は Doma 2 のマニュアルの 式言語 に記載されています。
select
  /*%expand*/*
from
  user_info
where
  mail_address like /* @infix(mailAddress) */'%@sample.com%'
この時 SQL ファイルの上に「SQL dialect is not configured.」のメッセージが表示されますので、右側に表示されている「Change dialect to...」リンクをクリックします。

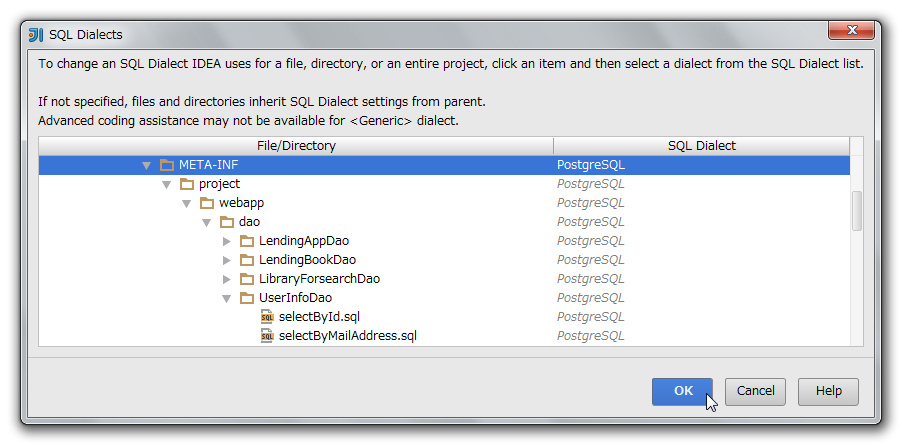
「SQL Dialects」ダイアログが表示されますので、左側の「File/Directory」で META-INF を選択した後、右側の「SQL Dialect」で 「PostgreSQL」を選択します。

選択後、「OK」ボタンをクリックしてダイアログを閉じます。
SQL が正常に実行されるか確認します。SQL 上で Alt+Enter を押して「Run Query in Console」メニューを表示した後、Enter を押します。

画面下のコンソールに Database Console View が表示され、"@sample.com" が含まれるメールアドレスのデータだけが表示されていることが確認できます。

src/main/java/project/webapp/web の下に SampleController.java を作成します。http://localhost:8080/sample?mailAddress=... にアクセスされたら mailAddress パラメータで指定されたデータを表示します。
package project.webapp.web;

import org.springframework.beans.factory.annotation.Autowired;
import org.springframework.stereotype.Controller;
import org.springframework.ui.Model;
import org.springframework.web.bind.annotation.RequestMapping;
import project.webapp.dao.UserInfoDao;
import project.webapp.entity.UserInfo;

import java.util.List;

@Controller
@RequestMapping("/sample")
public class SampleController {

    @Autowired
    private UserInfoDao userInfoDao;

    @RequestMapping
    public String index(String mailAddress
            , Model model) {
        List<UserInfo> userInfoList = userInfoDao.selectByMailAddress(mailAddress);
        model.addAttribute("userInfoList", userInfoList);
        return "sample/sample";
    }

}
src/main/resources/templates の下に sample ディレクトリを作成、その下に sample.html を作成します。
<!DOCTYPE html>
<html xmlns="http://www.w3.org/1999/xhtml"
      xmlns:th="http://www.thymeleaf.org">
<head>
    <meta charset="UTF-8"/>
    <title>sample</title>
</head>
<body>
<ol>
    <li th:each="userInfo : ${userInfoList}"
         th:text="${userInfo.username + ', ' + userInfo.mailAddress}">
    </li>
</ol>
</body>
</html>
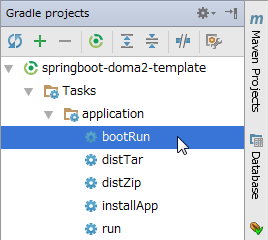
動作確認します。Gradle projects View から bootRun タスクを実行します。
ブラウザから http://localhost:8080/sample?mailAddress=@test.co.jp にアクセスします。画面上に "@test.co.jp" が含まれるデータが表示されます。

user_info テーブルを select する ( ページングあり )
src/main/java/project/webapp/dao の下の UserInfoDao.java に SelectOptions options の引数を入れた selectByMailAddress メソッドを追加します。SQL ファイルは selectByMailAddress.sql のものが使用されますので新規には作成しません。
@Dao
@ComponentAndAutowiredDomaConfig
public interface UserInfoDao {

    /**
     * @param userId
     * @return the UserInfo entity
     */
    @Select
    UserInfo selectById(Long userId);

    @Select
    List<UserInfo> selectByMailAddress(String mailAddress);

    @Select
    List<UserInfo> selectByMailAddress(String mailAddress, SelectOptions options);
src/main/java/project/webapp/web の下の SampleController.java に paging メソッドを追加します。http://localhost:8080/sample/paging?mailAddress=...&page=...&size=... にアクセスされたら mailAddress パラメータで指定されたデータを指定された page, size 分だけ表示します。
    @RequestMapping("/paging")
    public String paging(String mailAddress
            , @PageableDefault(size = 2, page = 0) Pageable pageable
            , Model model) {
        SelectOptions options = SelectOptionsUtils.get(pageable, true);
        List<UserInfo> userInfoList = userInfoDao.selectByMailAddress(mailAddress, options);
        model.addAttribute("userInfoList", userInfoList);
        return "sample/sample";
    }

}
動作確認します。Ctrl+F5 を押して bootRun タスクを再実行します。
ブラウザから http://localhost:8080/sample/paging?mailAddress=@test.co.jp&page=0&size=2 にアクセスします。画面上に "@test.co.jp" が含まれるデータの1ページ目(2件)が表示されます。

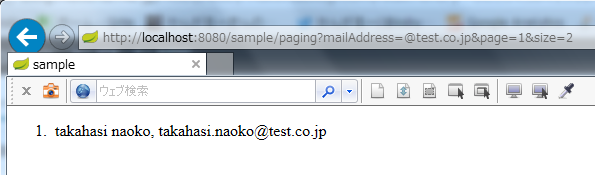
http://localhost:8080/sample/paging?mailAddress=@test.co.jp&page=1&size=2 にアクセスします。画面上に2ページ目(残りの1件)が表示されます。
user_info テーブルに insert する
src/main/java/project/webapp/dao の下の UserInfoDao.java の insert メソッドの @Insert アノテーションに (excludeNull = true) を追加します。これでフィールドの値が null のカラムは insert 文に含まれなくなり、DB 側で default が定義されているカラムには default の設定が適用されます。
    @Insert(excludeNull = true)
    int insert(UserInfo entity);
src/main/java/project/webapp/web の下に SampleService.java を作成し、その中で add メソッドを定義します。今回は Spring Security を導入していないので password は平文のまま登録します。
@Service
public class SampleService {

    @Autowired
    private UserInfoDao userInfoDao;

    public UserInfo add(String username, String password, String mailAddress) {
        UserInfo userInfo = new UserInfo();
        userInfo.setUsername(username);
        userInfo.setPassword(password);
        userInfo.setMailAddress(mailAddress);
        userInfoDao.insert(userInfo);
        return userInfo;
    }

}
この Project テンプレートでは src/main/resources/applicationContext-develop.xml の以下の定義により、末尾が Service で終わるクラスのメソッドにはトランザクション境界が設定されるようにしていますので、SampleService クラスの add メソッドは @Transactional アノテーションを付加しなくてもトランザクション処理の対象になります。
    <tx:advice id="txAdvice" transaction-manager="transactionManager">
        <tx:attributes>
            <tx:method name="*" rollback-for="Exception"/>
        </tx:attributes>
    </tx:advice>

    <aop:config>
        <aop:pointcut id="pointcutService" expression="execution(* project.webapp..*Service.*(..))"/>
        <aop:advisor advice-ref="txAdvice" pointcut-ref="pointcutService"/>
    </aop:config>
src/main/java/project/webapp/web の下の SampleController.java に add メソッドを追加します。http://localhost:8080/sample/add?username=...&password=...&mailAddress=... にアクセスされたら指定されたデータで user_info テーブルにデータを登録した後、mailAddress パラメータで指定されたデータを表示します。
@Controller
@RequestMapping("/sample")
public class SampleController {

    @Autowired
    private UserInfoDao userInfoDao;

    @Autowired
    private SampleService sampleService;

    .....

    @RequestMapping("/add")
    public String add(String username, String password, String mailAddress
            , Model model) {
        UserInfo userInfo = sampleService.add(username, password, mailAddress);
        System.out.println("★★★ " + userInfo.getUserId());

        List<UserInfo> userInfoList = userInfoDao.selectByMailAddress(mailAddress);
        model.addAttribute("userInfoList", userInfoList);
        return "sample/sample";
    }

}
動作確認します。Ctrl+F5 を押して bootRun タスクを再実行します。
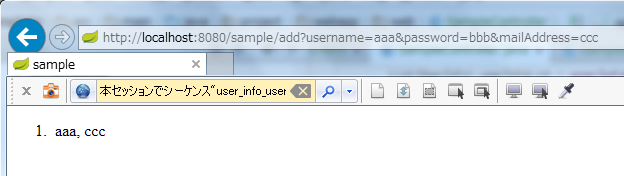
ブラウザから http://localhost:8080/sample/add?username=aaa&password=bbb&mailAddress=ccc にアクセスします。登録されたデータが画面上に表示されます。
Console で insert 文と、insert 時に発行された user_id が確認できます。insert 文には値をセットした username, password, mail_address のカラムしか指定されていません。

Database View でも user_info テーブルにデータが登録されていることが確認できます。

例外発生時に rollback されるのか?
例外発生時に rollback されるか ( トランザクションが有効か ) 確認します。
src/main/java/project/webapp/web の下の SampleService.java の add メソッドで RuntimeException を throw します。
    public UserInfo add(String username, String password, String mailAddress) {
        UserInfo userInfo = new UserInfo();
        userInfo.setUsername(username);
        userInfo.setPassword(password);
        userInfo.setMailAddress(mailAddress);
        userInfoDao.insert(userInfo);
        if (true) {
            throw new RuntimeException("rollback されるかテストします");
        }
        return userInfo;
    }
動作確認します。Ctrl+F5 を押して bootRun タスクを再実行します。
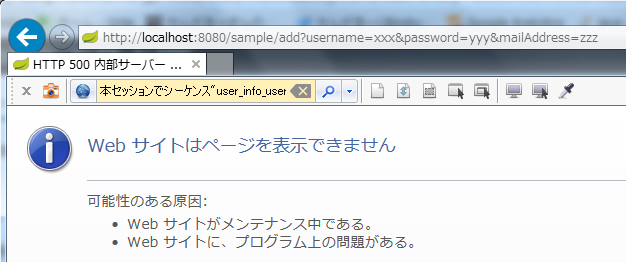
ブラウザから http://localhost:8080/sample/add?username=xxx&password=yyy&mailAddress=zzz にアクセスします。RuntimeException の影響で下の画面が表示されます。
Console で insert 文と rollback が確認できます。

Database View でもデータが登録されていないことが確認できます。
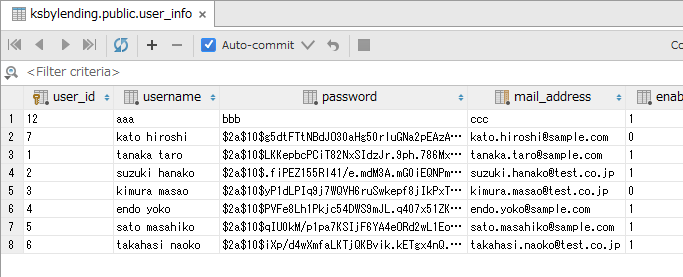
トランザクションは有効になっていることが確認できます。
また、この Project テンプレートでは src/main/resources/applicationContext-develop.xml の定義で RuntimeException 以外に Exception でも rollback されるように設定しています。
user_info テーブルのデータを update する ( SQL ファイルは使わない場合 )
user_info.mail_address のカラムだけを更新するメソッドを作成してみます。
src/main/java/project/webapp/dao の下の UserInfoDao.java に SelectOptions options 引数ありの selectById メソッドと、updateMailAddress メソッドを追加します。
@Dao
@ComponentAndAutowiredDomaConfig
public interface UserInfoDao {

    /**
     * @param userId
     * @return the UserInfo entity
     */
    @Select
    UserInfo selectById(Long userId);

    @Select
    UserInfo selectById(Long userId, SelectOptions options);

    .....

    @Update(include = {"mailAddress"})
    int updateMailAddress(UserInfo entity);
src/main/java/project/webapp/web の下の SampleService.java に updateMailAddress メソッドを追加します。
    public void updateMailAddress(Long userId, String mailAddress) {
        UserInfo userInfo = userInfoDao.selectById(userId, SelectOptions.get().forUpdate());
        userInfo.setMailAddress(mailAddress);
        userInfoDao.updateMailAddress(userInfo);
    }
src/main/java/project/webapp/web の下の SampleController.java に update メソッドを追加します。http://localhost:8080/sample/update?userId=...&mailAddress=... にアクセスされたら指定された user_id のデータの mail_address を更新した後、mailAddress パラメータで指定されたデータを表示します。
    @RequestMapping("/update")
    public String update(Long userId, String mailAddress
            , Model model) {
        sampleService.updateMailAddress(userId, mailAddress);

        List<UserInfo> userInfoList = userInfoDao.selectByMailAddress(mailAddress);
        model.addAttribute("userInfoList", userInfoList);
        return "sample/sample";
    }
動作確認します。Ctrl+F5 を押して bootRun タスクを再実行します。
ブラウザから http://localhost:8080/sample/update?userId=12&mailAddress=999 にアクセスします。更新された後、データが画面上に表示されます。

Console で select for update 文と update 文が確認できます。
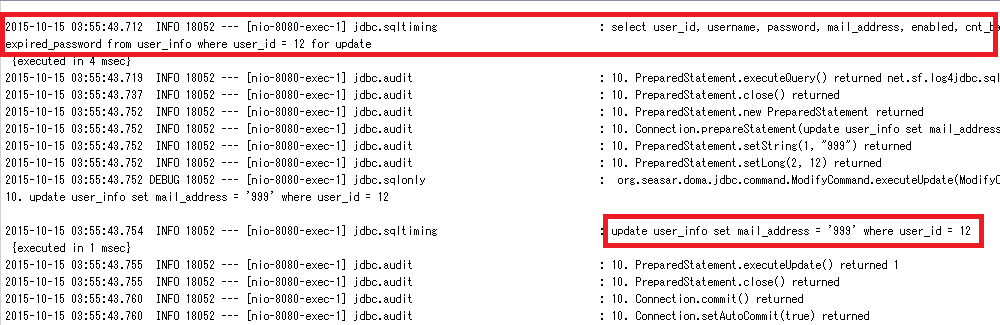
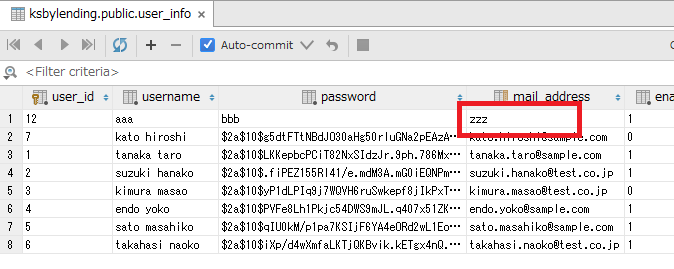
Database View でも mail_address が更新されていることが確認できます。

user_info テーブルのデータを update する ( SQL ファイルを使う場合 )
今度は SQL ファイルを使用して user_info.mail_address のカラムだけを更新するメソッドを作成してみます。
src/main/java/project/webapp/dao の下の UserInfoDao.java に updateMailAddressBySQLFile メソッドを追加します。
    @Update
    int update(UserInfo entity);

    @Update(include = {"mailAddress"})
    int updateMailAddress(UserInfo entity);

    @Update(sqlFile = true)
    int updateMailAddressBySQLFile(Long userId, String mailAddress);
src/main/resources/META-INF/project/webapp/dao/UserInfoDao の下にメソッド名と同じ名前の SQL ファイル updateMailAddressBySQLFile.sql を作成します。
update
  user_info
set
  mail_address = /* mailAddress */'test@sample.com'
where
  user_id = /* userId */1
src/main/java/project/webapp/web の下の SampleService.java に updateMailAddressBySQLFile メソッドを追加します。今回は update 前に select for update は実行しません。
    public void updateMailAddressBySQLFile(Long userId, String mailAddress) {
        userInfoDao.updateMailAddressBySQLFile(userId, mailAddress);
    }
src/main/java/project/webapp/web の下の SampleController.java に updateBySQLFile メソッドを追加します。http://localhost:8080/sample/updateBySQLFile?userId=...&mailAddress=... にアクセスされたら指定された user_id のデータの mail_address を更新した後、mailAddress パラメータで指定されたデータを表示します。
    @RequestMapping("/updateBySQLFile")
    public String updateBySQLFile(Long userId, String mailAddress
            , Model model) {
        sampleService.updateMailAddressBySQLFile(userId, mailAddress);

        List<UserInfo> userInfoList = userInfoDao.selectByMailAddress(mailAddress);
        model.addAttribute("userInfoList", userInfoList);
        return "sample/sample";
    }
動作確認します。Ctrl+F5 を押して bootRun タスクを再実行します。
ブラウザから http://localhost:8080/sample/updateBySQLFile?userId=12&mailAddress=zzz にアクセスします。更新された後、データが画面上に表示されます。

Console で update 文が確認できます。

Database View でも mail_address が更新されていることが確認できます。
開発中に SQL ファイルを修正したら Tomcat を再起動しなくても反映されるのか?
開発中 ( spring.profiles.active=develop ) は SQL ファイルのキャッシュが無効になっているか確認します。
Ctrl+F5 を押して bootRun タスクを再実行します。
ブラウザから http://localhost:8080/sample?mailAddress=@test.co.jp にアクセスします。画面上に "@test.co.jp" が含まれるデータが3件表示されます。

Tomcat を起動した状態のままで src/main/resources/META-INF/project/webapp/dao/UserInfoDao の下の selectByMailAddress.sql の where 句に and username = 'suzuki hanako' の条件を追加します。
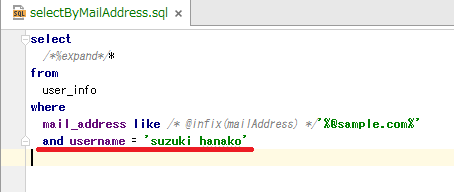
再度ブラウザから http://localhost:8080/sample?mailAddress=@test.co.jp にアクセスします。今度は suzuki hanako のデータ1件だけが表示されました。

Console でも select 文の最後に `and username = 'suzuki hanako' の条件が追加されていることが確認できます。

テーブルにカラムを追加後、domaGen タスクを実行して Entity クラスに反映する
user_info テーブルにカラムを追加後、domaGen タスクを実行して Entity クラスに反映します。また UserInfoDao インターフェースに追加したメソッドが消えていないか確認します。
user_info テーブルに memo カラムを追加します。Database View で user_info テーブルを選択した後、コンテキストメニューを表示して「New」->「Column」メニューを選択します。

「Add New Column」ダイアログが表示されますので、Name に「memo」、Type に「TEXT」を入力し「Nullable」をチェックした後、「OK」ボタンをクリックします。

Database View で user_info テーブルにカラムが追加されたことが確認できます。

Gradle projects View から domaGen タスクを実行します。

domaGen タスクが実行され、Console に "BUILD SUCCESSFUL" のメッセージが出力されます。

Project View 上で UserInfo クラスが git add された状態になっていることが確認できます。またファイルを開くと memo カラムに対応したフィールドが追加されています。

UserInfoDao インターフェースを開くと @ComponentAndAutowiredDomaConfig アノテーションも追加したメソッドも消えずに残っていることが確認できます。

以上のようにデータベースを変更した場合には、domaGen タスクを実行するだけで追加した実装が消えることなく反映されます。
※本来 Doma-Gen が提供する方法で対応すると、独自のテンプレートファイルを使用する の方法でテンプレートを作成する+DaoConfig の overwrite パラメータに false を設定して既存のファイルを上書きしないようにする、だと思うのですが、現時点ではその方法を調べきれなかったので単純に文字列リプレースする方法にしています。
最後に
Doma 2 は機能が豊富で便利と思えるものがいろいろ揃っており、Spring Boot と組み合わせるとかなり楽に開発できる印象です。個人的には Spring Data JPA、MyBatis よりも推しますので、今回の記事を参考に触ってみてください。
ちなみに IntelliJ IDEA Ultimate Edition を組み合わせれば以下の機能が利用できるようになり、Doma 2 が一層便利になります。
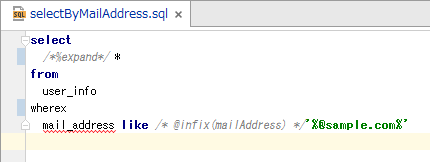
SQL ファイルでシンタックスハイライトが行われます。また文法チェックも行われ、問題がある場合にはシンタックスハイライトが解除されたり、赤い波線が表示されます。
下の画像では where → wherex へ変更しており、where のシンタックスハイライトが解除されています。
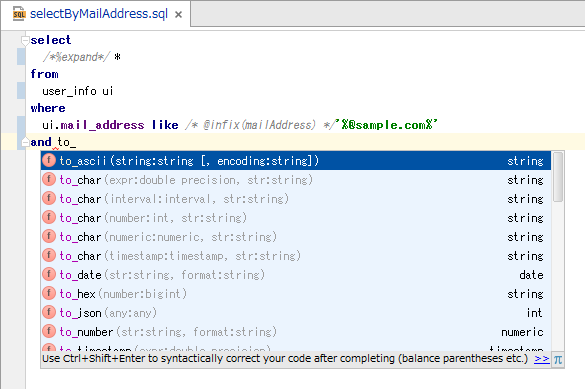
Ctrl+SPACE 押すとテーブルや関数等の候補一覧が表示されます。

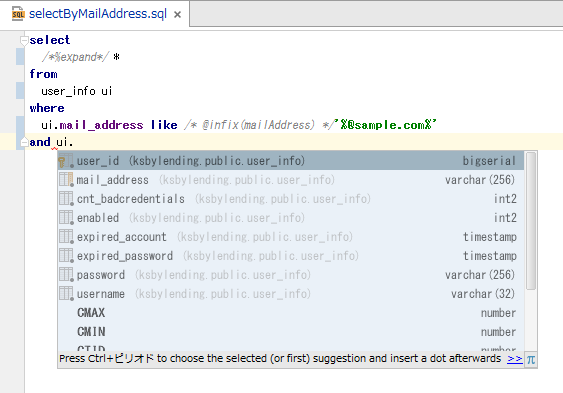
テーブルにエイリアス(別名)を記述すれば、別名 + "." を書いた時にカラム一覧が表示されます。
SQL ファイル上で Alter+Enter キーを押して「Run Query in Console」メニューを表示して、IDE から SQL ファイルを実行して試すことができます。

履歴
2015/10/15
初版発行。
2015/10/16
* ページの初めに GitHub へのリンクを追加しました。
* 「開発中に SQL ファイルを修正したら Tomcat を再起動しなくても反映されるのか?」を追加しました。
* 「テーブルにカラムを追加後、domaGen タスクを実行して Entity クラスに反映する」を追加しました。
2015/10/31
* 「Spring Boot で Doma 2 を使用するにあたっての方針」に spring-boot-starter-data-jpa を利用すること、JPA の AutoConfiguration は無効にすることを追記しました。
* 「最後に」に IntelliJ IDEA Ultimate Edition を組み合わせた時の便利機能を追加しました。
