Spring Boot 2.3.x の Web アプリを 2.4.x へバージョンアップする ( その10 )( Docker で複数の Tomcat を起動して動作確認する )
概要
記事一覧はこちらです。
- 今回の手順で確認できるのは以下の内容です。
- Build OCI images with Cloud Native Buildpacks の機能で作成した Docker image で Web アプリを実行して動作確認します。
参照したサイト・書籍
目次
- clean タスク実行 → Rebuild Project 実行 → build タスクを実行する
- bootBuildImage タスクを実行する
- docker-compose.app.yml を変更する
- Docker で複数の Tomcat を起動して動作確認する
手順
clean タスク実行 → Rebuild Project 実行 → build タスクを実行する
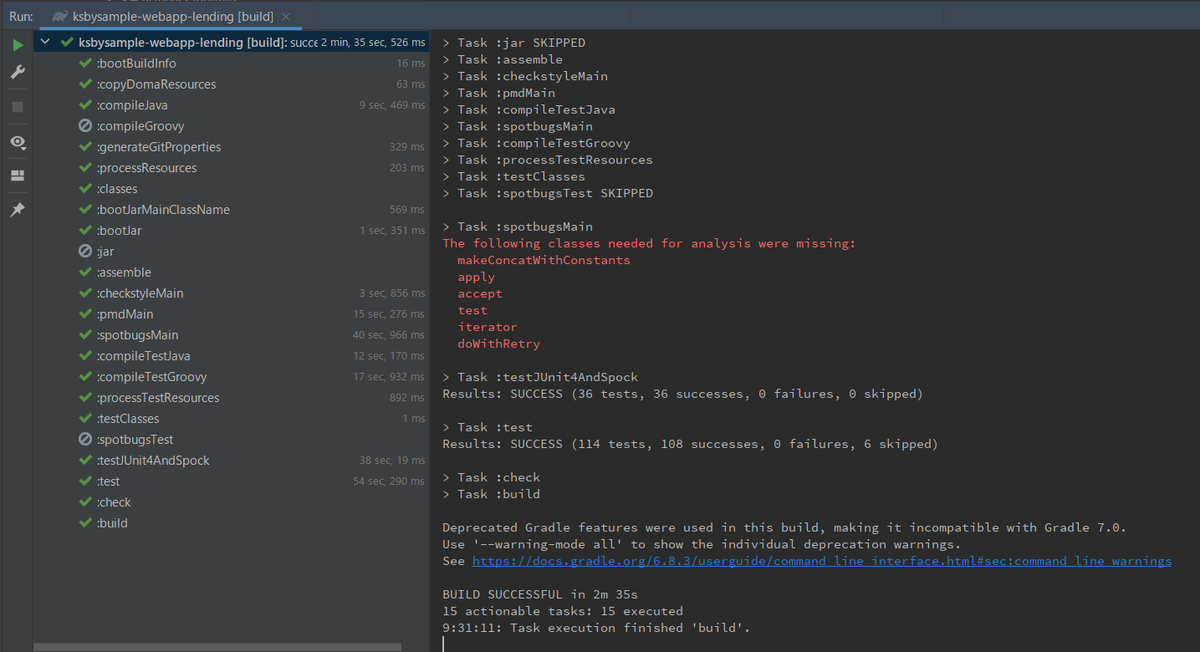
clean タスク実行 → Rebuild Project 実行 → build タスクを実行して BUILD SUCCESSFUL のメッセージが出力されることを確認します。

bootBuildImage タスクを実行する
bootBuildImage タスクを実行して Successfully built image 'docker.io/library/ksbysample-webapp-lending:2.4.3' と BUILD SUCCESSFUL のメッセージが出力されることを確認します。

docker-compose.app.yml を変更する
docker-compose.app.yml を以下のように変更します。
  app:
    image: ksbysample-webapp-lending:2.4.3
    environment:
      - JAVA_TOOL_OPTIONS=-Dspring.profiles.active=product -Dlogging.appender=CONSOLE
      - SPRING_DATASOURCE_HIKARI_JDBC_URL=jdbc:postgresql://postgresql/ksbylending
      - SPRING_MAIL_HOST=mail-server
      - SPRING_RABBITMQ_HOST=haproxy
    deploy:
      mode: replicated
      replicas: 3
    # entrypoint: /bin/bash
    # stdin_open: true
    # tty: true
image: ksbysample-webapp-lending:2.3.7-RELEASE→image: ksbysample-webapp-lending:2.4.3に変更します。
Docker で複数の Tomcat を起動して動作確認する
docker-compose -f docker-compose.mail.yml up -d、docker-compose -f docker-compose.app.yml --compatibility up -d コマンドを実行します。

http://localhost:8080/haproxy?stats にアクセスして全てのインスタンスが緑色になるまで待ちます。

以下の手順で動作確認します ( 画面キャプチャは省略します )。
- ブラウザを起動して http://localhost:8080/ にアクセスしてログイン画面を表示します。tanaka.taro@sample.com / taro でログインします。
- 検索対象図書館登録画面が表示されます。"東京都" で検索した後、一覧表示されている図書館から「国立国会図書館東京本館」を選択します。
- ログアウトします。
- ログイン画面に戻るので suzuki.hanako@test.co.jp / hanako でログインします。
- 貸出希望書籍 CSV ファイルアップロード画面が表示されます。以下の内容が記述された CSV ファイルをアップロードします。
"ISBN","書名"
"978-4-7741-6366-6","GitHub実践入門"
"978-4-7741-5377-3","JUnit実践入門"
"978-4-7973-8014-9","Java最強リファレンス"
"978-4-7973-4778-4","アジャイルソフトウェア開発の奥義"
"978-4-87311-704-1","Javaによる関数型プログラミング" - 「貸出状況を確認しました」のメールが送信されるので、メールに記述されている URL にアクセスします。
- 貸出申請画面が表示されます。3冊程「申請する」を選択して申請します。
- ログアウトします。
- 「貸出申請がありました」のメールが送信されるので、メールに記述されている URL にアクセスします。ログイン画面が表示されるので、tanaka.taro@sample.com / taro でログインします。
- 貸出承認画面が表示されます。「承認」あるいは「却下」を選択して確定させます。
- ログアウトします。
- 「貸出申請が承認・却下されました」のメールが送信されるので、メールに記述されている URL にアクセスします。ログイン画面が表示されるので、suzuki.hanako@test.co.jp / hanako でログインします。
- 貸出申請結果確認画面が表示されるので内容を確認します。
動作確認は特に問題ありませんでした。
docker-compose -f docker-compose.app.yml --compatibility down、docker-compose -f docker-compose.mail.yml down、docker-compose down コマンドを実行してコンテナを停止します。
履歴
2021/03/11
初版発行。
Spring Boot 2.3.x の Web アプリを 2.4.x へバージョンアップする ( その9 )( RedisClusterConfig の RedisConnectionFactory Bean を削除し、application.properties で設定する方法に切り替える )
概要
記事一覧はこちらです。
Spring Boot 2.3.x の Web アプリを 2.4.x へバージョンアップする ( その8 )( Docker コンテナの image をバージョンアップする ) の続きです。
- 今回の手順で確認できるのは以下の内容です。
- これまで Redis に接続するための RedisConnectionFactory Bean は Spring Boot 1.5.x の Web アプリを 2.0.x へバージョンアップする ( その30 )( Redis のクライアントライブラリを Jedis → Lettuce に変更する ) で作成したものを使用していましたが、Redis 6+lettuce-core 6 で Redis 6 の新機能を試そうと思って Spring Boot 2.4.3 の Common Application properties を見ていたところ
spring.redis.~やspring.redis.lettuce.~の property があることに気づきました。自分で RedisConnectionFactory Bean を定義しなくても設定ファイルで定義できそうです。 - RedisConnectionFactory bean を定義している src/main/java/ksbysample/webapp/lending/config/RedisClusterConfig.java を削除して、設定ファイルで定義する方式に切り替えてみます。
- これまで Redis に接続するための RedisConnectionFactory Bean は Spring Boot 1.5.x の Web アプリを 2.0.x へバージョンアップする ( その30 )( Redis のクライアントライブラリを Jedis → Lettuce に変更する ) で作成したものを使用していましたが、Redis 6+lettuce-core 6 で Redis 6 の新機能を試そうと思って Spring Boot 2.4.3 の Common Application properties を見ていたところ
参照したサイト・書籍
Common Application properties
https://docs.spring.io/spring-boot/docs/2.4.3/reference/html/appendix-application-properties.htmlLettuce Reference Guide
https://lettuce.io/core/6.0.2.RELEASE/reference/lettuce-io / lettuce-core - Redis Cluster
https://github.com/lettuce-io/lettuce-core/wiki/Redis-Cluster
目次
- RedisClusterConfig.java を削除し、application.properties に Redis へ接続するための設定を追加する
- 動作確認
- Spring Boot のバージョンアップ時に Common Application properties に追加されたものを確認するには?
手順
RedisClusterConfig.java を削除し、application.properties に Redis へ接続するための設定を追加する
まず src/main/java/ksbysample/webapp/lending/config/RedisClusterConfig.java を削除します。
src/main/resources/application.properties を以下のように変更します。
spring.redis.client-name=ksbysample-webapp-lending
spring.redis.cluster.nodes=${host.ip.address}:6379,${host.ip.address}:6380,${host.ip.address}:6381,${host.ip.address}:6382,${host.ip.address}:6383,${host.ip.address}:6384
spring.redis.lettuce.cluster.refresh.period=5s
spring.redis.timeout=30s
- これまでは
spring.redis.cluster.nodes[0]=${host.ip.address}:6379、spring.redis.cluster.nodes[1]=${host.ip.address}:6380、... のようにspring.redis.cluster.nodesに添え字を付けて設定していましたが、spring.redis.cluster.nodes を見るとカンマ区切りで設定できると書いてあったので、spring.redis.cluster.nodes=${host.ip.address}:6379,${host.ip.address}:6380,...に変更します。 - 以下の設定を追加します。
spring.redis.client-name=ksbysample-webapp-lending- redis-cli で
client listコマンドを実行した時に Web アプリケーションから接続しているセッションの name にここで設定している文字列が表示されます。
- redis-cli で
spring.redis.lettuce.cluster.refresh.period=5s- この設定は実際には 60s 程度にしておいた方がよいでしょう。今は cluster 内で redis サーバを落とした時の切り替えを短時間で行うために 5s と短い時間に設定しています。
spring.redis.timeout=30s- あまり短い時間(例えば 5s)を設定すると Spring Session が Redis からデータを取得しようとして Command time out が発生した時に Tomcat のエラー画面が直接表示されることがあるので、ある程度長い時間を設定する必要があります。

- あまり短い時間(例えば 5s)を設定すると Spring Session が Redis からデータを取得しようとして Command time out が発生した時に Tomcat のエラー画面が直接表示されることがあるので、ある程度長い時間を設定する必要があります。
clean タスク実行 → Rebuild Project 実行 → build タスクを実行して BUILD SUCCESSFUL のメッセージが出力されることを確認します。

動作確認
IntelliJ IDEA から Web アプリを起動してログイン・ログアウトは問題なくできました。ログインしてから Web アプリを再起動した後画面を操作しても強制的にログアウトさせられることもありませんでした。
ログインしている状態で、

redis-cli で cluster nodes コマンドを実行して master になっている redis サーバを確認した後、

6379、6380、6381 を落とします。

その後 40秒程何もしなければ画面を操作してもエラーが出ませんでした。
40秒以下で画面を操作すると、spring.redis.timeout に設定した 30s が経過した後 500 Internal Server Error のエラー画面が表示されました。

Spring Boot のバージョンアップ時に Common Application properties に追加されたものを確認するには?
spring-boot-autoconfigure-x.x.x.jar の META-INF/spring-configuration-metadata.json を見れば一覧が分かります。

今回設定した spring.redis.lettuce.cluster.refresh.period がいつ追加されたのか確認するために 2.4.3、2.3.9、2.2.13 の spring-configuration-metadata.json を取得して比較したところ、2.3 から追加されていました。
履歴
2021/03/10
初版発行。
Spring Boot 2.3.x の Web アプリを 2.4.x へバージョンアップする ( その8 )( Docker コンテナの image をバージョンアップする )
概要
記事一覧はこちらです。
Spring Boot 2.3.x の Web アプリを 2.4.x へバージョンアップする ( その7 )( SpotBugs を 4.1.1 → 4.2.1 へバージョンアップする ) の続きです。
- 今回の手順で確認できるのは以下の内容です。
- Docker コンテナの image をバージョンアップします。
参照したサイト・書籍
目次
- docker-compose.yml を変更する
- docker-compose.app.yml を変更する
- .env を変更する
docker-compose up -dコマンドを実行する- 動作確認
手順
docker-compose.yml を変更する
services:
  prometheus:
    image: prom/prometheus:v2.25.0
    ..........

  grafana:
    image: grafana/grafana:7.4.3
    ..........

  redis_exporter:
    image: oliver006/redis_exporter:v1.17.1-alpine
    ..........

  haproxy:
    image: haproxy:${HAPROXY_VERSION}-alpine
- prometheus で
image: prom/prometheus:v2.23.0→image: prom/prometheus:v2.25.0に変更します。 - grafana で
image: grafana/grafana:7.3.6→image: grafana/grafana:7.4.3に変更します。 - redis_exporter で
image: oliver006/redis_exporter:v1.14.0-alpine→image: oliver006/redis_exporter:v1.17.1-alpineに変更します。 - haproxy で
image: haproxy:2.3.2-alpine→image: haproxy:${HAPROXY_VERSION}-alpineに変更します。
docker-compose.app.yml を変更する
  haproxy-app:
    image: haproxy:${HAPROXY_VERSION}-alpine
    ..........
- haproxy で
image: haproxy:2.3.2-alpine→image: haproxy:${HAPROXY_VERSION}-alpineに変更します。
.env を変更する
HOST_IP_ADDRESS=192.168.3.4
REDIS_VERSION=6.2.1
REDIS_CLUSTER_1_PORT=6379
REDIS_CLUSTER_2_PORT=6380
REDIS_CLUSTER_3_PORT=6381
REDIS_CLUSTER_4_PORT=6382
REDIS_CLUSTER_5_PORT=6383
REDIS_CLUSTER_6_PORT=6384

RABBITMQ_VERSION=3.8.14-management
RABBITMQ_ERLANG_COOKIE=Uzkm93w5e1Lz8AcP
RABBITMQ_DEFAULT_USER=rabbitmq
RABBITMQ_DEFAULT_PASS=12345678
RABBITMQ_DEFAULT_VHOST=/

HAPROXY_VERSION=2.3.6

POSTGRESQL_VERSION=12.6
PGADMIN4_VERSION=5.0

FLYWAY_VERSION=7.5.4
FLYWAY_URL=jdbc:postgresql://postgresql/ksbylending
FLYWAY_USER=ksbylending_user
FLYWAY_PASSWORD=xxxxxxxx

POSTGRES_EXPORTER_USER=postgres_exporter
POSTGRES_EXPORTER_PASSWORD=zzzzzzzz

MAILSERVER_VERSION=release-v7.2.0
REDIS_VERSION=6.0.9→REDIS_VERSION=6.2.1に変更します。RABBITMQ_VERSION=3.8.9-management→RABBITMQ_VERSION=3.8.14-managementに変更します。HAPROXY_VERSION=2.3.6を追加します。POSTGRESQL_VERSION=12.5→POSTGRESQL_VERSION=12.6に変更します。PGADMIN4_VERSION=4.29→PGADMIN4_VERSION=5.0に変更します。FLYWAY_VERSION=7.3.1→FLYWAY_VERSION=7.5.4に変更します。
docker-compose up -d コマンドを実行する
以下のコマンドを実行して docker image を更新・ダウンロードします(画面キャプチャはなし)。
docker-compose build --no-cacheコマンドを実行し、Dockerfile で作成している image を更新します。docker-compose up -dコマンドを実行してコンテナ一式(メールサーバ・rainloop を除く)を起動します。
動作確認
http://localhost:1936/haproxy?stats にアクセスして RabbitMQ が起動することを確認します。

http://localhost:15672/ にアクセスして rabbitmq / 12345678 でログインし、rabbitmq1~3 が正常に動作していることを確認します。

clean タスク実行 → Rebuild Project 実行 → build タスクを実行して BUILD SUCCESSFUL のメッセージが出力されることを確認します。

http://localhost:9090/graph にアクセスして Prometheus の画面が表示されることを確認します。

http://localhost:3000/ にアクセスして admin / admin でログインし、画面が表示されることを確認します。

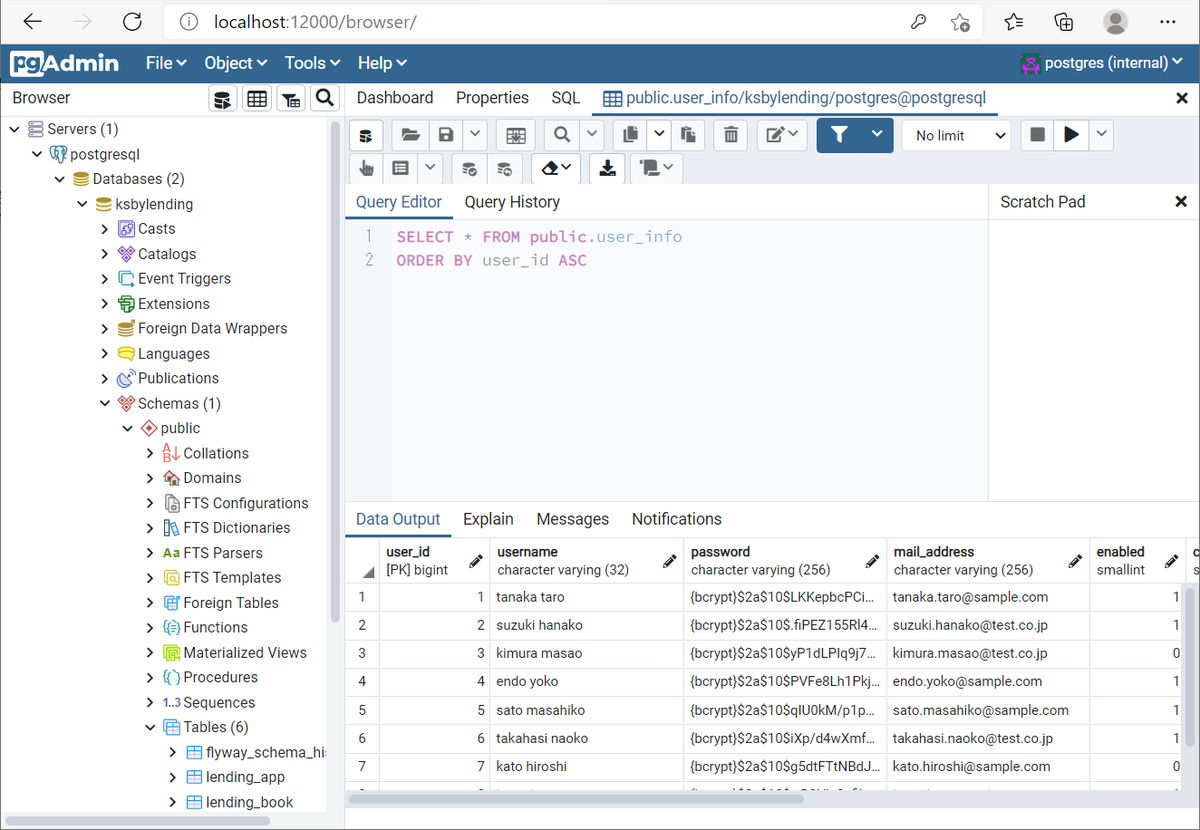
http://localhost:12000/ にアクセスして postgres@example.com / yyyyyyyy でログインし、画面が表示されることを確認します。
IntelliJ IDEA の Service から redis-cluster-6379 コンテナに Create Terminal で接続して、redis-cli → cluster nodes コマンドを実行してクラスタ構成になっていることを確認します。

特に問題はなさそうです。前回と違って今回は楽でした。。。
履歴
2021/03/06
初版発行。
Spring Boot 2.3.x の Web アプリを 2.4.x へバージョンアップする ( その7 )( SpotBugs を 4.1.1 → 4.2.1 へバージョンアップする )
概要
記事一覧はこちらです。
Spring Boot 2.3.x の Web アプリを 2.4.x へバージョンアップする ( その6 )( Error Prone を 2.4.0 → 2.5.1 へバージョンアップする ) の続きです。
- 今回の手順で確認できるのは以下の内容です。
- SpotBugs を 4.1.1 → 4.2.1 へバージョンアップします。
- SpotBugs 4.2.1 に対応する spotbugs-gradle-plugin のバージョンは 4.6.1 なので、このバージョンにします。対応バージョンは SpotBugs version mapping に記載されています。
- これまで build.gradle 内に SpotBugs のバージョン番号を直接記述していましたが、Refer the version in the build script に
${spotbugs.toolVersion.get()}で取れるとの記述がありましたので、今回からこの方法に切り替えます。
参照したサイト・書籍
SpotBugs
https://spotbugs.github.io/spotbugs / spotbugs
https://github.com/spotbugs/spotbugsspotbugs / spotbugs-gradle-plugin
https://github.com/spotbugs/spotbugs-gradle-pluginThe following classes needed for analysis were missing for method names
https://github.com/find-sec-bugs/find-sec-bugs/issues/440ati90ati / bugreport-spotbugs-gradle-plugin-logging
https://github.com/ati90ati/bugreport-spotbugs-gradle-plugin-logging
目次
手順
build.gradle を変更する
plugins {
    id "java"
    id "eclipse"
    id "idea"
    id "org.springframework.boot" version "2.4.3"
    id "io.spring.dependency-management" version "1.0.11.RELEASE"
    id "groovy"
    id "checkstyle"
    id "com.github.spotbugs" version "4.6.1"
    id "pmd"
    id "net.ltgt.errorprone" version "1.3.0"
    id "com.gorylenko.gradle-git-properties" version "2.2.4"
    id "org.seasar.doma.codegen" version "1.2.1"
}

..........

spotbugs {
    toolVersion = "${spotbugs.toolVersion.get()}"
    ignoreFailures = true
    spotbugsTest.enabled = false
}
spotbugsMain {
    reports {
        html {
            enabled = true
            stylesheet = "color.xsl"
        }
    }
}

..........

dependencies {
    def jdbcDriver = "org.postgresql:postgresql:42.2.19"
    def spockVersion = "1.3-groovy-2.5"
    def domaVersion = "2.45.0"
    def lombokVersion = "1.18.18"
    def errorproneVersion = "2.5.1"
    def powermockVersion = "2.0.9"

    ..........

    // for SpotBugs
    spotbugs(configurations.spotbugsPlugins.dependencies)
    annotationProcessor("com.github.spotbugs:spotbugs-annotations:${spotbugs.toolVersion.get()}")
    spotbugsPlugins("com.h3xstream.findsecbugs:findsecbugs-plugin:1.11.0")
}
- plugins block の以下の点を変更します。
id "com.github.spotbugs" version "4.5.0"→id "com.github.spotbugs" version "4.6.1"
- spotbugs block の以下の点を変更します。
toolVersion = "4.1.1"→toolVersion = "${spotbugs.toolVersion.get()}"
- dependencies block の以下の点を変更します。
def spotbugsVersion = "4.1.1"を削除します。spotbugs("com.github.spotbugs:spotbugs:${spotbugsVersion}")→spotbugs(configurations.spotbugsPlugins.dependencies)compileOnly("com.github.spotbugs:spotbugs-annotations:${spotbugsVersion}")→annotationProcessor("com.github.spotbugs:spotbugs-annotations:${spotbugs.toolVersion.get()}")spotbugsPlugins("com.h3xstream.findsecbugs:findsecbugs-plugin:1.10.1")→spotbugsPlugins("com.h3xstream.findsecbugs:findsecbugs-plugin:1.11.0")
Gradle Tool Window の左上にある「Refresh all Gradle projects」ボタンをクリックして更新した後、clean タスク実行 → Rebuild Project 実行 → build タスクを実行すると BUILD SUCCESSFUL のメッセージが出力されました。

履歴
2021/03/04
初版発行。
Spring Boot 2.3.x の Web アプリを 2.4.x へバージョンアップする ( その6 )( Error Prone を 2.4.0 → 2.5.1 へバージョンアップする )
概要
記事一覧はこちらです。
Spring Boot 2.3.x の Web アプリを 2.4.x へバージョンアップする ( その5 )( PMD を 6.26.0 → 6.32.0 へバージョンアップする ) の続きです。
- 今回の手順で確認できるのは以下の内容です。
- Error Prone を 2.4.0 → 2.5.1 へバージョンアップします。
参照したサイト・書籍
- tbroyer / gradle-errorprone-plugin
https://github.com/tbroyer/gradle-errorprone-plugin
目次
手順
build.gradle を変更する
plugins {
    id "java"
    id "eclipse"
    id "idea"
    id "org.springframework.boot" version "2.4.3"
    id "io.spring.dependency-management" version "1.0.11.RELEASE"
    id "groovy"
    id "checkstyle"
    id "com.github.spotbugs" version "4.5.0"
    id "pmd"
    id "net.ltgt.errorprone" version "1.3.0"
    id "com.gorylenko.gradle-git-properties" version "2.2.4"
    id "org.seasar.doma.codegen" version "1.2.1"
}

..........

dependencies {
    def jdbcDriver = "org.postgresql:postgresql:42.2.19"
    def spockVersion = "1.3-groovy-2.5"
    def domaVersion = "2.45.0"
    def lombokVersion = "1.18.18"
    def errorproneVersion = "2.5.1"
    def powermockVersion = "2.0.9"
    def spotbugsVersion = "4.1.1"

    ..........
- plugins block の以下の点を変更します。
id "net.ltgt.errorprone" version "1.2.1"→id "net.ltgt.errorprone" version "1.3.0"
- dependencies block の以下の点を変更します。
def errorproneVersion = "2.4.0"→def errorproneVersion = "2.5.1"
Gradle Tool Window の左上にある「Refresh all Gradle projects」ボタンをクリックして更新した後、clean タスク実行 → Rebuild Project 実行 → build タスクを実行すると compileJava タスクで警告が 100個以上出ました(コンソールには 100個と出力されていますが警告が 100個以上あっても1度には 100個までしか出力されません)。

警告の原因を取り除く
警告:[SameNameButDifferent] The name@Datarefers to [java.lang.SuppressWarnings, java.util.List, java.lang.String, java.lang.Override, java.lang.Object] within this file. It may be confusing to have the same name refer to multiple types. Consider qualifying them for clarity.
警告が出ている src/main/java/ksbysample/webapp/lending/config/RedisClusterConfig.java を見ると、警告とは関係ありませんが画面上部に「Spring Boot Configuration Annotation Processor not configured」のメッセージが表示されていました。

メッセージの右側の「Open Documentation...」のリンクをクリックして https://docs.spring.io/spring-boot/docs/2.4.3/reference/html/appendix-configuration-metadata.html#configuration-metadata-annotation-processor を開くと、dependencies block で spring-boot-configuration-processor を記述する時に annotationProcessor が使われていますね。。。

annotationProcessor は使っていなかったはず。。。と思って build.gradle を見ると、compileOnly で記述していました。

annotationProcessor に変更して Gradle Tool Window の左上にある「Refresh all Gradle projects」ボタンをクリックして更新します。
今度は「Re-run Spring Boot Configuration Annotation Processor to update generated metadata」というメッセージが表示されたので、右側の「Hide notification」リンクをクリックしてメッセージが表示されないようにします。

SameNameButDifferent の原因の方ですが、警告が出ている箇所を見ると全て @Data アノテーションが付与されていました。error-prone の GitHub にも以下の Issue がありました。
SameNameButDifferent throw IndexOutOfBoundsException when using lombok @NonNull and @Getter
https://github.com/google/error-prone/issues/2120
おそらく SameNameButDifferent を有効にしていると Lombok の @Data アノテーションで必ず警告が出ているだけのような気がします。build.gradle を以下のように変更して SameNameButDifferent を無効にします。
[compileJava, compileTestGroovy, compileTestJava]*.options*.encoding = "UTF-8"
[compileJava, compileTestGroovy, compileTestJava]*.options*.compilerArgs = ["-Xlint:all,-options,-processing,-path"]
tasks.withType(JavaCompile).configureEach {
    options.errorprone {
        disableWarningsInGeneratedCode = true
        disable("SameNameButDifferent")
    }
}
tasks.named("compileTestJava").configure {
    options.errorprone.enabled = false
}
tasks.withType(JavaCompile).configureEach { ... }にdisable("SameNameButDifferent")を追加します。
Gradle Tool Window の左上にある「Refresh all Gradle projects」ボタンをクリックして更新した後、clean タスク実行 → Rebuild Project 実行 → build タスクを実行すると、今度は警告が出なくなりました。

履歴
2021/03/03
初版発行。
Spring Boot 2.3.x の Web アプリを 2.4.x へバージョンアップする ( その5 )( PMD を 6.26.0 → 6.32.0 へバージョンアップする )
概要
記事一覧はこちらです。
- 今回の手順で確認できるのは以下の内容です。
- PMD を 6.26.0 → 6.32.0 へバージョンアップします。
参照したサイト・書籍
目次
手順
build.gradle を変更する
pmd {
    toolVersion = "6.26.0"
    sourceSets = [project.sourceSets.main]
    ignoreFailures = true
    consoleOutput = true
    ruleSetFiles = rootProject.files("/config/pmd/pmd-project-rulesets.xml")
    ruleSets = []
}
toolVersion = "6.26.0"→toolVersion = "6.32.0"に変更します。
Gradle Tool Window の左上にある「Refresh all Gradle projects」ボタンをクリックして更新した後、clean タスク実行 → Rebuild Project 実行 → build タスクを実行すると BUILD SUCCESSFUL が表示されました。
履歴
2021/03/03
初版発行。
Spring Boot 2.3.x の Web アプリを 2.4.x へバージョンアップする ( その4 )( Release Notes を見て必要な箇所を変更する。。。ことがなさそうなので Checkstyle を 8.35 → 8.41 へバージョンアップする )
概要
記事一覧はこちらです。
Spring Boot 2.3.x の Web アプリを 2.4.x へバージョンアップする ( その3 )( Spring Boot を 2.3.9 → 2.4.3 へバージョンアップする ) の続きです。
- 今回の手順で確認できるのは以下の内容です。
- 以下のドキュメントを見て必要な箇所を変更します。。。と思ったのですが、記述が多い割に今回は変更が必要なところがありませんでした。
- Checkstyle を 8.35 → 8.41 へバージョンアップします。
- 最新版の google_checks.xml の内容も反映します。
参照したサイト・書籍
checkstyle / checkstyle
https://github.com/checkstyle/checkstylecheckstyle/checkstyle - checkstyle/src/main/resources/google_checks.xml
https://github.com/checkstyle/checkstyle/blob/master/src/main/resources/google_checks.xml
目次
- build.gradle を変更する
- IntelliJ IDEA の CheckStyle-IDEA Plugin が使用する Checkstyle のバージョンを 8.34 に変更する
- 最新版の google_checks.xml から設定をコピーする
- 今回 google_checks.xml に追加した COMPACT_CTOR_DEF とは?
手順
build.gradle を変更する
checkstyle {
    configFile = file("${rootProject.projectDir}/config/checkstyle/google_checks.xml")
    toolVersion = "8.41"
    sourceSets = [project.sourceSets.main]
}
toolVersion = "8.35"→toolVersion = "8.41"に変更します。
Gradle Tool Window の左上にある「Refresh all Gradle projects」ボタンをクリックして更新した後、clean タスク実行 → Rebuild Project 実行 → build タスクを実行すると BUILD SUCCESSFUL が表示されましたが、以下の WARNING も出力されました。

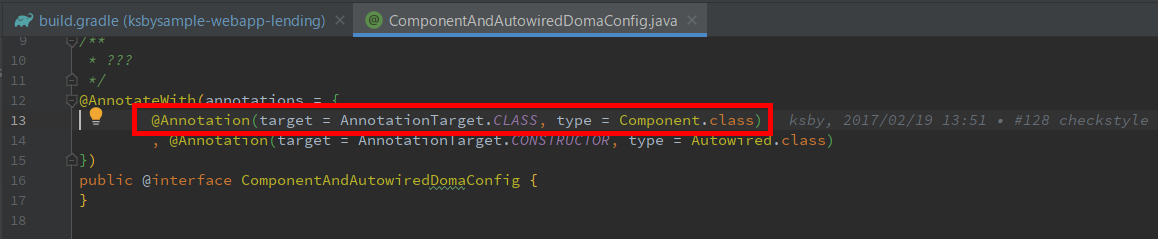
[ant:checkstyle] [WARN] D:\project-springboot\ksbysample-webapp-lending\src\main\java\ksbysample\webapp\lending\util\doma\ComponentAndAutowiredDomaConfig.java:13:9: 'annotation array initialization' の子のインデントレベル 8 は正しくありません。期待されるレベルは 4 です。 [Indentation]
該当箇所を見てみると確かにインデントが 8 でした。
今はこのままにして、google_checks.xml を変更する時に対応します。
IntelliJ IDEA の CheckStyle-IDEA Plugin が使用する Checkstyle のバージョンを 8.40 に変更する
CheckStyle-IDEA Plugin に指定できるバージョンが 8.40 までだったので 8.40 を指定します。

最新版の google_checks.xml から設定をコピーする
最新版の google_checks.xml から差分を反映します。今回反映した内容を箇条書きで記述しておきます。
<module name="LeftCurly">の<property name="tokens">の value に COMPACT_CTOR_DEF を追加しました。<module name="RightCurly">の<property name="tokens">の value に COMPACT_CTOR_DEF を追加しました。<module name="WhitespaceAround">に<property name="ignoreEnhancedForColon" value="false"/>を追加しました。<module name="EmptyLineSeparator">の<property name="tokens">の value に COMPACT_CTOR_DEF を追加しました。<module name="PatternVariableName">...</module>を追加しました。<module name="Indentation">の<property name="arrayInitIndent" value="4"/>→<property name="arrayInitIndent" value="8"/>に変更しました。上で出力された WARNING はこれで解消します。<module name="AnnotationLocation">の<property name="tokens">の value に COMPACT_CTOR_DEF を追加しました。<module name="RequireEmptyLineBeforeBlockTagGroup"/>を追加しました。<module name="JavadocMethod">の<property name="tokens">の value に COMPACT_CTOR_DEF を追加しました。<module name="MissingJavadocMethod">の<property name="tokens">の value に COMPACT_CTOR_DEF を追加しました。<module name="MissingJavadocType">...</module>を追加しました。ただし<property name="tokens">の value から RECORD_DEF は削除しました。
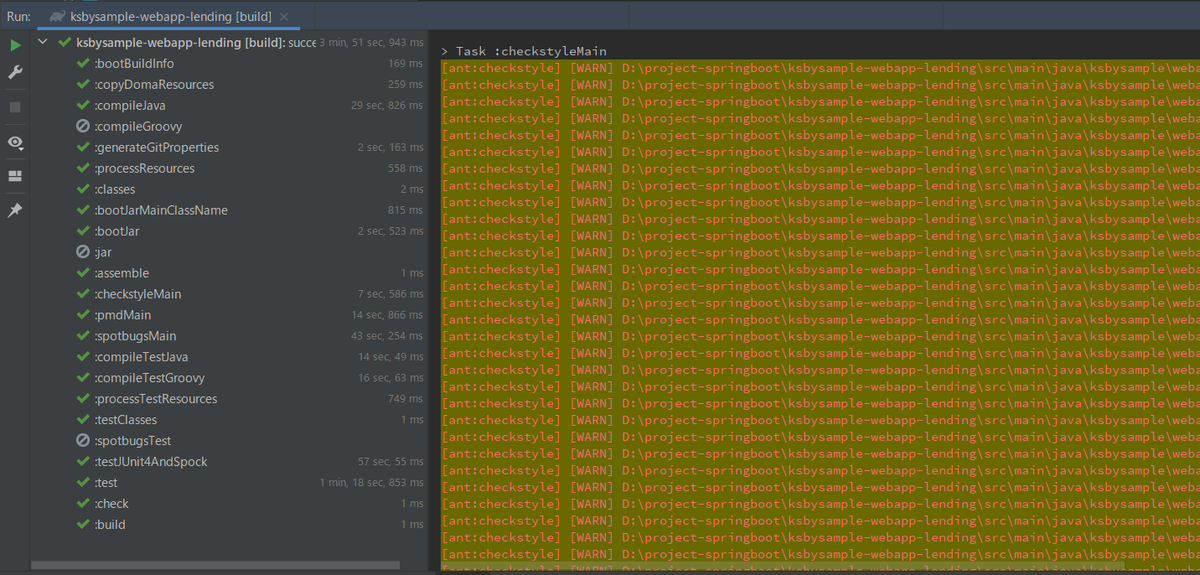
clean タスク実行 → Rebuild Project 実行 → build タスクを実行すると BUILD SUCCESSFUL が表示されましたが、WARNING も大量に出力されました。以下の点を変更します。
Javadoc コメントがありません。 [MissingJavadocType]- 以前は WARNING が出なかった箇所も指摘してくれるようになったようです。Javadoc コメントを追加します。
Javadoc tag '@return' の前には空の行が必要です。 [RequireEmptyLineBeforeBlockTagGroup]- Doma 2 で自動生成した Entity クラスで WARNING が出ていました。Ctrl+Alt+L でフォーマットすると解消されます。
再度 clean タスク実行 → Rebuild Project 実行 → build タスクを実行すると WARNING が出なくなりました。

今回 google_checks.xml に追加した COMPACT_CTOR_DEF とは?
https://checkstyle.sourceforge.io/apidocs/com/puppycrawl/tools/checkstyle/api/TokenTypes.html
には A compact canonical constructor eliminates the list of formal parameters; they are declared implicitly. と記述されています。
同じページ内にある For example: のサンプルを見ると Java 14 からの Record 構文用の設定のようです。今回は RECORD_DEF のようにエラーや警告は出ないので追加したままにします。
 public record myRecord () {
     public myRecord{}
 }
履歴
2021/03/03
初版発行。