React+Tailwind CSS+Storybook のプロジェクトを作成する
概要
記事一覧はこちらです。
ユーティリティーファーストとTailwind CSSのススメ の記事を読んで React+Tailwind CSS の組み合わせに興味を持ったのでサンプルプロジェクトを作成してみます。作成した Component を確認できるよう Storybook も入れてみます。
Typescript は導入せず Javascript で記述する想定です。
Node.js、npm、yarn は以下のバージョンを使用しています(Node.js と npm のバージョンが古いな。。。とは思いつつ今回はこのままでいきます)。

参照したサイト・書籍
ユーティリティーファーストとTailwind CSSのススメ
https://qiita.com/Takazudo/items/5180f5eb6d798a52074fTailwind CSS
https://tailwindcss.com/tailwindlabs / tailwindcss-forms
https://github.com/tailwindlabs/tailwindcss-formspostcss / postcss - PostCSS 8 for end users
https://github.com/postcss/postcss/wiki/PostCSS-8-for-end-users- ツールの PostCSS 8 の対応状況が表示されています。
Install Tailwind CSS with Create React App
https://tailwindcss.com/docs/guides/create-react-appgsoft-inc / craco
https://github.com/gsoft-inc/cracoInstallation
https://tailwindcss.com/docs/installationConfiguration
https://tailwindcss.com/docs/configurationtailwindcss initコマンドの-pflag の説明はここに記述されていました。
Storybook
https://storybook.js.org/Install Storybook
https://storybook.js.org/docs/react/get-started/installIntroduction to Storybook for React
https://storybook.js.org/docs/react/get-started/introductionIntegrating React, Tailwind and Storybook
https://johnclarke73.medium.com/integrating-react-tailwind-and-storybook-3ae124aff0d9Storybook-tailwind. How should I add tailwind to storybook
https://stackoverflow.com/questions/65495912/storybook-tailwind-how-should-i-add-tailwind-to-storybook
目次
- create-react-app で react-taiwindcss-storybook-sample プロジェクトを作成する
- Tailwind CSS をインストールする
- CRACO をインストール・設定する
npx tailwindcss init -pコマンドを実行して tailwind.config.js、postcss.config.js を作成する- src/index.css を変更する
- src/App.css、src/App.js を変更して Tailwind CSS が利用できることを確認する
npx sb initコマンドを実行して Storybook をインストールする- babel-loader が 8.2.2 にバージョンアップされて
yarn start実行時にエラーが出るので 8.1.0 にバージョンダウンする - .storybook/preview.js、.storybook/main.js を変更する
- src/stories を削除する
- component のサンプルを作成して Storybook 上に表示する
手順
create-react-app で react-taiwindcss-storybook-sample プロジェクトを作成する
コマンドプロンプトから以下のコマンドを実行し、プロジェクトを作成します。
cd /d/project-react/npx create-react-app react-taiwindcss-storybook-samplecd react-taiwindcss-storybook-sample/yarn testを実行してテストが正常に終了することを確認します。yarn startを実行してブラウザに React のロゴが表示されることを確認します。
Tailwind CSS をインストールする
Install Tailwind CSS with Create React App のページを参考に以下のコマンドを実行します。@tailwindcss/forms もインストールします。Tailwind CSS は PostCSS 8 に対応しているのですが create-react-app がまだ対応していないらしく、PostCSS 7 を使うようにする必要があるとのこと。
yarn add tailwindcss@npm:@tailwindcss/postcss7-compat @tailwindcss/postcss7-compat postcss@^7 autoprefixer@^9
※(2021/04/20追記)postcss、autoprefixer はyarn add -Dでインストールした方がよい。yarn add @tailwindcss/forms


CRACO をインストール・設定する
引き続き Install Tailwind CSS with Create React App のページを参考に yarn add @craco/craco コマンドを実行して CRACO をインストールします。create-react-app の PostCSS の設定を変更するためにこのツールが必要とのこと。

package.json 内の scripts で react-scripts → craco に変更します。
  "scripts": {
    "start": "craco start",
    "build": "craco build",
    "test": "craco test",
    "eject": "craco eject"
  },
プロジェクトのルートディレクトリ直下に craco.config.js を作成し、以下の内容を記述します。
module.exports = {
  style: {
    postcss: {
      plugins: [
        require('tailwindcss'),
        require('autoprefixer'),
      ],
    },
  },
}
npx tailwindcss init -p コマンドを実行して tailwind.config.js、postcss.config.js を作成する
Installation のページを参考に npx tailwindcss init -p コマンドを実行して tailwind.config.js、postcss.config.js を作成します。

tailwind.config.js は以下の内容に変更します。
module.exports = {
  purge: ['./src/**/*.{js,jsx,ts,tsx}', './public/index.html'],
  darkMode: false, // or 'media' or 'class'
  theme: {
    extend: {},
  },
  variants: {
    extend: {},
  },
  plugins: [
    require('@tailwindcss/forms'),
  ],
}
- purgeに
'./src/**/*.{js,jsx,ts,tsx}', './public/index.html'を追加します。 - plugins に
require('@tailwindcss/forms'),を追加します。
postcss.config.js は作成されたままで何も変更しません。
module.exports = {
  plugins: {
    tailwindcss: {},
    autoprefixer: {},
  },
}
src/index.css を変更する
src/index.css の中身を全てクリアし、以下の内容に変更します。
@tailwind base;
@tailwind components;
@tailwind utilities;
@tailwind forms;
src/App.css、src/App.js を変更して Tailwind CSS が利用できることを確認する
Tailwind CSS が利用できるようになっていることを確認します。
src/App.css の中身はどれも使用しないので全てクリアします。
src/App.js を Tailwind CSS を利用して文字列を表示するよう以下の内容に変更します。
import './App.css';

function App() {
  return (
    <div className="pt-4 pl-4 text-red-600 text-4xl font-extrabold">
      React+Tailwind CSS
    </div>
  );
}

export default App;
yarn start を実行すると、

ブラウザに以下のように表示されました。問題なく利用できるようになっています。

npx sb init コマンドを実行して Storybook をインストールする
Install Storybook のページを参考に npx sb init コマンドを実行して Storybook をインストールします。
 ..........

yarn storybook コマンドを実行して、
 ..........

Storybook の画面が表示されることを確認します。

babel-loader が 8.2.2 にバージョンアップされて yarn start 実行時にエラーが出るので 8.1.0 にバージョンダウンする
Storybook をインストールした後に yarn start を実行すると "babel-loader": "8.1.0" が必要とのエラーが出ます。

yarn.lock を見ると babel-loader が 8.2.2 になっていました。yarn add -D babel-loader@8.1.0 を実行してバージョンダウンします。
バージョンダウン後、再度 yarn start を実行すると今度は画面が表示されました。
.storybook/preview.js、.storybook/main.js を変更する
Tailwind CSS が適用されるよう .storybook/preview.js、.storybook/main.js を変更します。
.storybook/preview.js を以下のように変更します。
import '../src/index.css';

export const parameters = {
  actions: { argTypesRegex: "^on[A-Z].*" },
  controls: {
    matchers: {
      color: /(background|color)$/i,
      date: /Date$/,
    },
  },
}
import '../src/index.css';を追加します。
.storybook/main.js を以下のように変更します。Integrating React, Tailwind and Storybook や Storybook-tailwind. How should I add tailwind to storybook を見てコピペしました。
const path = require('path');

module.exports = {
  "stories": [
    "../src/**/*.stories.mdx",
    "../src/**/*.stories.@(js|jsx|ts|tsx)"
  ],
  "addons": [
    "@storybook/addon-links",
    "@storybook/addon-essentials",
    "@storybook/preset-create-react-app"
  ],
  webpackFinal: async (config) => {
    config.module.rules.push({
      test: /\,css&/,
      use: [
        {
          loader: 'postcss-loader',
          options: {
            ident: 'postcss',
            plugins: [
              require('tailwindcss'),
              require('autoprefixer')
            ]
          }
        }
      ],
      include: path.resolve(__dirname, '../'),
    })
    return config
  }
}
const path = require('path');を追加します。webpackFinal: async (config) => { ... }を追加します。
src/stories を削除する
src/stories に Storybook のサンプルが作成されていますが、不要なので削除します。
component のサンプルを作成して Storybook 上に表示する
src/components/sample ディレクトリを作成し、その下に ListItem.js、List.js の2つの component を作成します。
まずは ListItem.js から。以下の内容を記述します。
import React from 'react';

const ListItem = ({image, title, author}) => (
  <article className="p-2 flex space-x-4">
    <img className="flex-none w-16 h-16 rounded-lg" src={image} alt=""/>
    <div>
      <dl>
        <div>
          <dt className="sr-only">Title</dt>
          <dd className="text-2xl font-bold">{title}</dd>
        </div>
        <div className="mt-0.5">
          <dt className="sr-only">Author</dt>
          <dd className="text-sm font-semibold text-indigo-500">By {author}</dd>
        </div>
      </dl>
    </div>
  </article>
);

export default ListItem;
同じ階層に ListItem.stories.js を作成し、以下の内容を記述します。
import React from 'react';

import ListItem from './ListItem';
import dog from './dog.jpg';

export default {
  title: 'sample/ListItem',
  component: ListItem,
};

const Template = (args) => <ListItem {...args}/>;

export const Default = Template.bind({});
Default.args = {
  image: dog,
  title: 'サンプルブック1',
  author: '作者は犬',
};
Storybook で ListItem component を表示すると以下のように表示されました。

次は List.js。以下の内容を記述します。
import React from 'react';

import ListItem from "./ListItem";

const List = ({items}) => (
  <ul className="divide-y divide-gray-600">
    {items.map(item => (
      <ListItem key={item.title} {...item}/>
    ))}
  </ul>
);

export default List;
同じ階層に List.stories.js を作成し、以下の内容を記述します。
import React from 'react';

import List from './List';
import dog from './dog.jpg';
import cat from './cat.jpg';
import tiger from './tiger.jpg';

export default {
  title: 'sample/List',
  component: List,
};

const Template = (args) => <List {...args}/>;

export const Default = Template.bind({});
Default.args = {
  items: [
    {
      image: dog,
      title: 'サンプルブック1',
      author: '作者は犬',
    },
    {
      image: cat,
      title: 'サンプルブック2',
      author: '作者は猫',
    },
    {
      image: tiger,
      title: 'サンプルブック3',
      author: '作者はトラ',
    },
  ]
};
Storybook で List component を表示すると以下のように表示されました。

履歴
2021/04/17
初版発行。
2021/04/20
* yarn add babel-loader@8.1.0 → yarn add -D babel-loader@8.1.0 に変更しました。
* <ListItem {...item}/> → <ListItem key={item.title} {...item}/> に変更しました。
Spring Boot 2.3.x の Web アプリを 2.4.x へバージョンアップする ( その11 )( exclude junit-vintage-engine の記述を削除する+domaGen タスクで SQL ファイルが作成されない問題を解消する )
概要
記事一覧はこちらです。
感想 まで書きましたが、修正が必要な点を見つけたので反映します。
参照したサイト・書籍
目次
- build.gradle から
exclude group: "org.junit.vintage", module: "junit-vintage-engine"を削除する - domaGen タスクを実行した時に SQL ファイルを作成しない問題を解消する
手順
build.gradle から exclude group: "org.junit.vintage", module: "junit-vintage-engine" を削除する
JUnit 5’s Vintage Engine Removed from spring-boot-starter-test の記述があったのに build.gradle から不要な記述を削除するのを忘れていました。
build.gradle の testImplementation("org.springframework.boot:spring-boot-starter-test") に記述していた { exclude group: "org.junit.vintage", module: "junit-vintage-engine" } を削除します。
dependencies {
    ..........
    implementation("io.micrometer:micrometer-registry-prometheus")
    testImplementation("org.springframework.boot:spring-boot-starter-test")
    testImplementation("org.springframework.security:spring-security-test")
    ..........
}
domaGen タスクを実行した時に SQL ファイルを作成しない問題を解消する
新規テーブルを作成して domaGen タスクを実行したところ SQL ファイルを生成しないことに気づきました。domaCodeGenDbSql タスクを実行していないことが原因だったので追加します。
// beforeDomaCodeGen --> domaCodeGenDbEntity --> domaCodeGenDbDao --> domaCodeGenDbSql --> domaGen --> afterDomaCodeGen
domaCodeGenDbEntity.dependsOn beforeDomaCodeGen
domaCodeGenDbDao.dependsOn domaCodeGenDbEntity
domaCodeGenDbSql.dependsOn domaCodeGenDbDao
domaGen.dependsOn domaCodeGenDbSql
domaGen.finalizedBy afterDomaCodeGen
domaCodeGenDbSql.dependsOn domaCodeGenDbDaoを追加します。domaGen.dependsOn domaCodeGenDbDao→domaGen.dependsOn domaCodeGenDbSqlに変更します。
domaGen タスクの全体は以下のようになりました。
// for doma-codegen-plugin
// まず変更が必要なもの
def rootPackageName = "ksbysample.webapp.lending"
def rootPackagePath = "src/main/java/ksbysample/webapp/lending"
def dbUrl = "jdbc:postgresql://localhost/ksbylending"
def dbUser = "ksbylending_user"
def dbPassword = "xxxxxxxx"
def dbTableNamePattern = ".*"
// おそらく変更不要なもの
def packageEntityPath = rootPackagePath + "/entity"
def packageDaoPath = rootPackagePath + "/dao"
def importOfComponentAndAutowiredDomaConfig = "${rootPackageName}.util.doma.ComponentAndAutowiredDomaConfig"
def workPath = "work"
def workEntityPath = "${workPath}/entity"
def workDaoPath = "${workPath}/dao"
task domaGen(group: "doma code generation") {
    // このタスク自体は何もしない。実行する時の起点用タスクとして作成している。
}
task beforeDomaCodeGen {
    doLast {
        // 作業用ディレクトリを削除する
        delete "${workPath}"

        // 現在の dao, entity パッケージのバックアップを取得する
        copy() {
            from "${packageDaoPath}"
            into "${workDaoPath}/org"
        }
        copy() {
            from "${packageEntityPath}"
            into "${workEntityPath}/org"
        }

        // dao, entity パッケージを削除する
        delete "${packageDaoPath}"
        delete "${packageEntityPath}"
    }
}
domaCodeGen {
    db {
        url = "${dbUrl}"
        user = "${dbUser}"
        password = "${dbPassword}"
        tableNamePattern = "${dbTableNamePattern}"
        ignoredTableNamePattern = "flyway_schema_history|SPRING_SESSION.*"
        entity {
            packageName = "${rootPackageName}.entity"
            useListener = false
            useMappedSuperclass = false
        }
        dao {
            packageName = "${rootPackageName}.dao"
        }
    }
}
task afterDomaCodeGen {
    doLast {
        // 生成された Entity クラスを作業用ディレクトリにコピーし、
        // @SuppressWarnings({"PMD.TooManyFields"}) アノテーションを付加する
        copy() {
            from "${packageEntityPath}"
            into "${workEntityPath}/replace"
            filter {
                line ->
                    line.replaceAll('@Entity', '@SuppressWarnings({"PMD.TooManyFields"})\n@Entity')
            }
        }

        // 生成された Dao インターフェースからバックアップにあるクラスを削除する
        // ※生成済の Dao インターフェースを再生成したい場合には事前に削除すること!
        for (workDaoFile in new File("${workDaoPath}/org").listFiles()) {
            def packageDaoFile = new File("${packageDaoPath}/${workDaoFile.name}")
            if (packageDaoFile.exists()) {
                packageDaoFile.delete()
            }
        }

        // 生成された Dao インターフェースを作業用ディレクトリにコピーし、
        // @ComponentAndAutowiredDomaConfig アノテーションを付加し、
        // Javadoc の @param に説明文を追加する
        copy() {
            from "${packageDaoPath}"
            into "${workDaoPath}/replace"
            filter {
                line ->
                    line.replaceAll('import org.seasar.doma.Dao;', "import ${importOfComponentAndAutowiredDomaConfig};\nimport org.seasar.doma.Dao;")
                            .replaceAll('@Dao', '@Dao\n@ComponentAndAutowiredDomaConfig')
                            .replaceAll('@param (\\S+)$', '@param $1 $1')
            }
        }

        // 元々 dao, entity パッケージ内にあったファイルを元に戻す
        copy() {
            from "${workDaoPath}/org"
            into "${packageDaoPath}"
        }
        copy() {
            from "${workEntityPath}/org"
            into "${packageEntityPath}"
        }

        // @ComponentAndAutowiredDomaConfig アノテーションを付加した Dao インターフェースを
        // dao パッケージへ戻す
        copy() {
            from "${workDaoPath}/replace"
            into "${packageDaoPath}"
        }

        // @SuppressWarnings({"PMD.TooManyFields"}) アノテーションを付加した Entity クラスを
        // entity パッケージへ戻す
        copy() {
            from "${workEntityPath}/replace"
            into "${packageEntityPath}"
        }

        // 作業用ディレクトリを削除する
        delete "${workPath}"
    }
}
// beforeDomaCodeGen --> domaCodeGenDbEntity --> domaCodeGenDbDao --> domaCodeGenDbSql --> domaGen --> afterDomaCodeGen
domaCodeGenDbEntity.dependsOn beforeDomaCodeGen
domaCodeGenDbDao.dependsOn domaCodeGenDbEntity
domaCodeGenDbSql.dependsOn domaCodeGenDbDao
domaGen.dependsOn domaCodeGenDbSql
domaGen.finalizedBy afterDomaCodeGen
履歴
2021/04/13
初版発行。
Antora で生成するドキュメントサイトに antora-lunr で検索機能を追加する
概要
記事一覧はこちらです。
antora-lunr を使うと antora で生成するドキュメントサイトに検索機能を追加できると聞いたので、試してみます。
参照したサイト・書籍
Mogztter / antora-lunr
https://github.com/Mogztter/antora-lunrMogztter / antora-site-generator-lunr
https://github.com/Mogztter/antora-site-generator-lunrlunr-languages
https://www.npmjs.com/package/lunr-languagesMihaiValentin / lunr-languages
https://github.com/MihaiValentin/lunr-languagesLANGUAGE SUPPORT
https://lunrjs.com/guides/language_support.html
目次
npm install --save-dev antora-site-generator-lunrを実行する- ドキュメントサイトを生成して検索機能を試してみる
DOCSEARCH_LANGS=en,jaやDOCSEARCH_LANGS=jaを指定してもダメでした。。。- lunr-languages をインストールして日本語で検索できるようにする
DOCSEARCH_INDEX_VERSION=latestを指定して最新バージョンのドキュメントだけ index が生成されるようにする
手順
npm install --save-dev antora-site-generator-lunr を実行する
antora-lunr のドキュメントを読むと、簡単に導入するのであれば antora-site-generator-lunr をインストールすればよいとのこと。
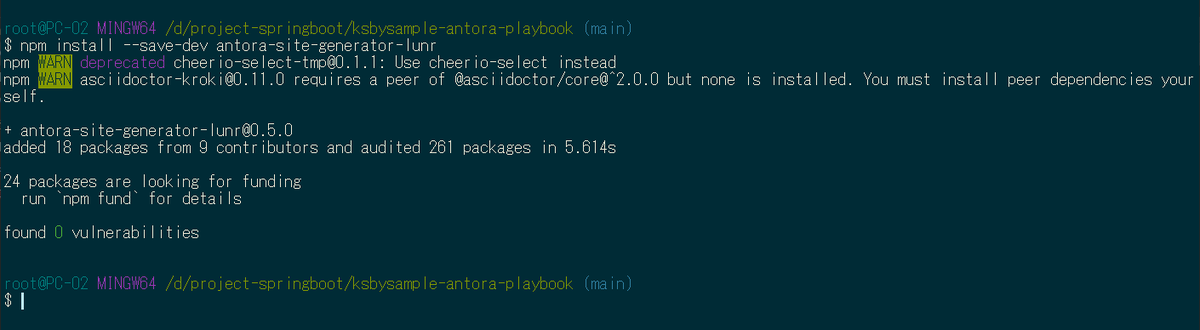
ksbysample-antora-playbook プロジェクトで npm install --save-dev antora-site-generator-lunr を実行して antora-site-generator-lunr をインストールします。
ドキュメントサイトに search component を表示するために antora-playbook.yml を以下のように変更します。
..........
ui:
  bundle:
    url: https://gitlab.com/antora/antora-ui-default/-/jobs/artifacts/master/raw/build/ui-bundle.zip?job=bundle-stable
    snapshot: true
  supplemental_files: ./node_modules/antora-lunr/supplemental_ui

..........
supplemental_files: ./node_modules/antora-lunr/supplemental_uiを追加します。
ドキュメントサイトを生成して検索機能を試してみる
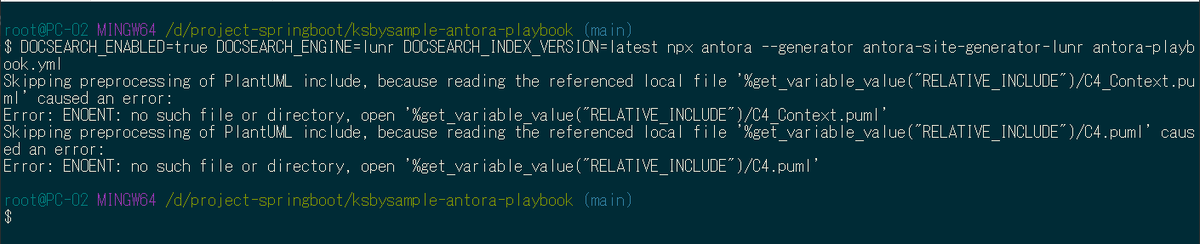
build ディレクトリを削除してから DOCSEARCH_ENABLED=true DOCSEARCH_ENGINE=lunr npx antora --generator antora-site-generator-lunr antora-playbook.yml を実行します。

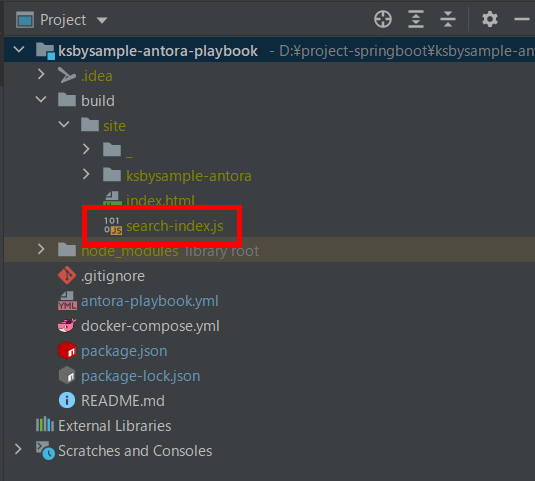
生成された build ディレクトリを見ると build/site/search-index.js が生成されています。
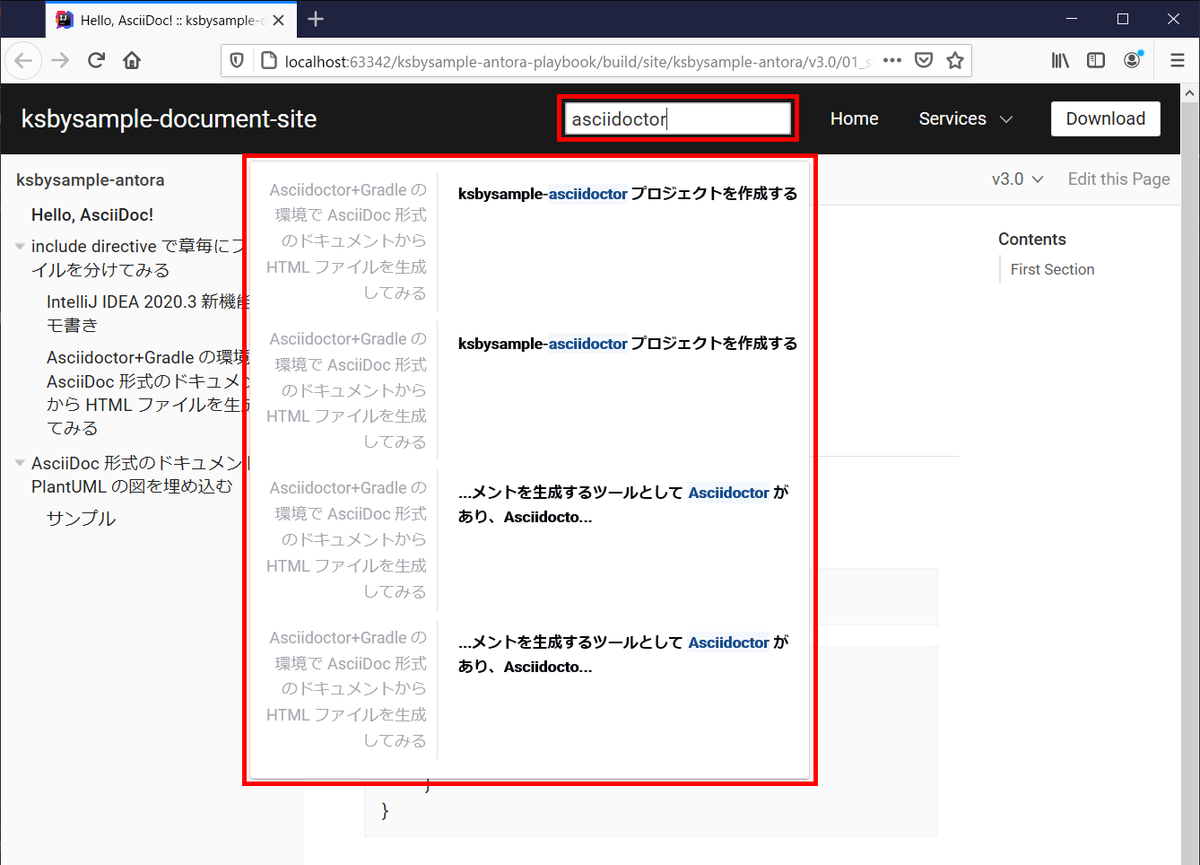
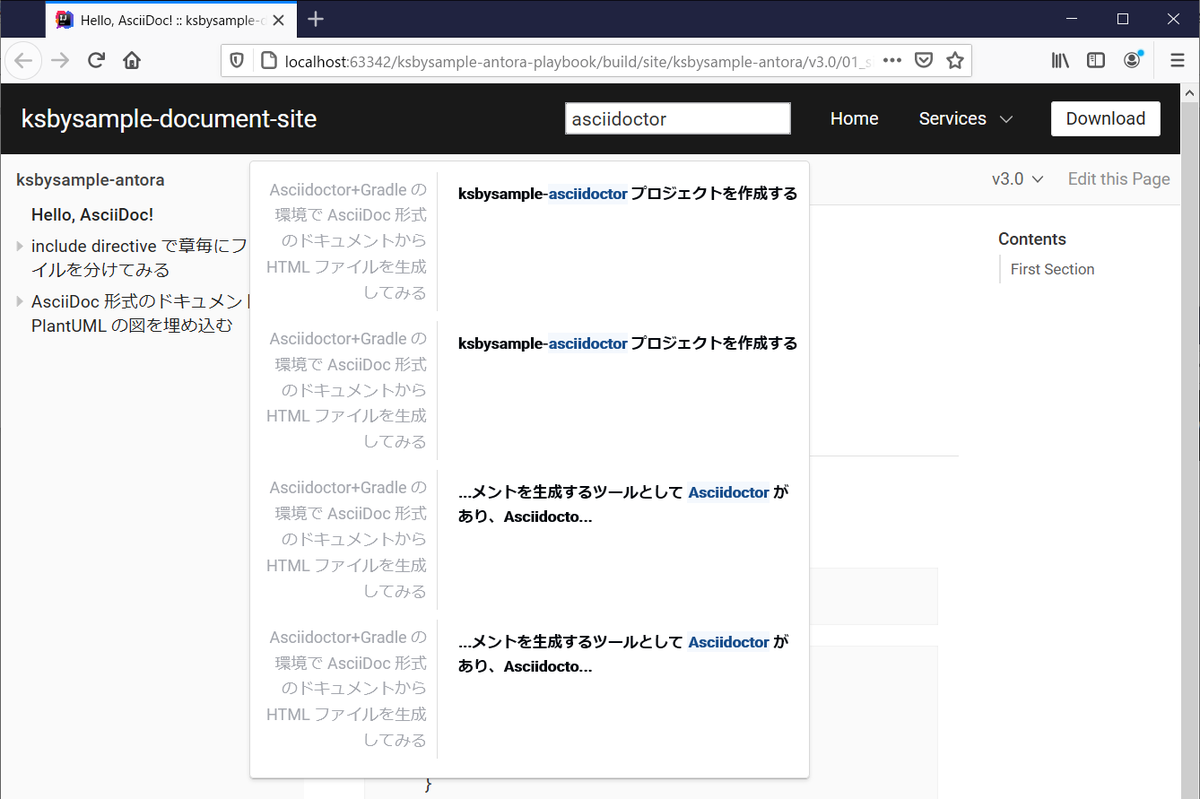
build/site/index.html をブラウザで開くと search component が画面上部に表示されて、asciidoctor と入力すると検索結果が表示されました! ただし結果が2重に表示されています。
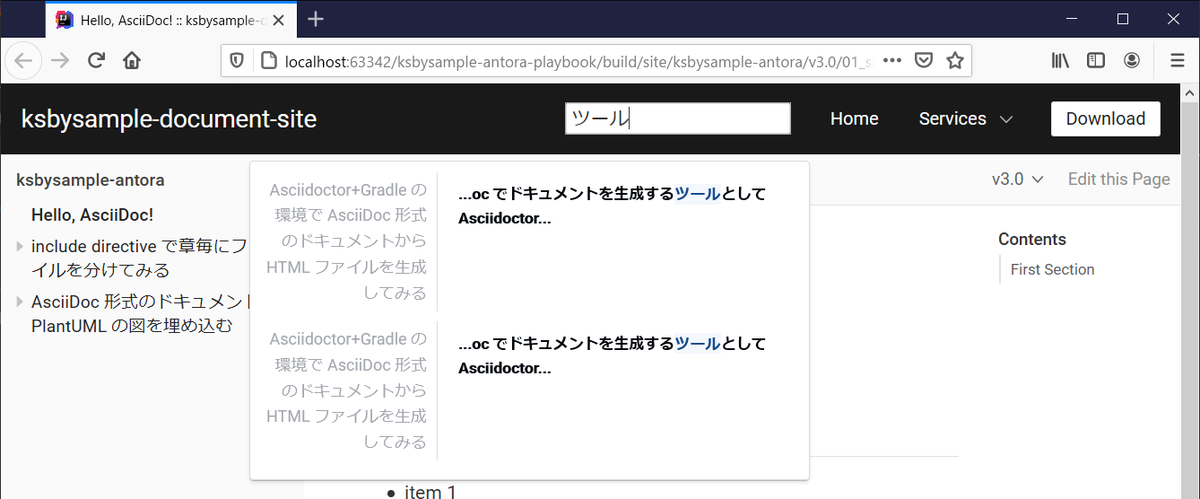
また日本語で ツール と入力すると何もヒットしませんでした。

DOCSEARCH_LANGS=en,ja や DOCSEARCH_LANGS=ja を指定してもダメでした。。。
Support for other languages の記述があったので、DOCSEARCH_LANGS=en,ja を追加して DOCSEARCH_ENABLED=true DOCSEARCH_ENGINE=lunr DOCSEARCH_LANGS=en,ja npx antora --generator antora-site-generator-lunr antora-playbook.yml でドキュメントサイトを生成し直してみましたが、

結果は変わりませんでした。

DOCSEARCH_LANGS=ja に変更しても結果は変わらず。
lunr-languages をインストールして日本語で検索できるようにする
lunr を日本語で検索できるようにするには lunr-languages をインストールすればよいとの記事を見かけたので、インストールして日本語が検索できるようにしてみます。
まずは npm install --save-dev lunr-languages を実行して lunr-languages をインストールします。

In a web browser に従い、node_modules/antora-lunr/lib/generate-index.js を以下のように変更します。
'use strict'

const lunr = require('lunr')
require("lunr-languages/lunr.stemmer.support")(lunr)
require('lunr-languages/tinyseg')(lunr)
require("lunr-languages/lunr.ja")(lunr)
const cheerio = require('cheerio')
const Entities = require('html-entities').AllHtmlEntities
const entities = new Entities()

..........

  const lunrIndex = lunr(function () {
    const self = this
    self.use(lunr.ja)
    self.ref('url')
    ..........
- 以下の3行を追加します。
require("lunr-languages/lunr.stemmer.support")(lunr)require('lunr-languages/tinyseg')(lunr)require("lunr-languages/lunr.ja")(lunr)
lunr(function () { ... }の中に以下の1行を追加します。self.use(lunr.ja)
DOCSEARCH_ENABLED=true DOCSEARCH_ENGINE=lunr npx antora --generator antora-site-generator-lunr antora-playbook.yml を実行します。

日本語で ツール と入力すると今度は検索結果が表示されました!
asciidoctor と入力しても検索結果が表示されます。日本語以外を入力しても問題ないようです。
DOCSEARCH_INDEX_VERSION=latest を指定して最新バージョンのドキュメントだけ index が生成されるようにする
検索結果が2重に表示されたのは v3.0 と v2.0 の2つのバージョンのドキュメントで index が生成されているためでした。Index only the latest version の記述がありましたので、DOCSEARCH_INDEX_VERSION=latest を追加して最新バージョンのドキュメントのみ index が生成されるようにします。
最初は DOCSEARCH_INDEX_VERSION=v3.0 と index を生成したい tag を指定するのかと思ったのですが、この設定では結果は何も変わらず、DOCSEARCH_INDEX_VERSION=latest と指定する必要がありました。
DOCSEARCH_ENABLED=true DOCSEARCH_ENGINE=lunr DOCSEARCH_INDEX_VERSION=latest npx antora --generator antora-site-generator-lunr antora-playbook.yml を実行します。
日本語で ツール と入力すると今度は検索結果が1件だけ表示されました。

履歴
2021/03/29
初版発行。
IntelliJ IDEA を 2020.3.2 → 2020.3.3 へ、Git for Windows を 2.30.0.2 → 2.31.0 へバージョンアップ
IntelliJ IDEA を 2020.3.2 → 2020.3.3 へバージョンアップする
IntelliJ IDEA の 2020.3.3 がリリースされているのでバージョンアップします。
- IntelliJ IDEA 2020.3.3 Is Available
https://blog.jetbrains.com/idea/2021/03/intellij-idea-2020-3-3/
※ksbysample-webapp-lending プロジェクトを開いた状態でバージョンアップしています。
IntelliJ IDEA のメインメニューから「Help」-「Check for Updates...」を選択します。
「IntelliJ IDE and Plugin Updates」ダイアログが表示されます。右下に「Update and Restart」ボタンが表示されていますので、「Update and Restart」ボタンをクリックします。

Plugin の update も表示されました。このまま「Update and Restart」ボタンをクリックします。

Patch がダウンロードされて IntelliJ IDEA が再起動します。
IntelliJ IDEA が起動すると画面下部に「Indexing」のメッセージが表示されますので、終了するまで待機します。
IntelliJ IDEA のメインメニューから「Help」-「About」を選択し、2020.3.3 へバージョンアップされていることを確認します。
clean タスク実行 → Rebuild Project 実行 → build タスクを実行して、"BUILD SUCCESSFUL" のメッセージが出力されることを確認します。

Project Tool Window で src/test でコンテキストメニューを表示して「More Run/Debug」-「Run 'All Tests' with Coverage」を選択し、テストが全て成功することを確認します。

Git for Windows を 2.30.0.2 → 2.31.0 へバージョンアップする
Git for Windows の 2.31.0 がリリースされていたのでバージョンアップします。
https://gitforwindows.org/ の「Download」ボタンをクリックして Git-2.31.0-64-bit.exe をダウンロードします。
Git-2.31.0-64-bit.exe を実行します。
「Git 2.31.0 Setup」ダイアログが表示されます。インストーラーの画面を一通り見たいので「Only show new options」のチェックを外してから [Next >] ボタンをクリックします。
「Select Components」画面が表示されます。「Git LFS(Large File Support)」だけチェックした状態で [Next >]ボタンをクリックします。
「Choosing the default editor used by Git」画面が表示されます。「Use Vim (the ubiquitous text editor) as Git's default editor」が選択された状態で [Next >]ボタンをクリックします。
「Adjusting the name of the initial branch in new repositories」画面が表示されます。「Let Git decide」が選択されていることを確認後、[Next >]ボタンをクリックします。
「Adjusting your PATH environment」画面が表示されます。中央の「Git from the command line and also from 3rd-party software」が選択されていることを確認後、[Next >]ボタンをクリックします。
「Choosing HTTPS transport backend」画面が表示されます。「Use the OpenSSL library」が選択されていることを確認後、[Next >]ボタンをクリックします。
「Configuring the line ending conversions」画面が表示されます。一番上の「Checkout Windows-style, commit Unix-style line endings」が選択されていることを確認した後、[Next >]ボタンをクリックします。
「Configuring the terminal emulator to use with Git Bash」画面が表示されます。「Use Windows'default console window」が選択されていることを確認した後、[Next >]ボタンをクリックします。
「Choose the default behavior of
git pull」画面が表示されます。「Default (fast-forward or merge)」が選択されていることを確認した後、[Next >]ボタンをクリックします。「Choose a credential helper」画面が表示されます。「None」が選択されていることを確認した後、[Next >]ボタンをクリックします。
「Configuring extra options」画面が表示されます。「Enable file system caching」だけがチェックされていることを確認した後、[Next >]ボタンをクリックします。
「Configuring experimental options」画面が表示されます。何もチェックせずに [Install]ボタンをクリックします。
インストールが完了すると「Completing the Git Setup Wizard」のメッセージが表示された画面が表示されます。中央の「View Release Notes」のチェックを外した後、[Next >]ボタンをクリックしてインストーラーを終了します。
コマンドプロンプトを起動して
git --versionを実行し、git のバージョンがgit version 2.31.0.windows.1になっていることを確認します。
特に問題はないようですので、2.31.0 で作業を進めたいと思います。
springdoc-openapi メモ書き
概要
記事一覧はこちらです。
springdoc-openapi を試した時のメモ書きです。
参照したサイト・書籍
Documenting Spring Boot Rest API With OpenAPI 3.0
https://tebatso191.medium.com/documenting-spring-boot-rest-api-with-openapi-3-0-a49be5e836adspringdoc-openapi
https://springdoc.org/Springdoc-openapi Demos
https://springdoc.org/#demosspringdoc / springdoc-openapi-demos
https://github.com/springdoc/springdoc-openapi-demosOpenAPI Specification
https://swagger.io/specification/API Documentation & Design Tools for Teams | Swagger
https://swagger.io/springdoc / springdoc-openapi-gradle-plugin
https://github.com/springdoc/springdoc-openapi-gradle-pluginOpenAPI (Swagger) 超入門
https://qiita.com/teinen_qiita/items/e440ca7b1b52ec918f1bSwagger(OAS) 3.0の登場
https://news.mynavi.jp/itsearch/article/devsoft/3854Swagger ではない OpenAPI Specification 3.0 による API サーバー開発
https://www.slideshare.net/techblogyahoo/swagger-openapi-specification-30-api
目次
- WebAPI を提供する Web アプリを作成する
- springdoc-openapi-ui を依存関係に追加し、application.properties に設定を追加する
- @SpringBootApplication 付与クラスに @OpenAPIDefinition アノテーションを付与して API の情報を表示する
- @RestController 付与クラスに @Tag、@Operation、@ApiResponses 等のアノテーションを付与して REST API の情報を表示する
- @RestControllerAdvice 付与クラスの @ExceptionHandler を付与したメソッドが UI に表示されないようにする
- POJO クラスに @Schema アノテーションを付与して UI の Schemas に表示される情報を追加する
- Swagger Petstore のページが表示されないようにする
- /api-docs にアクセスすると JSON の、/api-docs.yaml にアクセスすると YAML の OpenAPI ドキュメントがダウンロードできる
- 最後に
手順
WebAPI を提供する Web アプリを作成する
Web アプリを作成して ksbysample-springdoc-openapi-sample に入れます。
springdoc-openapi-ui を依存関係に追加し、application.properties に設定を追加する
まず build.gradle を変更します。
dependencies {
    ..........

    // dependency-management-plugin によりバージョン番号が自動で設定されないもの、あるいは最新バージョンを指定したいもの
    implementation("org.springdoc:springdoc-openapi-ui:1.5.5")
    testImplementation("net.javacrumbs.json-unit:json-unit-spring:2.25.0")

    ..........
implementation("org.springdoc:springdoc-openapi-ui:1.5.5")を追加します。
src/main/resources/application.properties を以下のように変更します。
server.port=9080

springdoc.api-docs.path=/api-docs
springdoc.swagger-ui.path=/swagger-ui.html
- 以下の2行を追加します。springdoc.swagger-ui.path の方は default 値と同じ設定なので記述しなくてもよいのですが、書いておいた方が URL を思い出しやすいかなと思い明記しています。springdoc.api-docs.path も default の /v3/api-docs のままでよければ書く必要はありません。
springdoc.api-docs.path=/api-docsspringdoc.swagger-ui.path=/swagger-ui.html
server.port=9080を設定しているのは default の 8080 以外の場合の動作を確認するためです(実際には何もすることはありませんでした)。
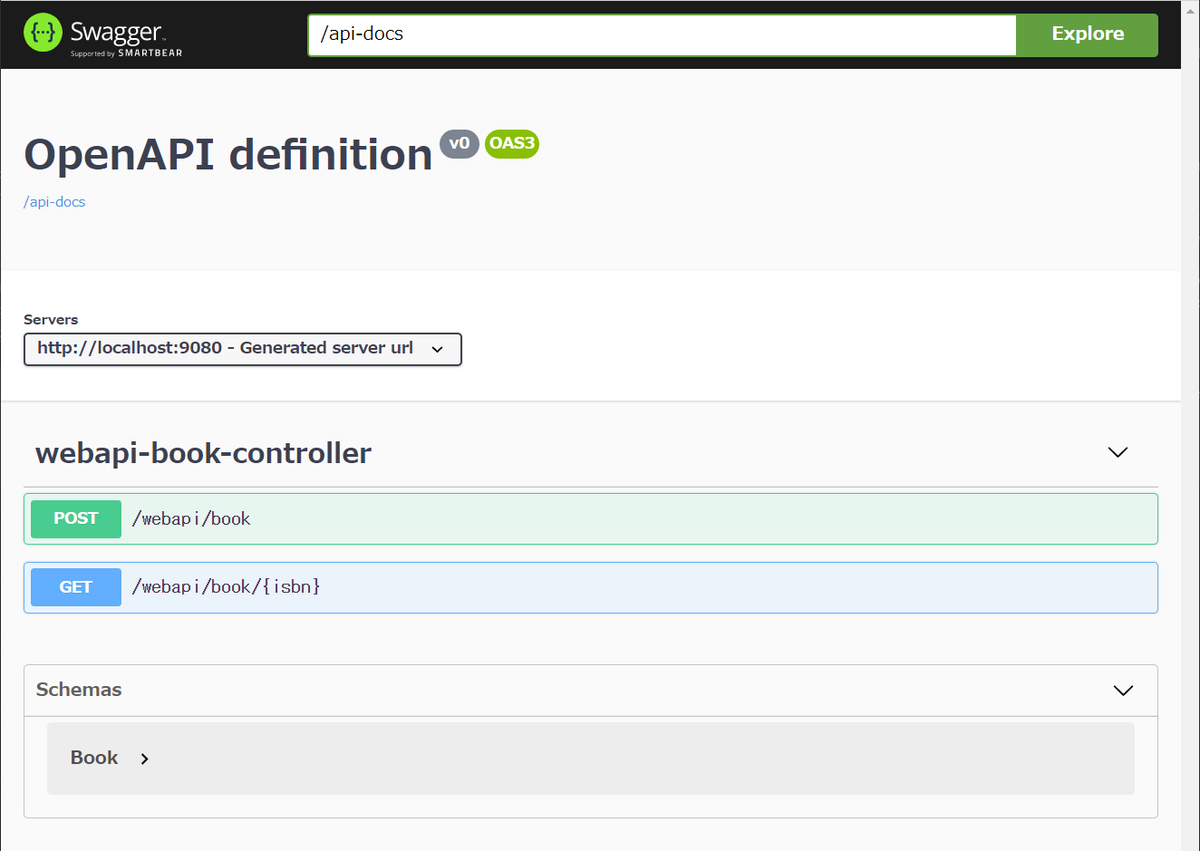
Web アプリを起動して http://localhost:9080/swagger-ui.html にアクセスすると以下の画面が表示されます。タイトルが OpenAPI definition で、バージョンが v0、その下の endpoint や Schemas には何も説明がついていない状態です。
@SpringBootApplication 付与クラスに @OpenAPIDefinition アノテーションを付与して API の情報を表示する
src/main/java/ksbysample/webapp/springdocsample/SpringdocSampleApplication.java に @OpenAPIDefinition アノテーションを付与します。
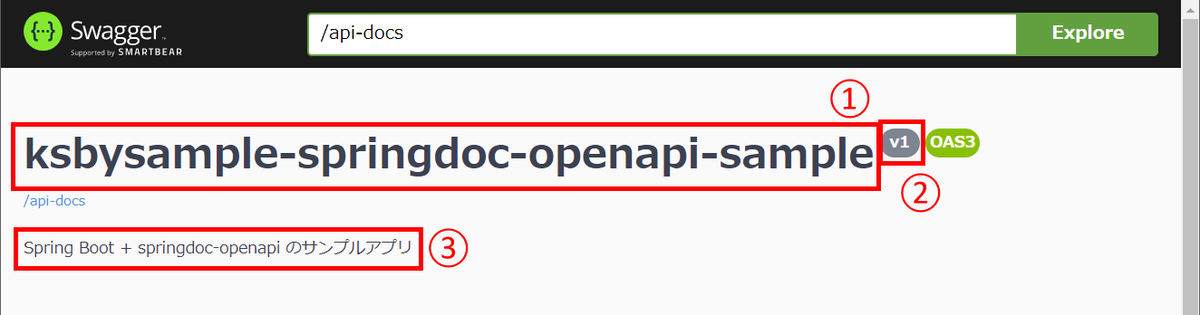
package ksbysample.webapp.springdocsample;

import io.swagger.v3.oas.annotations.OpenAPIDefinition;
import io.swagger.v3.oas.annotations.info.Info;
import org.springframework.boot.SpringApplication;
import org.springframework.boot.autoconfigure.SpringBootApplication;

@SpringBootApplication
@OpenAPIDefinition(info = @Info(title = "ksbysample-springdoc-openapi-sample",  // (1)
        description = "Spring Boot + springdoc-openapi のサンプルアプリ",  // (2)
        version = "v1"))  // (3)
public class SpringdocSampleApplication {

    ..........
@OpenAPIDefinition アノテーションの各属性の記述は UI の以下の場所に表示されます。
@RestController 付与クラスに @Tag、@Operation、@ApiResponses 等のアノテーションを付与して REST API の情報を表示する
src/main/java/ksbysample/webapp/springdocsample/webapi/book/WebapiBookController.java に @Tag、@Operation、@ApiResponses 等のアノテーションを付与します。
package ksbysample.webapp.springdocsample.webapi.book;

import io.swagger.v3.oas.annotations.Operation;
import io.swagger.v3.oas.annotations.Parameter;
import io.swagger.v3.oas.annotations.media.Content;
import io.swagger.v3.oas.annotations.media.Schema;
import io.swagger.v3.oas.annotations.responses.ApiResponse;
import io.swagger.v3.oas.annotations.responses.ApiResponses;
import io.swagger.v3.oas.annotations.tags.Tag;
import ksbysample.webapp.springdocsample.exception.BookInvalidException;
import ksbysample.webapp.springdocsample.exception.BookNotFoundException;
import lombok.extern.slf4j.Slf4j;
import org.springframework.validation.BindingResult;
import org.springframework.validation.annotation.Validated;
import org.springframework.web.bind.annotation.*;

@Slf4j
@RestController
@RequestMapping("/webapi/book")
@Tag(name = "Book", description = "the Book API")
public class WebapiBookController {

    ..........

    @Operation(summary = "Book データを登録する",
            description = "Book データを受け取ってリストに追加する")
    @ApiResponses(value = {
            @ApiResponse(responseCode = "200", description = "成功"),
            @ApiResponse(responseCode = "405", description = "入力チェックエラー")
    })
    @PostMapping
    public void add(
            @io.swagger.v3.oas.annotations.parameters.RequestBody(description = "Book データ")
            @Validated @RequestBody Book book,
            BindingResult bindingResult) {
        ..........
    }

    @Operation(summary = "Book データを検索する",
            description = "指定された ISBN の Book データを検索する")
    @ApiResponses(value = {
            @ApiResponse(responseCode = "200", description = "成功",
                    content = @Content(mediaType = "application/json", schema = @Schema(implementation = Book.class))),
            @ApiResponse(responseCode = "404", description = "指定された ISBN の Book データが存在しない",
                    content = @Content)
    })
    @GetMapping("/{isbn}")
    public Book findByIsbn(
            @Parameter(required = true, description = "ISBN-13", example = "978-4873119038")
            @PathVariable String isbn) {
        ..........
    }

}
- class に
@Tagアノテーションを付与します。 - add メソッド、findByIsbn メソッドに
@Operation、@ApiResponsesアノテーションを付与します。 - add メソッドの引数 book に
@io.swagger.v3.oas.annotations.parameters.RequestBodyアノテーションを付与します。 - findByIsbn メソッドの引数 isbn に
@Parameterアノテーションを付与します。
API が以下のように表示されます。
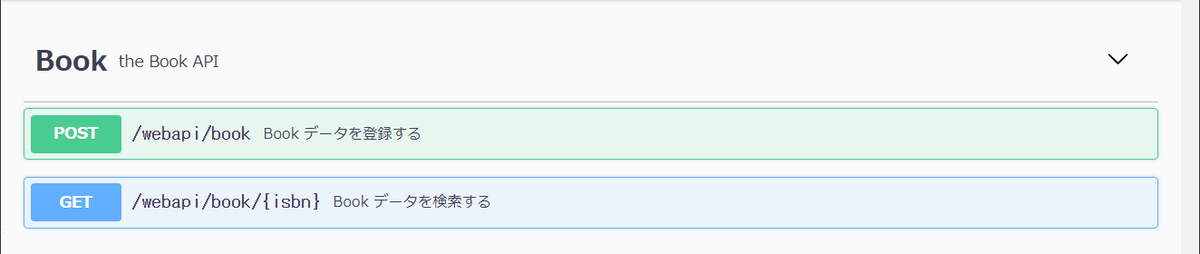
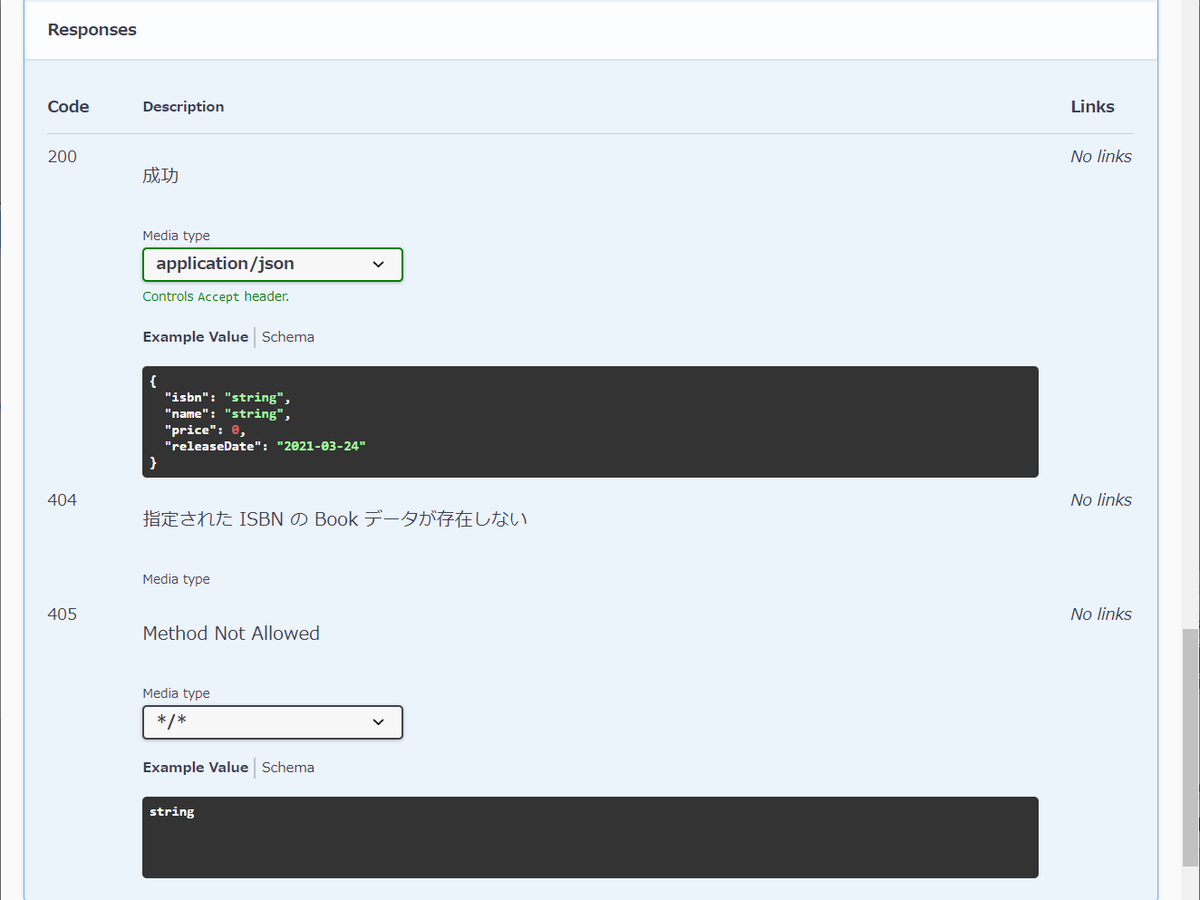
/webapi/book API は以下のように表示されます。Response に @ApiResponses に記述していない 404 が表示されていますが、これは @RestControllerAdvice クラスに定義したものが表示されているからです。この後に表示されないように記述を追加します。


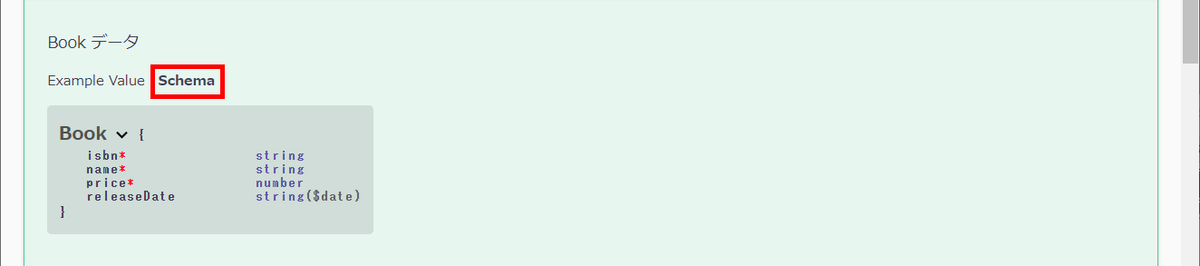
Request body の Book データの Schema タブをクリックすると以下の表示に切り替わります。
/webapi/book/{isbn} API は以下のように表示されます。こちらは不要な 405 が表示されています。

@RestControllerAdvice 付与クラスの @ExceptionHandler を付与したメソッドが UI に表示されないようにする
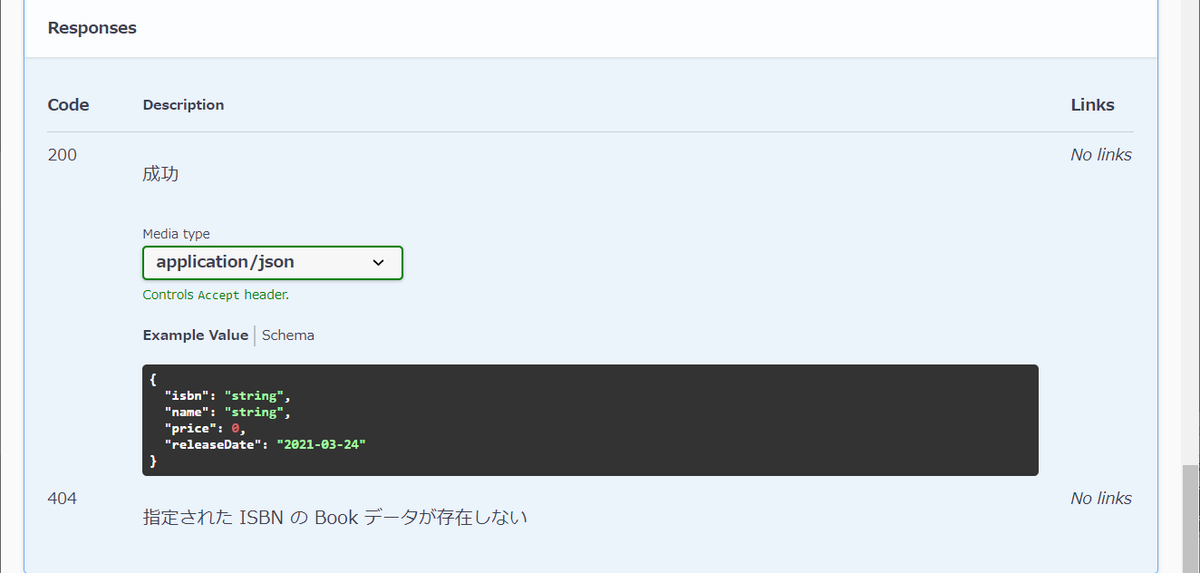
@RestControllerAdvice 付与クラスの @ExceptionHandler を付与したメソッドの情報が各 API の Responses に表示されますが、今回は不要なので class に @Hide アノテーションを付与して表示されないようにします。
package ksbysample.webapp.springdocsample.webapi.book;

import io.swagger.v3.oas.annotations.Hidden;
import ksbysample.webapp.springdocsample.exception.BookInvalidException;
import ksbysample.webapp.springdocsample.exception.BookNotFoundException;
import org.springframework.http.HttpStatus;
import org.springframework.http.ResponseEntity;
import org.springframework.web.bind.annotation.ExceptionHandler;
import org.springframework.web.bind.annotation.ResponseStatus;
import org.springframework.web.bind.annotation.RestControllerAdvice;

/**
 * WebAPI 用 Error Handler クラス
 */
@RestControllerAdvice
@Hidden
public class WebapiBookErrorHandler {

    ..........
各 API の Responses の表示が以下のようになります。

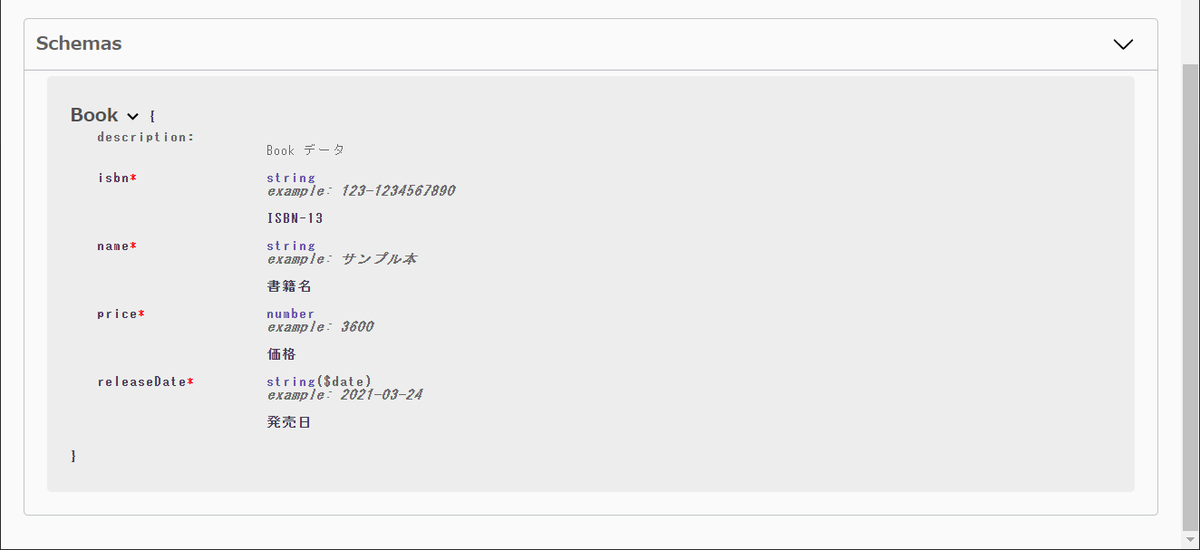
POJO クラスに @Schema アノテーションを付与して UI の Schemas に表示される情報を追加する
src/main/java/ksbysample/webapp/springdocsample/webapi/book/Book.java に @Schema アノテーションを付与します。
package ksbysample.webapp.springdocsample.webapi.book;

import io.swagger.v3.oas.annotations.media.Schema;
import lombok.*;

import javax.validation.constraints.NotBlank;
import javax.validation.constraints.NotNull;
import java.math.BigDecimal;
import java.time.LocalDate;

/**
 * Book データクラス
 */
@Data
@NoArgsConstructor
@AllArgsConstructor
@Builder
@ToString
@Schema(description = "Book データ")
public class Book {

    @NotBlank
    @Schema(type = "string", required = true, description = "ISBN-13", example = "123-1234567890")
    private String isbn;

    @NotBlank
    @Schema(type = "string", required = true, description = "書籍名",
            example = "サンプル本")
    private String name;

    @NotNull
    @Schema(type = "number", required = true, description = "価格", example = "3600")
    private BigDecimal price;

    @Schema(type = "string", format="date", required = true, description = "発売日", example = "2021-03-24")
    private LocalDate releaseDate;

}
UI の Schemas に以下のように表示されます。
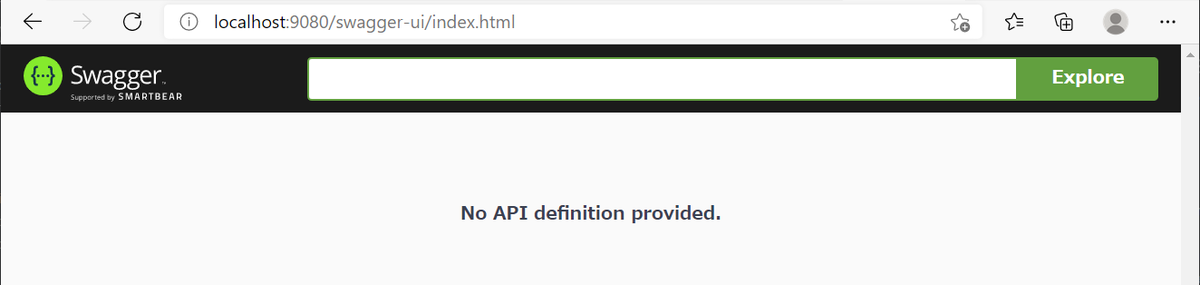
Swagger Petstore のページが表示されないようにする
UI が表示されているブラウザのアドレスバーの URL http://localhost:9080/swagger-ui/index.html?configUrl=/api-docs/swagger-config から ?configUrl=/api-docs/swagger-config を取り除くと Swagger Petstore の情報が表示されます。
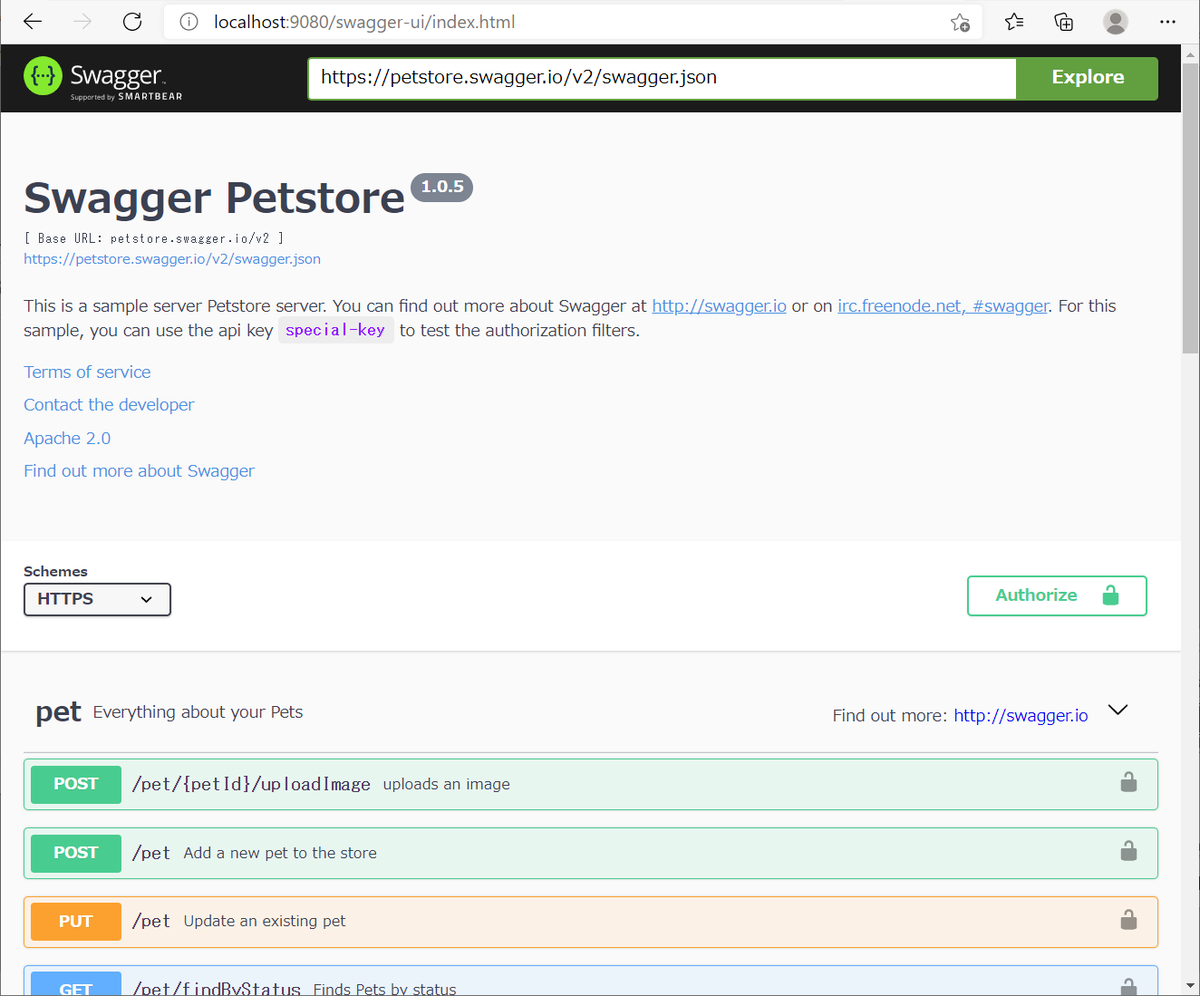
表示させたくない場合、application.properties に springdoc.swagger-ui.disable-swagger-default-url=true を追加します。
server.port=9080

springdoc.api-docs.path=/api-docs
springdoc.swagger-ui.disable-swagger-default-url=true
springdoc.swagger-ui.path=/swagger-ui.html
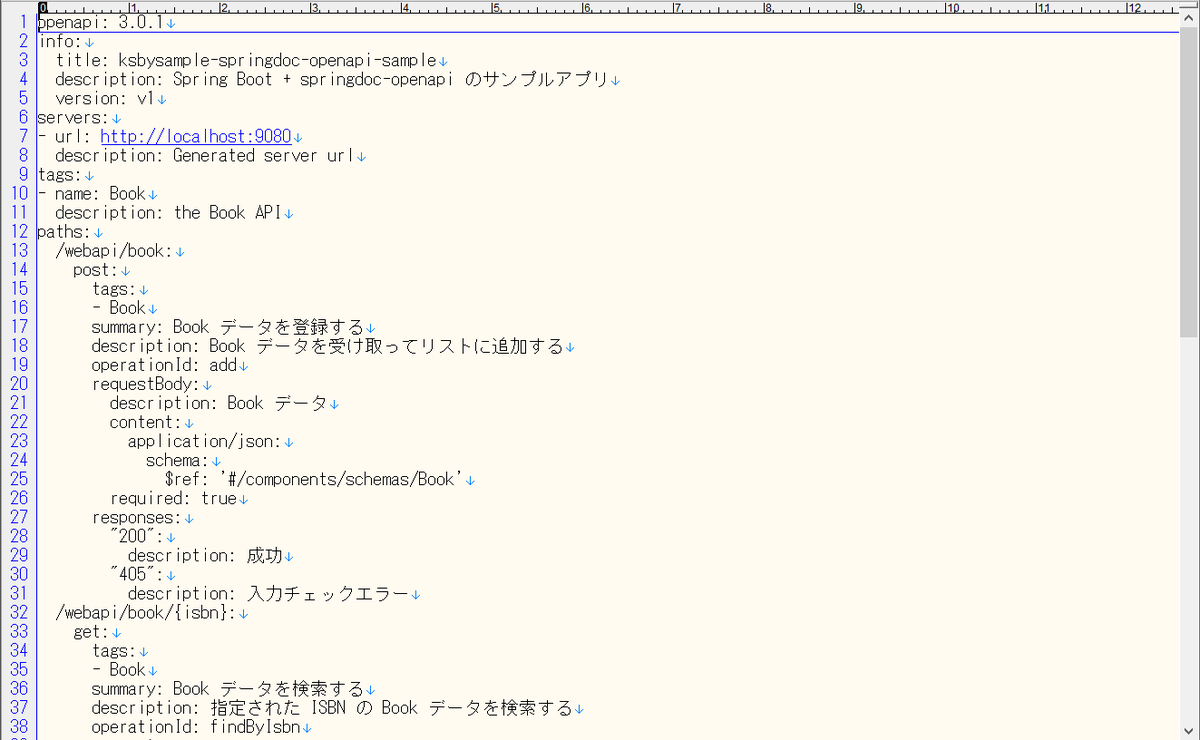
/api-docs にアクセスすると JSON の、/api-docs.yaml にアクセスすると YAML の OpenAPI ドキュメントがダウンロードできる
http://localhost:9080/api-docs にアクセスすると JSON の OpenAPI ドキュメントが表示され、
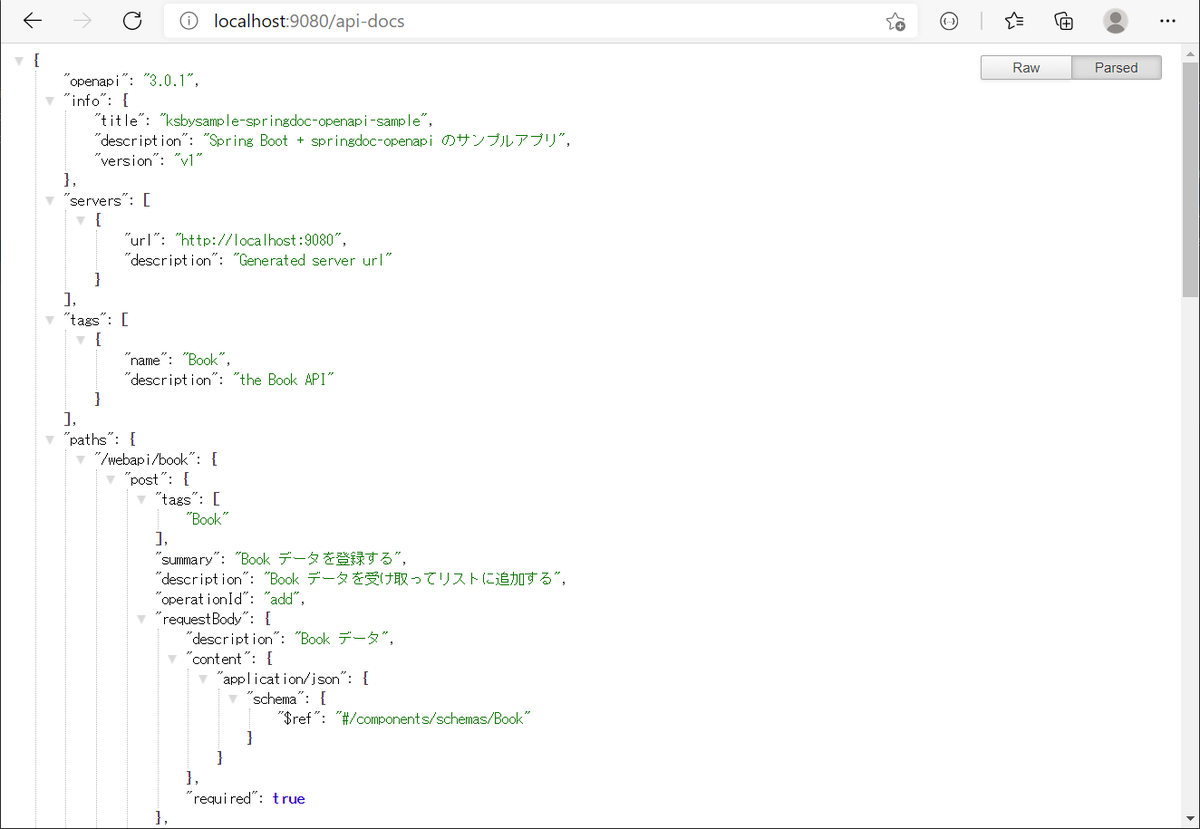
http://localhost:9080/api-docs.yaml にアクセスすると YAML の OpenAPI ドキュメントがダウンロードできます。
最後に
他にも以下のようなことができる(らしい)。テストは試してみましたが、下の2つは記事を見かけただけです。
- UI からテストがやりやすい。
- OpenAPI ドキュメントからソースコードを自動生成できる。
- AWS API Gateway の API 作成でも OpenAPI ドキュメントが使える。Configuring a REST API using OpenAPI。
今回の変更内容はこちらです。
https://github.com/ksby/ksbysample-springdoc-openapi-sample/compare/before...after
履歴
2021/03/25
初版発行。
2021/03/27
* 最後に に今回変更した点が分かるリンクを追加しました。
Spring Boot 2.3.x の Web アプリを 2.4.x へバージョンアップする ( 感想 )
記事一覧はこちらです。
Spring Boot 2.4 Release Notes と What's New in Version 5.3 には結構記述があるのですが、アプリに直接影響が出る変更がなく今回はバージョンアップするだけで終わりました。
Config File Processing (application properties and YAML files) の変更は記事を書く前から聞いていたので身構えていたのですが、ドキュメントを読むと使っていない機能に関する変更だったので影響ありませんでした。調べている時に見つけた関連しそうなリンクをメモっておきます。
- Config file processing in Spring Boot 2.4
https://spring.io/blog/2020/08/14/config-file-processing-in-spring-boot-2-4 - Spring Boot Config Data Migration Guide
https://github.com/spring-projects/spring-boot/wiki/Spring-Boot-Config-Data-Migration-Guide - Configure a Pod to Use a ConfigMap
https://kubernetes.io/docs/tasks/configure-pod-container/configure-pod-configmap/
- Config file processing in Spring Boot 2.4
これまでバージョンアップした時には追加されている Common Application properties(昔からのクセで Google で検索する時は
spring boot appendix aを入力していますね。。。) は Release Notes に記述がなければ特にチェックしていなかったのですが、2.3 から spring.redis.lettuce.cluster.refresh.period が追加されて Lettuce を利用する Redis Cluster 用の RedisConnectionFactory Bean を自分で定義する必要がなくなっていました(設定ファイルだけでよくなった)。今後は org.springframework.boot:spring-boot-autoconfigure の META-INF/spring-configuration-metadata.json をチェックすることにします。概要 で「今回のバージョンアップで Redis 6+lettuce-core 6 の構成になるので、Redis 6 の新機能を試してみます。 」と書いていたのですが、一番興味があった Client-side caching の機能を試そうとしたら lettuce-core の Issue に Investigate for Client-side caching using Redis Cluster and Master/Replica を見つけて Redis Cluster だと使用できないようなので今回は止めておきます。
Spring Boot とは直接関係ありませんが、今回いろいろ調べている時に Groovy の公式ドキュメントのサイトを見つけたのでメモっておきます(事例も豊富で分かりやすい!)。JsonSlurper の存在を初めて知ったり、サイト内のリンクから JsonUnit も初めて知りました。テストは Groovy&Spock で書くことが多いのですが、groovy-sql とか便利なライブラリも多いので個人的にはまだまだテストは Groovy で記述するつもりです。
- Groovy Language Documentation
https://docs.groovy-lang.org/latest/html/documentation/ https://github.com/apache/groovy/tree/master/src/spec/doc
- Groovy Language Documentation
次は、最近の Gradle Multi Project は buildSrc ディレクトリの下に plugin を書いてやる方式に変わっているようなので、それについて調べる予定です。
Spring Boot 2.3.x の Web アプリを 2.4.x へバージョンアップする ( その10 )( Docker で複数の Tomcat を起動して動作確認する )
概要
記事一覧はこちらです。
- 今回の手順で確認できるのは以下の内容です。
- Build OCI images with Cloud Native Buildpacks の機能で作成した Docker image で Web アプリを実行して動作確認します。
参照したサイト・書籍
目次
- clean タスク実行 → Rebuild Project 実行 → build タスクを実行する
- bootBuildImage タスクを実行する
- docker-compose.app.yml を変更する
- Docker で複数の Tomcat を起動して動作確認する
手順
clean タスク実行 → Rebuild Project 実行 → build タスクを実行する
clean タスク実行 → Rebuild Project 実行 → build タスクを実行して BUILD SUCCESSFUL のメッセージが出力されることを確認します。

bootBuildImage タスクを実行する
bootBuildImage タスクを実行して Successfully built image 'docker.io/library/ksbysample-webapp-lending:2.4.3' と BUILD SUCCESSFUL のメッセージが出力されることを確認します。

docker-compose.app.yml を変更する
docker-compose.app.yml を以下のように変更します。
  app:
    image: ksbysample-webapp-lending:2.4.3
    environment:
      - JAVA_TOOL_OPTIONS=-Dspring.profiles.active=product -Dlogging.appender=CONSOLE
      - SPRING_DATASOURCE_HIKARI_JDBC_URL=jdbc:postgresql://postgresql/ksbylending
      - SPRING_MAIL_HOST=mail-server
      - SPRING_RABBITMQ_HOST=haproxy
    deploy:
      mode: replicated
      replicas: 3
    # entrypoint: /bin/bash
    # stdin_open: true
    # tty: true
image: ksbysample-webapp-lending:2.3.7-RELEASE→image: ksbysample-webapp-lending:2.4.3に変更します。
Docker で複数の Tomcat を起動して動作確認する
docker-compose -f docker-compose.mail.yml up -d、docker-compose -f docker-compose.app.yml --compatibility up -d コマンドを実行します。

http://localhost:8080/haproxy?stats にアクセスして全てのインスタンスが緑色になるまで待ちます。

以下の手順で動作確認します ( 画面キャプチャは省略します )。
- ブラウザを起動して http://localhost:8080/ にアクセスしてログイン画面を表示します。tanaka.taro@sample.com / taro でログインします。
- 検索対象図書館登録画面が表示されます。"東京都" で検索した後、一覧表示されている図書館から「国立国会図書館東京本館」を選択します。
- ログアウトします。
- ログイン画面に戻るので suzuki.hanako@test.co.jp / hanako でログインします。
- 貸出希望書籍 CSV ファイルアップロード画面が表示されます。以下の内容が記述された CSV ファイルをアップロードします。
"ISBN","書名"
"978-4-7741-6366-6","GitHub実践入門"
"978-4-7741-5377-3","JUnit実践入門"
"978-4-7973-8014-9","Java最強リファレンス"
"978-4-7973-4778-4","アジャイルソフトウェア開発の奥義"
"978-4-87311-704-1","Javaによる関数型プログラミング" - 「貸出状況を確認しました」のメールが送信されるので、メールに記述されている URL にアクセスします。
- 貸出申請画面が表示されます。3冊程「申請する」を選択して申請します。
- ログアウトします。
- 「貸出申請がありました」のメールが送信されるので、メールに記述されている URL にアクセスします。ログイン画面が表示されるので、tanaka.taro@sample.com / taro でログインします。
- 貸出承認画面が表示されます。「承認」あるいは「却下」を選択して確定させます。
- ログアウトします。
- 「貸出申請が承認・却下されました」のメールが送信されるので、メールに記述されている URL にアクセスします。ログイン画面が表示されるので、suzuki.hanako@test.co.jp / hanako でログインします。
- 貸出申請結果確認画面が表示されるので内容を確認します。
動作確認は特に問題ありませんでした。
docker-compose -f docker-compose.app.yml --compatibility down、docker-compose -f docker-compose.mail.yml down、docker-compose down コマンドを実行してコンテナを停止します。
履歴
2021/03/11
初版発行。