Spring Boot + npm + Geb で入力フォームを作ってテストする ( その98 )( Gradle を 6.4 → 6.9.1 へ、Spring Boot を 2.2.7 → 2.4.10 へ、Geb を 3.4 → 4.1 へバージョンアップする )
概要
記事一覧はこちらです。
Spring Boot + npm + Geb で入力フォームを作ってテストする ( その97 )( webpack を 4.43.0 → 5.56.0 へバージョンアップする ) の続きです。
- 今回の手順で確認できるのは以下の内容です。
- Gradle を 6.4 → 6.9.1 へバージョンアップします。
- Spring Boot を 2.2.7 → 2.4.10 へ、Geb を 3.4 → 4.1 へバージョンアップします。
参照したサイト・書籍
Spring Boot 2.4.2 and Thymeleaf 3.0.12 - access static methods
https://stackoverflow.com/questions/66048129/spring-boot-2-4-2-and-thymeleaf-3-0-12-access-static-methods/66053568Improve restricted expression evaluation mode
https://github.com/thymeleaf/thymeleaf/issues/809
目次
- バージョンアップの進め方を決める
- Gradle を 6.4 → 6.9.1 へバージョンアップする
- Spring Boot を 2.2.7 → 2.4.10 へ、Geb を 3.4 → 4.1 へバージョンアップする
手順
バージョンアップの進め方を決める
以下の手順で進めます。
- JDK 11 のまま、Gradle を 6系最新へ、Spring Boot を 2.2.7 → 2.4.10 へ、Geb を 3.4 → 4.1 へバージョンアップする(Groovy は 2系のまま)。
- JDK 11 のまま、Gradle を 7系最新へ、Spring Boot を 2.4.10 → 2.5.4 へ、Geb を 4.1 → 5.0 へバージョンアップする(Groovy を 3系へ)。
- JDK 17 へ、Spring Boot を 2.5.4 → 2.5.5 へバージョンアップする。
Gradle を 6.4 → 6.9.1 へバージョンアップする
build.gradle の wrapper タスクの記述を以下のように変更します。
wrapper {
    gradleVersion = "6.9.1"
    distributionType = Wrapper.DistributionType.ALL
}
gradleVersion = "6.4"→gradleVersion = "6.9.1"に変更します。
コマンドプロンプトから gradlew wrapper --gradle-version=6.9.1 コマンドを実行します。。。が、java.lang.IllegalArgumentException: Unsupported class file major version 61 のエラーが出力されてバージョンアップできませんでした。

いろいろ試してみたところ、どうも 6.4 の Gradle Deamon が起動している時に gradlew wrapper --gradle-version=6.9.1 コマンドを実行すると、このエラーが出るような気がします。PC を再起動して Gradle Daemon が何も実行されていない状態にしてみます(後で知りましたが gradlew --stop コマンドを実行すれば Gradle Daemon は停止できました)。
PC 再起動後、コマンドプロンプトから gradlew wrapper --gradle-version=6.9.1、gradlew --version コマンドを実行すると今度は正常に終了しました。

gradle/wrapper/gradle-wrapper.properties は以下の内容になります。
distributionBase=GRADLE_USER_HOME
distributionPath=wrapper/dists
distributionUrl=https\://services.gradle.org/distributions/gradle-6.9.1-all.zip
zipStoreBase=GRADLE_USER_HOME
zipStorePath=wrapper/dists
Gradle Tool Window の左上にある「Refresh all Gradle projects」ボタンをクリックして更新します。
clean タスク実行 → Rebuild Project 実行 → build タスクを実行すると "BUILD SUCCESSFUL" のメッセージが出力されました。

Spring Boot を 2.2.7 → 2.4.10 へ、Geb を 3.4 → 4.1 へバージョンアップする
build.gradle の以下の点を変更します。
buildscript {
    ext {
        group "ksbysample"
        version "2.4.10"
    }
    repositories {
        mavenCentral()
        gradlePluginPortal()
    }
    dependencies {
        // for doma-codegen-plugin
        classpath "com.h2database:h2:1.4.200"
    }
}

plugins {
    id "java"
    id "eclipse"
    id "idea"
    id "org.springframework.boot" version "2.4.10"
    id "io.spring.dependency-management" version "1.0.11.RELEASE"
    id "groovy"
    id "net.ltgt.errorprone" version "1.1.1"
    id "checkstyle"
    id "com.github.spotbugs" version "4.0.8"
    id "pmd"
    id "com.github.node-gradle.node" version "3.1.1"
    id "com.gorylenko.gradle-git-properties" version "2.3.1"
    id "com.energizedwork.webdriver-binaries" version "1.4"
    id "org.seasar.doma.codegen" version "1.4.1"
}

..........

dependencyManagement {
    imports {
        // mavenBom は以下の URL のものを使用する
        // https://repo.spring.io/release/org/springframework/boot/spring-boot-starter-parent/2.1.4.RELEASE/
        // bomProperty に指定可能な property は以下の URL の BOM に記述がある
        // https://repo.spring.io/release/org/springframework/boot/spring-boot-dependencies/2.1.4.RELEASE/spring-boot-dependencies-2.1.4.RELEASE.pom
        mavenBom org.springframework.boot.gradle.plugin.SpringBootPlugin.BOM_COORDINATES
        mavenBom("org.junit:junit-bom:5.7.2")
    }
}

dependencies {
    def spockVersion = "1.3-groovy-2.5"
    def domaVersion = "2.49.0"
    def lombokVersion = "1.18.22"
    def errorproneVersion = "2.3.4"
    def powermockVersion = "2.0.7"
    def seleniumVersion = "3.141.59"
    def spotbugsVersion = "4.0.2"

    // dependency-management-plugin によりバージョン番号が自動で設定されるもの
    // Appendix F. Dependency versions ( https://docs.spring.io/spring-boot/docs/2.1.4.RELEASE/reference/html/appendix-dependency-versions.html ) 参照
    implementation("org.springframework.boot:spring-boot-starter-web")
    implementation("org.springframework.boot:spring-boot-starter-validation")
    implementation("org.springframework.boot:spring-boot-starter-thymeleaf")
    implementation("org.springframework.boot:spring-boot-starter-data-jpa")
    implementation("org.springframework.boot:spring-boot-starter-freemarker")
    implementation("org.springframework.boot:spring-boot-starter-mail")
    implementation("org.springframework.boot:spring-boot-starter-security")
    implementation("org.springframework.boot:spring-boot-starter-actuator")
    runtimeOnly("org.springframework.boot:spring-boot-devtools")
    implementation("org.springframework.session:spring-session-core")
    implementation("org.springframework.session:spring-session-jdbc")
    implementation("org.codehaus.janino:janino")
    testImplementation("org.springframework.boot:spring-boot-starter-test") {
        exclude group: "org.junit.vintage", module: "junit-vintage-engine"
    }
    testImplementation("org.springframework.security:spring-security-test")
    testImplementation("org.yaml:snakeyaml")

    // dependency-management-plugin によりバージョン番号が自動で設定されないもの、あるいは最新バージョンを指定したいもの
    implementation("com.integralblue:log4jdbc-spring-boot-starter:2.0.0")
    implementation("org.flywaydb:flyway-core:5.2.4")
    implementation("com.h2database:h2:1.4.200")
    implementation("com.github.rozidan:modelmapper-spring-boot-starter:2.3.1")
    implementation("com.google.guava:guava:27.1-jre")
    implementation("org.apache.commons:commons-lang3:3.8.1")
    testImplementation("org.dbunit:dbunit:2.7.0")
    testImplementation("org.assertj:assertj-core:3.16.0")
    testImplementation("org.spockframework:spock-core:${spockVersion}")
    testImplementation("org.spockframework:spock-spring:${spockVersion}")
    testImplementation("org.jsoup:jsoup:1.13.1")
    testImplementation("com.icegreen:greenmail:1.5.13")

    // for lombok
    annotationProcessor("org.projectlombok:lombok:${lombokVersion}")
    compileOnly("org.projectlombok:lombok:${lombokVersion}")

    // for Doma
    implementation("org.seasar.doma:doma-core:${domaVersion}")
    annotationProcessor("org.seasar.doma:doma-processor:${domaVersion}")

    // for Error Prone ( http://errorprone.info/ )
    errorprone("com.google.errorprone:error_prone_core:${errorproneVersion}")
    compileOnly("com.google.errorprone:error_prone_annotations:${errorproneVersion}")

    // PowerMock
    testImplementation("org.powermock:powermock-module-junit4:${powermockVersion}")
    testImplementation("org.powermock:powermock-api-mockito2:${powermockVersion}")

    // for Geb + Spock
    testImplementation("org.gebish:geb-spock:3.4") {
        exclude group: "org.codehaus.groovy", module: "groovy-all"
    }
    testImplementation("org.seleniumhq.selenium:selenium-chrome-driver:${seleniumVersion}")
    testImplementation("org.seleniumhq.selenium:selenium-firefox-driver:${seleniumVersion}")
    testImplementation("org.seleniumhq.selenium:selenium-support:${seleniumVersion}")
    testImplementation("org.seleniumhq.selenium:selenium-api:${seleniumVersion}")
    testImplementation("org.seleniumhq.selenium:selenium-remote-driver:${seleniumVersion}")

    // for SpotBugs
    compileOnly("com.github.spotbugs:spotbugs:${spotbugsVersion}")
    compileOnly("net.jcip:jcip-annotations:1.0")
    compileOnly("com.github.spotbugs:spotbugs-annotations:${spotbugsVersion}")
    testImplementation("com.google.code.findbugs:jsr305:3.0.2")
    spotbugsStylesheets("com.github.spotbugs:spotbugs:${spotbugsVersion}")
    spotbugsPlugins("com.h3xstream.findsecbugs:findsecbugs-plugin:1.10.1")

    // for JUnit 5
    // junit-jupiter で junit-jupiter-api, junit-jupiter-params, junit-jupiter-engine の3つが依存関係に追加される
    testCompile("org.junit.jupiter:junit-jupiter")
    testRuntime("org.junit.platform:junit-platform-launcher")
}

..........
Spring Boot 2.4.10 へのバージョンアップとして以下の点を変更します。
- buildscript block の以下の点を変更します。
version "2.2.7-RELEASE"→version "2.4.10"
- plugins block の以下の点を変更します。
id "org.springframework.boot" version "2.2.7.RELEASE"→id "org.springframework.boot" version "2.4.10"id "io.spring.dependency-management" version "1.0.9.RELEASE"→id "io.spring.dependency-management" version "1.0.11.RELEASE"
- dependencies block の以下の点を変更します。
implementation("org.springframework.boot:spring-boot-starter-validation")を追加します。
各種ライブラリのバージョンアップとして以下の点を変更します。
- plugins block の以下の点を変更します。
id "com.gorylenko.gradle-git-properties" version "2.2.2"→id "com.gorylenko.gradle-git-properties" version "2.3.1"id "org.seasar.doma.codegen" version "0.0.2"→id "org.seasar.doma.codegen" version "1.4.1"
- dependencyManagement block の以下の点を変更します。
mavenBom org.springframework.boot.gradle.plugin.SpringBootPlugin.BOM_COORDINATES→mavenBom(org.springframework.boot.gradle.plugin.SpringBootPlugin.BOM_COORDINATES) { bomProperty "groovy.version", "2.5.15" }mavenBom("org.junit:junit-bom:5.6.2")→mavenBom("org.junit:junit-bom:5.7.2")
- dependencies block の以下の点を変更します。
def lombokVersion = "1.18.12"→def lombokVersion = "1.18.20"def domaVersion = "2.34.0"→def domaVersion = "2.49.0"implementation("org.flywaydb:flyway-core:5.2.4")→implementation("org.flywaydb:flyway-core:7.14.1")implementation("com.google.guava:guava:27.1-jre")→implementation("com.google.guava:guava:31.0.1-jre")implementation("org.apache.commons:commons-lang3:3.8.1")→implementation("org.apache.commons:commons-lang3:3.12.0")testImplementation("org.dbunit:dbunit:2.7.0")→testImplementation("org.dbunit:dbunit:2.7.2")testImplementation("org.assertj:assertj-core:3.16.0")→testImplementation("org.assertj:assertj-core:3.21.0")testImplementation("org.jsoup:jsoup:1.13.1")→testImplementation("org.jsoup:jsoup:1.14.3")testImplementation("com.icegreen:greenmail:1.5.13")→testImplementation("com.icegreen:greenmail:1.6.5")testImplementation("org.gebish:geb-spock:3.4") {→testImplementation("org.gebish:geb-spock:4.1") {
Gradle Tool Window の左上にある「Refresh all Gradle projects」ボタンをクリックして更新します。
clean タスク実行 → Rebuild Project 実行 → build タスクを実行すると compileJava タスクで警告が1件、testJUnit4AndSpock タスクでテストが大量に失敗しました。

compileJava タスクの警告は error-prone が build/generated の下のソースをチェックして出力していました。自動生成されたコードをチェックしないよう build.gradle に disableWarningsInGeneratedCode = true の設定を追加します。
[compileJava, compileTestGroovy, compileTestJava]*.options*.encoding = "UTF-8"
[compileJava, compileTestGroovy, compileTestJava]*.options*.compilerArgs = ["-Xlint:all,-options,-processing,-path"]
tasks.withType(JavaCompile).configureEach {
    options.errorprone {
        disableWarningsInGeneratedCode = true
    }
}
tasks.named("compileTestJava").configure {
    options.errorprone.enabled = false
}
testJUnit4AndSpock タスクでテストが大量に失敗している方は、失敗したテストを 1件だけ IntelliJ IDEA 上から実行してみると Caused by: org.flywaydb.core.api.FlywayException: Found non-empty schema(s) "PUBLIC" but no schema history table. Use baseline() or set baselineOnMigrate to true to initialize the schema history table. というエラーメッセージが出力されていました。

Flyway が実行される時に PUBLIC スキーマが空でなく、spring.flyway.baseline-on-migrate=true を設定すれば schema history table を初期化してくれるとのことですが、spring.flyway.baseline-on-migrate=true を設定するのではなく PUBLIC テーブルが空でない原因を調べることにします。
application.properties を見ると以下の設定が記述されており、明らかにこれですね。。。 おそらくバージョンアップ前は Flywasy が先に実行されて Sprig Session のテーブル作成はその後に実行されていたのが、バージョンアップ後はその順序が逆になったものと思われます。
spring.session.store-type=jdbc
spring.session.jdbc.initialize-schema=embedded
spring.session.jdbc.schema=classpath:org/springframework/session/jdbc/schema-h2.sql
spring.session.jdbc.table-name=SPRING_SESSION
spring.session.jdbc.initialize-schema=embedded → spring.session.jdbc.initialize-schema=never に変更して Spring Session のテーブルを自動作成しないように変更してから、
spring.session.store-type=jdbc
spring.session.jdbc.initialize-schema=never
spring.session.jdbc.table-name=SPRING_SESSION
失敗していたテスト(このテストは Spring Session の機能を利用していない)を実行してみると、成功するようになりました。

spring.session.jdbc.initialize-schema=never の設定はそのままにして、Flyway で Spring Session のテーブルを作成するようにします。
src/main/resources/db/migration の下に V1.2__create_spring_session_schema.sql を新規作成した後、org/springframework/session/jdbc/schema-h2.sql の内容をコピーします。
-- copy from org/springframework/session/jdbc/schema-h2.sql
CREATE TABLE SPRING_SESSION
(
    PRIMARY_ID            CHAR(36) NOT NULL,
    SESSION_ID            CHAR(36) NOT NULL,
    CREATION_TIME         BIGINT   NOT NULL,
    LAST_ACCESS_TIME      BIGINT   NOT NULL,
    MAX_INACTIVE_INTERVAL INT      NOT NULL,
    EXPIRY_TIME           BIGINT   NOT NULL,
    PRINCIPAL_NAME        VARCHAR(100),
    CONSTRAINT SPRING_SESSION_PK PRIMARY KEY (PRIMARY_ID)
);

CREATE UNIQUE INDEX SPRING_SESSION_IX1 ON SPRING_SESSION (SESSION_ID);
CREATE INDEX SPRING_SESSION_IX2 ON SPRING_SESSION (EXPIRY_TIME);
CREATE INDEX SPRING_SESSION_IX3 ON SPRING_SESSION (PRINCIPAL_NAME);

CREATE TABLE SPRING_SESSION_ATTRIBUTES
(
    SESSION_PRIMARY_ID CHAR(36)      NOT NULL,
    ATTRIBUTE_NAME     VARCHAR(200)  NOT NULL,
    ATTRIBUTE_BYTES    LONGVARBINARY NOT NULL,
    CONSTRAINT SPRING_SESSION_ATTRIBUTES_PK PRIMARY KEY (SESSION_PRIMARY_ID, ATTRIBUTE_NAME),
    CONSTRAINT SPRING_SESSION_ATTRIBUTES_FK FOREIGN KEY (SESSION_PRIMARY_ID) REFERENCES SPRING_SESSION (PRIMARY_ID) ON DELETE CASCADE
);
再度 clean タスク実行 → Rebuild Project 実行 → build タスクを実行すると、テストがまだ 2件失敗します。

原因を調査すると、改行コードを <br/> に変換している th:utext="*{inquiry} ? ${#strings.replace(#strings.escapeXml(confirmForm.inquiry), T(java.lang.System).getProperty('line.separator'), '<br />')} : ''" のところで org.attoparser.ParseException: Instantiation of new objects and access to static classes is forbidden in this context というエラーメッセージが出力されていました。
<tr> <th nowrap>お問い合わせの内容</th> <td id="inquiry" th:utext="*{inquiry} ? ${#strings.replace(#strings.escapeXml(confirmForm.inquiry), T(java.lang.System).getProperty('line.separator'), '<br />')} : ''"> ここに、<br/> 入力されたお問い合わせの内容が表示されます。 </td> </tr>
Web で調べると Spring Boot 2.4.2 and Thymeleaf 3.0.12 - access static methods を見つけました。Thymeleaf 3.0.12 からセキュリティ強化のために T(identifier) in SpringEL の形式では呼び出せなくなったとのこと。
System.getProperty を呼び出す Bean を作成して、Thymeleaf テンプレートから呼び出すように変更します。
まず src/main/java/ksbysample/webapp/bootnpmgeb/helper の下に thymeleaf パッケージを作成し、その下に SystemPropertiesHelper.java を新規作成して以下の内容を記述します。
package ksbysample.webapp.bootnpmgeb.helper.thymeleaf;

import org.springframework.boot.system.SystemProperties;
import org.springframework.stereotype.Component;

/**
 * System Property 値取得用 Helper クラス
 */
@Component("sph")
public class SystemPropertiesHelper {

    /**
     * System#getProperty を呼び出して指定された system property の値を取得する
     *
     * @param properties 値を取得する system property 名
     * @return 取得した system property の値
     */
    public String getProperty(String... properties) {
        return SystemProperties.get(properties);
    }

}
src/main/resources/templates/web/inquiry/confirm.html を以下のように変更します。
<tr> <th nowrap>お問い合わせの内容</th> <td id="inquiry" th:utext="*{inquiry} ? ${#strings.replace(#strings.escapeXml(confirmForm.inquiry), @sph.getProperty('line.separator'), '<br />')} : ''"> ここに、<br/> 入力されたお問い合わせの内容が表示されます。 </td> </tr>
T(java.lang.System).getProperty('line.separator')→@sph.getProperty('line.separator')に変更します。
再度 clean タスク実行 → Rebuild Project 実行 → build タスクを実行すると、今度は "BUILD SUCCESSFUL" のメッセージが出力されました。

gebTest タスクも "BUILD SUCCESSFUL" のメッセージが表示されました。Geb のバージョンアップは特に問題は発生しないようです。

履歴
2021/10/10
初版発行。
Spring Boot + npm + Geb で入力フォームを作ってテストする ( その97 )( webpack を 4.43.0 → 5.56.0 へバージョンアップする )
概要
記事一覧はこちらです。
- 今回の手順で確認できるのは以下の内容です。
- webpack を 4.43.0 → 5.56.0 へ、webpack-cli を 3.3.11 → 4.8.0 へバージョンアップします。
参照したサイト・書籍
To v5 from v4
https://webpack.js.org/migrate/5/TerserWebpackPlugin
https://webpack.js.org/plugins/terser-webpack-plugin/webpack-contrib / terser-webpack-plugin
https://github.com/webpack-contrib/terser-webpack-plugin#terseroptionsterser / terser
https://github.com/terser/terserwebpack@5の主な変更点まとめ
https://blog.hiroppy.me/entry/webpack5webpack 5 にアップグレードしました
https://medium.com/studist-dev/migration-webpack-from-4-to-5-3df31da8e7a2browserslist / browserslist
https://github.com/browserslist/browserslistCache
https://webpack.js.org/configuration/cache/#cachebuilddependencies
目次
- webpack を 4.43.0 → 4.46.0 へ、webpack-cli を 3.3.11 → 4.8.0 へバージョンアップする
- webpack を 4.46.0 → 5.56.0 へバージョンアップする
- uglifyjs-webpack-plugin を terser-webpack-plugin に変更する
- package.json に browserslist を追加する
- cache の設定を追加する
- 最後に各種コマンドや build で問題がないか確認する
手順
webpack を 4.43.0 → 4.46.0 へ、webpack-cli を 3.3.11 → 4.8.0 へバージョンアップする
To v5 from v4 の Upgrade webpack 4 and its plugins/loaders に webpack 4、webpack-cli を最新バージョンに上げるよう記述されているので、以下のコマンドを実行します。
npm install --save-dev webpack@4.46.0npm install --save-dev webpack-cli@4.8.0
webpack を 4.46.0 → 5.56.0 へバージョンアップする
Make sure your build has no errors or warnings に記載されている
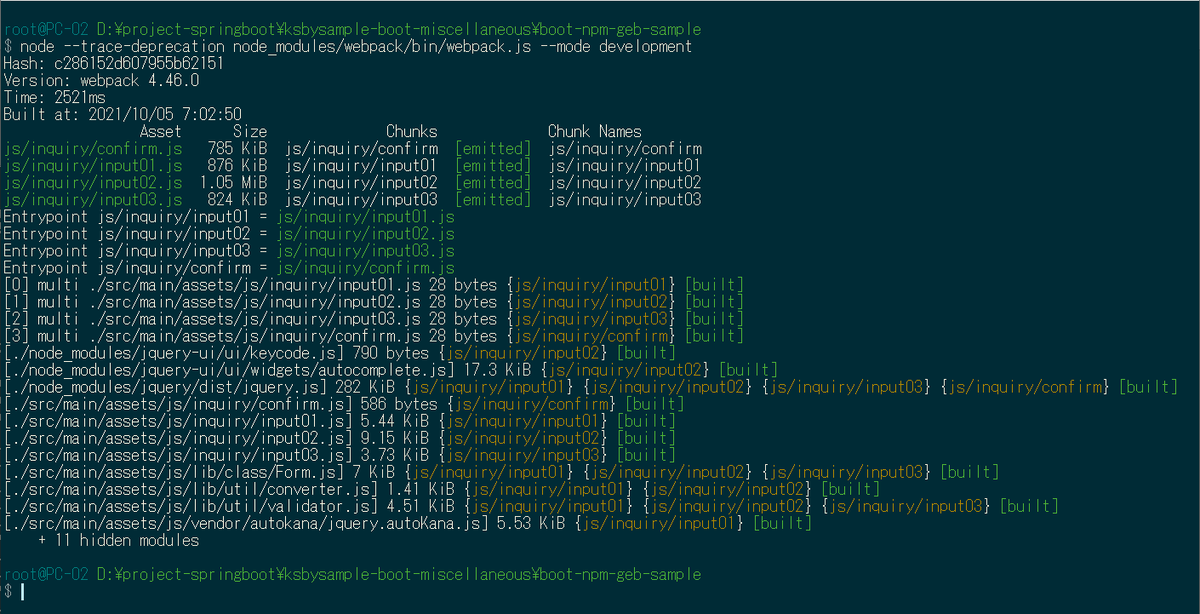
node --trace-deprecation node_modules/webpack/bin/webpack.js を実行します。
mode は起動時オプションで指定するようにしているので、まずは node --trace-deprecation node_modules/webpack/bin/webpack.js --mode production を実行してみると特に警告やエラーのメッセージは出力されませんでした。

次に node --trace-deprecation node_modules/webpack/bin/webpack.js --mode development を実行してみますが、こちらもメッセージは何も出力されませんでした。
Test webpack 5 compatibility に記載されているオプションを webpack.config.js に追加してから、
module.exports = (env, argv) => {
  return {
    node: {
      Buffer: false,
      process: false,
    },
    entry: {
      "js/inquiry/input01": ["./src/main/assets/js/inquiry/input01.js"],
      ..........
node --trace-deprecation node_modules/webpack/bin/webpack.js --mode production コマンドを実行してみましたが、メッセージ等は表示されませんでした。webpack.config.js に追加したオプションは削除します。

問題ないようなので、以下のコマンドを実行し webpack を 5 の最新バージョンにバージョンアップします。
npm install --save-dev webpack@5.56.0

使用していない prettier-webpack-plugin に関するメッセージが出力されているので、以下のコマンドを実行して削除します。
npm uninstall --save-dev prettier-webpack-plugin
uglifyjs-webpack-plugin は後で削除するので、今はこのままにします。
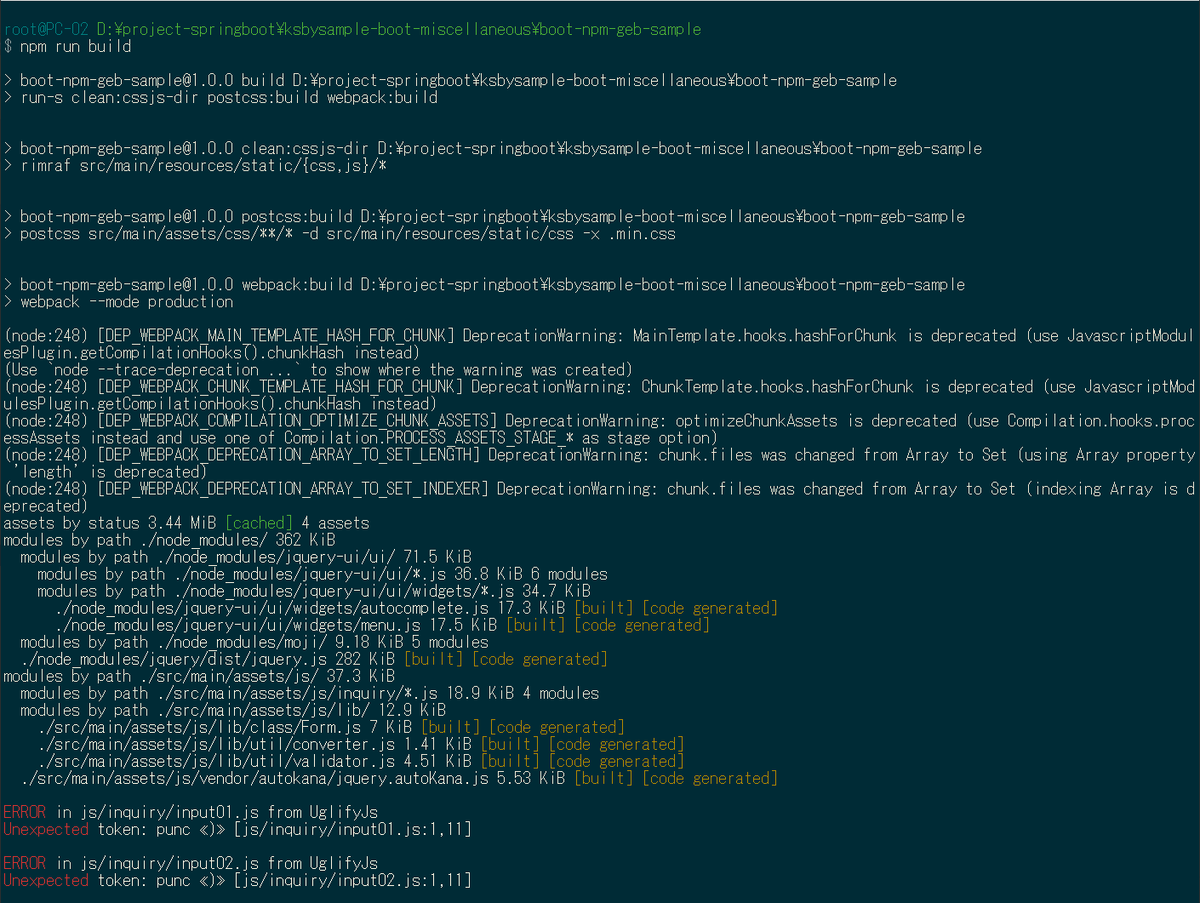
npm run build コマンドを実行すると webpack 5 に対応していない uglifyjs-webpack-plugin の設定を残している影響でエラーメッセージが大量に出力されます。

uglifyjs-webpack-plugin を terser-webpack-plugin に変更する
以下のコマンドを実行して uglifyjs-webpack-plugin をアンインストール、terser-webpack-plugin をインストールします。
npm uninstall --save-dev uglifyjs-webpack-pluginnpm install --save-dev terser-webpack-plugin@5.2.4
terser-webpack-plugin は uglifyjs-webpack-plugin とほぼ同じオプションが指定できるそうなので webpack.config.js の optimization を以下の内容に変更します。
const webpack = require("webpack");
const TerserPlugin = require("terser-webpack-plugin");

// --mode オプションで指定された文字列を参照したい場合には argv.mode を参照する
module.exports = (env, argv) => {
  return {
    ..........
    optimization: {
      minimizer: [
        new TerserPlugin({
          terserOptions: {
            ecma: 5,
            output: {
              comments: false,
            },
            compress: {
              dead_code: true,
              drop_console: true,
            },
          },
        }),
      ],
    },
    ..........
    devtool: argv.mode === "production" ? false : "inline-source-map",
  };
};
const UglifyJsPlugin = require("uglifyjs-webpack-plugin");→const TerserPlugin = require("terser-webpack-plugin");に変更します。new UglifyJsPlugin({→new TerserPlugin({に変更します。uglifyOptions: {→terserOptions: {に変更します。- compress オプションの指定が
compress: trueとcompress: { ... }の2つ書かれていたことに気づいたので、compress: trueの方を削除します。 - source map を生成するか否かは devtools の設定に依存するようになったので、
sourceMap: falseを削除します。 - production モードの場合には source map を生成しないよう
devtool: "inline-source-map"→devtool: argv.mode === "production" ? false : "inline-source-map",に変更します。
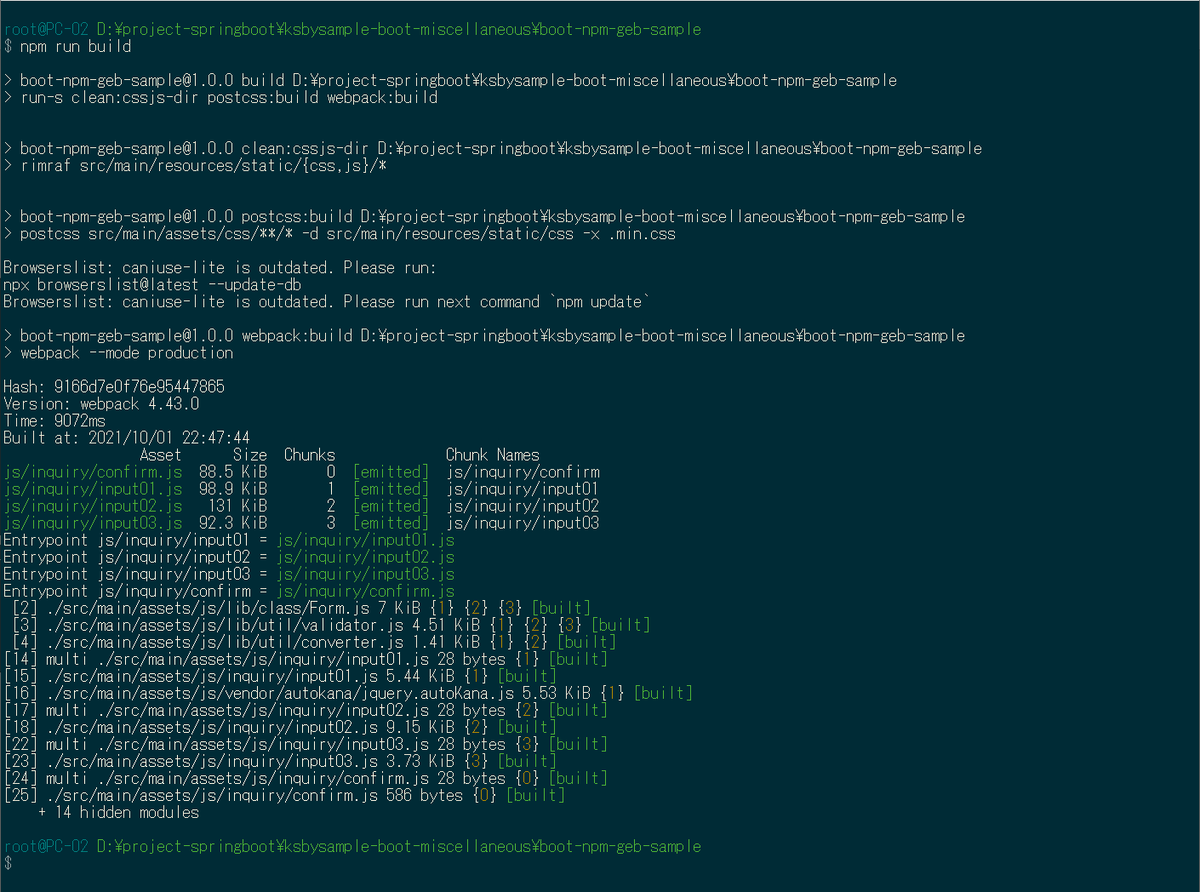
‘npm run build‘ コマンドを実行するとエラーメッセージは出なくなりました。

生成された js ファイルを見ると、~.LICENSE.txt というファイルも生成されるようになりました。

package.json に browserslist を追加する
Need to support an older browser like IE 11? を読むと package.json に browserslist を記述しておくと webpack 5 がコードスタイルを決めてくれるようになったそうです。https://github.com/postcss/autoprefixer を見ると autoprefixer も browserslist の設定を見てくれるようなので、package.json の最後に "browserslist": [ ... ] を追加します。
  ..........
  "browserslist": [
    "last 1 version",
    "> 1%",
    "IE 11"
  ]
}
postcss.config.js も以下のように変更します。
module.exports = {
  plugins: [
    require("stylelint"),
    require("autoprefixer"),
    require("cssnano")({
      preset: "default",
    }),
  ],
};
require("autoprefixer")({ browserlist: ["last 2 versions"] }),→require("autoprefixer"),に変更します。
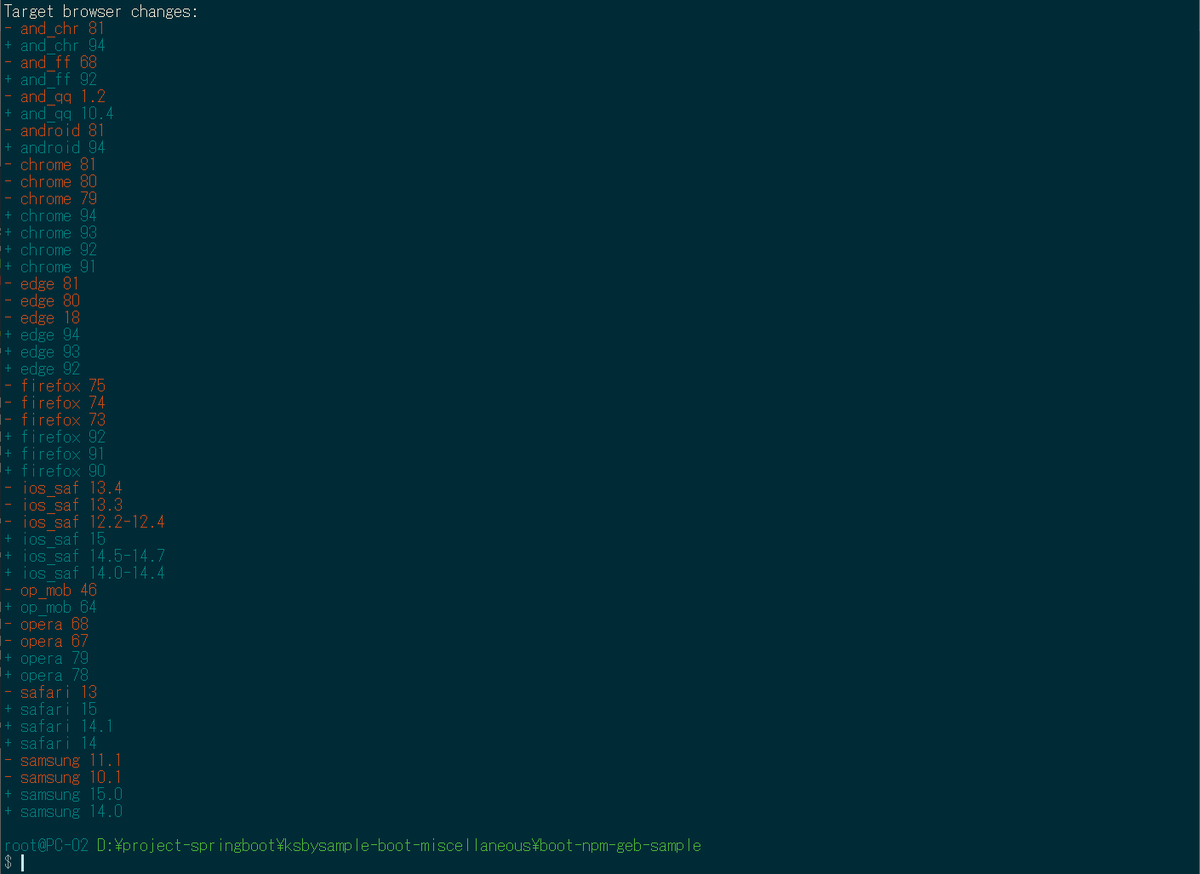
browserslist を追加する前は npx browserslist コマンドを実行すると以下のように出力されますが、

追加した後は以下のよう変わりました。

cache の設定を追加する
webpack 5 からファイルシステムによるキャッシュが導入されて大幅に速度改善できるようになったとのことなので、設定を追加します。
webpack.config.js に cache を追加します。development 環境では有効、production 環境では無効にします。
    output: {
      ..........
    },
    cache:
      argv.mode === "production"
        ? false
        : {
            type: "filesystem",
            buildDependencies: {
              config: [__filename],
            },
          },
    resolve: {
      ..........
最後に各種コマンドや build で問題がないか確認する
最後にコマンド、build で問題がないか一通り確認します。
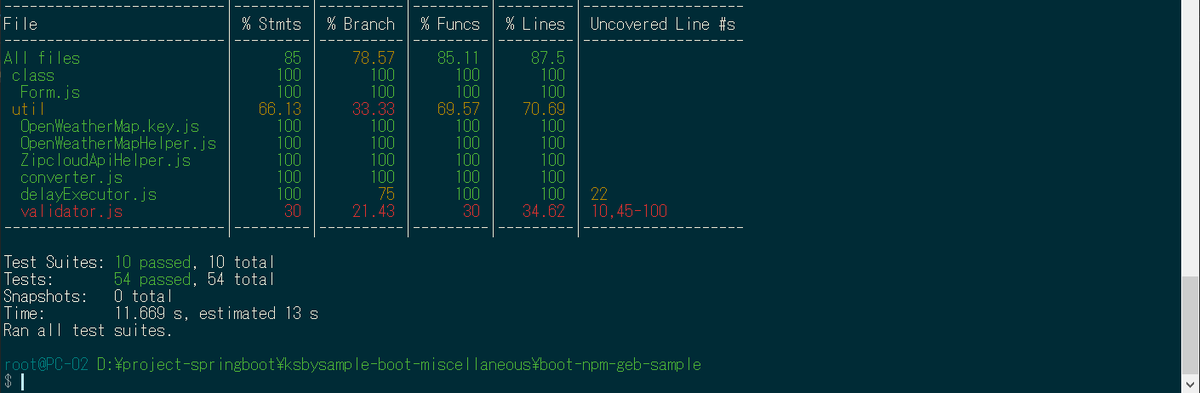
npm test コマンドは問題ありません。

npm run build コマンドも問題ありません。

clean タスク実行 → Rebuild Project 実行 → build タスク実行も問題ありません。

gebTest タスクも問題ありません。

履歴
2021/10/08
初版発行。
Spring Boot + npm + Geb で入力フォームを作ってテストする ( その96 )( postcss を 7.0.29 → 8.3.8 へ、postcss-cli を 7.1.1 → 9.0.1 へ、prettier を 2.0.5 → 2.4.1 へ、stylelint を 13.3.3 → 13.13.1 へバージョンアップする )
概要
記事一覧はこちらです。
- 今回の手順で確認できるのは以下の内容です。
- autoprefixer を 9.7.6 → 10.3.6 へ、cssnano を 4.1.10 → 5.0.8 へ、postcss を 7.0.29 → 8.3.8 へ、postcss-cli を 7.1.1 → 9.0.1 へバージョンアップします。
- prettier を 2.0.5 → 2.4.1 へバージョンアップします。
- stylelint を 13.3.3 → 13.13.1 へ、stylelint-config-standard を 20.0.0 → 22.0.0 へバージョンアップします。
参照したサイト・書籍
目次
- autoprefixer を 9.7.6 → 10.3.6 へ、cssnano を 4.1.10 → 5.0.8 へ、postcss を 7.0.29 → 8.3.8 へ、postcss-cli を 7.1.1 → 9.0.1 へバージョンアップする
- prettier を 2.0.5 → 2.4.1 へバージョンアップする
- stylelint を 13.3.3 → 13.13.1 へ、stylelint-config-standard を 20.0.0 → 22.0.0 へバージョンアップする
- 最後に各種コマンドや build で問題がないか確認する
手順
autoprefixer を 9.7.6 → 10.3.6 へ、cssnano を 4.1.10 → 5.0.8 へ、postcss を 7.0.29 → 8.3.8 へ、postcss-cli を 7.1.1 → 9.0.1 へバージョンアップする
以下のコマンドを実行して最新のバージョンにします。
npm install --save-dev autoprefixer@10.3.6npm install --save-dev cssnano@5.0.8npm install --save-dev postcss-cli@9.0.1
npm test コマンドを実行するとテストは全て成功しましたが、

npm run build コマンドを実行すると Please install PostCSS 8 or above のメッセージが出力されました。postcss-cli をバージョンアップしただけでは postcss はバージョンアップされないようです。

node_modules/postcss/CHANGELOG.md を確認したところ 7.0.29 がインストールされていました。https://www.npmjs.com/package/postcss を見ると最新バージョンは 8.3.8 なので、以下のコマンドを実行します。
npm install --save-dev postcss@8.3.8
npm run build コマンドを実行すると今度は何の警告・エラーメッセージも出力されずに終了しました。

prettier を 2.0.5 → 2.4.1 へバージョンアップする
以下のコマンドを実行して最新のバージョンにします。
npm install --save-dev prettier@2.4.1
npm test コマンド、npm run build コマンドのどちらも何の警告・エラーメッセージも出力されずに終了しました。
今回のバージョンアップでは1ファイルだけフォーマットし直されており、改行位置が少し変更されていました。

stylelint を 13.3.3 → 13.13.1 へ、stylelint-config-standard を 20.0.0 → 22.0.0 へバージョンアップする
以下のコマンドを実行して最新のバージョンにします。
npm install --save-dev stylelint@13.13.1npm install --save-dev stylelint-config-standard@22.0.0
npm test コマンド、npm run build コマンドのどちらも何の警告・エラーメッセージも出力されずに終了しました。
最後に各種コマンドや build で問題がないか確認する
最後にコマンド、build で問題がないか一通り確認します。
npm test コマンドは問題ありません。

npm run build コマンドも問題ありません。

clean タスク実行 → Rebuild Project 実行 → build タスク実行も問題ありません。

gebTest タスクも問題ありません。

IntelliJ IDEA の「Settings」ダイアログを開いて「Language & Frameworks」-「Node.js and NPM」を表示し、バージョンアップ後の状態も記載しておきます。


履歴
2021/10/04
初版発行。
Spring Boot + npm + Geb で入力フォームを作ってテストする ( その95 )( eslint を 6.8.0 → 7.32.0 へ、jest を 26.0.1 → 27.2.4 へバージョンアップする )
概要
記事一覧はこちらです。
Spring Boot + npm + Geb で入力フォームを作ってテストする ( その94 )( Node.js を 12.16.3 → 14.18.0 へバージョンアップする ) の続きです。
- 今回の手順で確認できるのは以下の内容です。
- eslint を 6.8.0 → 7.32.0 へ、jest を 26.0.1 → 27.2.4 へバージョンアップします。
参照したサイト・書籍
package.json に記載されているパッケージのバージョンアップ方法 【 npm-check-updates, outdated 】
https://qiita.com/sugurutakahashi12345/items/df736ddaf65c244e1b4fTesting Asynchronous Code
https://jestjs.io/docs/asynchronousaxios - Cancellation
https://github.com/axios/axios#cancellationNode.js v15に実装されたAbortController
https://www.mitsue.co.jp/knowledge/blog/frontend/202012/14_0900.html
目次
- eslint を 6.8.0 → 7.32.0 へ、eslint-config-airbnb-base を 14.1.0 → 14.2.1 へ、eslint-config-prettier を 6.11.0 → 8.3.0 へ、eslint-plugin-import を 2.20.1 → 2.24.2 へ、eslint-plugin-prettier を 3.1.3 → 4.0.0 へバージョンアップする
- jest を 26.0.1 → 27.2.4 へバージョンアップする
- テストが失敗した原因を解消する
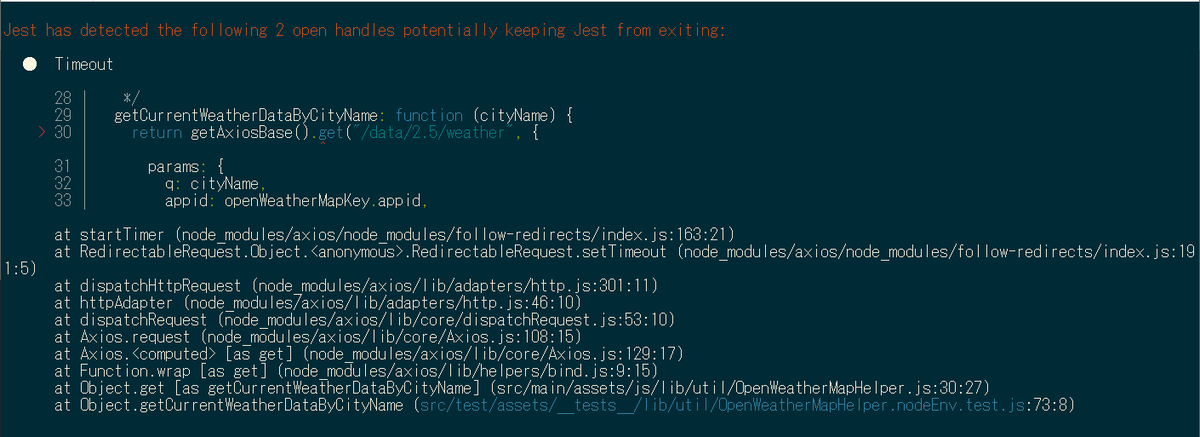
The error below may be caused by using the wrong test environment, see https://jestjs.io/docs/configuration#testenvironment-string. Consider using the "jsdom" test environment.jQuery requires a window with a documentTest functions cannot both take a 'done' callback and return something. Either use a 'done' callback, or return a promise.Jest has detected the following 2 open handles potentially keeping Jest from exiting:jest.setTimeout(...);を呼び出しても効かないようなので jest.config.json に testTimeout を設定する方法に切り替える
手順
eslint を 6.8.0 → 7.32.0 へ、eslint-config-airbnb-base を 14.1.0 → 14.2.1 へ、eslint-config-prettier を 6.11.0 → 8.3.0 へ、eslint-plugin-import を 2.20.1 → 2.24.2 へ、eslint-plugin-prettier を 3.1.3 → 4.0.0 へバージョンアップする
以下のコマンドを実行して eslint 関連のモジュールを最新のバージョンにします。
npm install --save-dev eslint@7.32.0npm install --save-dev eslint-config-airbnb-base@14.2.1npm install --save-dev eslint-config-prettier@8.3.0npm install --save-dev eslint-plugin-import@2.24.2npm install --save-dev eslint-plugin-prettier@4.0.0
npm test コマンドを実行するとテストは全て成功し、
npm run build コマンドも正常に終了しました。
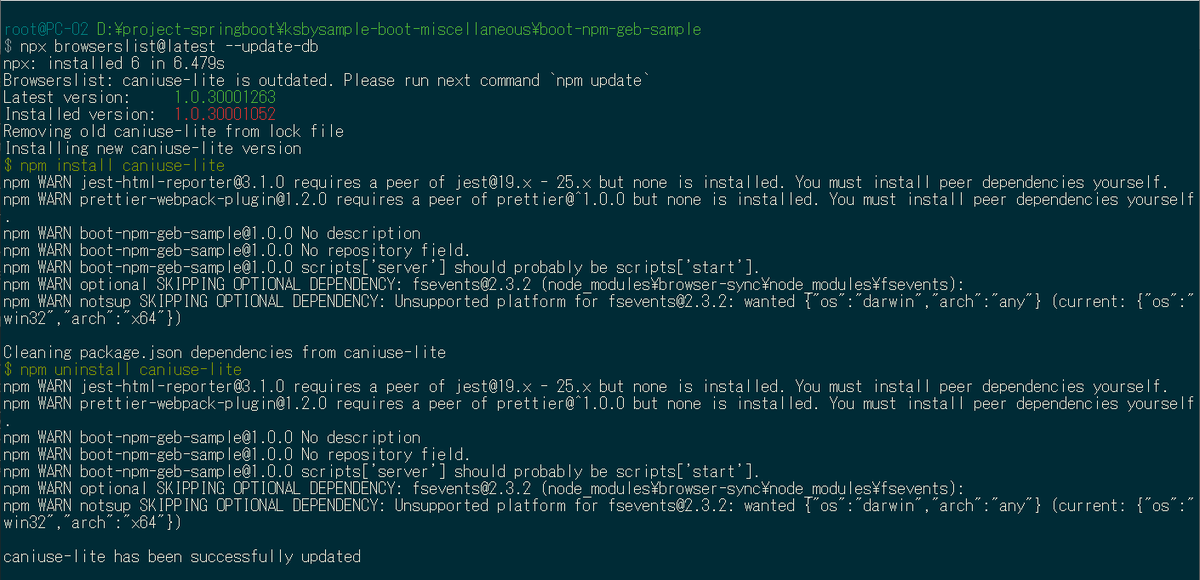
途中で npx browserslist@latest --update-db のコマンドを実行するようメッセージが出力されているので、実行します。npm update は eslint 以外のモジュールもバージョンアップされるので(しかも必ずしも最新バージョンになる訳ではないらしい)実行しません。
jest を 26.0.1 → 27.2.4 へバージョンアップする
以下のコマンドを実行します。
npm install --save-dev jest@27.2.4npm install --save-dev jest-html-reporter@3.4.1
レポートファイルを削除したいので最初に gradle から clean タスクを実行しておきます。
npm test コマンドを実行するとテストが大量に失敗するようになりました。。。

build/reports/jest/jest-html-reporter.html にレポートが出力されていますが、failed の赤ばかりです。
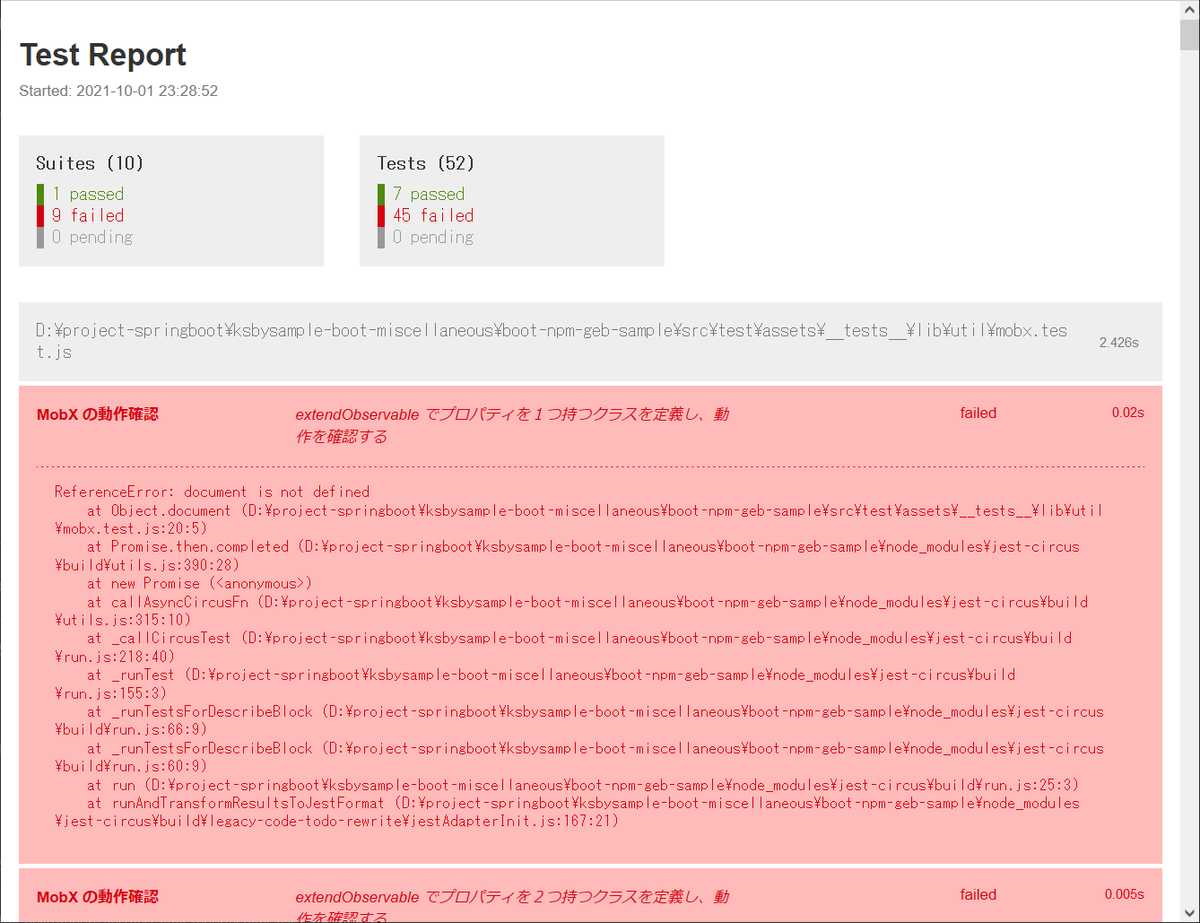
エラーになったテストで出力されているメッセージは全部で4つあり、1つ目は The error below may be caused by using the wrong test environment, see https://jestjs.io/docs/configuration#testenvironment-string. Consider using the "jsdom" test environment.。
2つ目は jQuery requires a window with a document。

3つ目は Test functions cannot both take a 'done' callback and return something. Either use a 'done' callback, or return a promise.。
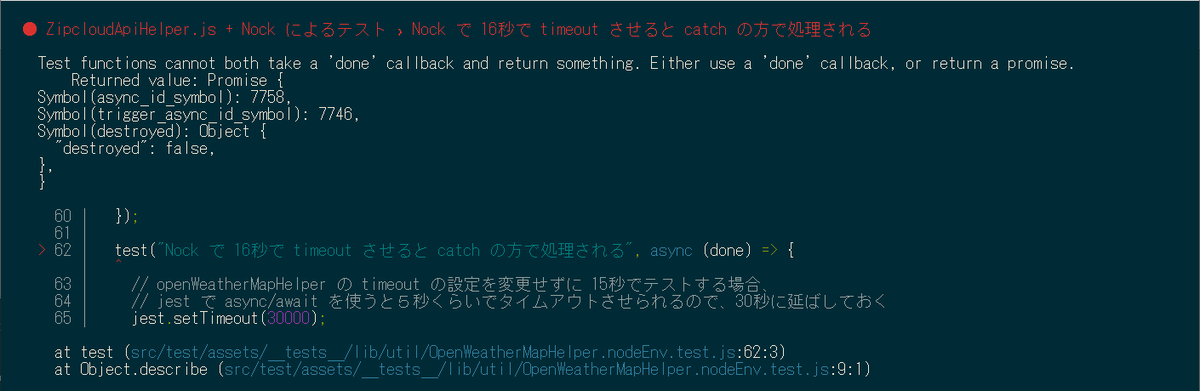
4つ目は Jest has detected the following 2 open handles potentially keeping Jest from exiting:。
テストが失敗した原因を解消する
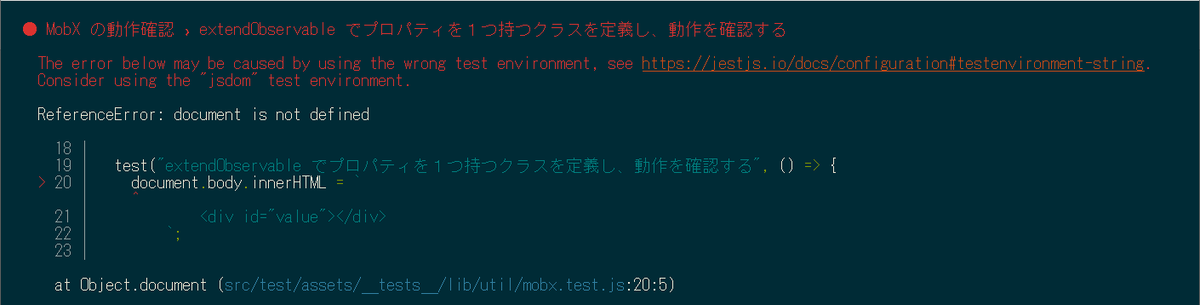
The error below may be caused by using the wrong test environment, see https://jestjs.io/docs/configuration#testenvironment-string. Consider using the "jsdom" test environment.
エラーメッセージに出力されている https://jestjs.io/docs/configuration#testenvironment-string を見ると The test environment that will be used for testing. The default environment in Jest is a Node.js environment. If you are building a web app, you can use a browser-like environment through jsdom instead. という記述があり、テストファイルの先頭に @jest-environment docblock を追加して @jest-environment jsdom を記述すれば解決するようですが、さすがに各テストファイルに記述するのは避けたいところです。
jest.config.json に "testEnvironment": "jsdom", を追加することにします。
{
  "coverageDirectory": "build/reports/jest",
  "moduleDirectories": [
    "node_modules",
    "src/main/assets/js"
  ],
  "testEnvironment": "jsdom",
  "reporters": [
    "default",
    [
      "./node_modules/jest-html-reporter",
      {
        "pageTitle": "Test Report"
      }
    ]
  ]
}
また Jest 27: New Defaults for Jest, 2021 edition に For this reason, we are changing the default test environment from "jsdom" to "node". という記述がありました。For this reason の前の文章を読むと jsdom はパフォーマンス・オーバーヘッドがあるので default を node に変更したとのこと。今後は必要なテストだけテストファイルの先頭に @jest-environment docblock を追加する方式にした方が良いのでしょう。
jQuery requires a window with a document
testEnvironment を jsdom に変更したら出力されなくなりました。
Test functions cannot both take a 'done' callback and return something. Either use a 'done' callback, or return a promise.
https://jestjs.io/blog/2020/05/05/jest-26#other-breaking-changes-in-jest-26 に [jest-circus] Fail tests if a test takes a done callback and have return value という記述がありました。
done callback を使っているとテストが失敗するようになったことは分かりましたが、これだけでは対応方法が分かりません。他に参考になるものがないか調べてみると Done.fail function is not working の中に Testing Asynchronous Code へのリンクがありました。このページに対応方法が記載されています。
リンク先の記述に従って修正すると以下のコードの場合には、
  test("Nock で 500 を返すと catch の方で処理される", async (done) => {
    nock("http://api.openweathermap.org")
      .get(/^\/data\/2\.5\/weather/)
      .reply(500);

    await openWeatherMapHelper
      .getCurrentWeatherDataByCityName("Tokyo")
      .then((response) => {
        done.fail("then に処理が来たらエラー");
      })
      .catch((e) => {
        expect(e.response.status).toBe(500);
      });

    // test("...", async done => { ...}); と done を記述している場合には、テストの最後で done(); を呼び出さないと
    // 5秒待機した後、
    // Error: Timeout - Async callback was not invoked within timeout specified by jasmine.DEFAULT_TIMEOUT_INTERVAL.
    // のエラーメッセージを表示してテストが失敗する
    // ※https://facebook.github.io/jest/docs/en/asynchronous.html#callbacks 参照
    done();
  });
async/await を取り除いて Promise を返すようにするか(Promise を返せば Jest は Promise が完了するまで待つとのこと)、
  test("Nock で 500 を返すと catch の方で処理される", () => {
    expect.assertions(1);

    nock("http://api.openweathermap.org")
      .get(/^\/data\/2\.5\/weather/)
      .reply(500);

    return openWeatherMapHelper
      .getCurrentWeatherDataByCityName("Tokyo")
      .catch(e => expect(e.response.status).toBe(500));
  });
async/await を残すならば try...catch で以下のように記述すればテストが成功するようになります。
  test("Nock で 500 を返すと catch の方で処理される", async () => {
    expect.assertions(1);

    nock("http://api.openweathermap.org")
      .get(/^\/data\/2\.5\/weather/)
      .reply(500);

    try {
      await openWeatherMapHelper.getCurrentWeatherDataByCityName("Tokyo");
    } catch (e) {
      expect(e.response.status).toBe(500);
    }
  });
今回は後者の async/await を残して try...catch で対応することにします。
async (done)→async ()に変更する。done();あるいはdone.~を呼び出している箇所を削除する。- テストの最初に
expect.assertions(1);を記述する(assertions メソッドに渡す数字はテストで expect が呼び出される回数を指定する)。https://jestjs.io/docs/expect#expectassertionsnumber を読むと async を付けたテストメソッドの場合、きちんとテストが実行されているのかを確認するために expect.assertions を書いた方が良いらしい。 - await を付けて呼び出しているところを、await を取り除いて try...catch で囲む記述に変更する。
Jest has detected the following 2 open handles potentially keeping Jest from exiting:
package.json で jest を実行するコマンドに --detectOpenHandles オプションを付けているのでテスト終了時にオープンされたままのハンドラが検知・出力されるのですが、以前から付けていて Jest 27 にバージョンアップされたらこれまで検知されていなかったものが検知されるようになったようです。
  "scripts": {
    "test": "run-s prettier:format prettier:format-test jest",
    "jest": "jest --config=jest.config.json --coverage --runInBand --detectOpenHandles",
    ..........
axios のリクエストを cancel する方法が https://github.com/axios/axios#cancellation に記述されており、これを使えば解消しそうな気がするのですが、うまく実装できません。。。 テストは成功しているので、今回は特に何もしないことにします。
また https://jestjs.io/docs/cli#--detectopenhandles によると --detectOpenHandles はデバッグ時のみ使用するよう書かれていたので、テストが並列で実行されなくなる --runInBand オプションと合わせて外すことにします。
  "scripts": {
    "test": "run-s prettier:format prettier:format-test jest",
    "jest": "jest --config=jest.config.json --coverage",
    "jest:debug": "jest --config=jest.config.json --coverage --runInBand --detectOpenHandles",
    ..........
jest.setTimeout(...); を呼び出しても効かないようなので jest.config.json に testTimeout を設定する方法に切り替える
上記4つの調査でいろいろ試している時に気づいたのですが、テストメソッド内で jest.setTimeout(30000); を呼び出しても 5秒経過するとテストがエラーになりました。jest.config.json に "testTimeout": 30000, を設定すれば有効になるようなので、こちらの設定に切り替えます。
{
  "coverageDirectory": "build/reports/jest",
  "moduleDirectories": [
    "node_modules",
    "src/main/assets/js"
  ],
  "testEnvironment": "jsdom",
  "testTimeout": 30000,
  "reporters": [
    "default",
    [
      "./node_modules/jest-html-reporter",
      {
        "pageTitle": "Test Report"
      }
    ]
  ]
}
npm test コマンドを実行すると A worker process has failed to exit gracefully and has been force exited. This is likely caused by tests leaking due to improper teardown. Try running with --detectOpenHandles to find leaks. というメッセージが出力されますが、テストは全て成功するようになりました。

build/reports/jest/jest-html-reporter.html のレポートも passed の緑のみになっています。

履歴
2021/10/03
初版発行。
Spring Boot + npm + Geb で入力フォームを作ってテストする ( その94 )( Node.js を 12.16.3 → 14.18.0 へバージョンアップする )
概要
記事一覧はこちらです。
Spring Boot + npm + Geb で入力フォームを作ってテストする ( その93 )( WebDriver を最新バージョンに上げる ) の続きです。
- 今回の手順で確認できるのは以下の内容です。
- Node.js を 12.16.3 → 14.18.0 へバージョンアップします。npm は 6.14.5 のままです(npm 7 系は Node.js の 16.x から対応のようなので)。
- これまで Node.js のバージョン管理ツールとして nodist を使用していましたが 30 Mar 2019 にリリースされた 0.9.1 でバージョンが止まっており、Node.js の 14.x 系へのバージョンアップもスムーズに出来ないようなのと、nvm-windows の 1.1.8 が2週間程前にちょうどリリースされたので、nvm-windows に切り替えることにします。
- npm でインストールしているモジュールを一部を除き最新のバージョンにします。
参照したサイト・書籍
2020 年ではもう使えない Nodist はアンインストールする (Windows)
https://zenn.dev/ymasaoka/articles/note-uninstall-nodish-windowscoreybutler / nvm-windows
https://github.com/coreybutler/nvm-windowsnode-gradle / gradle-node-plugin
https://github.com/node-gradle/gradle-node-pluginNode.jsの新LTS版となる「Node.js 16」正式リリース。Apple M1チップ対応、JavaScriptエンジン「V8 9.0」搭載など新機能
https://www.publickey1.jp/blog/21/nodejsltsnodejs_16apple_m1javascriptv8_90.html- Node.js は 16.x 系がリリースされていたはずと思っていたら、アクティブな LTS になるのはリリースから6ヶ月後の 10月下旬からでした。npm 7対応も 16.x からのようです。
目次
- まずは現在の状況を確認する
- nodist をアンインストールする
- nvm-windows をインストールして Node.js を 12.16.3 → 14.18.0 へバージョンアップする
- モジュールを最新のバージョンにする
- Gradle の npm-script 実行用のプラグインを
com.moowork.node:1.3.1→com.github.node-gradle.node:3.1.1に変更する
手順
まずは現在の状況を確認する
現在のバージョンは nodist が 0.9.1、Node.js が 12.16.3、npm が 6.14.5 です。

https://nodejs.org/ja/ を見ると Node.js の推奨版は 14.18.0 LTS です。

nodist をアンインストールする
2020 年ではもう使えない Nodist はアンインストールする (Windows) の記事を見つけたので、ここに記載されている手順でアンインストールします。
コントロールパネルの「プログラムと機能」の画面を開き、nodist を選択してコンテキストメニューを表示してから「アンインストールと変更」を選択します。

D:\Nodist にインストールしていましたが、アンインストール後もこのディレクトリが残っているので削除します。
C:\Users\<ユーザ名>\.npmrc のファイルを削除します。
C:\Users\root\AppData\Roaming\npm-cache のディレクトリを削除します。
コマンドプロンプトで実行を試みると、nodist、Node.js、npm の全てが実行できなくなっていることが確認できました。

nvm-windows をインストールして Node.js を 12.16.3 → 14.18.0 へバージョンアップする
https://github.com/coreybutler/nvm-windows/releases の「1.1.8 - Corepack」から nvm-setup.zip をダウンロードします。
ダウンロードしたファイルを解凍すると nvm-setup.exe が生成されるので実行します。
- 「Setup - NVM for Windows」画面が表示されるので、「I accept the agreement」を選択後「Next」ボタンをクリックします。
- 「Select Destination Location」画面が表示されるので、インストール先を
D:\nvmに変更後「Next」ボタンをクリックします。 - 「Set Node.js Symlink」画面が表示されるので、
D:\nodejsに変更後「Next」ボタンをクリックします。 - 「Ready to install」画面が表示されるので、「Install」ボタンをクリックします。
- 「Completing the NVM for Windows Setup Wizard」画面が表示されるので、「Finish」ボタンをクリックします。
インストール後に環境変数を確認すると NVM_HOME、NVM_SYMLINK の2つが追加されて、この2つの環境変数を参照するよう PATH に追加されていました。
1.1.8 で nvm install lts というコマンドが追加されており、実行すると自動で現在の LTS である 14.18.0 がインストールされます。素晴らしい!

nvm use 14.18.0 コマンドを実行するよう書かれているので実行します。。。が、エラーになる上に SJIS の文字コードだとエラーメッセージが文字化けして読めません。

nvm use 14.18.0 > nvm.log でファイルに出力してから IntelliJ IDEA で確認してみると、exit status 1: この操作を実行するための十分な特権がありません。 というエラーメッセージでした。
コマンドプロンプトを「管理者として実行」で起動してから nvm use 14.18.0 コマンドを実行すると、正常に実行されました。

管理者として実行していないコマンドプロンプトに戻ってバージョンを確認すると、nvm が 1.1.8、Node.js が 14.18.0、npm が 6.14.5 になっていました。

モジュールを最新のバージョンにする
バージョンアップ可能なモジュールを確認します。IntelliJ IDEA のメインメニューから「File」-「Settings...」を選択して「Settings」ダイアログを開き、画面左側で「Language & Frameworks」-「Node.js and NPM」を選択します。。。が、node、npm を認識していませんでした。後から気づきましたが、nvm use 14.18.0 コマンド実行後に IntelliJ IDEA を再起動し忘れているのが原因なので、手動で追加して認識させる必要はありませんでした。。。

手動で追加して認識させることにします。「Node interpreter」の右にある「...」ボタンをクリックします。

「Node interpreters」ダイアログが表示されるので、画面左上の「+」ボタンをクリックした後ドロップダウンメニューから「Add Local...」を選択します。

「Select Path」ダイアログが表示されるので、D:\nodejs\node.exe を選択して「OK」ボタンをクリックします。

D:\Nodist\... のパスが登録されていますが邪魔なので選択して「-」ボタンをクリックして削除します。

削除後「OK」ボタンをクリックしてダイアログを閉じて「Settings」ダイアログに戻ると、今度は画面右側にモジュールの一覧と現行バージョン、最新バージョン一覧が表示されました。


今回は以下の方針でバージョンアップします。
- admin-lte、bootstrap、ionicons は現行のまま。
- mobx、mobx-utils は少し触ってみただけなのでバージョンアップしない。
- eslint、jest、autoprefixer + cssnano + postcss-cli、prettier、stylelint + stylelint-config-standard、webpack + webpack-cli は別に章を分けてバージョンアップする。
- バージョンアップは
npm updateではなくnpm install --save-dev autoprefixer@8.0.0(package.json の dependencies に記載されているものは --save、devDependencies に記載されているものは --save-dev にする) のようにバージョンを指定しながらバージョンアップする。 - 1つずつ上からバージョンアップする。関連しそうなところを動作確認しながら進める。
特に問題がでなければ画面キャプチャは撮りません。
npm install --save-dev acorn@8.5.0npm install --save-dev axios@0.21.4npm install --save-dev browser-sync@2.27.5npm install --save-dev http-proxy-middleware@2.0.1npm install --save-dev jquery@3.6.0npm install --save-dev jquery-mockjax@2.6.0npm install --save-dev nock@13.1.3
npm install コマンドを実行してから(npm scripts の postinstall の処理を実行するため) npm test コマンドを実行すると全てのテストが成功しました。

npm run build コマンドも正常に終了しました。

clean タスク実行 → Rebuild Project 実行 → build タスク実行は npmTest タスクでエラーになりました。

原因は nvm use 14.18.0 コマンド実行後に IntelliJ IDEA を再起動していないため、D:\nodejs のディレクトリ(コマンド実行後に作成されるシンボリックリンク)を認識できていないからでした。
IntelliJ IDEA を再起動すれば認識されるはずですが、Gradle の npm-script 実行用のプラグインは cmd.exe を呼び出さなくてもよい https://github.com/node-gradle/gradle-node-plugin が出ているので、切り替えることにします。
Gradle の npm-script 実行用のプラグインを com.moowork.node:1.3.1 → com.github.node-gradle.node:3.1.1 に変更する
build.gradle の以下の点を変更します。
plugins {
    ..........
    id "com.github.node-gradle.node" version "3.1.1"
    ..........
}

..........

task npmTest(type: NpmTask) {
    args = ["test"]
}
task npmBuild(type: NpmTask) {
    args = ["run", "build"]
}
npmBuild.dependsOn npmTest
processResources.dependsOn npmBuild
- plugins block の以下の点を変更します。
id "com.moowork.node" version "1.3.1"→id "com.github.node-gradle.node" version "3.1.1"に変更します。
- npmTest タスクの以下の点を変更します。
- type を
Exec→NpmTaskに変更します。 commandLine "cmd", "/c", "npm test >NUL 2>&1"→args = ["test"]に変更します。
- type を
- npmBuild タスクの以下の点を変更します。
- type を
Exec→NpmTaskに変更します。 commandLine "cmd", "/c", "npm run build >NUL 2>&1"→args = ["run", "build"]に変更します。
- type を
Gradle Tool Window の左上にある「Refresh all Gradle projects」ボタンをクリックして更新します。
clean タスク実行 → Rebuild Project 実行 → build タスク実行は問題なく BUILD SUCCESSFUL のメッセージが出力されて成功し、

gebTest タスクも BUILD SUCCESSFUL のメッセージが出力されて成功しました。

今回は browser-sync と http-proxy-middleware をバージョンアップしたので npm run springboot で起動してみましたが特に問題なく起動しました。


履歴
2021/10/01
初版発行。
Spring Boot + npm + Geb で入力フォームを作ってテストする ( その93 )( WebDriver を最新バージョンに上げる )
概要
記事一覧はこちらです。
何回かに分けて boot-npm-geb-sample プロジェクトのモジュールやツールを 2021/10 時点の最新バージョンにします。IntelliJ IDEA は 2021.2.2、JDK は Eclipse Temurin 11.0.12+7 を使用します。
- 今回の手順で確認できるのは以下の内容です。
参照したサイト・書籍
目次
手順
WebDriver のバージョンを最新にする
動作確認をする前に Chrome と Firefox のWebDriver を最新バージョンにします。Chrome の WebDriver は https://chromedriver.chromium.org/ を見ると Latest stable release は 94.0.4606.61、Firefox の WebDriver は https://github.com/mozilla/geckodriver/releases を見ると 0.30.0 でした。
build.gradle の以下の点を変更します。
webdriverBinaries {
    chromedriver "94.0.4606.61"
    geckodriver "0.30.0"
}
chromedriver "81.0.4044.69"→chromedriver "94.0.4606.61"に変更します。geckodriver "0.26.0"→geckodriver "0.30.0"に変更します。
変更後、Gradle Tool Window の左上にある「Refresh all Gradle projects」ボタンをクリックして更新します。
また chromedriver、geckodriver の exe もダウンロードして D:\chromedriver\94.0.4606.61、D:\geckodriver\0.30.0 の下に配置した後、src/test/resources/GebConfig.groovy の以下の点を変更します。
//System.setProperty("webdriver.gecko.driver", "D:/geckodriver/0.30.0/geckodriver.bat")
//System.setProperty("webdriver.chrome.driver", "D:/chromedriver/94.0.4606.61/chromedriver.exe")
driver = {
    ..........
D:/geckodriver/0.26.0/geckodriver.bat→D:/geckodriver/0.30.0/geckodriver.batに変更します。D:/chromedriver/81.0.4044.69/chromedriver.exe→D:/chromedriver/94.0.4606.61/chromedriver.exeに変更します。
build タスクと gebTest タスク、及び IDEA から Geb のテストを実行した時の動作確認する
clean タスク実行 → Rebuild Project 実行 → build タスク実行を行うと compileTestGroovy タスクで警告のメッセージが出ますが、BUILD SUCCESSFUL のメッセージが表示されます。Spring Boot + npm + Geb で入力フォームを作ってテストする ( その83 )( Checkstyle を 8.11 → 8.19 へ、PMD を 6.6.0 → 6.13.0 へバージョンアップ+JUnit 5 の導入+ Oracle JDK 8u202 → AdoptOpenJDK 11.0.2+9 へ、error-prone を 2.3.1 → 2.3.3 へバージョンアップする) と同じ状況ですので、これは OK。

Web アプリを起動してから gebTest タスクを実行してみると、こちらも BUILD SUCCESSFUL のメッセージが表示されました。

次は IDEA から Geb のテストを実行してみます。src/test/resources/GebConfig.groovy の上に記述している WebDriver のパスの設定のコメントを解除してから、
System.setProperty("webdriver.gecko.driver", "D:/geckodriver/0.30.0/geckodriver.bat")
System.setProperty("webdriver.chrome.driver", "D:/chromedriver/94.0.4606.61/chromedriver.exe")
driver = {
    ChromeOptions chromeOptions = new ChromeOptions()
    new ChromeDriver(chromeOptions)
//    FirefoxOptions firefoxOptions = new FirefoxOptions()
//    new FirefoxDriver(firefoxOptions)
}
src/test/groovy/geb/gebspec/inquiry/InquiryTestSpec.groovy を開いてテストを実行します。

Chrome はすべてのテストが成功しました。

Firefox に切り替えてテストを実行すると、
System.setProperty("webdriver.gecko.driver", "D:/geckodriver/0.30.0/geckodriver.bat")
System.setProperty("webdriver.chrome.driver", "D:/chromedriver/94.0.4606.61/chromedriver.exe")
driver = {
//    ChromeOptions chromeOptions = new ChromeOptions()
//    new ChromeDriver(chromeOptions)
    FirefoxOptions firefoxOptions = new FirefoxOptions()
    new FirefoxDriver(firefoxOptions)
}
こちらもすべてのテストが成功しました。

履歴
2021/09/29
初版発行。
Spring Boot 2.4.x の Web アプリを 2.5.x へバージョンアップする ( その14 )( google_checks.xml に Record に関する定義を反映する+bootBuildImage タスクで Java 17 ベースの Docker Image を作成して動作確認する )
概要
記事一覧はこちらです。
- 今回の手順で確認できるのは以下の内容です。
- Java 17 にバージョンアップしたので、checkstyle の定義ファイル google_checks.xml にエラーが出るので未反映だった Record に関する定義を反映します。
- bootBuildImage タスクを実行して Java 17 ベースの docker.io/library/ksbysample-webapp-lending:2.5.5 の Docker Image を作成して動作確認します。
参照したサイト・書籍
checkstyle/checkstyle - checkstyle/src/main/resources/google_checks.xml
https://github.com/checkstyle/checkstyle/blob/master/src/main/resources/google_checks.xml"network default: network.external.name is deprecated in favor of network.name"
https://github.com/docker/compose-cli/issues/1856
目次
手順
google_checks.xml に Record に関する定義を反映する
google_checks.xml から Record に関する定義を反映します。今回反映した内容を箇条書きで記述しておきます。
- RECORD_DEF、RECORD_COMPONENT_DEF の記述が未反映の箇所に反映しました。
<module name="RecordComponentName">.....</module>を追加しました。<module name="RecordTypeParameterName">.....</module>を追加しました。
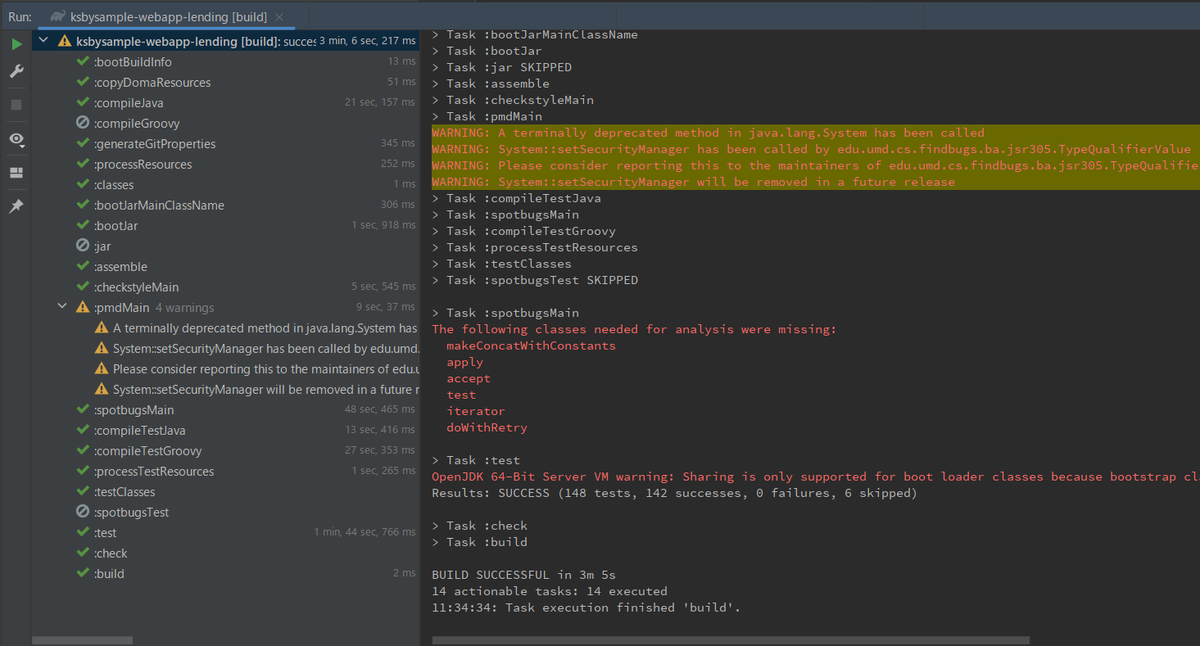
clean タスク実行 → Rebuild Project 実行 → build タスクを実行すると checkstyleMain タスクで何もログは出力されず、"BUILD SUCCESSFUL" のメッセージが出力されました。
bootBuildImage タスクで Java 17 ベースの Docker Image を生成し動作確認する
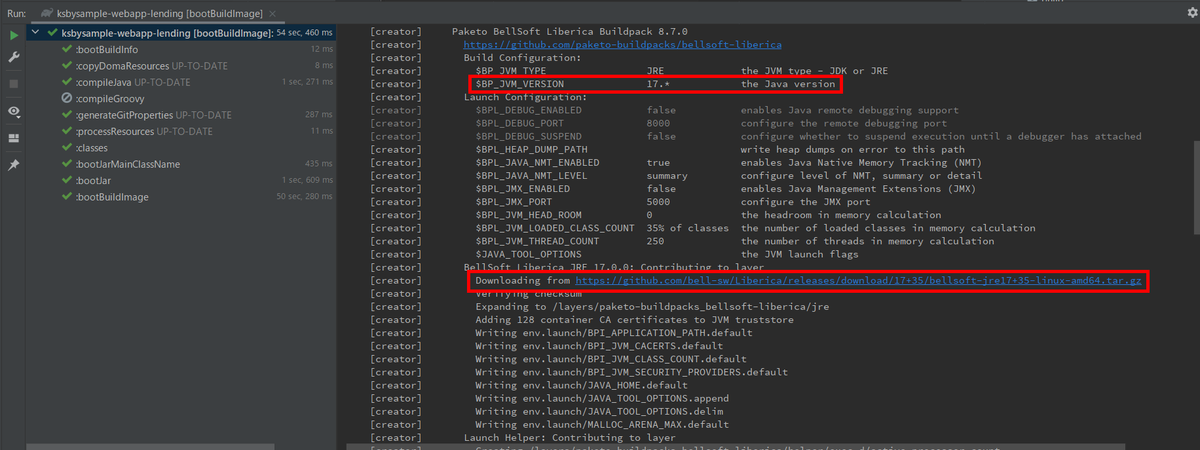
bootBuildImage タスクを実行して ksbysample-webapp-lending:2.5.5 の Docker Image を生成します。
https://github.com/bell-sw/Liberica/releases/download/17+35/bellsoft-jre17+35-linux-amd64.tar.gz がダウンロードされて BUILD SUCCESSFUL のメッセージが出力されました。bootBuildImage タスクも Java 17 対応されているようです。
 ..........

docker-compose.app.yml を以下のように変更します。
  app:
    image: ksbysample-webapp-lending:2.5.5
    environment:
      - JAVA_TOOL_OPTIONS=-Dspring.profiles.active=product -Dlogging.appender=CONSOLE
      - SPRING_DATASOURCE_HIKARI_JDBC_URL=jdbc:postgresql://postgresql/ksbylending
      - SPRING_MAIL_HOST=mail-server
      - SPRING_RABBITMQ_HOST=haproxy
    deploy:
      mode: replicated
      replicas: 3
    # entrypoint: /bin/bash
    # stdin_open: true
    # tty: true
image: ksbysample-webapp-lending:2.5.4→image: ksbysample-webapp-lending:2.5.5に変更します。
docker-compose -f docker-compose.mail.yml up -d コマンドを実行します。。。が、network default: network.external.name is deprecated in favor of network.name というメッセージが出力されていることに気づきました。

調べてみると https://github.com/docker/compose-cli/issues/1856 のことで、Docker Compose V2 から記述の仕方が変更になるようです。docker-compose -f docker-compose.mail.yml down を実行した後、docker-compose.mail.yml、docker-compose.app.yml の networks の記述を以下のように変更します。
networks:
  default:
    name: ksbysample-webapp-lending_default
    external: true
- networks.default.external.name → networks.default.name に変更し、name と同じ階層に
external: trueを追加します。
docker-compose -f docker-compose.mail.yml up -d、docker-compose -f docker-compose.app.yml up -d コマンドを実行します。

http://localhost:8080/haproxy?stats にアクセスして全てのインスタンスが緑色になるまで待ちます。

Spring Boot 2.4.x の Web アプリを 2.5.x へバージョンアップする ( その11 )( Docker で複数の Tomcat を起動して動作確認する ) に書いてある手順で動作確認します(画面キャプチャは省略します)。
動作確認は特に問題ありませんでした。
docker-compose -f docker-compose.app.yml down、docker-compose -f docker-compose.mail.yml down、docker-compose down コマンドを実行してコンテナを停止します。
履歴
2021/09/29
初版発行。