Spring Boot + npm + Geb で入力フォームを作ってテストする ( その55 )( PMD を 5.8.1 → 6.4.0 へバージョンアップする )
概要
記事一覧はこちらです。
Spring Boot + npm + Geb で入力フォームを作ってテストする ( その54 )( webpack を 3.8.1 → 4.9.1 へバージョンアップする ) の続きです。
- 今回の手順で確認できるのは以下の内容です。
参照したサイト・書籍
PMD Release Notes - 15-December-2017 - 6.0.0
https://pmd.github.io/pmd-6.0.0/pmd_release_notes.html#metrics-frameworkPMD Making Rulesets
https://pmd.github.io/pmd-6.4.0/pmd_userdocs_making_rulesets.htmlJava Rules
https://pmd.github.io/pmd-6.4.0/pmd_rules_java.html
目次
- build.gradle を変更する
- 変更の方針を決める
- category/java/bestpractices.xml
Unsupported build listener: class org.gradle.api.internal.project.ant.AntLoggingAdapter、Unsupported build listener: class org.apache.tools.ant.AntClassLoaderThis analysis could be faster, please consider using Incremental Analysis: https://pmd.github.io/pmd-6.4.0/pmd_userdocs_getting_started.html#incremental-analysis
- category/java/codestyle.xml
Variables that are final and static should be all capitals, '...' is not all capitals.Parameter '...' is not assigned and could be declared finalAvoid excessively long variable names like ...Local variable '...' could be declared finalEach class should declare at least one constructorAvoid variables with short names like ...Avoid the use of value in annotations when its the only elementAvoid unnecessary constructors - the compiler will generate these for youThe utility class name '...' doesn't match '[A-Z][a-zA-Z0-9]+(Utils?|Helper)'Use explicit scoping instead of the default package private levelTo avoid mistakes add a comment at the beginning of the ... field if you want a default access modifierA method should have only one exit point, and that should be the last statement in the method
- category/java/design.xml
Removed misconfigured rule: LoosePackageCoupling cause: No packages or classes specifiedAll methods are static. Consider using a utility class instead. Alternatively, you could add a private constructor or make the class abstract to silence this warning.The method '...' has a NCSS line count of ....Potential violation of Law of Demeter (method chain calls)This class has too many methods, consider refactoring it.The class '...' is suspected to be a Data ClassAvoid throwing raw exception types.Rather than using a lot of String arguments, consider using a container object for those values.The method '...' has a cyclomatic complexity of ....
- ここまでやってみた感想
手順
build.gradle を変更する
build.gradle の以下の点を変更します。
pmd {
    toolVersion = "6.4.0"
    sourceSets = [project.sourceSets.main]
    ignoreFailures = true
    consoleOutput = true
    ruleSetFiles = rootProject.files("/config/pmd/pmd-project-rulesets.xml")
    ruleSets = []
}
toolVersion = "5.8.1"→toolVersion = "6.4.0"に変更します。
変更後、Gradle Tool Window の左上にある「Refresh all Gradle projects」ボタンをクリックして更新します。
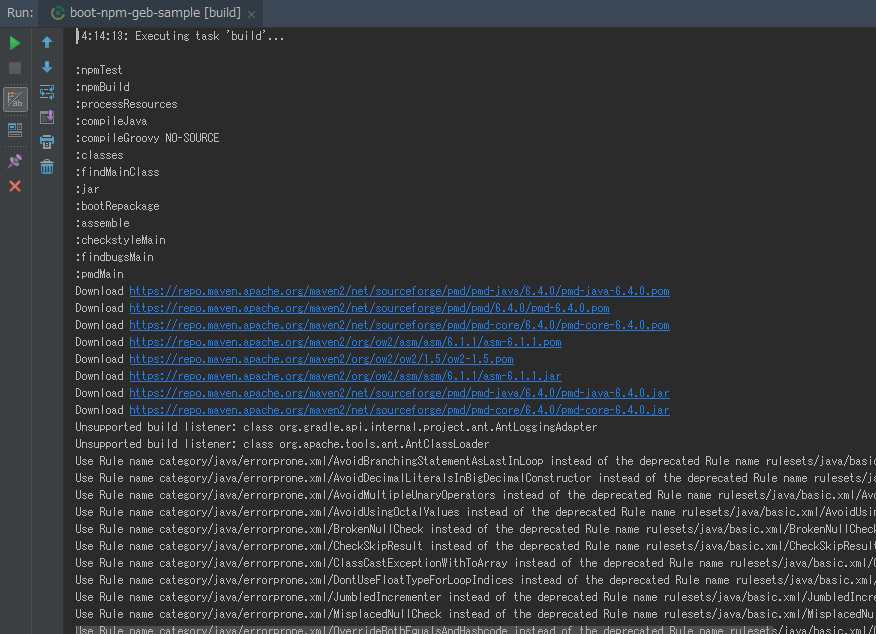
clean タスク実行 → Rebuild Project 実行 → build タスクを実行してみますが、相変わらず大量にエラーが出ています。。。
変更の方針を決める
PMD Release Notes - 15-December-2017 - 6.0.0、PMD Making Rulesets、Java Rules を見ると、Rule の Category が一新されていて1から見直した方が良さそうに思えたので、以下の方針で変更します。
- pmd-project-rulesets.xml は1から作り直します。build タスク実行で出力されたエラーメッセージを元に修正はしません。
- pmd-project-rulesets.xml には
<rule ref="category/java/bestpractices.xml" />のフォーマットで Category の xml ファイルを1つずつ記述して、build タスクを実行して結果を見て調整します。 - 現在 exclude している Rule は、基本的に同じように exclude します。
config/pmd/pmd-project-rulesets.xml を以下の内容に書き換えます。
<?xml version="1.0" encoding="UTF-8"?>
<ruleset name="mybraces"
         xmlns="http://pmd.sourceforge.net/ruleset/2.0.0"
         xmlns:xsi="http://www.w3.org/2001/XMLSchema-instance"
         xsi:schemaLocation="http://pmd.sourceforge.net/ruleset/2.0.0 http://pmd.sourceforge.net/ruleset_2_0_0.xsd">
    <description>project rulesets</description>

    <!--
        rulesets の種類・説明は 以下の URL 参照
        https://github.com/pmd/pmd/tree/master/pmd-java/src/main/resources/category/java
        https://github.com/pmd/pmd/tree/master/pmd-java/src/main/resources/rulesets/java
        https://pmd.github.io/pmd-6.4.0/pmd_rules_java.html
        ※"pmd-6.4.0" の部分は適用しているバージョンに変更すること。
    -->
    <rule ref="category/java/bestpractices.xml"/>
    ..........
</ruleset>
<rule ref="category/java/bestpractices.xml"/> の部分に1つずつ category を記述して調整していきます。
category/java/bestpractices.xml
PMD のルール違反は出ませんでしたが、それ以外で以下のメッセージが出力されました。
:pmdMain
Unsupported build listener: class org.gradle.api.internal.project.ant.AntLoggingAdapter
Unsupported build listener: class org.apache.tools.ant.AntClassLoader
This analysis could be faster, please consider using Incremental Analysis: https://pmd.github.io/pmd-6.4.0/pmd_userdocs_getting_started.html#incremental-analysis
This analysis could be faster, please consider using Incremental Analysis: https://pmd.github.io/pmd-6.4.0/pmd_userdocs_getting_started.html#incremental-analysis
Unsupported build listener: class org.gradle.api.internal.project.ant.AntLoggingAdapter、Unsupported build listener: class org.apache.tools.ant.AntClassLoader
コマンドラインから gradlew clean → gradlew --debug pmdMain を実行してみたところ、以下のログが出力されました。
16:06:18.934 [WARN] [org.gradle.api.internal.project.ant.AntLoggingAdapter] Unsupported build listener: class org.gradle.api.internal.project.ant.AntLoggingAdapter
16:06:18.935 [WARN] [org.gradle.api.internal.project.ant.AntLoggingAdapter] Unsupported build listener: class org.apache.tools.ant.AntClassLoader
Unsupported build listener で調べてみると
Gradle - Method details - addBuildListener) から Interface BuildListener が見つかりました。AntLoggingAdapter と AntClassLoader のクラスで BuildListener インターフェースが実装されていないのが原因のようです。
WARN のログなので、出力されたままにすることにします。
This analysis could be faster, please consider using Incremental Analysis: https://pmd.github.io/pmd-6.4.0/pmd_userdocs_getting_started.html#incremental-analysis
https://pmd.github.io/pmd-6.4.0/pmd_userdocs_getting_started.html#incremental-analysis のリンク先のページを見ると、なぜか Gradle だけリンクになっていませんね。。。
他にも調べてみると Revert "Support PMD's analysis cache (#2223)" が見つかりました。おそらく原因はこれだと思うのですが、まだ解決していないようです。対策がないようですので、出力されたままにします。
category/java/codestyle.xml
設定を追加して build タスクを実行すると 307 PMD rule violations were found. と出力されました。メッセージは以下の12種類でした。
Variables that are final and static should be all capitals, '...' is not all capitals.Parameter '...' is not assigned and could be declared finalAvoid excessively long variable names like ...Local variable '...' could be declared finalEach class should declare at least one constructorAvoid variables with short names like ...Avoid the use of value in annotations when its the only elementAvoid unnecessary constructors - the compiler will generate these for youThe utility class name '...' doesn't match '[A-Z][a-zA-Z0-9]+(Utils?|Helper)'Use explicit scoping instead of the default package private levelTo avoid mistakes add a comment at the beginning of the ... field if you want a default access modifierA method should have only one exit point, and that should be the last statement in the method
Variables that are final and static should be all capitals, '...' is not all capitals.
VariableNamingConventions のルール違反のメッセージです。前も exclude していたので、今回も exclude します。
Parameter '...' is not assigned and could be declared final
MethodArgumentCouldBeFinal のルール違反のメッセージです。前も exclude していたので、今回も exclude します。
Avoid excessively long variable names like ...
LongVariable のルール違反のメッセージです。前も exclude していたので、今回も exclude します。
Local variable '...' could be declared final
LocalVariableCouldBeFinal のルール違反のメッセージです。前も exclude していたので、今回も exclude します。
Each class should declare at least one constructor
AtLeastOneConstructor のルール違反のメッセージです。前は何もしていませんでしたが、今のところ対応する必要性を感じなかったので exclude します。
Avoid variables with short names like ...
ShortVariable のルール違反のメッセージです。前も exclude していたので、今回も exclude します。
Avoid the use of value in annotations when its the only element
UnnecessaryAnnotationValueElement のルール違反のメッセージです。PMD 6.2.0 から新規に追加された Rule です。指摘された箇所のアノテーションは削除しようがなかったので、exclude します。
Avoid unnecessary constructors - the compiler will generate these for you
UnnecessaryConstructor のルール違反のメッセージです。
メッセージが出ているのは src/main/java/ksbysample/webapp/bootnpmgeb/config/DomaConfig.java で、ルール違反を指摘されているコンストラクタを削除しても特に問題なかったので、ソースを修正してメッセージが出ないようにします。
The utility class name '...' doesn't match '[A-Z][a-zA-Z0-9]+(Utils?|Helper)'
ClassNamingConventions のルール違反のメッセージです。
メッセージが出ているのは以下の2つのクラスですが、static のフィールド・メソッドしかないと出ているようです。
- src/main/java/ksbysample/webapp/bootnpmgeb/constants/UrlConst.java
- src/main/java/ksbysample/webapp/bootnpmgeb/util/validator/EmailValidator.java
個人的にクラス名を変更したくなかったので、exclude することにします。
Use explicit scoping instead of the default package private level
DefaultPackage のルール違反のメッセージです。
メッセージが出ているのは Doma 2 の Entity クラスで対応しようがなかったので、exclude することにします。
To avoid mistakes add a comment at the beginning of the ... field if you want a default access modifier
CommentDefaultAccessModifier のルール違反のメッセージです。
メッセージが出ているのは Doma 2 の Entity クラスで、DomaGen で生成した時にコメントがついていないのが原因なので(確か COMMENT ON COLUMN ... IS '...'; でカラムにコメントを付けるとコメントに出るはず)、exclude することにします。
A method should have only one exit point, and that should be the last statement in the method
OnlyOneReturn のルール違反のメッセージです。
個人的にはメソッド内に複数 return を入れても構わないと思っているので、exclude します。
以上で category/java/codestyle.xml は以下のような定義になりました。
    <rule ref="category/java/codestyle.xml">
        <exclude name="VariableNamingConventions"/>
        <exclude name="MethodArgumentCouldBeFinal"/>
        <exclude name="LongVariable"/>
        <exclude name="LocalVariableCouldBeFinal"/>
        <exclude name="AtLeastOneConstructor"/>
        <exclude name="ShortVariable"/>
        <exclude name="UnnecessaryAnnotationValueElement"/>
        <exclude name="ClassNamingConventions"/>
        <exclude name="DefaultPackage"/>
        <exclude name="CommentDefaultAccessModifier"/>
        <exclude name="OnlyOneReturn"/>
    </rule>
category/java/design.xml
設定を追加して build タスクを実行すると 95 PMD rule violations were found. と出力されました。メッセージは以下の9種類でした。
Removed misconfigured rule: LoosePackageCoupling cause: No packages or classes specifiedAll methods are static. Consider using a utility class instead. Alternatively, you could add a private constructor or make the class abstract to silence this warning.The method '...' has a NCSS line count of ....Potential violation of Law of Demeter (method chain calls)This class has too many methods, consider refactoring it.The class '...' is suspected to be a Data ClassAvoid throwing raw exception types.Rather than using a lot of String arguments, consider using a container object for those values.The method '...' has a cyclomatic complexity of ....
Removed misconfigured rule: LoosePackageCoupling cause: No packages or classes specified
LoosePackageCoupling の設定がないというメッセージのようです。
リンク先の説明を読みましたが、今は必要そうに思えなかったので exclude することにします。
All methods are static. Consider using a utility class instead. Alternatively, you could add a private constructor or make the class abstract to silence this warning.
UseUtilityClass のルール違反のメッセージです。
ClassNamingConventions を exclude したのと同じ理由で、こちらも exclude します。
The method '...' has a NCSS line count of ....
NcssCount のルール違反のメッセージです。PMD 6.0.0 から新規に追加された Rule です。
実はこのルールが何を指摘しているのかよく分かりませんでした。。。 対応方法もよく分からないので exclude します。
Potential violation of Law of Demeter (method chain calls)
LawOfDemeter のルール違反のメッセージです。
リンク先の説明を読みましたが、有効性がよく分からなかったので exclude します。
This class has too many methods, consider refactoring it.
TooManyMethods のルール違反のメッセージです。
このルールは残しておきたいので、メッセージが表示された以下のクラスに @SuppressWarnings("PMD.TooManyMethods") を付けることにします。
The class '...' is suspected to be a Data Class
DataClass のルール違反のメッセージです。PMD 6.0.0 から新規に追加された Rule です。
メッセージが出ていたのが Doma 2 の Entity クラスだったのですが対応のしようがないのと、このルールの必要性も感じなかったので、exclude します。
Avoid throwing raw exception types.
AvoidThrowingRawExceptionTypes のルール違反のメッセージです。
エラーが明確に分かる例外クラスではなく RuntimeException を throw していたところでメッセージが出ていました。確かにその通りなので、今回はメッセージが出ている以下のクラスに @SuppressWarnings("PMD.AvoidThrowingRawExceptionTypes") を付けることにします。
- src/main/java/ksbysample/webapp/bootnpmgeb/helper/freemarker/FreeMarkerHelper.java
- src/main/java/ksbysample/webapp/bootnpmgeb/values/ValuesHelper.java
- src/main/java/ksbysample/webapp/bootnpmgeb/values/validation/ValuesEnumValidator.java
Rather than using a lot of String arguments, consider using a container object for those values.
UseObjectForClearerAPI のルール違反のメッセージです。
メソッドの引数が多い場合に Parameter クラスを新規作成してそちらでも渡せるようにした方がよい、というルールのようです。今のところ必要性を感じなかったので exclude します。
The method '...' has a cyclomatic complexity of ....
CyclomaticComplexity のルール違反のメッセージです。
1メソッド内の行数(処理量?)が多いと出るメッセージで有効だと思うのですが、今回は exclude します。
以上で category/java/codestyle.xml は以下のような定義になりました。
    <rule ref="category/java/design.xml">
        <exclude name="LoosePackageCoupling"/>
        <exclude name="UseUtilityClass"/>
        <exclude name="NcssCount"/>
        <exclude name="LawOfDemeter"/>
        <exclude name="DataClass"/>
        <exclude name="UseObjectForClearerAPI"/>
        <exclude name="CyclomaticComplexity"/>
    </rule>
ここまでやってみた感想
今回は Rule の exclude 有無を1つずつ見直していますが、単純にバージョンアップするなら以下の方針で構わないと思います。
- build.gradle の記述については特に変更する必要はありません。
- 独自の Rulesets は書き方が変わっているので書き直しが必要。https://github.com/pmd/pmd/tree/master/pmd-java/src/main/resources/category/java の category の一覧を見て、xml ファイルに
<rule ref="category/java/bestpractices.xml"/>のフォーマットで全て列挙します。 - その後に build タスクを実行して、メッセージが出力された Rule を全て exclude します。
- 6 以降に追加された Rule は exclude されたままにせず確認して追加するのか exclude したままにするのか判断します。
履歴
2018/06/03
初版発行。
Spring Boot + npm + Geb で入力フォームを作ってテストする ( その54 )( webpack を 3.8.1 → 4.9.1 へバージョンアップする )
概要
記事一覧はこちらです。
Spring Boot + npm + Geb で入力フォームを作ってテストする ( その53 )( Gradle を 3.5 → 4.6 へバージョンアップする ) の続きです。
- 今回の手順で確認できるのは以下の内容です。
- webpack を 3.8.1 → 4.9.1 へバージョンアップします。
参照したサイト・書籍
webpack/webpack-cli
https://github.com/webpack/webpack-cliwebpack-contrib/webpack-command
https://github.com/webpack-contrib/webpack-commandMigrating to Webpack 4 today
https://codeburst.io/migrating-to-webpack-4-today-d564b453a3bawebpack@4のmodeとminimize(UglifyJS)
https://numb86-tech.hatenablog.com/entry/2018/03/08/200527webpack-contrib/uglifyjs-webpack-plugin
https://github.com/webpack-contrib/uglifyjs-webpack-plugin
目次
- webpack を 3.8.1 → 4.9.1 へバージョンアップする
npm run buildコマンドを実行してみる- webpack-cli をインストールする
- 再び
npm run buildコマンドを実行してみる - uglifyjs-webpack-plugin を 1.2.2 → 1.2.5 へバージョンアップする
- webpack.config.js を変更する
- package.json を変更する
- cross-env をアンインストールする
- 動作確認
- webpack.config.js から optimization、devtool の設定を取り除くとどうなるのか?
手順
webpack を 3.8.1 → 4.9.1 へバージョンアップする
npm install --save-dev webpack@4.9.1 コマンドを実行します。

npm run build コマンドを実行してみる
バージョンアップしただけで webpack.config.js は何も修正していない状態で npm run build コマンドを実行してみます。

CLI が別のパッケージになったので webpack-cli か webpack-command をインストールするようメッセージが出力されました。webpack-cli と webpack-command の違いは webpack-command サイト内の Differences With webpack-cli に記述があります。
今回は webpack-cli をインストールします。
webpack-cli をインストールする
npm install --save-dev webpack-cli コマンドを実行します。

再び npm run build コマンドを実行してみる
再び npm run build コマンドを実行してみます。


webpack 4 から追加された --mode オプションを指定していないので、WARNING のメッセージが出力されました。
webpack 3 → 4 へのマイグレーション関連の記事を Web で調べて、以下の点を変更することにします。
- webpack を実行している npm scripts に
--modeオプションを追加します。 - cross-env パッケージが不要になるのでアンインストールします。
- webpack 4 では
--mode developmentが指定されている時には最適化処理が実行されず、--mode productionが指定されている時には最適化処理が実行されるようになったので、Uglify の設定を変更します。 - uglifyjs-webpack-plugin をインストールしなくても
--mode productionが指定されていると Uglify されるのですが、デフォルトの設定ではconsole.log()が削除されないようなので、uglifyjs-webpack-plugin をインストールしたままにして独自に設定することにします。また uglifyjs-webpack-plugin を最新版にバージョンアップします。
uglifyjs-webpack-plugin を 1.2.2 → 1.2.5 へバージョンアップする
npm install --save-dev uglifyjs-webpack-plugin@1.2.5 コマンドを実行します。

webpack.config.js を変更する
webpack.config.js の以下の点を変更します。
const webpack = require("webpack");
const UglifyJsPlugin = require('uglifyjs-webpack-plugin');

// --mode オプションで指定された文字列を参照したい場合には argv.mode を参照する
module.exports = (env, argv) => {
    return {
        entry: {
            "js/inquiry/input01": ["./src/main/assets/js/inquiry/input01.js"],
            "js/inquiry/input02": ["./src/main/assets/js/inquiry/input02.js"],
            "js/inquiry/input03": ["./src/main/assets/js/inquiry/input03.js"],
            "js/inquiry/confirm": ["./src/main/assets/js/inquiry/confirm.js"]
        },
        output: {
            path: __dirname + "/src/main/resources/static",
            publicPath: "/",
            filename: "[name].js"
        },
        resolve: {
            modules: [
                "node_modules",
                "src/main/assets/js"
            ],
            alias: {
                jquery: "jquery"
            }
        },
        module: {
            rules: [
                {
                    test: /\.js$/,
                    exclude: [
                        /node_modules/,
                        /jquery.autoKana.js$/
                    ],
                    loader: "eslint-loader"
                }
            ]
        },
        optimization: {
            minimizer: [
                new UglifyJsPlugin({
                    uglifyOptions: {
                        compress: true,
                        ecma: 5,
                        output: {
                            comments: false
                        },
                        compress: {
                            dead_code: true,
                            drop_console: true
                        }
                    },
                    sourceMap: false
                })
            ]
        },
        plugins: [
            new webpack.ProvidePlugin({
                $: "jquery",
                jQuery: "jquery"
            })
        ],
        devtool: "inline-source-map"
    };
};
const isProduct = process.env.NODE_ENV === "product";を削除します。--modeオプションで指定されたモードを参照できるようにするために、module.exports = { ... };→module.exports = (env, argv) => { return { ... }; };に変更します。これでargv.modeで--modeオプションで指定された文字列を参照できるようになります。optimization: { ... }を追加し、ここに UglifyJsPlugin の設定を記述します。optimization: { ... }の設定は--mode developmentの時には適用されず(Uglify や sourceMap出力が行われません)、--mode productionの時のみ適用されるようです(Uglify や sourceMap出力が行われます)。またecma: 6にすると IE11 で入力画面2の郵便番号を入力してヒットした候補をドロップダウンリストに表示する機能が動作しなかったので、ecma: 5にします。plugins: [ ... ]から.concat(isProduct ? [new UglifyJsPlugin()] : []を削除します。devtool: "inline-source-map"は残します。残しておかないとソースが変わりすぎて Chrome で debug しにくそうに思えたからです。optimization: { ... }で UglifyJsPlugin の設定も記述しておくと--mode productionの時に sourceMap が残りません。
ちなみに console.log() が残ることを気にしなければ、optimization: { ... } の設定がなくても --mode production を指定すれば Uglify は行われます。
package.json を変更する
package.json の以下の点を変更します。
  "scripts": {
    ..........
    "webpack:build": "webpack --mode production",
    "webpack:watch": "webpack --mode development --watch",
    ..........
    "build": "run-s clean:cssjs-dir postcss:build webpack:build"
  },
webpack:buildのコマンドをwebpack→webpack --mode productionに変更します。webpack:watchのコマンドをwebpack --watch→webpack --mode development --watchに変更します。buildのコマンドをcross-env NODE_ENV=product run-s ...→run-s ...に変更します。
cross-env をアンインストールする
npm uninstall --save-dev cross-env コマンドを実行します。

動作確認
tomcat を起動した後、npm run springboot コマンドを実行してみます。


生成された js ファイルを見るとファイルサイズが全て 700KB 以上あり、ファイルを開いてみても Uglify はされておらず、ソースはほぼそのまま残っています。

http://localhost:9080/inquiry/input/01/ にアクセスして入力画面1~3まで操作してみましたが、特に問題はありませんでした。
今度は npm run build コマンドを実行してみます。


生成された js ファイルがほぼ 100KB 以下になり、ファイルを開いてみると Uglify されています。

http://localhost:8080/inquiry/input/01/ にアクセスして(ポート番号を 9080 → 8080 に変更して Tomcat に直接アクセスしています)入力画面1~3まで操作してみましたが、特に問題はありませんでした。
src/test/groovy/ksbysample/webapp/bootnpmgeb/web/inquiry/InquiryInputControllerTest.groovy の失敗するテストをコメントアウトした後、clean タスク実行 → Rebuild Project → build タスクを実行してみます。

BUILD SUCCESSFUL のメッセージが出力されました。
問題なさそうですので、このまま 4.9.1 を使います。書き終わった時には 4.10.2 までバージョンが上がっていましたが。。。
webpack.config.js から optimization、devtool の設定を取り除くとどうなるのか?
optimization、devtool の設定を書かない時の動作もメモしておきます。
webpack.config.js から optimization、devtool の設定を削除します。
        ..........
        module: {
            rules: [
                {
                    test: /\.js$/,
                    exclude: [
                        /node_modules/,
                        /jquery.autoKana.js$/
                    ],
                    loader: "eslint-loader"
                }
            ]
        },
        plugins: [
            new webpack.ProvidePlugin({
                $: "jquery",
                jQuery: "jquery"
            })
        ]
    };
};
まずは --mode development である npm run springboot を実行してみます。


optimization、devtool の設定を入れていた時は生成された js ファイルは 700KB以上ありましたが、今回は 300~400KB程度になりました。
生成された js ファイルを開いてみると、実行コードは改行コードが \r\n に変換されて eval( ... ); で囲まれるようです。

Tomcat を起動してから、Chrome で http://localhost:8080/inquiry/input/01/ にアクセスして DevTools で input01.js を開いてみると、eval( ... ); のまま表示されて、これだと debug をどうやればよいのかちょっと分かりませんでした。
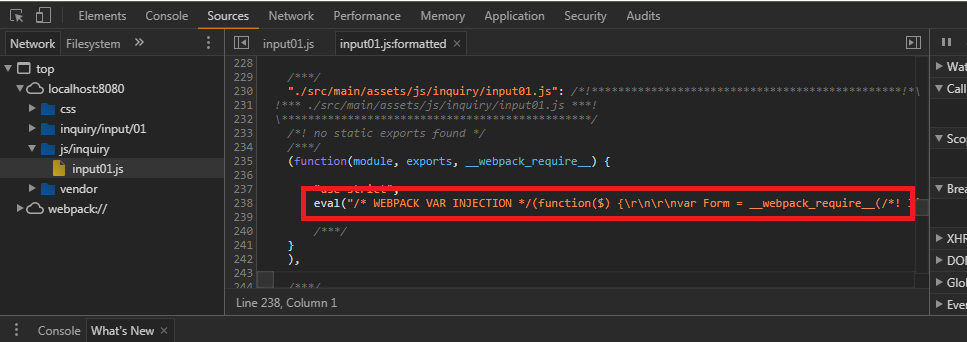
sourceMap もたぶん出力されていませんね。ファイルサイズが小さいのはその辺が理由でしょう。
次に --mode production である npm run build を実行してみます。


ファイルサイズは optimization、devtool の設定を入れていた時より数KBだけ大きいです。
生成された js ファイルを開いてみると、Uglify されていますがコメントが完全に削除されずに一部残っていました。

Tomcat を起動してから、Chrome で http://localhost:8080/inquiry/input/01/ にアクセスして動作確認してみましたが、IE11 でも入力画面2の郵便番号を入力してヒットした候補をドロップダウンリストに表示する機能が動作しましたし、他にも問題はありませんでした。
また console.log(...); も入れていると削除されません(これは実際に書いて試してみました)。
今のところ、個人的には optimization、devtool の設定は書く方が好みですね。webpack 4 の設定がまだよく分かっていないだけかもしれませんが。
履歴
2018/06/02
初版発行。
Spring Boot + npm + Geb で入力フォームを作ってテストする ( その53 )( Gradle を 3.5 → 4.6 へバージョンアップする )
概要
記事一覧はこちらです。
Spring Boot + npm + Geb で入力フォームを作ってテストする ( その52 )( 入力画面3を作成する5 ) の続きです。
- 今回の手順で確認できるのは以下の内容です。
- Gradle を 3.5 → 4.6 へバージョンアップします。
参照したサイト・書籍
Gradle Docs 4.0 - Gradle Release Notes
https://docs.gradle.org/4.0/release-notes.htmlGradle Docs 4.1 - Gradle Release Notes
https://docs.gradle.org/4.1/release-notes.html
目次
手順
build タスク実行時に出たエラーを解消する
Gradle のバージョンアップの前に clean タスク実行 → Rebuild Project 実行 → build タスクを実行したところ、PMD の警告が出ていたので解消します。

'The String literal "セ??トされるはず?????ータがセ??トされて??ません" appears 5 times in this file; the first occurrence is on line 91'
src/main/java/ksbysample/webapp/bootnpmgeb/web/inquiry/InquiryInputController.java の中で throw new IllegalArgumentException("セットされるはずのデータがセットされていません"); とエラーメッセージの文字列を直接記述していたのが原因なので、定数文字列に変更します。
src/main/resources/messages_ja_JP.properties の以下の点を変更します。
InquiryInputController.validate.form.error=セットされるはずのデータがセットされていません
InquiryInput02Form.zipcode.UnmatchPattern=郵便番号が数字7桁ではありません。
..........
InquiryInputController.validate.form.error=セットされるはずのデータがセットされていませんを追加します。
https://github.com/ksby/ksbysample-webapp-lending/blob/1.0.x/src/main/java/ksbysample/webapp/lending/helper/message/MessagesPropertiesHelper.java をコピーして src/main/java/ksbysample/webapp/bootnpmgeb/helper/message/MessagesPropertiesHelper.java に配置します。
src/main/java/ksbysample/webapp/bootnpmgeb/web/inquiry/InquiryInputController.java の以下の点を変更します。
@Slf4j
@Controller
@RequestMapping("/inquiry/input")
@SessionAttributes("sessionData")
public class InquiryInputController {

    ..........

    private static final String VALIDATE_FORM_ERROR = "InquiryInputController.validate.form.error";

    private final ModelMapper modelMapper;

    private final InquiryInput02FormValidator inquiryInput02FormValidator;

    private final Validator mvcValidator;

    private final MessagesPropertiesHelper mph;

    /**
     * コンストラクタ
     *
     * @param modelMapper                 {@link ModelMapper} オブジェクト
     * @param inquiryInput02FormValidator {@link InquiryInput02FormValidator} オブジェクト
     * @param mvcValidator                {@link Validator} オブジェクト
     * @param mph                         {@link MessagesPropertiesHelper} オブジェクト
     */
    public InquiryInputController(ModelMapper modelMapper
            , InquiryInput02FormValidator inquiryInput02FormValidator
            , Validator mvcValidator
            , MessagesPropertiesHelper mph) {
        this.modelMapper = modelMapper;
        this.inquiryInput02FormValidator = inquiryInput02FormValidator;
        this.mvcValidator = mvcValidator;
        this.mph = mph;
    }

    ..........

    /**
     * 入力画面1 「次へ」ボタンクリック時の処理
     *
     * @return 入力画面2の URL
     */
    @PostMapping(value = "/01", params = {"move=next"})
    public String input01MoveNext(@Validated InquiryInput01Form inquiryInput01Form
            , BindingResult bindingResult
            , SessionData sessionData
            , UriComponentsBuilder builder) {
        if (bindingResult.hasErrors()) {
            bindingResult.getAllErrors().stream().forEach(e -> log.warn(e.getCode()));
            throw new IllegalArgumentException(mph.getMessage(VALIDATE_FORM_ERROR, null));
        }

        ..........
    }

    ..........
private static final String VALIDATE_FORM_ERROR = "InquiryInputController.validate.form.error";を追加します。private final MessagesPropertiesHelper mph;を追加します。- コンストラクタの引数に
MessagesPropertiesHelper mphを、メソッド内にthis.mph = mph;を追加します。 throw new IllegalArgumentException("セットされるはずのデータがセットされていません");→throw new IllegalArgumentException(mph.getMessage(VALIDATE_FORM_ERROR, null));に変更します(全部で5ヶ所)。
clean タスク実行 → Rebuild Project 実行 → build タスクを実行して PMD の警告が出力されなくなったことを確認します(画面キャプチャは省略します)。
Gradle を 3.5 → 4.6 へバージョンアップする
build.gradle の以下の点を変更します。
task wrapper(type: Wrapper) {
    gradleVersion = '4.6'
}
gradleVersion = '3.5'→gradleVersion = '4.6'に変更します。
コマンドプロンプトを起動し、gradlew wrapper コマンドを実行します。

gradle/wrapper/gradle-wrapper.properties を開くと gradle-4.6-bin.zip に変更されています。

Gradle Tool Window の左上にある「Refresh all Gradle projects」ボタンをクリックして更新します。
必ず失敗させているテストが1つあるので無効にします。src/test/groovy/ksbysample/webapp/bootnpmgeb/web/inquiry/InquiryInputControllerTest.groovy の以下の点を変更します。
/*
        @Test
        void "項目全てに入力して次へボタンをクリックすると確認画面へ遷移し、前の画面へ戻るボタンを押して入力画面3へ戻ると以前入力したデータがセットされて表示される"() {
            expect:
            assert false, "確認画面を実装してからテストを作成する"
        }
*/
void "項目全てに入力して次へボタンをクリックすると確認画面へ遷移し、前の画面へ戻るボタンを押して入力画面3へ戻ると以前入力したデータがセットされて表示される"() { ... }のテストをコメントアウトします。
clean タスク実行 → Rebuild Project → build タスクを実行します。。。が findbugsMain タスクでエラーになりました。
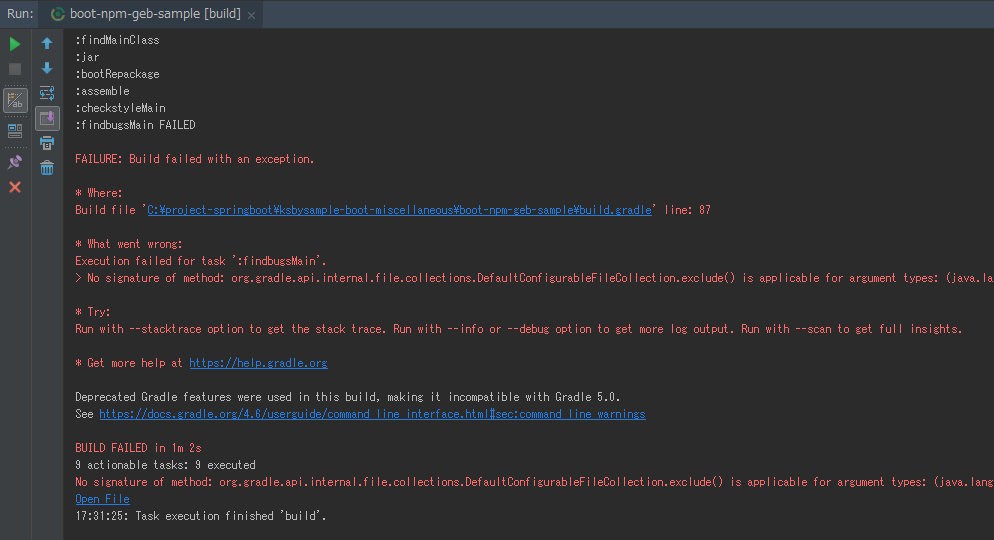
エラーが発生している Build file 'C:\project-springboot\ksbysample-boot-miscellaneous\boot-npm-geb-sample\build.gradle' line: 87 は以下の部分で、> No signature of method: org.gradle.api.internal.file.collections.DefaultConfigurableFileCollection.exclude() is applicable for argument types: (java.lang.String) values: [**/*.properties] というエラーメッセージが出ています。

tasks.withType(FindBugs) { ... } の doFirst { ... } の部分はさすがに Gradle 4.x 以降になったら不要になっていると思いたいので、一旦削除してみます。
tasks.withType(FindBugs) {
    reports {
        xml.enabled = false
        html.enabled = true
    }
}
clean タスク実行 → Rebuild Project → build タスクを実行すると、今度は BUILD SUCCESSFUL のメッセージが出力されました。

コンソールに出力されていた https://docs.gradle.org/4.6/userguide/command_line_interface.html#sec:command_line_warnings を見ると、By default, Gradle won’t display all warnings (e.g. deprecation warnings). という記述がありました。これで FindBugs Plugin の warnings が出なくなっているようです。Deprecated Gradle features were used in this build, making it incompatible with Gradle 5.0. のメッセージが出ていますが、 5.0 にバージョンアップする時にまた考えることにします。
問題なさそうですので、このまま 4.6 を使います。src/test/groovy/ksbysample/webapp/bootnpmgeb/web/inquiry/InquiryInputControllerTest.groovy のコメントアウトしたテストは元に戻します。
履歴
2018/05/27
初版発行。
IntelliJ IDEA を 2018.1.2 → 2018.1.4 へバージョンアップ
IntelliJ IDEA を 2018.1.2 → 2018.1.4 へバージョンアップする
IntelliJ IDEA の 2018.1.4 がリリースされているのでバージョンアップします。
- IntelliJ IDEA 2018.1.3 is released!
https://blog.jetbrains.com/idea/2018/05/intellij-idea-2018-1-3-is-released/ - IntelliJ IDEA 2018.1.4 is released!
https://blog.jetbrains.com/idea/2018/05/intellij-idea-2018-1-4-is-released/
IntelliJ IDEA 2018.1.4 is released! の記事を読むと、Java SE を 8u162 → 8u172 へ、IntelliJ IDEA を 2017.3.4 → 2017.3.5 → 2018.1.2 へ、Git for Windows を 2.16.2 → 2.17.0 へバージョンアップ に書いた 「Working directory」に $MODULE_DIR$ がセットされるようになっていた件について変更が入ったようです。
※ksbysample-webapp-lending プロジェクトを開いた状態でバージョンアップしています。
IntelliJ IDEA のメインメニューから「Help」-「Check for Updates...」を選択します。
「IDE and Plugin Updates」ダイアログが表示されます。マイナーバージョンアップなのに左下に「Update and Restart」ボタンではなく「Download」ボタンが表示されていますね。

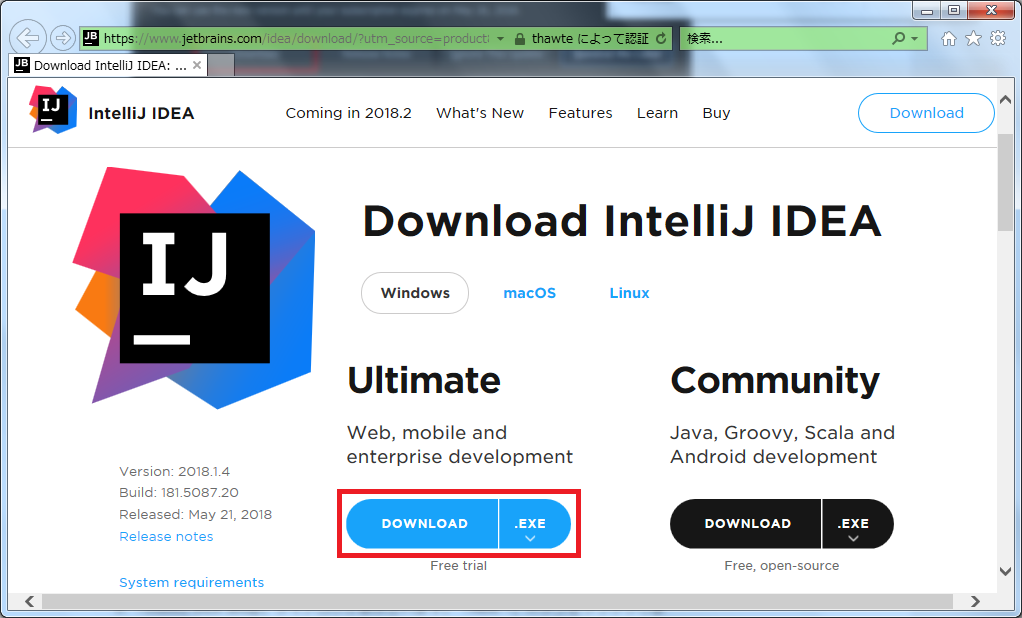
「Download」ボタンを押して IntelliJ IDEA の Download ページを開いた後、「DOWNLOAD」ボタンを押して ideaIU-2018.1.4.exe をダウンロードします。
起動している IntelliJ IDEA を終了します。
ideaIU-2018.1.4.exe を実行します。
「IntelliJ IDEA Setup」ダイアログが表示されます。「Next >」ボタンをクリックします。

「Uninstall old versions」画面が表示されます。画面上の全てのチェックボックスをチェックした後、「Next >」ボタンをクリックします。

「Choose Install Location」画面が表示されます。「Destination Folder」を C:\IntelliJ_IDEA\2018.1.4 に変更した後、「Next >」ボタンをクリックします。

「Installation Options」画面が表示されます。何も変更せずに「Next >」ボタンをクリックします。

「Choose Start Menu Folder」画面が表示されます。何も変更せずに「Install」ボタンをクリックします。
「Installing」画面が表示されてインストールが始まりますので、完了するまで待ちます。
インストールが完了すると「Completing IntelliJ IDEA Setup」画面が表示されます。「Finish」ボタンをクリックしてダイアログを閉じます。
C:\IntelliJ_IDEA\2018.1.4\bin\idea64.exe を実行します。
IntelliJ IDEA のメイン画面が表示され画面下部に「Indexing…」のメッセージが表示されますので、終了するまで待機します。

Plugin が全て最新にアップデートされていないようなので先にアップデートします。IntelliJ IDEA のメインメニューから「Help」-「Check for Updates...」を選択します。
「IDE and Plugin Updates」ダイアログが表示されます。何も変更せずに「Update」ボタンをクリックします。

Patch がダウンロードされた後、IntelliJ IDEA を再起動します。再起動後、画面下部に「Indexing…」のメッセージが表示されますので、終了するまで待機します。
IntelliJ IDEA のメインメニューから「Help」-「About」を選択し、2018.1.4 へバージョンアップされていることを確認します。
Gradle Tool Window のツリーを見ると「Tasks」の下に「other」しかない状態になっているので、左上にある「Refresh all Gradle projects」ボタンをクリックして更新します。

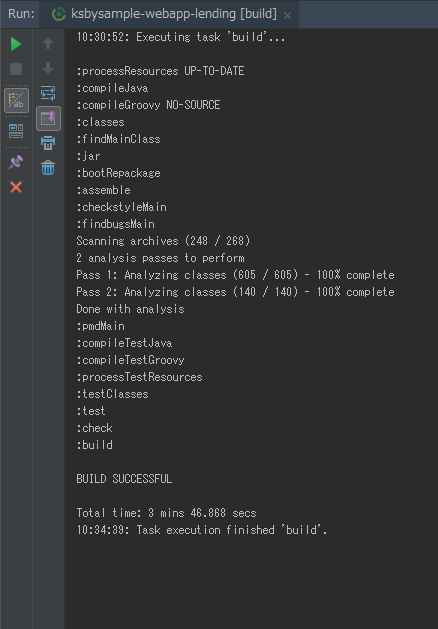
clean タスク実行 → Rebuild Project 実行 → build タスクを実行して、"BUILD SUCCESSFUL" のメッセージが出力されることを確認します。
Project Tool Window で src/test を選択した後、コンテキストメニューを表示して「Run ‘All Tests’ with Coverage」を選択し、テストが全て成功することを確認します。

最後に「Working directory」に
$MODULE_DIR$がセットされる件を 新規Projectを作成して確認してみたところ、$MODULE_DIR$がセットされたままでした。。。? セットされるのは変わらないようです。
Spring Boot + npm + Geb で入力フォームを作ってテストする ( その52 )( 入力画面3を作成する5 )
概要
記事一覧はこちらです。
Spring Boot + npm + Geb で入力フォームを作ってテストする ( その51 )( 入力画面3を作成する4 ) の続きです。
- 今回の手順で確認できるのは以下の内容です。
- 入力画面3の作成
- サーバ側のテストを作成します。
参照したサイト・書籍
目次
手順
InquiryInput03FormNotEmptyRule クラスのテストを作成する
src/main/java/ksbysample/webapp/bootnpmgeb/web/inquiry/form/InquiryInput03FormNotEmptyRule.java で Ctrl+Shift+T を押して「Create Test」ダイアログを表示してから、以下の画像の値にした後「OK」ボタンをクリックします。

src/test/groovy/ksbysample/webapp/bootnpmgeb/web/inquiry/form/InquiryInput03FormNotEmptyRuleTest.groovy が新規作成されるので、以下の内容を記述します。
package ksbysample.webapp.bootnpmgeb.web.inquiry.form

import ksbysample.webapp.bootnpmgeb.values.Type1Values
import ksbysample.webapp.bootnpmgeb.values.Type2Values
import spock.lang.Specification
import spock.lang.Unroll

import javax.validation.ConstraintViolation
import javax.validation.Validation

class InquiryInput03FormNotEmptyRuleTest extends Specification {

    def validator
    def inquiryInput03FormNotEmptyRule

    def setup() {
        validator = Validation.buildDefaultValidatorFactory().getValidator()
        inquiryInput03FormNotEmptyRule = new InquiryInput03FormNotEmptyRule(
                type1: Type1Values.PRODUCT.value
                , type2: [Type2Values.ESTIMATE.value, Type2Values.OTHER.value]
                , inquiry: "これはテストです"
                , survey: ["1", "2"]
        )
    }

    @Unroll
    def "type1 の NotEmpty のテスト(#type1 --> #size)"() {
        setup:
        inquiryInput03FormNotEmptyRule.type1 = type1
        Set<ConstraintViolation<InquiryInput03FormNotEmptyRule>> constraintViolations =
                validator.validate(inquiryInput03FormNotEmptyRule)

        expect:
        constraintViolations.size() == size

        where:
        type1                     || size
        ""                        || 1
        Type1Values.PRODUCT.value || 0
    }

    @Unroll
    def "type2 の NotEmpty のテスト(#type2 --> #size)"() {
        setup:
        inquiryInput03FormNotEmptyRule.type2 = type2
        Set<ConstraintViolation<InquiryInput03FormNotEmptyRule>> constraintViolations =
                validator.validate(inquiryInput03FormNotEmptyRule)

        expect:
        constraintViolations.size() == size

        where:
        type2                                                                              || size
        []                                                                                 || 1
        [Type2Values.ESTIMATE.value]                                                       || 0
        [Type2Values.ESTIMATE.value, Type2Values.CATALOGUE.value, Type2Values.OTHER.value] || 0
    }

    @Unroll
    def "inquiry の NotEmpty のテスト(#inquiry --> #size)"() {
        setup:
        inquiryInput03FormNotEmptyRule.inquiry = inquiry
        Set<ConstraintViolation<InquiryInput03FormNotEmptyRule>> constraintViolations =
                validator.validate(inquiryInput03FormNotEmptyRule)

        expect:
        constraintViolations.size() == size

        where:
        inquiry || size
        ""      || 1
        "テスト"   || 0
    }

}
テストを実行して全て成功することを確認します。

InquiryInputController クラスのテストを変更する
src/test/groovy/ksbysample/webapp/bootnpmgeb/web/inquiry/InquiryInputControllerTest.groovy の以下の点を変更します。
@RunWith(Enclosed)
class InquiryInputControllerTest {

    ..........

    @RunWith(SpringRunner)
    @SpringBootTest
    static class 入力画面3のテスト {
        private InquiryInput01Form inquiryInput01Form_001 =
                (InquiryInput01Form) new Yaml().load(getClass().getResourceAsStream("InquiryInput01Form_001.yaml"))
        private InquiryInput02Form inquiryInput02Form_001 = new InquiryInput02Form(
                zipcode1: "102"
                , zipcode2: "0072"
                , address: "東京都千代田区飯田橋1-1"
                , tel1: "03"
                , tel2: "1234"
                , tel3: "5678"
                , email: "taro.tanaka@sample.co.jp")
        private InquiryInput03Form inquiryInput03Form_001 = new InquiryInput03Form(
                type1: Type1Values.PRODUCT.value
                , type2: [Type2Values.ESTIMATE.value, Type2Values.CATALOGUE.value, Type2Values.OTHER.value]
                , inquiry: "これはテストです"
                , survey: ["1", "2", "3", "4", "5", "6", "7", "8"])

        @Autowired
        private WebApplicationContext context

        MockMvc mockMvc

        @Before
        void setup() {
            mockMvc = MockMvcBuilders.webAppContextSetup(context)
                    .build()
        }

        @Test
        void "初期表示時は画面の項目には何もセットされない"() {
            expect:
            mockMvc.perform(get("/inquiry/input/03"))
                    .andExpect(status().isOk())
                    .andExpect(html("select[name='type1'] option[selected]").notExists())
                    .andExpect(html("input[name='type2'][checked='checked']").notExists())
                    .andExpect(html("#inquiry").val(""))
                    .andExpect(html("input[name='survey'][checked='checked']").notExists())
        }

        @Test
        void "項目全てに入力して前の画面へ戻るボタンをクリックすると入力画面2へ戻り、次へ戻るボタンを押して入力画面3へ戻ると以前入力したデータがセットされて表示される"() {
            when: "入力画面1で項目全てに入力して「次へ」ボタンをクリックする"
            MvcResult result = mockMvc.perform(
                    TestHelper.postForm("/inquiry/input/01?move=next", inquiryInput01Form_001))
                    .andExpect(status().isFound())
                    .andExpect(redirectedUrlPattern("**/inquiry/input/02"))
                    .andReturn()
            MockHttpSession session = result.getRequest().getSession()

            and: "入力画面2で項目全てに入力して「次へ」ボタンをクリックする"
            mockMvc.perform(TestHelper.postForm("/inquiry/input/02?move=next", inquiryInput02Form_001)
                    .session(session))
                    .andExpect(status().isFound())
                    .andExpect(redirectedUrlPattern("**/inquiry/input/03"))

            and: "入力画面3で項目全てに入力して「前の画面へ戻る」ボタンをクリックする"
            mockMvc.perform(TestHelper.postForm("/inquiry/input/03?move=back", inquiryInput03Form_001)
                    .session(session))
                    .andExpect(status().isFound())
                    .andExpect(redirectedUrlPattern("**/inquiry/input/02"))

            and: "入力画面2で「次へ」ボタンをクリックする"
            mockMvc.perform(TestHelper.postForm("/inquiry/input/02?move=next", inquiryInput02Form_001)
                    .session(session))
                    .andExpect(status().isFound())
                    .andExpect(redirectedUrlPattern("**/inquiry/input/03"))

            then: "入力画面3が以前入力したデータがセットされて表示される"
            mockMvc.perform(get("/inquiry/input/03").session(session))
                    .andExpect(status().isOk())
                    .andExpect(html("select[name='type1'] option[selected]").val(inquiryInput03Form_001.type1))
                    .andExpect(html("input[name='type2'][checked='checked']").count(3))
                    .andExpect(html("#inquiry").val(inquiryInput03Form_001.inquiry))
                    .andExpect(html("input[name='survey'][checked='checked']").count(8))
        }

        @Test
        void "項目全てに入力して次へボタンをクリックすると確認画面へ遷移し、前の画面へ戻るボタンを押して入力画面3へ戻ると以前入力したデータがセットされて表示される"() {
            expect:
            assert false, "確認画面を実装してからテストを作成する"
        }

        @Test
        void "入力チェックエラーのあるデータで「次へ」ボタンをクリックするとIllegalArgumentExceptionが発生する"() {
            setup: "入力チェックエラーになるデータを用意する"
            inquiryInput03Form_001.type1 = ""

            expect: "入力画面3の「次へ」ボタンをクリックする"
            Throwable thrown = catchThrowable({
                mockMvc.perform(
                        TestHelper.postForm("/inquiry/input/03?move=next", inquiryInput03Form_001))
                        .andExpect(status().isOk())
            })
            assertThat(thrown.cause).isInstanceOf(IllegalArgumentException)
        }

    }

}
入力画面3のテストクラスを追加します。項目全てに入力して次へボタンをクリックすると確認画面へ遷移し、前の画面へ戻るボタンを押して入力画面3へ戻ると以前入力したデータがセットされて表示されるのテストは確認画面を実装しないとテストを作成できなかったので、今は常に失敗するようにします。
テストを実行して1つを除き成功することを確認します。

次回は。。。
確認画面を作成するか、以下3つのどれかをやりたいと思います。
- Spring Boot + npm + Geb で入力フォームを作ってテストする ( その46 )( Spring Boot を 1.5.9 → 1.5.10 へ、error-prone を 2.1.3 → 2.2.0 へ、Geb を 2.0 → 2.1 へバージョンアップする ) で PMD をバージョンアップできなかったのでバージョンアップする。
- Gradle を 3.5 → 4.x へバージョンアップする。
- webpack を 3.8.1 → 4.x へバージョンアップする。
履歴
2018/05/26
初版発行。
Spring Boot + npm + Geb で入力フォームを作ってテストする ( その51 )( 入力画面3を作成する4 )
概要
記事一覧はこちらです。
Spring Boot + npm + Geb で入力フォームを作ってテストする ( その50 )( 入力画面3を作成する3 ) の続きです。
- 今回の手順で確認できるのは以下の内容です。
- 入力画面3の作成
- 「前の画面へ戻る」ボタン、「確認画面へ」ボタンが正常に動作していないので原因を調査します。
- その後にサーバ側の処理を実装します。
参照したサイト・書籍
目次
- 「前の画面へ戻る」ボタンを押すと固まる原因を調査する
- 「確認画面へ」ボタンを押すとエラーになる原因を調査する
- Form クラスを作成する
- input03.html, input03.js を変更する
- SessionData クラスを変更する
- 画面表示時と「前の画面へ戻る」「確認画面へ」ボタンクリック時の処理を実装する
- 動作確認
手順
「前の画面へ戻る」ボタンを押すと固まる原因を調査する
Spring Boot + npm + Geb で入力フォームを作ってテストする ( その41 )( IntelliJ IDEA で Javascript を debug する ) に書いた手順で debug してみたら form タグの id 属性の文字列が input03.js に書いている id と一致していないことが原因でした。
src/main/assets/js/inquiry/input03.js を以下のように変更します。
          <form id="inquiryInput03Form" class="form-horizontal" method="post" action=""
                th:action="@{/inquiry/input/03/}">
input03Form→inquiryInput03Formに変更します。
入力画面3を表示して「前の画面へ戻る」ボタンを押すと、今度は入力画面2に戻りました。


「確認画面へ」ボタンを押すとエラーになる原因を調査する
上の調査で debug していた時に気づきましたが、原因は「確認画面へ」ボタンの class 属性に記述しているクラス名が js-btn-confirm なのに input03.js に書いているクラス名が js-btn-next だったからでした。
src/main/assets/js/inquiry/input03.js を以下のように変更します。
var btnBackOrNextClickHandler = function (event, url, ignoreCheckRequired) {
    ..........

    // 「前の画面へ戻る」「次へ」ボタンをクリック不可にする
    $(".js-btn-back").prop("disabled", true);
    $(".js-btn-confirm").prop("disabled", true);

    ..........
};

$(document).ready(function () {
    ..........

    // 「前の画面へ戻る」「次へ」ボタンクリック時の処理をセットする
    $(".js-btn-back").on("click", function (e) {
        return btnBackOrNextClickHandler(e, "/inquiry/input/03/?move=back", true);
    });
    $(".js-btn-confirm").on("click", function (e) {
        return btnBackOrNextClickHandler(e, "/inquiry/input/03/?move=next", false);
    });

    ..........
});
.js-btn-next→.js-btn-confirmに変更します。
動作確認します。入力画面3を表示して、

何も選択・入力せずに「確認画面へ」ボタンを押すと、入力画面3のままで必須項目にエラーメッセージが表示されました。
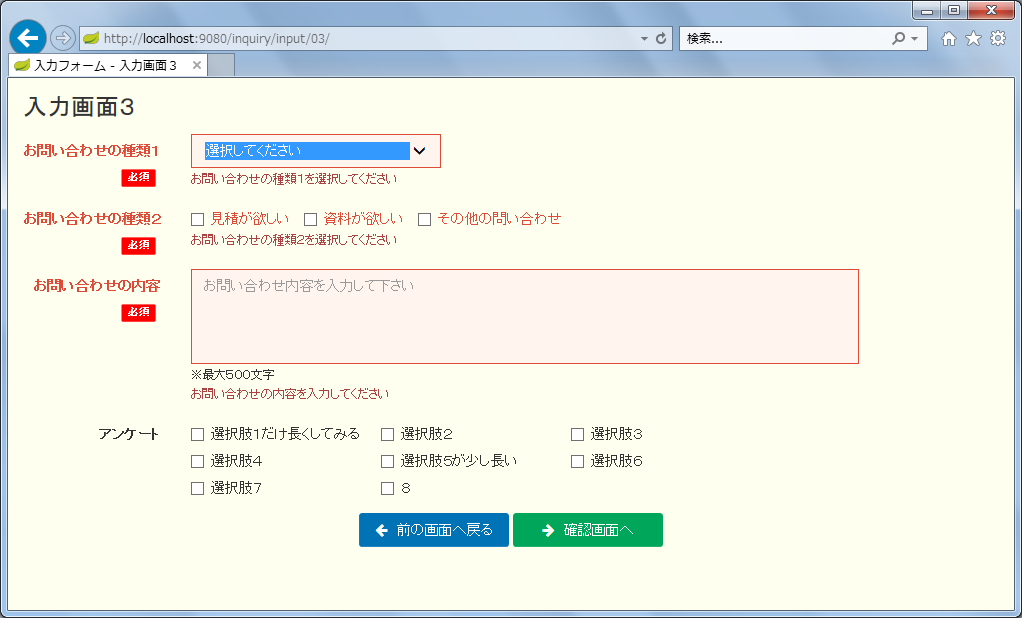
必須項目全てに選択・入力してから「確認画面へ」ボタンを押すと、

今度は確認画面が表示されました。

Form クラスを作成する
src/main/java/ksbysample/webapp/bootnpmgeb/web/inquiry/form の下に InquiryInput03Form.java を新規作成し、以下の内容を記述します。
package ksbysample.webapp.bootnpmgeb.web.inquiry.form;


import lombok.Data;

import java.io.Serializable;
import java.util.ArrayList;
import java.util.List;

/**
 * 入力画面3用 Form クラス
 */
@Data
public class InquiryInput03Form implements Serializable {

    private static final long serialVersionUID = -2818250124844174764L;

    private String type1;

    private List<String> type2 = new ArrayList<>();

    private String inquiry;

    private List<String> survey;

    private boolean copiedFromSession = false;

}
必須チェックだけ実行するためのクラスも作ります。src/main/java/ksbysample/webapp/bootnpmgeb/web/inquiry/form の下に InquiryInput03FormNotEmptyRule.java を新規作成し、以下の内容を記述します。
package ksbysample.webapp.bootnpmgeb.web.inquiry.form;


import lombok.Data;
import org.hibernate.validator.constraints.NotEmpty;

import java.util.ArrayList;
import java.util.List;

/**
 * 入力画面3 必須チェック用クラス
 */
@Data
public class InquiryInput03FormNotEmptyRule {

    @NotEmpty
    private String type1;

    @NotEmpty
    private List<String> type2 = new ArrayList<>();

    @NotEmpty
    private String inquiry;

    private List<String> survey;

    private boolean copiedFromSession = false;

}
input03.html, input03.js を変更する
src/main/resources/templates/web/inquiry/input03.html の以下の点を変更します。
<!DOCTYPE html> <html xmlns:th="http://www.thymeleaf.org"> <head th:replace="~{web/common/fragments :: common_header(~{::title}, ~{::link}, ~{::style})}"> <title>入力フォーム - 入力画面3</title> <style> /* 「チェックボックス複数行」の入力項目のチェックボックスを複数行に書くので、 */ /* 異なる行のチェックボックスの位置を左揃えにする */ @media (min-width: 768px) { #multiline-checkbox .checkbox label { display: block; float: left; width: 180px; } } @media (max-width: 767px) { #multiline-checkbox .checkbox label { display: block; float: left; width: 100%; } } </style> </head> <body class="skin-blue layout-top-nav"> <div class="wrapper"> <!-- Content Wrapper. Contains page content --> <div class="content-wrapper"> <!-- Content Header (Page header) --> <section class="content-header"> <h1> 入力画面3 </h1> </section> <!-- Main content --> <section class="content"> <div class="row"> <div class="col-xs-12"> <!--/*@thymesVar id="inquiryInput03Form" type="ksbysample.webapp.bootnpmgeb.web.inquiry.form.InquiryInput03Form"*/--> <form id="inquiryInput03Form" class="form-horizontal" method="post" action="" th:action="@{/inquiry/input/03/}" th:object="${inquiryInput03Form}"> <input type="hidden" name="copiedFromSession" id="copiedFromSession" th:value="*{copiedFromSession}"/> <!-- お問い合わせの種類1 --> <div class="form-group" id="form-group-type1"> <div class="control-label col-sm-2"> <label class="float-label">お問い合わせの種類1</label> <div class="label label-required">必須</div> </div> <div class="col-sm-10"> <div class="row"><div class="col-sm-10"> <select name="type1" id="type1" class="form-control" style="width: 250px;" autofocus> <th:block th:each="type1Value,iterStat : ${@vh.values('Type1Values')}"> <option value="" th:if="${iterStat.first}">選択してください</option> <option th:value="${type1Value.value}" th:text="${type1Value.text}" th:field="*{type1}"> </option> </th:block> </select> </div></div> <div class="row hidden js-errmsg"><div class="col-sm-10"><p class="form-control-static text-danger"><small>ここにエラーメッセージを表示します</small></p></div></div> </div> </div> <!-- お問い合わせの種類2 --> <div class="form-group" id="form-group-type2"> <div class="control-label col-sm-2"> <label class="float-label">お問い合わせの種類2</label> <div class="label label-required">必須</div> </div> <div class="col-sm-10"> <div class="row"><div class="col-sm-10"> <div class="checkbox"> <th:block th:each="type2Value : ${@vh.values('Type2Values')}"> <label> <input type="checkbox" name="type2" th:value="${type2Value.value}" th:field="*{type2}"> <th:block th:text="${type2Value.text}">見積が欲しい</th:block> </label> </th:block> </div> </div></div> <div class="row hidden js-errmsg"><div class="col-sm-10"><p class="form-control-static text-danger"><small>ここにエラーメッセージを表示します</small></p></div></div> </div> </div> <!-- お問い合わせの内容 --> <div class="form-group" id="form-group-inquiry"> <div class="control-label col-sm-2"> <label class="float-label">お問い合わせの内容</label> <div class="label label-required">必須</div> </div> <div class="col-sm-10"> <div class="row"><div class="col-sm-10"> <textarea rows="5" name="inquiry" id="inquiry" class="form-control" maxlength="500" placeholder="お問い合わせ内容を入力して下さい" th:field="*{inquiry}"></textarea> </div></div> <div class="row"><div class="col-sm-10"><p class="form-control-static"><small>※最大500文字</small></p></div></div> <div class="row hidden js-errmsg"><div class="col-sm-10"><p class="form-control-static text-danger"><small>ここにエラーメッセージを表示します</small></p></div></div> </div> </div> <div class="form-group" id="form-group-survey"> <div class="control-label col-sm-2"> <label class="float-label">アンケート</label> </div> <div class="col-sm-10" id="multiline-checkbox"> <th:block th:each="surveyOptions,iterStat : ${@soh.selectItemList('survey')}"> <th:block th:if="${iterStat.index % 3 == 0}" th:utext="'<div class="row"><div class="col-sm-12"><div class="checkbox">'"/> <label> <input type="checkbox" name="survey" th:value="${surveyOptions.itemValue}" th:field="*{survey}"> <th:block th:text="${surveyOptions.itemName}">選択肢1だけ長くしてみる</th:block> </label> <th:block th:if="${iterStat.index % 3 == 2 || iterStat.last}" th:utext="'</div></div></div>'"/> </th:block> </div> </div> <div class="text-center"> <button class="btn bg-blue js-btn-back"><i class="fa fa-arrow-left"></i> 前の画面へ戻る</button> <button class="btn bg-green js-btn-confirm"><i class="fa fa-arrow-right"></i> 確認画面へ</button> </div> </form> </div> </div> </section> <!-- /.content --> </div> <!-- /.content-wrapper --> </div> <!-- ./wrapper --> <!-- REQUIRED JS SCRIPTS --> <script src="/js/inquiry/input03.js"></script> </body> </html>
- form タグの上に
<!--/*@thymesVar id="inquiryInput03Form" type="ksbysample.webapp.bootnpmgeb.web.inquiry.form.InquiryInput03Form"*/-->を追加します。 - form タグの末尾に
th:object="${inquiryInput03Form}"を追加します。 <input type="hidden" name="copiedFromSession" id="copiedFromSession" th:value="*{copiedFromSession}"/>を追加します。<select name="type1" id="type1" class="form-control" style="width: 250px;" autofocus>→<select name="type1" id="type1" class="form-control" style="width: 250px;">に変更します。- 入力/選択項目のタグに
th:field="*{...}"(... には入力項目に対応した変数を記述) を追加します。
src/main/assets/js/inquiry/input03.js の以下の点を変更します。
$(document).ready(function (event) {
    // 入力チェック用の validator 関数をセットする
    $("#type1").on("blur", type1Validator);
    $("input:checkbox[name='type2']").on("blur", type2Validator);
    $("#inquiry").on("blur", inquiryValidator);

    // 「前の画面へ戻る」「次へ」ボタンクリック時の処理をセットする
    $(".js-btn-back").on("click", function (e) {
        return btnBackOrNextClickHandler(e, "/inquiry/input/03/?move=back", true);
    });
    $(".js-btn-confirm").on("click", function (e) {
        return btnBackOrNextClickHandler(e, "/inquiry/input/03/?move=next", false);
    });

    // 初期画面表示時にセッションに保存されていたデータを表示する場合には
    // 入力チェックを実行して画面の表示を入力チェック後の状態にする
    if ($("#copiedFromSession").val() === "true") {
        executeAllValidator(event);
    }

    // 「お問い合わせの種類1」にフォーカスをセットする
    $("#type1").focus().select();
});
$(document).ready(function () {→$(document).ready(function (event) {に変更します。if ($("#copiedFromSession").val() === "true") { ... }を追加します。
SessionData クラスを変更する
src/main/java/ksbysample/webapp/bootnpmgeb/session/SessionData.java の以下の点を変更します。
@Data
public class SessionData implements Serializable {

    private static final long serialVersionUID = -2673191456750655164L;

    private InquiryInput01Form inquiryInput01Form;

    private InquiryInput02Form inquiryInput02Form;

    private InquiryInput03Form inquiryInput03Form;

}
private InquiryInput03Form inquiryInput03Form;を追加します。
画面表示時と「前の画面へ戻る」「確認画面へ」ボタンクリック時の処理を実装する
src/main/java/ksbysample/webapp/bootnpmgeb/web/inquiry/InquiryInputController.java の以下の点を変更します。
@Slf4j
@Controller
@RequestMapping("/inquiry/input")
@SessionAttributes("sessionData")
public class InquiryInputController {

    ..........

    /**
     * 入力画面3 初期表示処理
     *
     * @return 入力画面3の Thymeleaf テンプレートファイルのパス
     */
    @GetMapping("/03")
    public String input03(InquiryInput03Form inquiryInput03Form
            , SessionData sessionData) {
        // セッションに保存されているデータがある場合にはコピーする
        if (sessionData.getInquiryInput03Form() != null) {
            modelMapper.map(sessionData.getInquiryInput03Form(), inquiryInput03Form);
            inquiryInput03Form.setCopiedFromSession(true);
        }

        return TEMPLATE_INPUT03;
    }

    /**
     * 入力画面3 「前へ」ボタンクリック時の処理
     *
     * @return 入力画面2の URL
     */
    @PostMapping(value = "/03", params = {"move=back"})
    public String input03MoveBack(@Validated InquiryInput03Form inquiryInput03Form
            , BindingResult bindingResult
            , SessionData sessionData
            , UriComponentsBuilder builder) {
        if (bindingResult.hasErrors()) {
            bindingResult.getAllErrors().stream().forEach(e -> log.warn(e.getCode()));
            throw new IllegalArgumentException("セットされるはずのデータがセットされていません");
        }

        // 入力されたデータをセッションに保存する
        sessionData.setInquiryInput03Form(inquiryInput03Form);

        return UrlBasedViewResolver.REDIRECT_URL_PREFIX
                + builder.path(UrlConst.URL_INQUIRY_INPUT_02).toUriString();
    }

    /**
     * 入力画面3 「確認画面へ」ボタンクリック時の処理
     *
     * @return 確認画面の URL
     */
    @PostMapping(value = "/03", params = {"move=next"})
    public String input03MoveNext(@Validated InquiryInput03Form inquiryInput03Form
            , BindingResult bindingResult
            , InquiryInput03FormNotEmptyRule inquiryInput03FormNotEmptyRule
            , SessionData sessionData
            , UriComponentsBuilder builder) {
        // 必須チェックをする
        mvcValidator.validate(inquiryInput03FormNotEmptyRule, bindingResult);
        if (bindingResult.hasErrors()) {
            bindingResult.getAllErrors().stream().forEach(e -> log.warn(e.getCode()));
            throw new IllegalArgumentException("セットされるはずのデータがセットされていません");
        }

        // 入力されたデータをセッションに保存する
        sessionData.setInquiryInput03Form(inquiryInput03Form);

        return UrlBasedViewResolver.REDIRECT_URL_PREFIX
                + builder.path(UrlConst.URL_INQUIRY_CONFIRM).toUriString();
    }

}
input03メソッドの以下の点を変更します。- 引数に
InquiryInput03Form inquiryInput03Form、SessionData sessionDataを追加します。 if (sessionData.getInquiryInput02Form() != null) { ... }の処理を追加します。
- 引数に
input03MoveBackメソッドの以下の点を変更します。- 引数に
@Validated InquiryInput03Form inquiryInput03Form、BindingResult bindingResult、SessionData sessionDataを追加します。 if (bindingResult.hasErrors()) { ... }の処理を追加します。sessionData.setInquiryInput03Form(inquiryInput03Form);を追加します。
- 引数に
input03MoveNextメソッドの以下の点を変更します。- 引数に
@Validated InquiryInput03Form inquiryInput03Form、BindingResult bindingResult、InquiryInput03FormNotEmptyRule inquiryInput03FormNotEmptyRule、SessionData sessionDataを追加します。 mvcValidator.validate(inquiryInput03FormNotEmptyRule, bindingResult);を追加します。if (bindingResult.hasErrors()) { ... }を追加します。sessionData.setInquiryInput03Form(inquiryInput03Form);を追加します。
- 引数に
動作確認
動作確認します。npm run springboot コマンドを実行し Tomcat を起動した後、ブラウザで http://localhost:9080/inquiry/input/03/ にアクセスします。
データを入力してから、「次へ」ボタンをクリックして入力画面3へ遷移します。

何も入力せずに「前の画面へ戻る」ボタンをクリックすると、入力画面2へ戻ります。サーバ側でも必須チェックは行われません。

「次へ」ボタンをクリックして入力画面3へ戻った後、データを入力します。

「前の画面へ戻る」ボタンをクリックして入力画面2へ戻ってから、

「次へ」ボタンをクリックして入力画面3へ戻ると、前に入力したデータが表示されます。

入力したデータを変更してから、

「確認画面へ」ボタンをクリックして確認画面へ遷移した後、

一番下の「修正する」ボタンをクリックすると、入力画面3へ戻り変更したデータが表示されます。

問題なく動作しているようです。
履歴
2018/05/19
初版発行。
Spring Boot + npm + Geb で入力フォームを作ってテストする ( その50 )( 入力画面3を作成する3 )
概要
記事一覧はこちらです。
Spring Boot + npm + Geb で入力フォームを作ってテストする ( その49 )( 入力画面3を作成する2 ) の続きです。
- 今回の手順で確認できるのは以下の内容です。
- 入力画面3の作成
- Javascript の処理を実装します。
参照したサイト・書籍
目次
手順
入力チェックを実装する
src/main/assets/js/inquiry/input03.js を以下のように変更します。
"use strict";

var Form = require("lib/class/Form.js");
var validator = require("lib/util/validator.js");

var form = new Form([
    "#type1",
    "input:checkbox[name='type2']",
    "#inquiry",
    "input:checkbox[name='survey']"
]);

var type1Validator = function (event) {
    var idFormGroup = "#form-group-type1";
    var idList = ["#type1"];
    form.convertAndValidate(form, event, idFormGroup, idList,
        undefined,
        function () {
            validator.checkRequired(form, idFormGroup, idList, "お問い合わせの種類1を選択してください");
        }
    );
};

var type2Validator = function (event) {
    var idFormGroup = "#form-group-type2";
    var idList = ["input:checkbox[name='type2']"];
    form.convertAndValidate(form, event, idFormGroup, idList,
        undefined,
        function () {
            validator.checkRequired(form, idFormGroup, idList, "お問い合わせの種類2を選択してください");
        }
    );
};

var inquiryValidator = function (event) {
    var idFormGroup = "#form-group-inquiry";
    var idList = ["#inquiry"];
    form.convertAndValidate(form, event, idFormGroup, idList,
        undefined,
        function () {
            validator.checkRequired(form, idFormGroup, idList, "お問い合わせの内容を入力してください");
        }
    );
};

var executeAllValidator = function (event) {
    form.forceAllFocused(form);
    [
        type1Validator,
        type2Validator,
        inquiryValidator
    ].forEach(function (validateFunction) {
        validateFunction(event);
    });
};

var btnBackOrNextClickHandler = function (event, url, ignoreCheckRequired) {
    // 全ての入力チェックを実行する
    try {
        if (ignoreCheckRequired) {
            validator.ignoreCheckRequired = ignoreCheckRequired;
            form.backupFocusedState(form);
        }
        executeAllValidator(event);
    } finally {
        if (ignoreCheckRequired) {
            validator.reset();
            form.restoreFocusedState(form);
        }
    }
    // 入力チェックエラーがある場合には処理を中断する
    if (event.isPropagationStopped()) {
        // 一番最初のエラーの項目にカーソルを移動する
        $(".has-error:first :input:first").focus().select();
        return false;
    }

    // 「前の画面へ戻る」「次へ」ボタンをクリック不可にする
    $(".js-btn-back").prop("disabled", true);
    $(".js-btn-next").prop("disabled", true);

    // サーバにリクエストを送信する
    $("#ignoreCheckRequired").val(ignoreCheckRequired);
    $("#inquiryInput03Form").attr("action", url);
    $("#inquiryInput03Form").submit();

    // return false は
    // event.preventDefault() + event.stopPropagation() らしい
    return false;
};

$(document).ready(function () {
    // 入力チェック用の validator 関数をセットする
    $("#type1").on("blur", type1Validator);
    $("input:checkbox[name='type2']").on("blur", type2Validator);
    $("#inquiry").on("blur", inquiryValidator);

    // 「前の画面へ戻る」「次へ」ボタンクリック時の処理をセットする
    $(".js-btn-back").on("click", function (e) {
        return btnBackOrNextClickHandler(e, "/inquiry/input/03/?move=back", true);
    });
    $(".js-btn-next").on("click", function (e) {
        return btnBackOrNextClickHandler(e, "/inquiry/input/03/?move=next", false);
    });

    // 「お問い合わせの種類1」にフォーカスをセットする
    $("#type1").focus().select();
});
input03.html を修正する
「次へ」ボタンはいつでも押せるようにします。src/main/resources/templates/web/inquiry/input02.html を以下のように変更します。
            <div class="text-center">
              <button class="btn bg-blue js-btn-back"><i class="fa fa-arrow-left"></i> 前の画面へ戻る</button>
              <button class="btn bg-green js-btn-confirm"><i class="fa fa-arrow-right"></i> 確認画面へ</button>
            </div>
<button class="btn bg-green js-btn-confirm" disabled>→<button class="btn bg-green js-btn-confirm">へ変更します。
動作確認
npm run springboot を実行し、Tomcat を起動して http://localhost:9080/inquiry/input/03/ にアクセスすると入力画面3が表示されます。

何も入力せずに Tab キーでカーソルを「前の画面へ戻る」ボタンまで移動すると赤色になってエラーメッセージが表示されます。

F5 キーを押してリロードした後、全ての項目にエラーにならないようデータを選択・入力すると、「アンケート」以外の項目が緑色になります。

Javascript の入力チェックは正常に動作しているようです。
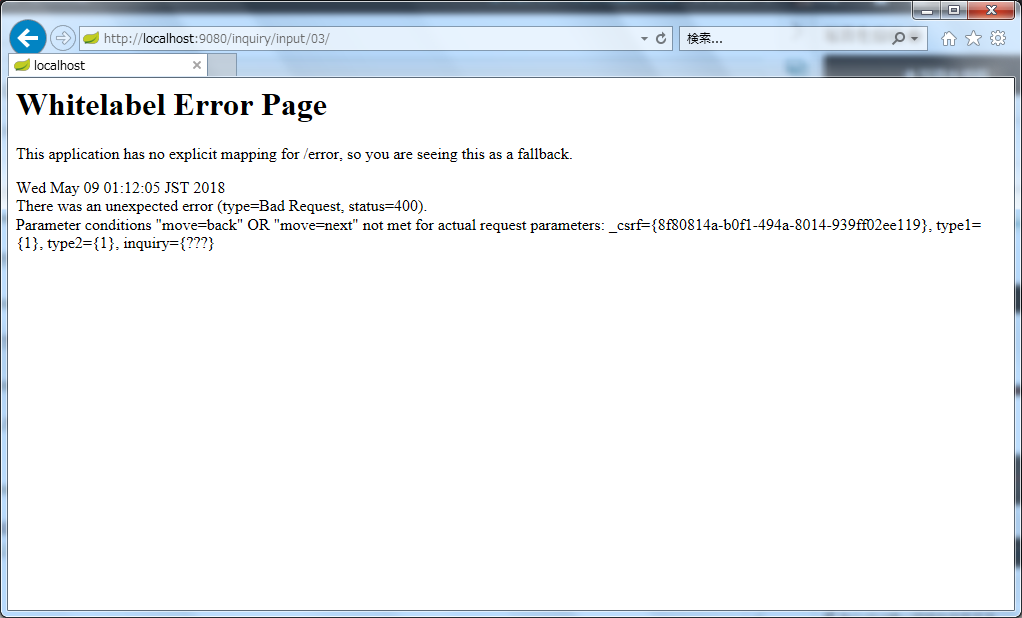
ただし「前の画面へ戻る」ボタンを押すと入力画面3のまま固まって入力画面2へは戻らず、「確認画面へ」ボタンを押すとエラーページが表示されました(入力データは保存しないが画面遷移だけはしたはずだった気が。。。) 次回は画面遷移しない原因を調べてみます。
履歴
2018/05/09
初版発行。