API Gateway で受信したメッセージを SNS 経由で Slack へ通知する
概要
記事一覧はこちらです。
API Gateway で受信したメッセージを Lambda で SNS へ転送し、SNS から Lambda で Slack へメッセージを送信してみます。
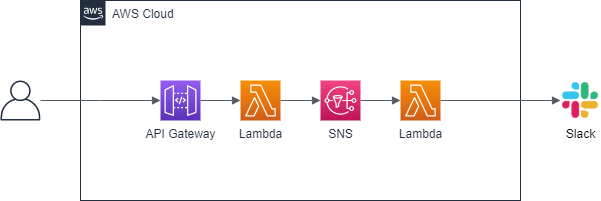
API Gateway → SNS 連携は AWS Service Proxy という機能を使えば直接送信できるそうですが、今回は Lambda 経由で送信します。
以下の仕様で実装します。
- API Gateway にアクセスする時の URL は
https://<deploy 時に表示されるドメイン名>/dev/send-msg。 - request body には message の項目だけが記述された JSON をセットします。

- message にセットされた文字列を Slack の
#generalに送信します。
参照したサイト・書籍
SNS
https://www.serverless.com/framework/docs/providers/aws/events/sns/AWS - Resources
https://www.serverless.com/framework/docs/providers/aws/guide/resources/- 以下の内容を参考にしました。
- resources に定義する AWS リソースに DependsOn が定義できる。
- serverless.xml 内で定義した lambda function を他の AWS リソースから参照する時に、
- 末尾に
LambdaFunctionを追加した文字列で参照できる。 - Override AWS CloudFormation Resource に function 名は normalizedFunctionName にする(先頭は大文字に変える、
-と_は文字列に変える)。 - 例えば notifySlack という function ならば、先頭を大文字に変えて末尾に
LambdaFunctionを追加した NotifySlackLambdaFunction というリソース名になる。
- 末尾に
- 以下の内容を参考にしました。
AWS CloudFormation でプッシュベースのイベントソースに AWS Lambda 関数をサブスクライブするにはどうすればよいですか?
https://aws.amazon.com/jp/premiumsupport/knowledge-center/lambda-subscribe-push-cloudformation/AWS: Publish SNS message for Lambda function via boto3 (Python2)
https://stackoverflow.com/questions/34029251/aws-publish-sns-message-for-lambda-function-via-boto3-python2Requests: HTTP for Humans
https://requests.readthedocs.io/en/master/- 今回から urllib3 ではなく requests を使ってみます。
- urllib3 は boto3 の依存関係にあるので追加インストールの必要がありませんが、requests は個別にインストールする必要があります。
Amazon SNS (from AWS) - The Ultimate Guide
https://www.serverless.com/amazon-sns/Sending messages using Incoming Webhooks
https://api.slack.com/messaging/webhooksウェブフックを使用して Amazon SNS メッセージを Amazon Chime、Slack や Microsoft Teams に発行する方法を教えてください。
https://aws.amazon.com/jp/premiumsupport/knowledge-center/sns-lambda-webhooks-chime-slack-teams/Requests: HTTP for Humans
https://requests.readthedocs.io/en/master/Variables
https://www.serverless.com/framework/docs/providers/aws/guide/variables/Encrypting messages published to Amazon SNS with AWS KMS
https://aws.amazon.com/jp/blogs/compute/encrypting-messages-published-to-amazon-sns-with-aws-kms/moto(boto3のmockモジュール)の使い方:SQS/SNS編
https://qiita.com/ck_fm0211/items/08a7bc5a0c98de112cb7django setting environment variables in unittest tests
https://stackoverflow.com/questions/31195183/django-setting-environment-variables-in-unittest-testsAn Introduction to Mocking in Python
https://www.toptal.com/python/an-introduction-to-mocking-in-pythonnotify-slack
https://registry.terraform.io/modules/terraform-aws-modules/notify-slack/aws/3.3.0- 書き終わるころに見つけました。メッセージを Slack に送信する手段が欲しいだけならば Terraform の module にしておいて簡単に作成できるようにしておくのもありですね。
目次
- apigw-sns-slack-project プロジェクトを作成する
- Serverless Framework で message_service サブプロジェクトを作成し serverless.yml を変更する
- requirements.txt を作成する
- API Gateway から呼び出す Lambda を実装する
- Slack App を作成し Webhook URL を生成する
- SNS から呼び出す Lambda を実装する
- ユニットテストを作成する
- deploy する
- 動作確認する
手順
apigw-sns-slack-project プロジェクトを作成する
以下の手順で apigw-sns-slack-project プロジェクトを作成します。具体的な手順は IntelliJ IDEA+Node.js+npm+serverless framework+Python の組み合わせで開発環境を構築して AWS Lambda を作成してみる 参照。
- apigw-sns-slack-project の Empty Project を作成する。
- Python の仮想環境を作成する。
- Serverless Framework をローカルインストールする。
- .envrc を作成する。
npm install --save-dev serverless-python-requirements- IDEA で Terminal を起動して boto3、requests、moto をインストールする。
pip install boto3pip install requestspip install moto
Serverless Framework で message_service サブプロジェクトを作成し serverless.yml を変更する
プロジェクトのルートディレクトリの下で npx sls create --template aws-python3 --path message_service を実行して message_service サブプロジェクトを作成します。
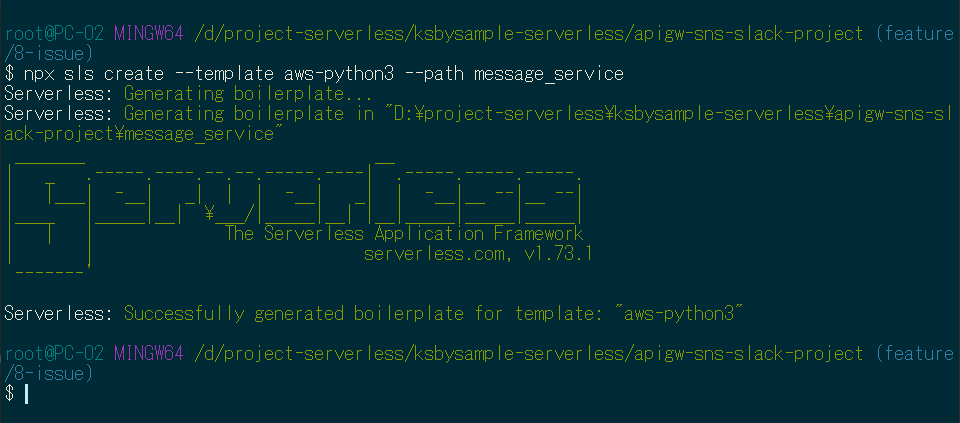
生成された serverless.yml を以下の内容に変更します。
service: message-service

plugins:
  - serverless-python-requirements

custom:
  pythonRequirements:
    dockerizePip: true

provider:
  name: aws
  runtime: python3.8

  stage: dev
  region: ap-northeast-1

  iamRoleStatements:
    - Effect: "Allow"
      Action:
        - "kms:GenerateDataKey"
        - "kms:Decrypt"
        - "sns:Publish"
        - "sns:Subscribe"
      Resource:
        - !Ref NotifySlackTopic

functions:
  sendMsg:
    handler: apigw_handler.send_msg
    environment:
      TOPIC_ARN: !Ref NotifySlackTopic
    events:
      - http:
          path: send-msg
          method: post
          cors: true

  notifySlack:
    handler: sns_handler.notify_slack
    environment:
      SLACK_WEBHOOK_URL: ${env:SLACK_WEBHOOK_URL}
    events:
      # - sns: notify-slack-topic という書き方ではなく resources で定義した Topic に関連付けている
      # ただしこの書き方だと Subscription を作成してくれないし、Topic にメッセージが publish されても Lambda 関数が実行されない
      # ので resources で Subscription を作成して必要な権限を付与している
      - sns:
        arn: !Ref NotifySlackTopic
        topicName: notify-slack-topic

resources:
  Resources:
    NotifySlackTopic:
      Type: AWS::SNS::Topic
      Properties:
        TopicName: notify-slack-topic

    # 以下のリソースは notifySlack 関数が作成された後に生成する
    # 既に作成されている Topic だと自動で Subscription を作成してくれないので、以下の定義で作成する
    NotifySlackSubscription:
      Type: AWS::SNS::Subscription
      DependsOn:
        # AWS - Resources
        # https://www.serverless.com/framework/docs/providers/aws/guide/resources/
        # notifySlack function ならば、先頭を大文字に変えて末尾に LambdaFunction を付けた
        # NotifySlackLambdaFunction という名称で参照できる
        - NotifySlackLambdaFunction
      Properties:
        TopicArn: !Ref NotifySlackTopic
        Endpoint:
          Fn::GetAtt:
            - NotifySlackLambdaFunction
            - Arn
        Protocol: lambda
    # Subscription を作成するだけでは Lambda を実行できないので、以下の定義で実行できるようにする
    NotifySlackLambdaResourcePolicy:
      Type: AWS::Lambda::Permission
      DependsOn:
        - NotifySlackLambdaFunction
      Properties:
        FunctionName: !Ref NotifySlackLambdaFunction
        Principal: sns.amazonaws.com
        Action: "lambda:InvokeFunction"
        SourceArn: !Ref NotifySlackTopic
- Serverless Framework では SNS に関連付けたい場合 functions の events に
- sns: notify-slack-topicと記述すればよいのですが、Topic へメッセージを publish する Lambda 関数も同じ serverless.xml に定義したい場合どうやって参照したらよいのかが分からなかったので、resources で NotifySlackSubscription を定義して、sendMsg と notifySlack の Lambda 関数から!Ref NotifySlackTopicで参照できるようにしました。 - sendMsg ではメッセージを publish する時に NotifySlackTopic の arn が必要になるので、environment に
TOPIC_ARN: !Ref NotifySlackTopicを定義し、環境変数で arn を渡しています。 - 通常 resources に定義された AWS リソースが全て作成されてから Lambda 関数が作成されますが、今回は NotifySlackTopic → sendMsg と notifySlack の Lambda 関数 → NotifySlackSubscription と NotifySlackLambdaResourcePolicy の順に作成する必要があるため、NotifySlackSubscription と NotifySlackLambdaResourcePolicy に DependsOn を定義して Lambda 関数が作成された後に作成されるようにしています。
- IAM Role は Lamda 関数毎に分けた方が良さそうですが、簡略化したかったので
sns:Publishとsns:Subscribeを1つの Role に入れました。
requirements.txt を作成する
message_service サブプロジェクトの下に requirements.txt を作成し、以下の内容を記述します。
requests==2.24.0
API Gateway から呼び出す Lambda を実装する
message_service サブプロジェクトを作成した時に作られている handler.py のファイル名を agigw_handler.py に変更した後、以下の内容を記述します。
import json
import logging
import os

import boto3

logger = logging.getLogger()
logger.setLevel(logging.INFO)


def send_msg(event, context):
    # body に { "message": "..." } のフォーマットで Slack へ送信したいメッセージを格納する
    logger.info(event)
    body = json.loads(event['body'])
    logger.info(f"message={body['message']}")

    sns_client = boto3.client('sns')
    response = sns_client.publish(
        TopicArn=os.environ['TOPIC_ARN'],
        Message=body['message']
    )

    response_body = {
        "message": f"published message to SNS (MessageId={response['MessageId']})",
        "input": event
    }

    response = {
        "statusCode": 200,
        "body": json.dumps(response_body)
    }

    return response
Slack App を作成し Webhook URL を生成する
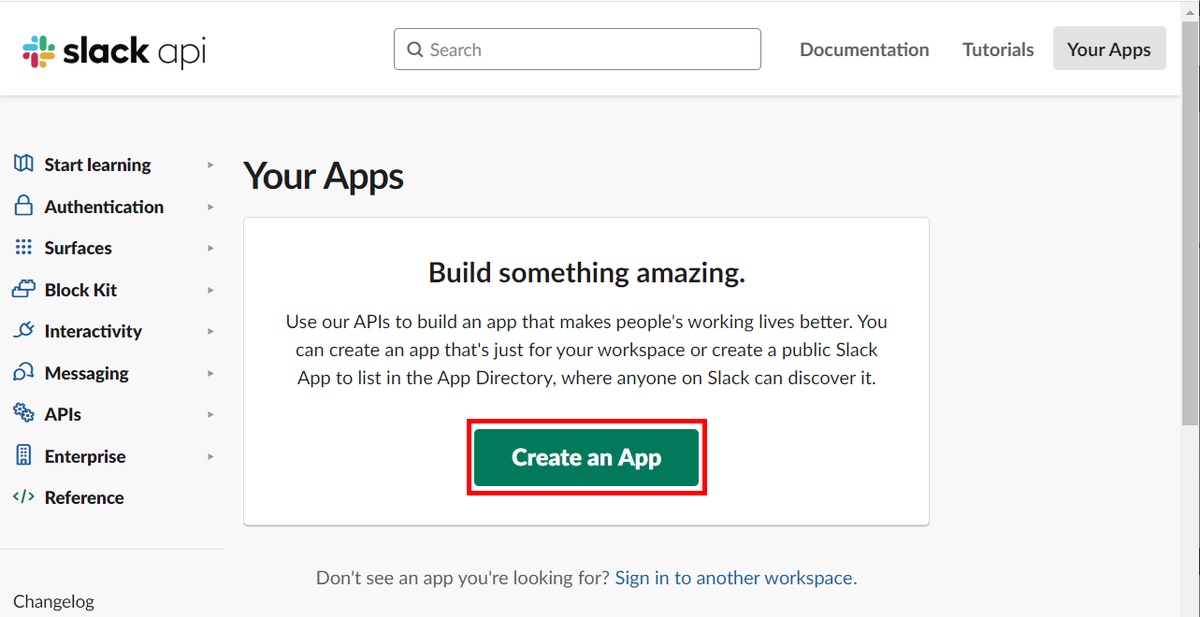
https://api.slack.com/ にアクセスした後、画面右上の「Your Apps」をクリックします。

以下の画像の画面が表示されるので「Create an App」ボタンをクリックします。
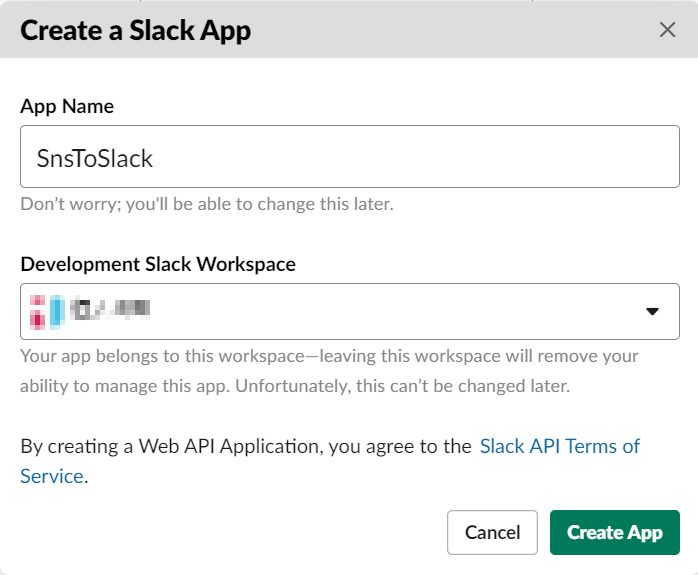
「Create a Slack App」ダイアログが表示されます。「App Name」に「SnsToSlack」を入力し、「Development Slack Workspace」を選択した後「Create App」ボタンをクリックします。
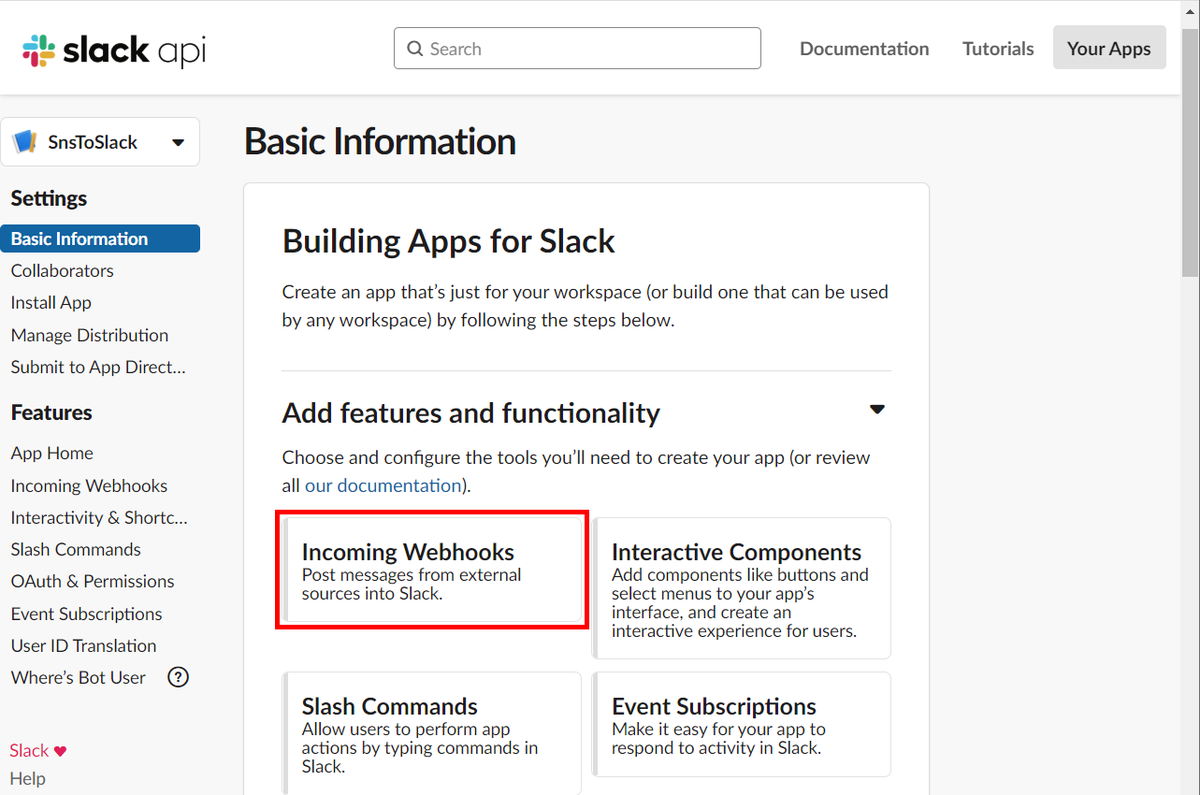
「SnsToSlack」App が作成されて「Basic Information」画面が表示されます。「Incoming Webhooks」をクリックします。
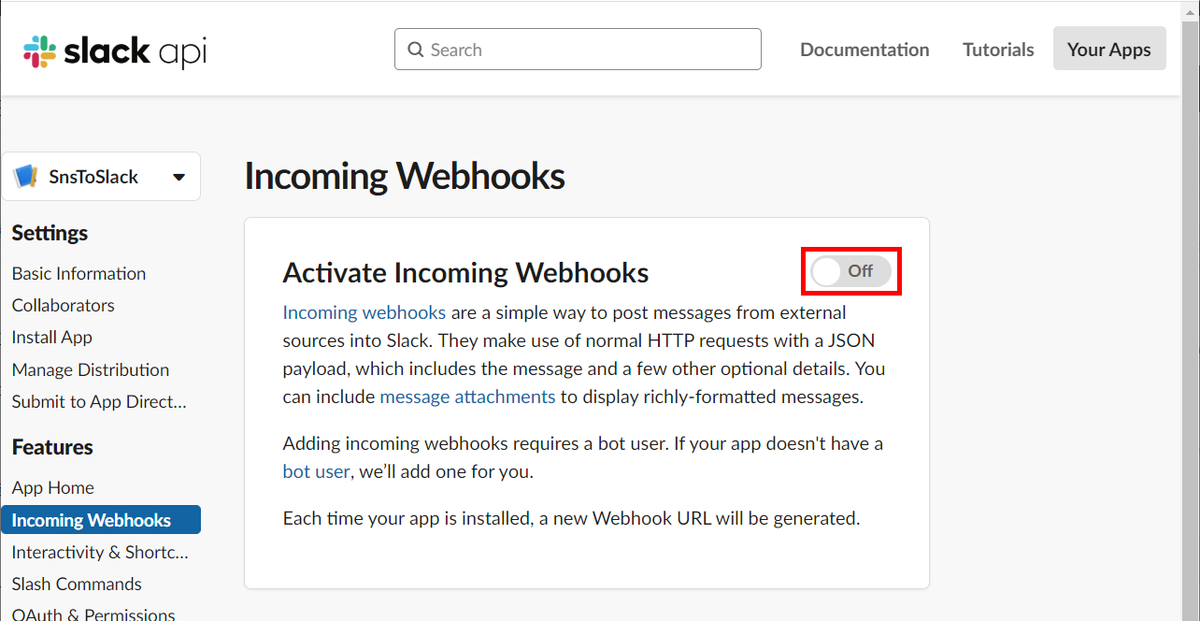
「Incoming Webhooks」画面が表示されます。右上のトグルを On に変えます。
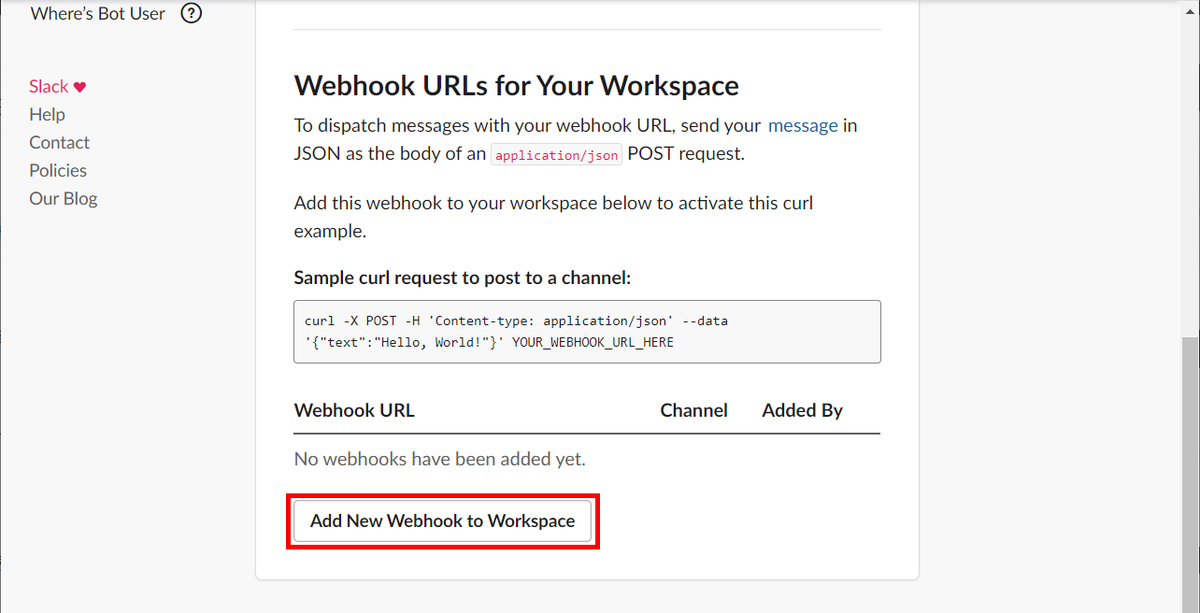
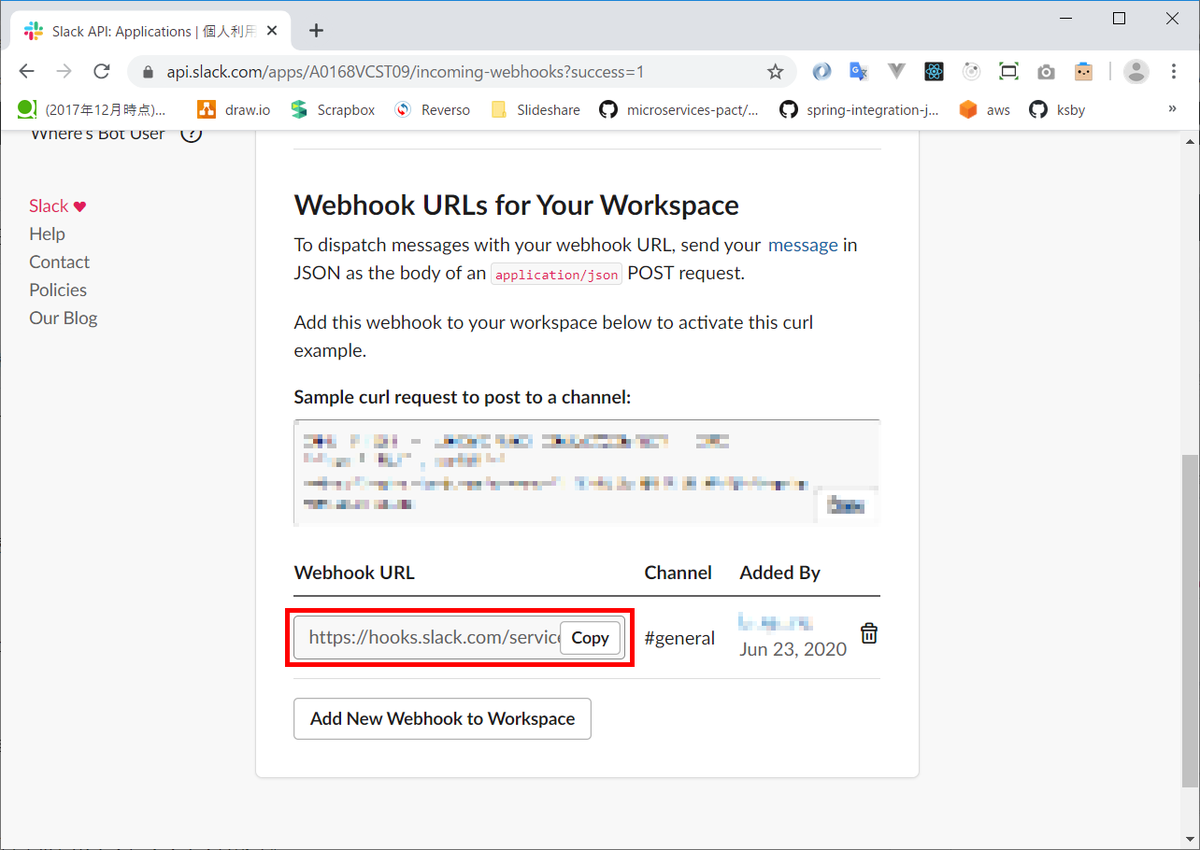
画面の下に「Webhook URLs for Your Workspace」が表示されます。「Add New Webhook to Workspace」ボタンをクリックします。
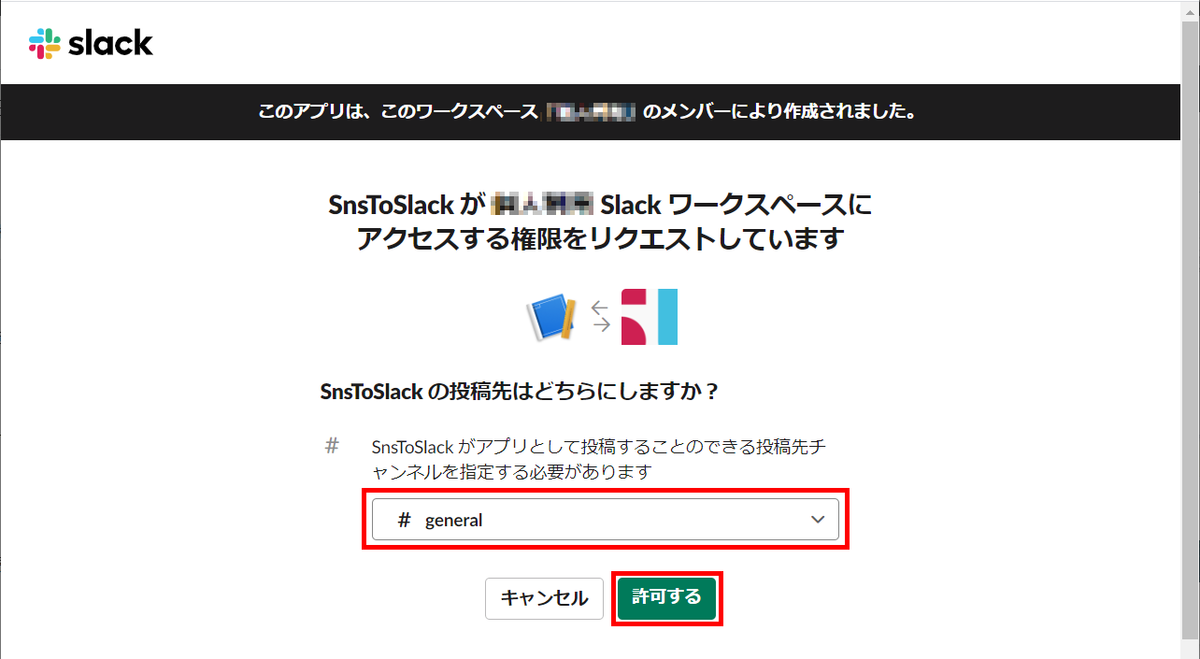
以下の画面が表示されます。「#general」を選択してから「許可する」ボタンをクリックします。
「Webhook URLs for Your Workspace」に発行された Webhook URL が表示されるのでコピーします。
SNS から呼び出す Lambda を実装する
Webhook URL は直接 Lambda 内には記述せず環境変数 SLACK_WEBHOOK_URL で渡すことにします。
.envrc に export SLACK_WEBHOOK_URL=... を追加します(AWS_PROFILE、SLACK_WEBHOOK_URL の ..... の部分には実際の値を記述します)。
export AWS_PROFILE=.....
# Windows 上の Python で UTF-8 をデフォルトにする
# https://qiita.com/methane/items/9a19ddf615089b071e71
export PYTHONUTF8=1

export SLACK_WEBHOOK_URL=https://hooks.slack.com/services/.....
serverless.yml の notifySlack 関数に環境変数 SLACK_WEBHOOK_URL の値を渡すよう記述を追加します。
  notifySlack:
    handler: sns_handler.notify_slack
    environment:
      SLACK_WEBHOOK_URL: ${env:SLACK_WEBHOOK_URL}
    events:
      # - sns: notify-slack-topic という書き方ではなく resources で定義した Topic に関連付けている
      # ただしこの書き方だと Subscription を作成してくれないし、Topic にメッセージが publish されても Lambda 関数が実行されない
      # ので resources で Subscription を作成して必要な権限を付与している
      - sns:
        arn: !Ref NotifySlackTopic
        topicName: notify-slack-topic
message_service サブプロジェクトの下に sns_handler.py を新規作成し、以下の内容を記述します。
import json
import logging
import os

import requests

logger = logging.getLogger()
logger.setLevel(logging.INFO)


def notify_slack(event, context):
    msg = {
        'text': event['Records'][0]['Sns']['Message']
    }
    encoded_msg = json.dumps(msg).encode('utf-8')
    res = requests.post(os.environ['SLACK_WEBHOOK_URL'], data=encoded_msg)
    logger.info(res.status_code)
    logger.info(res.headers)
    logger.info(res.text)
ユニットテストを作成する
プロジェクトのルートディレクトリ直下に tests ディレクトリを作成し、中身が空の __init__.py ファイルを作成します。
まずは sendMsg 関数のテストから。tests ディレクトリの下に test_apigw_handler.py を作成し、以下の内容を記述します。
import json
import unittest
from unittest.mock import patch

import boto3
from moto import mock_sns

from message_service import apigw_handler

TOPIC_NAME = 'notify-slack-topic'


@mock_sns
class TestApigwHandler(unittest.TestCase):
    def setUp(self):
        sns_client = boto3.client('sns')
        response = sns_client.create_topic(
            Name=TOPIC_NAME
        )
        self._topic_arn = response['TopicArn']
        self.env = patch.dict('os.environ', {
            'TOPIC_ARN': response['TopicArn'],
        })

    def tearDown(self):
        sns_client = boto3.client('sns')
        sns_client.delete_topic(
            TopicArn=self._topic_arn
        )

    def test_send_msg(self):
        with self.env:
            with open('tests/apigw_event.json', encoding='utf-8', mode='r') as f:
                apigw_event = json.load(f)

            response = apigw_handler.send_msg(apigw_event, None)
            self.assertEqual(response['statusCode'], 200)
apigw_event.json も作成し、以下の内容を記述します。
{
  "body": "eyJ0ZXN0IjoiYm9keSJ9",
  "resource": "/{proxy+}",
  "path": "/path/to/resource",
  "httpMethod": "POST",
  "isBase64Encoded": true,
  "queryStringParameters": {
    "foo": "bar"
  },
  "multiValueQueryStringParameters": {
    "foo": [
      "bar"
    ]
  },
  "pathParameters": {
    "proxy": "/path/to/resource"
  },
  "stageVariables": {
    "baz": "qux"
  },
  "headers": {
    "Accept": "text/html,application/xhtml+xml,application/xml;q=0.9,image/webp,*/*;q=0.8",
    "Accept-Encoding": "gzip, deflate, sdch",
    "Accept-Language": "en-US,en;q=0.8",
    "Cache-Control": "max-age=0",
    "CloudFront-Forwarded-Proto": "https",
    "CloudFront-Is-Desktop-Viewer": "true",
    "CloudFront-Is-Mobile-Viewer": "false",
    "CloudFront-Is-SmartTV-Viewer": "false",
    "CloudFront-Is-Tablet-Viewer": "false",
    "CloudFront-Viewer-Country": "US",
    "Host": "1234567890.execute-api.ap-northeast-1.amazonaws.com",
    "Upgrade-Insecure-Requests": "1",
    "User-Agent": "Custom User Agent String",
    "Via": "1.1 08f323deadbeefa7af34d5feb414ce27.cloudfront.net (CloudFront)",
    "X-Amz-Cf-Id": "cDehVQoZnx43VYQb9j2-nvCh-9z396Uhbp027Y2JvkCPNLmGJHqlaA==",
    "X-Forwarded-For": "127.0.0.1, 127.0.0.2",
    "X-Forwarded-Port": "443",
    "X-Forwarded-Proto": "https"
  },
  "multiValueHeaders": {
    "Accept": [
      "text/html,application/xhtml+xml,application/xml;q=0.9,image/webp,*/*;q=0.8"
    ],
    "Accept-Encoding": [
      "gzip, deflate, sdch"
    ],
    "Accept-Language": [
      "en-US,en;q=0.8"
    ],
    "Cache-Control": [
      "max-age=0"
    ],
    "CloudFront-Forwarded-Proto": [
      "https"
    ],
    "CloudFront-Is-Desktop-Viewer": [
      "true"
    ],
    "CloudFront-Is-Mobile-Viewer": [
      "false"
    ],
    "CloudFront-Is-SmartTV-Viewer": [
      "false"
    ],
    "CloudFront-Is-Tablet-Viewer": [
      "false"
    ],
    "CloudFront-Viewer-Country": [
      "US"
    ],
    "Host": [
      "0123456789.execute-api.ap-northeast-1.amazonaws.com"
    ],
    "Upgrade-Insecure-Requests": [
      "1"
    ],
    "User-Agent": [
      "Custom User Agent String"
    ],
    "Via": [
      "1.1 08f323deadbeefa7af34d5feb414ce27.cloudfront.net (CloudFront)"
    ],
    "X-Amz-Cf-Id": [
      "cDehVQoZnx43VYQb9j2-nvCh-9z396Uhbp027Y2JvkCPNLmGJHqlaA=="
    ],
    "X-Forwarded-For": [
      "127.0.0.1, 127.0.0.2"
    ],
    "X-Forwarded-Port": [
      "443"
    ],
    "X-Forwarded-Proto": [
      "https"
    ]
  },
  "requestContext": {
    "accountId": "123456789012",
    "resourceId": "123456",
    "stage": "prod",
    "requestId": "c6af9ac6-7b61-11e6-9a41-93e8deadbeef",
    "requestTime": "09/Apr/2015:12:34:56 +0000",
    "requestTimeEpoch": 1428582896000,
    "identity": {
      "cognitoIdentityPoolId": null,
      "accountId": null,
      "cognitoIdentityId": null,
      "caller": null,
      "accessKey": null,
      "sourceIp": "127.0.0.1",
      "cognitoAuthenticationType": null,
      "cognitoAuthenticationProvider": null,
      "userArn": null,
      "userAgent": "Custom User Agent String",
      "user": null
    },
    "path": "/prod/path/to/resource",
    "resourcePath": "/{proxy+}",
    "httpMethod": "POST",
    "apiId": "1234567890",
    "protocol": "HTTP/1.1"
  },
  "body": "{\r\n    \"message\": \"これはテストです  \"\r\n}",
  "isBase64Encoded": "False"
}
IDEA からテストを実行して成功することを確認します。

次は notifySlack 関数のテストです。tests ディレクトリの下に test_sns_handler.py を作成し、以下の内容を記述します。
import json
import os
import unittest
from unittest.mock import patch

from message_service import sns_handler


class TestApigwHandler(unittest.TestCase):
    def setUp(self):
        self.env = patch.dict('os.environ', {
            'SLACK_WEBHOOK_URL': 'https:/localhost/service/test',
        })

    def tearDown(self):
        None

    @patch('requests.post')
    def test_notify_slack(self, mock_requests):
        with self.env:
            with open('tests/sns_event.json', encoding='utf-8', mode='r') as f:
                sns_event = json.load(f)

            sns_handler.notify_slack(sns_event, None)

            msg = {
                'text': 'これはテストです'
            }
            encoded_msg = json.dumps(msg).encode('utf-8')
            mock_requests.assert_called_with(os.environ['SLACK_WEBHOOK_URL'], data=encoded_msg)
sns_event.json も作成し、以下の内容を記述します。
{
  "Records": [
    {
      "EventSource": "aws:sns",
      "EventVersion": "1.0",
      "EventSubscriptionArn": "arn:aws:sns:ap-northeast-1:446693287859:notify-slack-topic:2e6206ff-f201-400c-86f8-5ad2a168d1d0",
      "Sns": {
        "Type": "Notification",
        "MessageId": "accf8eb7-8119-54a8-a2e4-d9db0cb190fb",
        "TopicArn": "arn:aws:sns:ap-northeast-1:446693287859:notify-slack-topic",
        "Subject": "None",
        "Message": "これはテストです",
        "Timestamp": "2020-06-23T23:08:24.463Z",
        "SignatureVersion": "1",
        "Signature": "INeRjQ+zIe3qolznKBSlM5p9c1IguSBa9CBkd3AXwmwJm3SEpqKD+g3+Xmg/KT5v2wg8MVpOMpu1UO6zYdQ4lSnU90DP6Q1e6Bngr9uvy5ypgpE7Hy5s5L24vUT5bdqQCpY8Ig+Pt4Fx1PMFaRw9WnASl+26JRlGR53hMPux7GZlugQIYrlAhPJ/ZUlD0gqP5+hTg86FLdQ4GYblruvV1TqI7nEzd7ou88lviXj/RC4YYUUK0fonaR5U9tLTJmHwyr/cV3oII2kw6FzsxASpEHi3GhalKRuy1bW4Lx+Y4a0ITavK+KvvCs5iK9jZ+W07E8HyWd/vjqtRjMjwa83kYQ==",
        "SigningCertUrl": "https://sns.ap-northeast-1.amazonaws.com/SimpleNotificationService-a86cb10b4e1f29c941702d737128f7b6.pem",
        "UnsubscribeUrl": "https://sns.ap-northeast-1.amazonaws.com/?Action=Unsubscribe&SubscriptionArn=arn:aws:sns:ap-northeast-1:446693287859:notify-slack-topic:2e6206ff-f201-400c-86f8-5ad2a168d1d0",
        "MessageAttributes": {}
      }
    }
  ]
}
IDEA からテストを実行して成功することを確認します。

最後にコマンドラインの venv 環境下で python -m unittest -v を実行してテストが成功することを確認します。

deploy する
message_service を deploy します。


動作確認する
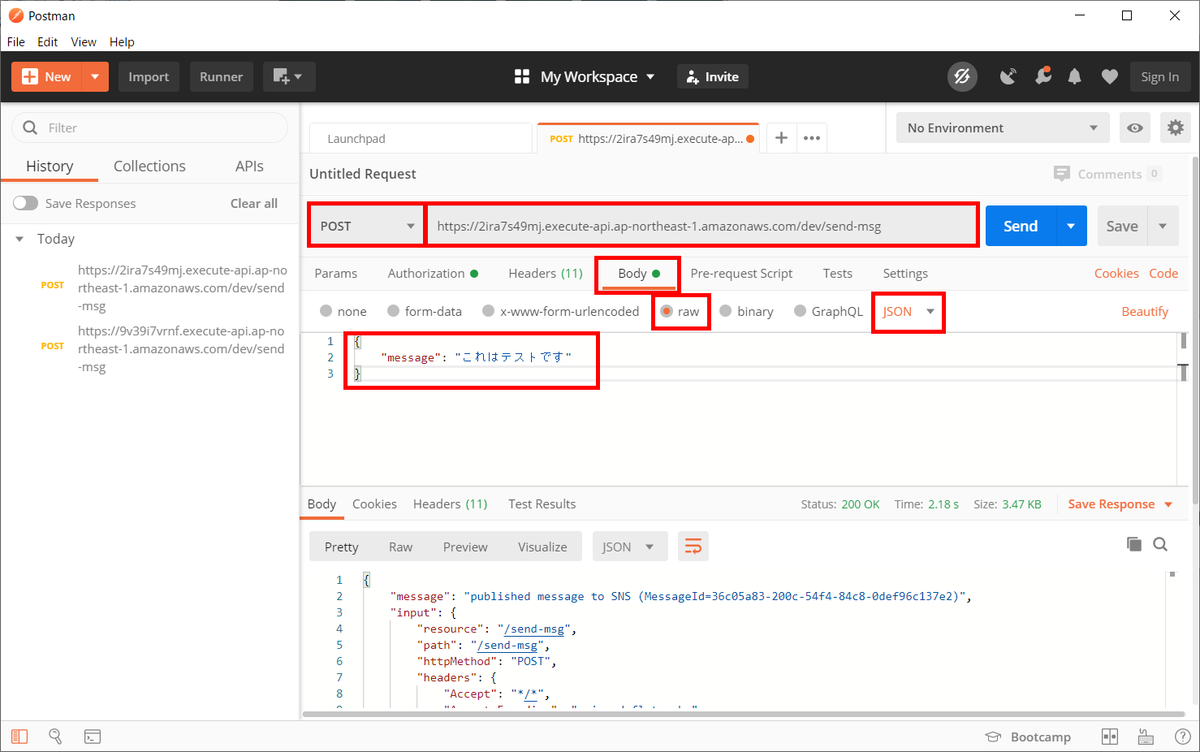
Postman を使用して API Gateway にメッセージを送信します。赤枠の部分が設定した箇所です。
Slack の #general にメッセージが届きました。

npx sls logs -f sendMsg、npx sls logs -f notifySlack --startTime 1h(ログが出てこなかったため過去1時間を表示するようオプションを追加しています) を実行してログを確認しても特に問題はなさそうです。


npx sls remove -v を実行して削除します。
履歴
2020/06/24
初版発行。