共有ライブラリを管理するために Sonatype の Nexus Repository Manager OSS を使用する ( その21 )( Spring Framework に依存するライブラリを作成する4 )
概要
- 今回の手順で確認できるのは以下の内容です。
- ksbysample-webapp-demo プロジェクトに ksbysample-library-depend-spring ライブラリを導入して動作確認します。
- ksbysample-library-depend-spring ライブラリを導入するだけで、@RequestMapping アノテーションで定義した URL にアクセスすれば request, response のデータのログが出力されるようになるはずです。
参照したサイト・書籍
目次
- ksbysample-webapp-demo プロジェクトに ksbysample-library-depend-spring ライブラリを導入する
- 動作確認する
- 1.3.6 ベースの ksbysample-webapp-demo プロジェクトに 1.3.8 ベースの ksbysample-library-depend-spring ライブラリを導入すると Spring Boot はどのバージョンが使用されるのか?
- 次回は。。。
手順
ksbysample-webapp-demo プロジェクトに ksbysample-library-depend-spring ライブラリを導入する
- build.gradle を リンク先の内容 に変更します。変更後、Gradle projects View の左上にある「Refresh all Gradle projects」ボタンをクリックして反映します。
動作確認する
Gradle projects View から bootRun タスクを実行し、Tomcat を起動します。
ブラウザを起動し http://localhost:8080/sample にアクセスすると、request, response のログが出力されることが確認できました。

Spring Boot の Auto-configuration を初めて使ってみましたが、AOP の処理も共通ライブラリ化できるのは結構便利な気がします。
1.3.6 ベースの ksbysample-webapp-demo プロジェクトに 1.3.8 ベースの ksbysample-library-depend-spring ライブラリを導入すると Spring Boot はどのバージョンが使用されるのか?
コマンドプロンプトを起動しカレントディレクトリを c:\project-springboot\ksbysample-nexus-repomng\ksbysample-webapp-demo へ移動した後、gradlew dependencies コマンドを実行すると以下の内容が出力されました。
一番下に ksbysample-library-depend-spring の依存関係が出力されていますが、org.springframework.boot:spring-boot-starter-web:1.3.8.RELEASE -> 1.3.6.RELEASE (*) のように 1.3.6 にダウングレードしていました。ライブラリではなくプロジェクトのバージョンが使用されるのでしょうか。。。
compile - Dependencies for source set 'main'.
+--- org.springframework.boot:spring-boot-starter-web: -> 1.3.6.RELEASE
|    +--- org.springframework.boot:spring-boot-starter:1.3.6.RELEASE
|    |    +--- org.springframework.boot:spring-boot:1.3.6.RELEASE
|    |    |    +--- org.springframework:spring-core:4.2.7.RELEASE
|    |    |    \--- org.springframework:spring-context:4.2.7.RELEASE
|    |    |         +--- org.springframework:spring-aop:4.2.7.RELEASE
|    |    |         |    +--- aopalliance:aopalliance:1.0
|    |    |         |    +--- org.springframework:spring-beans:4.2.7.RELEASE
|    |    |         |    |    \--- org.springframework:spring-core:4.2.7.RELEASE
|    |    |         |    \--- org.springframework:spring-core:4.2.7.RELEASE
|    |    |         +--- org.springframework:spring-beans:4.2.7.RELEASE (*)
|    |    |         +--- org.springframework:spring-core:4.2.7.RELEASE
|    |    |         \--- org.springframework:spring-expression:4.2.7.RELEASE
|    |    |              \--- org.springframework:spring-core:4.2.7.RELEASE
|    |    +--- org.springframework.boot:spring-boot-autoconfigure:1.3.6.RELEASE
|    |    |    \--- org.springframework.boot:spring-boot:1.3.6.RELEASE (*)
|    |    +--- org.springframework.boot:spring-boot-starter-logging:1.3.6.RELEASE
|    |    |    +--- ch.qos.logback:logback-classic:1.1.7
|    |    |    |    +--- ch.qos.logback:logback-core:1.1.7
|    |    |    |    \--- org.slf4j:slf4j-api:1.7.20 -> 1.7.21
|    |    |    +--- org.slf4j:jcl-over-slf4j:1.7.21
|    |    |    |    \--- org.slf4j:slf4j-api:1.7.21
|    |    |    +--- org.slf4j:jul-to-slf4j:1.7.21
|    |    |    |    \--- org.slf4j:slf4j-api:1.7.21
|    |    |    \--- org.slf4j:log4j-over-slf4j:1.7.21
|    |    |         \--- org.slf4j:slf4j-api:1.7.21
|    |    +--- org.springframework:spring-core:4.2.7.RELEASE
|    |    \--- org.yaml:snakeyaml:1.16
|    +--- org.springframework.boot:spring-boot-starter-tomcat:1.3.6.RELEASE
|    |    +--- org.apache.tomcat.embed:tomcat-embed-core:8.0.36
|    |    +--- org.apache.tomcat.embed:tomcat-embed-el:8.0.36
|    |    +--- org.apache.tomcat.embed:tomcat-embed-logging-juli:8.0.36
|    |    \--- org.apache.tomcat.embed:tomcat-embed-websocket:8.0.36
|    |         \--- org.apache.tomcat.embed:tomcat-embed-core:8.0.36
|    +--- org.springframework.boot:spring-boot-starter-validation:1.3.6.RELEASE
|    |    +--- org.springframework.boot:spring-boot-starter:1.3.6.RELEASE (*)
|    |    +--- org.apache.tomcat.embed:tomcat-embed-el:8.0.36
|    |    \--- org.hibernate:hibernate-validator:5.2.4.Final
|    |         +--- javax.validation:validation-api:1.1.0.Final
|    |         +--- org.jboss.logging:jboss-logging:3.2.1.Final -> 3.3.0.Final
|    |         \--- com.fasterxml:classmate:1.1.0
|    +--- com.fasterxml.jackson.core:jackson-databind:2.6.7
|    |    +--- com.fasterxml.jackson.core:jackson-annotations:2.6.0 -> 2.6.7
|    |    \--- com.fasterxml.jackson.core:jackson-core:2.6.7
|    +--- org.springframework:spring-web:4.2.7.RELEASE
|    |    +--- org.springframework:spring-aop:4.2.7.RELEASE (*)
|    |    +--- org.springframework:spring-beans:4.2.7.RELEASE (*)
|    |    +--- org.springframework:spring-context:4.2.7.RELEASE (*)
|    |    \--- org.springframework:spring-core:4.2.7.RELEASE
|    \--- org.springframework:spring-webmvc:4.2.7.RELEASE
|         +--- org.springframework:spring-beans:4.2.7.RELEASE (*)
|         +--- org.springframework:spring-context:4.2.7.RELEASE (*)
|         +--- org.springframework:spring-core:4.2.7.RELEASE
|         +--- org.springframework:spring-expression:4.2.7.RELEASE (*)
|         \--- org.springframework:spring-web:4.2.7.RELEASE (*)
+--- ksbysample.library:ksbysample-library-simpleutils:1.0-RELEASE
+--- ksbysample.library:ksbysample-library-depend-nospring:1.1-RELEASE
|    \--- org.apache.commons:commons-lang3:3.4 -> 3.5
\--- ksbysample.library:ksbysample-library-depend-spring:1.0.0-RELEASE
     +--- org.springframework.boot:spring-boot-autoconfigure:1.3.8.RELEASE -> 1.3.6.RELEASE (*)
     +--- org.springframework.boot:spring-boot-starter-web:1.3.8.RELEASE -> 1.3.6.RELEASE (*)
     +--- org.aspectj:aspectjweaver:1.8.9
     +--- org.apache.commons:commons-lang3:3.5
     \--- com.google.guava:guava:20.0

.....(本当はもっと出力されています)....
次回は。。。
次の2点を試してみます。
- 1.4 系のプロジェクトに 1.3.8 ベースの ksbysample-library-depend-spring ライブラリを導入すると Spring Boot はどのバージョンが使用されるのか、に興味が湧いたのでちょっと試してみます。
- ksbysample-library-depend-spring を導入してもデフォルトでは動作せず、
ksbysample.library.request-and-response-logger.enabled=trueを設定した時だけ動作するようにできるか試してみます。
ソースコード
build.gradle
dependencies {
    compile('org.springframework.boot:spring-boot-starter-web')
    testCompile('org.springframework.boot:spring-boot-starter-test')

    compile('ksbysample.library:ksbysample-library-simpleutils:1.0-RELEASE')
    compile('ksbysample.library:ksbysample-library-depend-nospring:1.1-RELEASE')
    compile('ksbysample.library:ksbysample-library-depend-spring:1.0.0-RELEASE')
}
- dependencies に
compile('ksbysample.library:ksbysample-library-depend-spring:1.0.0-RELEASE')を追加します。
履歴
2016/12/27
初版発行。
共有ライブラリを管理するために Sonatype の Nexus Repository Manager OSS を使用する ( その20 )( Spring Framework に依存するライブラリを作成する3 )
概要
- 今回の手順で確認できるのは以下の内容です。
- テストの実装、及び Nexus への登録まで進めます。
参照したサイト・書籍
Spring Boot Reference Guide - 40. Testing - 40.4.3 OutputCapture
https://docs.spring.io/spring-boot/docs/current/reference/html/boot-features-testing.html#boot-features-output-capture-test-utility- 標準出力に出力された内容を OutputCapture で確認する方法を参照しました。
Spring Framework Reference Documentation - 15. Integration Testing - @TestPropertySource
http://docs.spring.io/spring/docs/current/spring-framework-reference/html/integration-testing.html#__testpropertysource@TestPropertySourceを使用して、テストクラスで一時的に properties を設定する方法を参照しました。
目次
- src/test/java の下にテスト用の main class を作成する
- テスト用の Controller class を作成する
- RequestAndResponseLoggerAutoConfiguration クラスのテストを作成する
- 全てのテストが成功するか確認する
- Nexus に登録する
手順
src/test/java の下にテスト用の main class を作成する
main class はテスト用にあればよいので、src/main/java の下ではなく src/test/java の下に作成します。
src/test/java の下に ksbysample.library.dependspring パッケージを作成します。
src/test/java/ksbysample/library/dependspring の下に Application.java を作成し、リンク先の内容 を記述します。
テスト用の Controller class を作成する
RequestAndResponseLoggerAutoConfiguration クラスのテストを作成する
src/main/java/ksbysample/library/dependspring/config の下の RequestAndResponseLoggerAutoConfiguration.java で「Create Test」ダイアログを表示し、テストクラスを作成します。

「Choose Destination Directory」ダイアログが表示されたら src/test/java の方を選択して「OK」ボタンをクリックします。

src/test/java/ksbysample/library/dependspring/config の下に RequestAndResponseLoggerAutoConfigurationTest.java が作成されますので、リンク先の内容 を記述します。
全てのテストが成功するか確認する
テストを実行します。RequestAndResponseLoggerAutoConfigurationTest クラスのクラス名の左側に表示されているアイコンをクリックしてコンテキストメニューを表示後「Run 'RequestAndResponseLoggerAutoCo...'」を選択します。

テストが成功することが確認できます。

「ログが出力される」場合のテストのログを見ると request, response のデータが出力されていることが確認できます。

Nexus に登録する
Gradle projects View から uploadArchives タスクを実行します。BUILD SUCCESSFUL が表示されて正常に Nexus に登録されました。

Nexus の管理画面を見ると maven-releases repository に登録されていることが確認できます。


ksbysample-library-depend-spring-1.0.0-RELEASE.pom を見ると リンク先の内容 で登録されていました。
以下の場所の .gitkeep を削除した後、commit します。
ソースコード
Application.java
package ksbysample.library.dependspring;

import org.springframework.boot.SpringApplication;
import org.springframework.boot.autoconfigure.SpringBootApplication;

@SpringBootApplication
public class Application {

    public static void main(String[] args) {
        SpringApplication.run(Application.class, args);
    }

}
TestController.java
package ksbysample.library.dependspring;

import org.springframework.stereotype.Controller;
import org.springframework.web.bind.annotation.RequestMapping;
import org.springframework.web.bind.annotation.ResponseBody;

@Controller
@RequestMapping("/test")
public class TestController {

    @RequestMapping
    @ResponseBody
    public String index() {
        return "test";
    }

}
RequestAndResponseLoggerAutoConfigurationTest.java
package ksbysample.library.dependspring.config;

import ksbysample.library.dependspring.Application;
import org.junit.Before;
import org.junit.Rule;
import org.junit.Test;
import org.junit.experimental.runners.Enclosed;
import org.junit.runner.RunWith;
import org.springframework.beans.factory.annotation.Autowired;
import org.springframework.boot.test.OutputCapture;
import org.springframework.boot.test.SpringApplicationConfiguration;
import org.springframework.test.context.TestPropertySource;
import org.springframework.test.context.junit4.SpringJUnit4ClassRunner;
import org.springframework.test.context.web.WebAppConfiguration;
import org.springframework.test.web.servlet.MockMvc;
import org.springframework.test.web.servlet.setup.MockMvcBuilders;
import org.springframework.web.context.WebApplicationContext;

import static org.assertj.core.api.Assertions.assertThat;
import static org.springframework.test.web.servlet.request.MockMvcRequestBuilders.get;
import static org.springframework.test.web.servlet.result.MockMvcResultMatchers.status;

@RunWith(Enclosed.class)
public class RequestAndResponseLoggerAutoConfigurationTest {

    @RunWith(SpringJUnit4ClassRunner.class)
    @SpringApplicationConfiguration(classes = Application.class)
    @WebAppConfiguration
    public static class デフォルトの設定でのテスト {

        public MockMvc mvc;

        @Autowired
        private WebApplicationContext context;

        @Rule
        public OutputCapture capture = new OutputCapture();

        @Before
        public void setUp() throws Exception {
            this.mvc = MockMvcBuilders.webAppContextSetup(this.context)
                    .build();
        }

        @Test
        public void ログが出力される() throws Exception {
            mvc.perform(get("/test"))
                    .andExpect(status().isOk());
            assertThat(capture.toString()).contains("[req][info  ] REQUEST_URI = /test");
            assertThat(capture.toString()).contains("[res][info  ] RESPONSE_STATUS = 200");
        }

    }

    @RunWith(SpringJUnit4ClassRunner.class)
    @SpringApplicationConfiguration(classes = Application.class)
    @WebAppConfiguration
    @TestPropertySource(properties = {"ksbysample.library.request-and-response-logger.execution=execution(* ksbysample.library.dependspring..*.*(..))"})
    public static class executionプロパティ設定時のテスト_出力される設定 {

        public MockMvc mvc;

        @Autowired
        private WebApplicationContext context;

        @Rule
        public OutputCapture capture = new OutputCapture();

        @Before
        public void setUp() throws Exception {
            this.mvc = MockMvcBuilders.webAppContextSetup(this.context)
                    .build();
        }

        @Test
        public void ログが出力される() throws Exception {
            mvc.perform(get("/test"))
                    .andExpect(status().isOk());
            assertThat(capture.toString()).contains("[req][info  ] REQUEST_URI = /test");
            assertThat(capture.toString()).contains("[res][info  ] RESPONSE_STATUS = 200");
        }

    }

    @RunWith(SpringJUnit4ClassRunner.class)
    @SpringApplicationConfiguration(classes = Application.class)
    @WebAppConfiguration
    @TestPropertySource(properties = {"ksbysample.library.request-and-response-logger.execution=execution(* ksbysample.webapp.lending.web..*.*(..))"})
    public static class executionプロパティ設定時のテスト_出力されない設定 {

        public MockMvc mvc;

        @Autowired
        private WebApplicationContext context;

        @Rule
        public OutputCapture capture = new OutputCapture();

        @Before
        public void setUp() throws Exception {
            this.mvc = MockMvcBuilders.webAppContextSetup(this.context)
                    .build();
        }

        @Test
        public void ログが出力されない() throws Exception {
            mvc.perform(get("/test"))
                    .andExpect(status().isOk());
            assertThat(capture.toString()).doesNotContain("[req][info  ] REQUEST_URI = /test");
            assertThat(capture.toString()).doesNotContain("[res][info  ] RESPONSE_STATUS = 200");
        }

    }

}
ksbysample-library-depend-spring-1.0.0-RELEASE.pom
<project xmlns="http://maven.apache.org/POM/4.0.0" xmlns:xsi="http://www.w3.org/2001/XMLSchema-instance"
         xsi:schemaLocation="http://maven.apache.org/POM/4.0.0 http://maven.apache.org/xsd/maven-4.0.0.xsd">
    <modelVersion>4.0.0</modelVersion>
    <groupId>ksbysample.library</groupId>
    <artifactId>ksbysample-library-depend-spring</artifactId>
    <version>1.0.0-RELEASE</version>
    <dependencies>
        <dependency>
            <groupId>org.springframework.boot</groupId>
            <artifactId>spring-boot-autoconfigure</artifactId>
            <scope>compile</scope>
            <exclusions>
                <exclusion>
                    <artifactId>commons-logging</artifactId>
                    <groupId>commons-logging</groupId>
                </exclusion>
            </exclusions>
        </dependency>
        <dependency>
            <groupId>org.springframework.boot</groupId>
            <artifactId>spring-boot-starter-web</artifactId>
            <scope>compile</scope>
            <exclusions>
                <exclusion>
                    <artifactId>commons-logging</artifactId>
                    <groupId>commons-logging</groupId>
                </exclusion>
            </exclusions>
        </dependency>
        <dependency>
            <groupId>org.aspectj</groupId>
            <artifactId>aspectjweaver</artifactId>
            <scope>compile</scope>
            <exclusions>
                <exclusion>
                    <artifactId>commons-logging</artifactId>
                    <groupId>commons-logging</groupId>
                </exclusion>
            </exclusions>
        </dependency>
        <dependency>
            <groupId>org.apache.commons</groupId>
            <artifactId>commons-lang3</artifactId>
            <version>3.5</version>
            <scope>compile</scope>
            <exclusions>
                <exclusion>
                    <artifactId>commons-logging</artifactId>
                    <groupId>commons-logging</groupId>
                </exclusion>
            </exclusions>
        </dependency>
        <dependency>
            <groupId>com.google.guava</groupId>
            <artifactId>guava</artifactId>
            <version>20.0</version>
            <scope>compile</scope>
            <exclusions>
                <exclusion>
                    <artifactId>commons-logging</artifactId>
                    <groupId>commons-logging</groupId>
                </exclusion>
            </exclusions>
        </dependency>
        <dependency>
            <groupId>org.springframework.boot</groupId>
            <artifactId>spring-boot-starter-test</artifactId>
            <scope>test</scope>
        </dependency>
        <dependency>
            <groupId>org.assertj</groupId>
            <artifactId>assertj-core</artifactId>
            <version>3.6.1</version>
            <scope>test</scope>
        </dependency>
    </dependencies>
    <name>Spring依存のテストライブラリ ksbysample-library-depend-spring</name>
    <description>Spring に依存する共有ライブラリである</description>
    <dependencyManagement>
        <dependencies>
            <dependency>
                <groupId>org.springframework.boot</groupId>
                <artifactId>spring-boot-starter-parent</artifactId>
                <version>1.3.8.RELEASE</version>
                <scope>import</scope>
                <type>pom</type>
            </dependency>
            <dependency>
                <groupId>io.spring.platform</groupId>
                <artifactId>platform-bom</artifactId>
                <version>2.0.8.RELEASE</version>
                <scope>import</scope>
                <type>pom</type>
            </dependency>
        </dependencies>
    </dependencyManagement>
</project>
履歴
2016/12/26
初版発行。
共有ライブラリを管理するために Sonatype の Nexus Repository Manager OSS を使用する ( その19 )( Spring Framework に依存するライブラリを作成する2 )
概要
- 今回の手順で確認できるのは以下の内容です。
- ksbysample-webapp-lending から RequestAndResponseLogger.java を持ってきて auto-configuration 関連の実装まで進めます。
参照したサイト・書籍
Pro Spring Boot

- 作者: Felipe Gutierrez
- 出版社/メーカー: Apress
- 発売日: 2016/05/21
- メディア: ペーパーバック
- この商品を含むブログを見る
- auto-configuration プロジェクトのサンプルとして Chapter 14 の「The journal-spring-boot-autoconfigure Project」を参考にしました。
Spring Framework Reference Documentation - 12. Spring AOP APIs - 12.3.2 Advice types in Spring
http://docs.spring.io/spring/docs/current/spring-framework-reference/html/aop-api.html#aop-api-advice-types- MethodInterceptor インターフェースを実装しようとすると import 候補に
org.aopalliance.intercept.MethodInterceptorとorg.springframework.cglib.proxy.MethodInterceptorの2つが出て来るのですが、どちらを使用すればよいか分からなかったので、このページを参照しました。invoke メソッドが書かれていたのでorg.aopalliance.intercept.MethodInterceptorを使用します。
- MethodInterceptor インターフェースを実装しようとすると import 候補に
Spring Boot Reference Guide - 43. Creating your own auto-configuration
http://docs.spring.io/spring-boot/docs/current/reference/html/boot-features-developing-auto-configuration.htmlSpring Boot Reference Guide - 64. Spring Boot Gradle plugin - 64.6 Repackage configuration
http://docs.spring.io/spring-boot/docs/current/reference/html/build-tool-plugins-gradle-plugin.html#build-tool-plugins-gradle-repackage-configuration
目次
- ksbysample-webapp-lending から RequestAndResponseLogger.java を持ってくる
- AutoConfiguration クラスを作成する
- META-INF/spring.factories を作成する
- build してみる
- ksbysample-library-depend-spring-1.0.0-RELEASE.jar の中を見てみる
手順
ksbysample-webapp-lending から RequestAndResponseLogger.java を持ってくる
src/main/java の下に ksbysample.library.dependspring.intercepter パッケージを作成します。
ksbysample-webapp-lending の RequestAndResponseLogger.java をコピーして src/main/java/ksbysample/library/dependspring/intercepter の下にペーストします。
使用するライブラリがないので build.gradle を リンク先のその1の内容 に変更します。変更後、Gradle projects View の左上にある「Refresh all Gradle projects」ボタンをクリックして反映します。
AutoConfiguration クラスを作成する
Spring Boot の spring-boot-autoconfigure プロジェクト を見ると AutoConfiguration 用の Bean を作成するクラスはクラス名の末尾に AutoConfiguration が付けられているようなので、RequestAndResponseLoggerAutoConfiguration.java を作成します。
src/main/java/ksbysample/library/dependspring の下に config パッケージを作成します。
src/main/java/ksbysample/library/dependspring/config の下に RequestAndResponseLoggerAutoConfiguration.java を作成し、リンク先の内容 を記述します。
META-INF/spring.factories を作成する
src/main/resources の下に META-INF ディレクトリを作成します。
src/main/resources/META-INF の下に spring.factories を作成し、リンク先の内容 を記述します。
build してみる
clean タスク実行 → Rebuild Project 実行をした後、build タスクを実行します。

"FAILURE" の文字が出力され失敗しました。
IntelliJ IDEA のコンソールに出力された内容ではエラーの原因が分からないので、コマンドプロンプトから
--stacktraceオプションを付けて build タスクを実行してみます。

出力されたログを見た感じでは、以下の原因のようです。
- bootRepackage タスクで失敗している。
- main クラスがないため失敗している。
main クラスは作成しないのでどうすればよいか調べてみたところ、64.6 Repackage configuration に
enabledという設定項目を見つけました。これを false に設定すれば bootRepackage タスクは実行されなくなるようです。build.gradle を リンク先のその2の内容 に変更します。変更後、Gradle projects View の左上にある「Refresh all Gradle projects」ボタンをクリックして反映します。
再度 clean タスク実行 → Rebuild Project 実行をした後、build タスクを実行します。今度は "BUILD SUCCESSFUL" が出力されて成功しました。

jar ファイルが作成されていることも確認できました。

ksbysample-library-depend-spring-1.0.0-RELEASE.jar の中を見てみる
ksbysample-library-depend-spring-1.0.0-RELEASE.jar を解凍してみると以下の構成でした。
ksbysample-library-depend-spring-1.0.0-RELEASE.jar
├ generated
├ ksbysample
│ └ library
│    └ dependspring
│       ├ config
│       │ └ RequestAndResponseLoggerAutoConfiguration.class
│       └ intercepter
│          └ RequestAndResponseLogger.class
├ META-INF
│ ├ MANIFEST.MF
│ └ spring.factories
└ .gitkeep
ここまでの内容を commit します。
ソースコード
ksbysample-library-depend-spring/build.gradle
■その1
dependencies {
    // dependency-management-plugin によりバージョン番号が自動で設定されるもの
    // Appendix A. Dependency versions ( http://docs.spring.io/platform/docs/current/reference/htmlsingle/#appendix-dependency-versions ) 参照
    compile("org.springframework.boot:spring-boot-autoconfigure")
    compile("org.springframework.boot:spring-boot-starter-web")
    compile("org.aspectj:aspectjweaver")
    testCompile("org.springframework.boot:spring-boot-starter-test")

    // dependency-management-plugin によりバージョン番号が自動で設定されないもの、あるいは最新バージョンを指定したいもの
    compile("org.apache.commons:commons-lang3:3.5")
    compile("com.google.guava:guava:20.0")
    testCompile("org.assertj:assertj-core:3.6.1")
}
- 以下の記述を追加します。
- あとでテストも書くので AssertJ も追加しておきます。
■その2
dependencyManagement {
    imports {
        mavenBom 'io.spring.platform:platform-bom:2.0.5.RELEASE'
    }
}

bootRepackage {
    enabled = false
}

dependencies {
    ..........
}
bootRepackage { enabled = false }を追加します。
RequestAndResponseLogger.java
package ksbysample.library.dependspring.intercepter;

import com.google.common.collect.Iterators;
import org.aopalliance.intercept.MethodInterceptor;
import org.aopalliance.intercept.MethodInvocation;
import org.apache.commons.lang3.StringUtils;
import org.slf4j.Logger;
import org.slf4j.LoggerFactory;
import org.springframework.web.context.request.RequestContextHolder;
import org.springframework.web.context.request.ServletRequestAttributes;

import javax.servlet.http.HttpServletRequest;
import javax.servlet.http.HttpServletResponse;
import java.util.Arrays;
import java.util.Map;
import java.util.stream.StreamSupport;

public class RequestAndResponseLogger implements MethodInterceptor {

    private final Logger logger = LoggerFactory.getLogger(this.getClass());

    private static final String LOG_REQUEST_INFO = "[req][info  ] ";
    private static final String LOG_REQUEST_HEADER = "[req][header] ";
    private static final String LOG_REQUEST_COOKIE = "[req][cookie] ";
    private static final String LOG_REQUEST_PARAMETER = "[req][param ] ";

    private static final String LOG_RESPONSE_INFO = "[res][info  ] ";
    private static final String LOG_RESPONSE_HEADER = "[res][header] ";

    @Override
    public Object invoke(MethodInvocation invocation) throws Throwable {
        HttpServletRequest request = ((ServletRequestAttributes) RequestContextHolder.currentRequestAttributes()).getRequest();
        loggingRequest(request);
        Object ret = invocation.proceed();
        HttpServletResponse response = ((ServletRequestAttributes) RequestContextHolder.getRequestAttributes()).getResponse();
        loggingResponse(response);

        return ret;
    }

    private void loggingRequest(HttpServletRequest request) {
        loggingRequestInfo(request);
        loggingRequestHeaders(request);
        loggingRequestCookies(request);
        loggingRequestParameters(request);
    }

    ..........
RequestAndResponseLoggerAutoConfiguration.java
package ksbysample.library.dependspring.config;

import ksbysample.library.dependspring.intercepter.RequestAndResponseLogger;
import org.apache.commons.lang3.StringUtils;
import org.springframework.aop.Advisor;
import org.springframework.aop.aspectj.AspectJExpressionPointcut;
import org.springframework.aop.support.DefaultPointcutAdvisor;
import org.springframework.beans.factory.annotation.Value;
import org.springframework.boot.autoconfigure.condition.ConditionalOnWebApplication;
import org.springframework.context.annotation.Bean;
import org.springframework.context.annotation.Configuration;

@Configuration
public class RequestAndResponseLoggerAutoConfiguration {

    private static final String REQUESTMAPPING_EXPRESSION = "@annotation(org.springframework.web.bind.annotation.RequestMapping)";

    @Value("${ksbysample.library.request-and-response-logger.execution:}")
    private String execution;

    @Bean
    @ConditionalOnWebApplication
    public Advisor requestAndResponseLoggerAdvisor() {
        AspectJExpressionPointcut pointcut = new AspectJExpressionPointcut();
        String expression = StringUtils.EMPTY;
        if (StringUtils.isNotBlank(this.execution)) {
            expression = this.execution + " && ";
        }
        expression += REQUESTMAPPING_EXPRESSION;
        pointcut.setExpression(expression);
        return new DefaultPointcutAdvisor(pointcut, new RequestAndResponseLogger());
    }

}
- デフォルトでは @RequestMapping アノテーションが付与された全てのメソッドに RequestAndResponseLogger の invoke メソッドの処理を追加します。
- ただし適用するパッケージを制限できるよう application.properties に
ksbysample.library.request-and-response-logger.execution=execution(* ksbysample.webapp.lending.web..*.*(..))のように設定を追加すれば反映されるようにします。
META-INF/spring.factories
org.springframework.boot.autoconfigure.EnableAutoConfiguration=\
ksbysample.library.dependspring.config.RequestAndResponseLoggerAutoConfiguration
履歴
2016/12/25
初版発行。
共有ライブラリを管理するために Sonatype の Nexus Repository Manager OSS を使用する ( その18 )( Spring Framework に依存するライブラリを作成する )
概要
- 今回の手順で確認できるのは以下の内容です。
- Spring Framework に依存するライブラリを作成してみます。
- 作成するライブラリでは Spring Boot の auto-configuration の仕組みを利用してみます。
- 約4回で書く予定です。
- 今回は ksbysample-library-depend-spring プロジェクトを作成するところまで。
- 2回目は ksbysample-webapp-lending から RequestAndResponseLogger.java を持ってきて auto-configuration 関連の実装まで。
- 3回目はテストの実装、及び Nexus への登録まで。
- 4回目は ksbysample-webapp-demo プロジェクトに ksbysample-library-depend-spring ライブラリを導入して動作確認します。
参照したサイト・書籍
目次
手順
ライブラリの仕様を決める
今回は以下の仕様のライブラリを作成します。
- Gradle プロジェクトとして作成します。
- GroupId は
ksbysample.library、ArtifactId はksbysample-library-depend-springにします。 - ksbysample-webapp-lending で作成した RequestAndResponseLoggerクラス を外部ライブラリにします。ksbysample-library-depend-spring ライブラリを build.gradle の dependencies に記述するだけで、@RequestMapping で定義された URL にアクセスされた時に request, response のデータがログに出力されるようにします。
feature/3-issue ブランチを作成する
- GitHub に Issue 3 を作成した後、feature/3-issue ブランチを作成します。
ksbysample-library-depend-spring プロジェクトを作成する
IntelliJ IDEA の「Welcome to IntelliJ IDEA」ダイアログから「Create New Project」メニューをクリックします。

「New Project」ダイアログが表示されます。画面左側の一覧から「Gradle」を選択してから以下の画像の内容を入力後、「Next」ボタンをクリックします。

GroupId、ArtifactId を入力する画面が表示されます。以下の画像の内容を入力後、「Next」ボタンをクリックします。

以下の画像の画面が表示されます。「Create directories for empty content roots automatically」をチェックした後、「Next」ボタンをクリックします。

Project name と Project location を入力する画面が表示されます。Project location を C:\project-springboot\ksbysample-nexus-repomng\ksbysample-library-depend-spring に変更した後、「Finish」ボタンをクリックします。

build.gradle を リンク先の内容 に変更します。変更後、Gradle projects View の左上にある「Refresh all Gradle projects」ボタンをクリックして反映します。
以下のディレクトリに .gitkeep ファイルを作成します。
commit します。
ソースコード
ksbysample-library-depend-spring/build.gradle
group 'ksbysample.library'
version '1.0.0-RELEASE'

buildscript {
    ext {
        springBootVersion = '1.3.8.RELEASE'
    }
    repositories {
        jcenter()
        maven { url "http://repo.spring.io/repo/" }
    }
    dependencies {
        classpath("org.springframework.boot:spring-boot-gradle-plugin:${springBootVersion}")
        classpath("io.spring.gradle:dependency-management-plugin:0.6.1.RELEASE")
    }
}

apply plugin: 'java'
apply plugin: 'idea'
apply plugin: 'spring-boot'
apply plugin: 'io.spring.dependency-management'
apply plugin: 'groovy'
apply plugin: 'maven'

sourceCompatibility = 1.8
targetCompatibility = 1.8

compileJava.options.compilerArgs = ['-Xlint:all']
compileTestGroovy.options.compilerArgs = ['-Xlint:all']
compileTestJava.options.compilerArgs = ['-Xlint:all']

repositories {
    jcenter()
}

dependencyManagement {
    imports {
        mavenBom 'io.spring.platform:platform-bom:2.0.8.RELEASE'
    }
}

dependencies {
    // dependency-management-plugin によりバージョン番号が自動で設定されるもの
    // Appendix A. Dependency versions ( http://docs.spring.io/platform/docs/current/reference/htmlsingle/#appendix-dependency-versions ) 参照
    compile("org.springframework.boot:spring-boot-autoconfigure")

    // dependency-management-plugin によりバージョン番号が自動で設定されないもの、あるいは最新バージョンを指定したいもの
}

javadoc {
    options.charSet = 'UTF-8'
    options.encoding = 'UTF-8'
}

task sourcesJar(type: Jar, dependsOn: classes) {
    classifier = 'sources'
    from sourceSets.main.allSource
}

task javadocJar(type: Jar, dependsOn: javadoc) {
    classifier = 'javadoc'
    from javadoc.destinationDir
}

artifacts {
    archives sourcesJar
    archives javadocJar
}

uploadArchives {
    def nexusUrl = "http://localhost:8081"
    def nexusUsername = "admin"
    def nexusPassword = "admin123"

    repositories {
        mavenDeployer {
            repository(url: "${nexusUrl}/repository/maven-releases") {
                authentication(userName: nexusUsername, password: nexusPassword)
            }
            snapshotRepository(url: "${nexusUrl}/repository/maven-snapshots") {
                authentication(userName: nexusUsername, password: nexusPassword)
            }
            pom.withXml {
                asNode().appendNode('name', 'Spring 依存のテストライブラリ ksbysample-library-depend-spring')
                asNode().appendNode('description', 'Spring に依存する共有ライブラリである')
            }
        }
    }
}
- Spring Boot はまだ 1.4 系を触っていないので、1.3 系の最新バージョンである 1.3.8 を使用します。
- dependencies には現時点では
org.springframework.boot:spring-boot-autoconfigureのみ定義します。 - uploadArchives タスク内に記述する nexus にアップロードするユーザは admin を使います。
履歴
2016/12/25
初版発行。
共有ライブラリを管理するために Sonatype の Nexus Repository Manager OSS を使用する ( その17 )( Nexus へコンポーネントを登録する専用 User を作成する )
概要
- 今回の手順で確認できるのは以下の内容です。
- admin ではなくアップロード用の User を作成してコンポーネントを登録します。
参照したサイト・書籍
目次
手順
コンポーネント登録用の Role を作成する
http://localhost:8081/ にアクセスし nexus の管理画面を表示後、画面右上の「Sign in」をクリックして admin / admin123 でサインインします。
画面上部の歯車のアイコンをクリックします。

画面左側のツリーから「Security」-「Roles」を選択後、画面右側の画面の「Create role」-「Nexus role」をクリックします。

「Create Role」画面が表示されます。以下の値を入力後、「Create role」ボタンをクリックします。Privileges には以下のものを選択します。
- nx-repository-view-maven2-maven-releases-add
- nx-repository-view-maven2-maven-releases-browse
- nx-repository-view-maven2-maven-releases-edit
- nx-repository-view-maven2-maven-releases-read
- nx-repository-view-maven2-maven-snapshots-add
- nx-repository-view-maven2-maven-snapshots-browse
- nx-repository-view-maven2-maven-snapshots-edit
- nx-repository-view-maven2-maven-snapshots-read
※Maven2 の repository にコンポーネントを追加するのに必要なのは
nx-repository-view-maven2-maven-...で始まる role です。
※今回作成するユーザにはアップロードされたコンポーネントを削除できないように...-delete以外の role を追加します。

コンポーネント登録用の User を作成する
画面左側のツリーから「Security」-「Users」を選択後、画面右側の画面の「Create user」をクリックします。

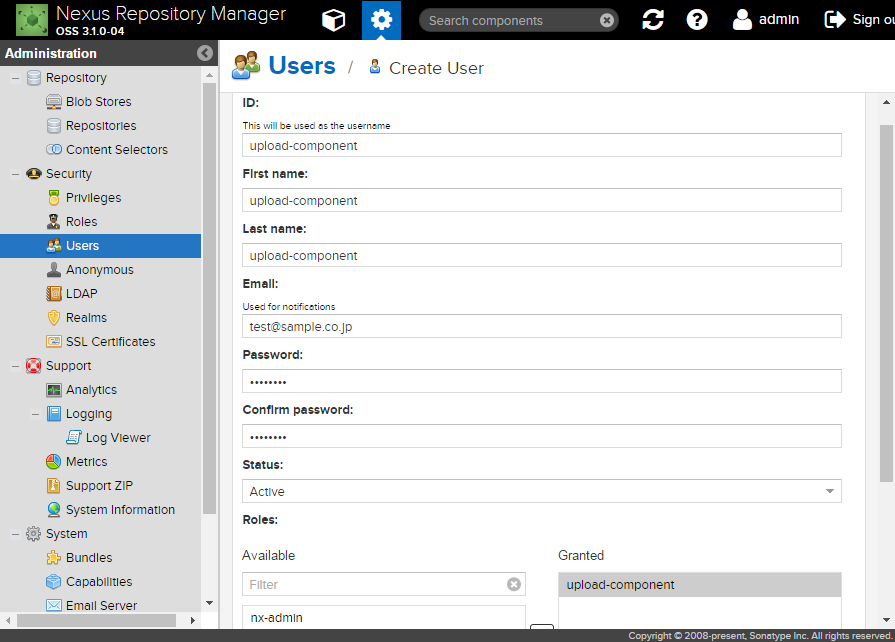
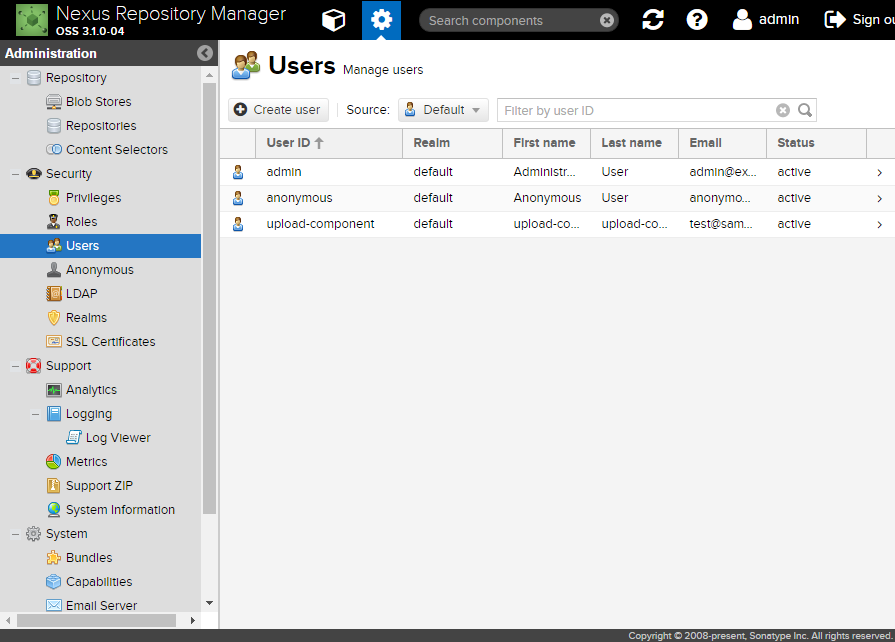
「Create User」画面が表示されます。以下の値を入力後、「Create user」ボタンをクリックします。
- 今回は単純に role と同じ名前を付けることにします。
- Password には
xxxxxxxxを入力します。 - Roles には上で作成した「upload-component」だけを選択します。
作成した User でコンポーネントを登録する
まず upload-component ユーザで maven-releases と maven-snapshots の repository を閲覧できるか確認します。
nexus の管理画面右上の「Sign out」をクリックしてサインアウトした後、「Sign in」をクリックして upload-component でサインインします。サインイン後、maven-releases と maven-snapshots の repository は以下のように表示されました。


ksbysample-library-depend-nospring プロジェクトで作成した upload-component ユーザでアップロードできるか確認します。
build.gradle を リンク先のその1の内容 に変更します。
IntelliJ IDEA の Gradle projects View の「Refresh all Gradle projects」ボタンをクリックした後、uploadArchives タスクを実行します。"BUILD SUCCESSFUL" が表示され、登録に成功します。

nexus の管理画面で maven-snapshots repository を見ると、ksbysample-library-depend-nospring ライブラリが登録されていることが確認できます。


「Delete component」ボタンが表示されていますが、クリックしても削除できませんでした。

build.gradle を リンク先のその2の内容 に変更します。
IntelliJ IDEA の Gradle projects View から uploadArchives タスクを実行します。"BUILD SUCCESSFUL" が表示され、登録に成功します。

nexus の管理画面で maven-releases repository を見ると、ksbysample-library-depend-nospring ライブラリが登録されていることが確認できます。


「Delete component」ボタンが表示されていますが、クリックしても削除できませんでした。

今回 nexus に登録した 1.3-SNAPSHOT, 1.3-RELEASE のコンポーネントは削除し、build.gradle の修正も元に戻します。
メモ書き
今回はやりませんでしたが、upload するコンポーネントを限定したい場合にはおそらく以下の手順で Role を作成すれば出来るはず。。。
- Content selector を作成します。selector の Specification に JEXL で限定するコンポーネントを記述します。
- Privilege を作成します。
- Privilege を割り当てた Role を作成します。
マニュアルはここ ( https://books.sonatype.com/nexus-book/reference3/admin.html#content-selectors )。
ソースコード
build.gradle
■その1
group 'ksbysample.library'
version '1.3-SNAPSHOT'

........

uploadArchives {
    def nexusUrl = "http://localhost:8081"
    def nexusUsername = "upload-component"
    def nexusPassword = "xxxxxxxx"

    ........
}
- version の値を
1.2-RELEASE→1.3-SNAPSHOTへ変更します。 - uploadArchives タスクの nexusUsername, nexusPassword を
admin→upload-component,admin123→xxxxxxxxへ変更します。
■その2
group 'ksbysample.library'
version '1.3-RELEASE'

........
- version の値を
1.3-SNAPSHOT→1.3-RELEASEへ変更します。
履歴
2016/12/18
初版発行。
共有ライブラリを管理するために Sonatype の Nexus Repository Manager OSS を使用する ( その16 )( Nexus を 3.0.1-01 → 3.1.0-04 へバージョンアップする )
概要
- 今回の手順で確認できるのは以下の内容です。
- Download Nexus Repository OSS ( http://www.sonatype.com/download-oss-sonatype ) から nexus-3.1.0-04-win64.zip がダウンロード可能になっていましたので、Nexus を 3.0.1-01 → 3.1.0-04 へバージョンアップします。
- 3.1.0 の Release Notes は Nexus Repository Manager 3.1.0 Release Notes ( https://support.sonatype.com/hc/en-us/articles/231713648-Nexus-Repository-Manager-3-1-0-Release-Notes ) です。
- バージョンアップ及びインストールの手順は以下のドキュメントを参考にします。
- How to Upgrade Nexus Repository Manager 3.0.2 to 3.1.0
https://support.sonatype.com/hc/en-us/articles/231723267 - Documentation Nexus Repository Manager 3.1 - Chapter 2. Installation and Running
https://books.sonatype.com/nexus-book/reference3/install.html#service-windows
- How to Upgrade Nexus Repository Manager 3.0.2 to 3.1.0
参照したサイト・書籍
目次
- nexus-3.1.0-04-win64.zip をダウンロードする
- nexus のサービスを停止する
- 3.0.1-01 をインストールした C:\nexus を別のディレクトリへコピーした後、アンインストールしてサービスを削除する
- nexus-3.0.1-01-win64.zip を解凍して C:\nexus の下に必要なディレクトリ・ファイルをコピーする
- nexus を起動する
- nexus を Windows のサービスに登録して起動する
- メモ書き
手順
nexus-3.1.0-04-win64.zip をダウンロードする
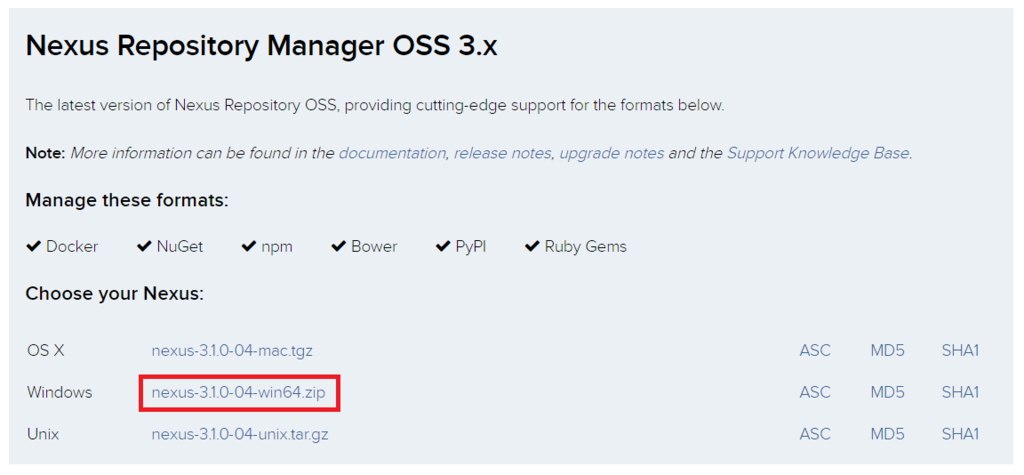
Download Nexus Repository OSS ( http://www.sonatype.com/download-oss-sonatype ) のページにアクセスします。
ページ内の「nexus-3.1.0-04-win64.zip」リンクをクリックして nexus-3.1.0-04-win64.zip をダウンロードします。exe 版がなくなっていますね。
nexus のサービスを停止する
管理ツールのサービスを開いてサービス一覧から「nexus」を選択した後、「サービスの停止」リンクをクリックしてサービスを停止します。

3.0.1-01 をインストールした C:\nexus を別のディレクトリへコピーした後、アンインストールしてサービスを削除する
作業用のディレクトリとして C:\tmp__work_nexus を作成します。
C:\nexus を C:\tmp__work_nexus の下へコピーします。
コントロールパネルから「プログラムと機能」を開き、「Sonatype Nexus 3.0.1-01」をアンインストールします。
管理ツールの「サービス」を開いて、nexus のサービスが削除されていることを確認します。

nexus-3.1.0-04-win64.zip を解凍して C:\nexus の下に必要なディレクトリ・ファイルをコピーする
ダウンロードした nexus-3.1.0-04-win64.zip を C:\tmp__work_nexus へコピーした後、解凍します。解凍すると以下のディレクトリが作成されます。

ちなみに退避した 3.0.1-01 のディレクトリ構成は以下のようになっていました。

C:\nexus の下に data フォルダが残っている場合には削除します。
C:\tmp__work_nexus\nexus-3.1.0-04-win64 の下の2つのフォルダ(nexus-3.1.0-04、sonatype-work)を C:\nexus の下にコピーします。
C:\tmp__work_nexus\nexus\data の下のフォルダ・ファイル一式を C:\nexus\sonatype-work\nexus3 の下へコピーします。
nexus を起動する
コマンドプロンプトから
nexus.exe /runを実行して起動・インストールします。
(.....しばらくログが出続けます.....)

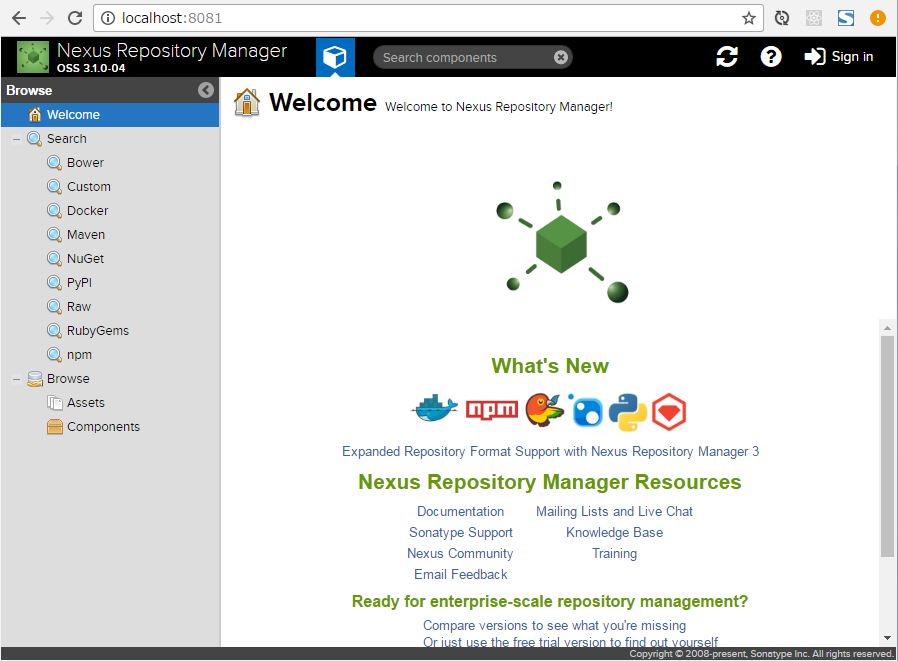
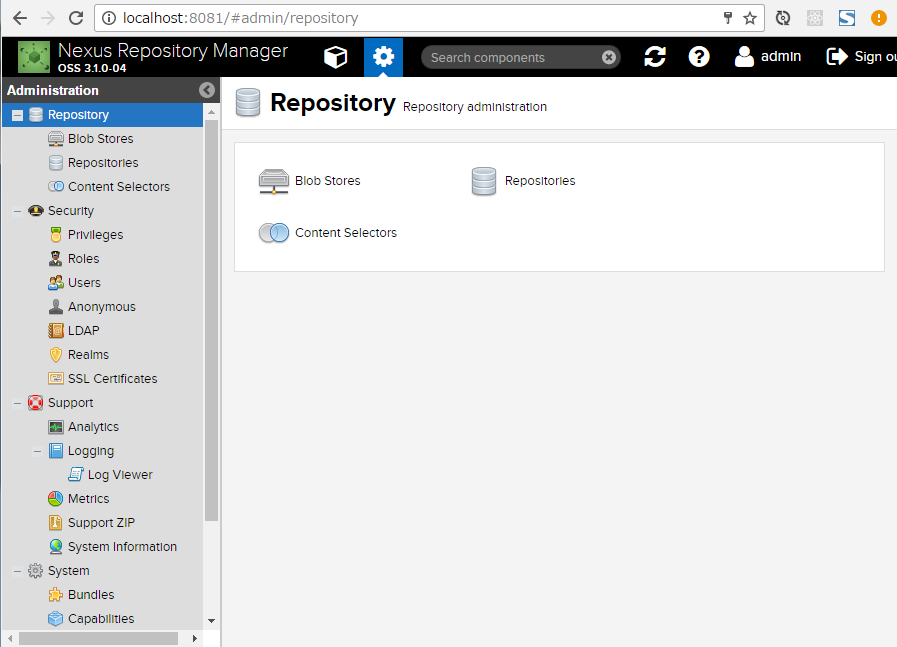
起動後 http://localhost:8081/ にアクセスすると nexus の管理画面が表示されました。画面左上のバージョン番号も「OSS 3.1.0-04」と表示されています。
以前登録した ksbysample-library-simpleutils、ksbysample-library-depend-nospring のコンポーネントが登録されているか確認しましたが、問題なく登録されていました。

admin / admin123 でログインできるか確認しましたが、問題なくログインできました。

管理画面の左側のメニューも 3.0.1-01 の頃と大きくは変わっていないようです。
起動後の C:\nexus のディレクトリ構成は以下のようになっていました。C:\nexus\sonatype-work\nexus3\etc の下は起動前は空だったのですが、起動後に nexus.properties が作成されていました。

nexus.properties の中は以下の内容が記述されています。
# Jetty section
# application-port=8081
# application-host=0.0.0.0
# nexus-args=${jetty.etc}/jetty.xml,${jetty.etc}/jetty-http.xml,${jetty.etc}/jetty-requestlog.xml
# nexus-context-path=/

# Nexus section
# nexus-edition=nexus-pro-edition
# nexus-features=\
#  nexus-pro-feature
JVMのオプションやデータディレクトリの指定等は C:\nexus\nexus-3.1.0-04\bin\nexus.vmoptions に設定されるようです。

-Xms1200M
-Xmx1200M
-XX:MaxDirectMemorySize=2G
-XX:+HeapDumpOnOutOfMemoryError
-XX:+UnlockDiagnosticVMOptions
-XX:+UnsyncloadClass
-XX:+LogVMOutput
-XX:LogFile=../sonatype-work/nexus3/log/jvm.log
-Djava.net.preferIPv4Stack=true
-Dkaraf.home=.
-Dkaraf.base=.
-Dkaraf.etc=etc/karaf
-Djava.util.logging.config.file=etc/karaf/java.util.logging.properties
-Dkaraf.data=../sonatype-work/nexus3
-Djava.io.tmpdir=../sonatype-work/nexus3/tmp
-Dkaraf.startLocalConsole=false
nexus.exe を起動したコマンドプロンプトで Ctrl+C を押して停止します。
nexus を Windows のサービスに登録して起動する
コマンドプロンプトを「管理者として実行...」で起動した後、
nexus.exe /install nexusを実行しサービスを登録します。
サービスの画面を開いて nexus が登録されていることを確認した後、「サービスの開始」リンクをクリックして起動します。


http://localhost:8081/ にアクセスして管理画面が表示されることを確認します。

メモ書き
- nexus-3.1.0-04 の Windows のサービス登録には Apache Karaf ( http://karaf.apache.org/ ) が使用されているようです。Linux のサービス登録にも使用できるようです。初めて聞きました。
ソースコード
履歴
2016/11/29
初版発行。
共有ライブラリを管理するために Sonatype の Nexus Repository Manager OSS を使用する ( 番外編 )( IntelliJ IDEA 2016.3 の新機能を試してみる )
目次
- 前準備
- Fira Code font を試してみる
- Memory view を試してみる
- Parameter hints を設定してみる
- Semantic highlighting を設定してみる
- 上記以外に気づいた点のメモ
手順
前準備
機能を試すのにある程度実装規模の大きなプロジェクトを使いたいので、ksbysample-webapp-lending プロジェクトを使用します。
IntelliJ IDEA のメインメニューから「File」-「Close Project」を選択して、現在開いているプロジェクトを閉じます。
ksbysample-webapp-lending プロジェクトを開きます。
IntelliJ IDEA のメインメニューから「File」-「Project Structure...」を選択して「Project Structure」ダイアログを開いた後、画面左側の「Project Settings」-「Project」を選択して、画面右側の「Project SDK」で「1.8.0_112」を選択します。

Gradle projects View のツリーで「Tasks」の下に「other」しかない状態になっているので、左上にある「Refresh all Gradle projects」ボタンをクリックして更新します。

clean タスク実行 → Rebuild Project 実行をした後、build タスクを実行して "BUILD SUCCESSFUL" のメッセージが表示されることを確認します。

※上のキャプチャにはありませんが、実際には groovy のライブラリを大量にダウンロードしていています。キャプチャを取る前に何度かリトライしており、その時にダウンロードされています。
Fira Code font を試してみる
IntelliJ IDEA のメインメニューから「File」-「Settings」を選択して「Settings」ダイアログを開いた後、画面左上の検索フィールドに "Font Ligatures" と入力します。
画面左側で「Editor」-「Colors & Fonts」-「Font」が選択されますので、画面右側で以下のように設定します。

- 「Primary font」に「Fira Code」を選択し、フォントサイズを 11pt にします(このフォントは 12pt だとちょっと見にくいです)。
「Enable font ligatures」をチェックします。Warning アイコンが出て以下の内容が表示されますが、一旦無視します。

そもそも "Font Ligatures" って何だろう?と思ったら Qiita に以下の記事がありました。全然聞いたことがなかったのですが、最近はそんな傾向があるのでしょうか?
- リガチャ(合字)を使ってコードをかっこよくしよう -WebStorm・IntelliJ IDEA編-
http://qiita.com/tonkotsuboy_com/items/e512bfa5db7593b87d74
src/main/java/ksbysample/webapp/lending/web/LoginController.java を開いてみると以下のような感じで表示されます。

!=とコメントの//は見やすい、と思いました。==と-->はすぐには良さが分かりませんでした。- リガチャではなくフォントの話ですが、フォントサイズが 12pt で見やすくない(ちょっと詰まった感じで表示されてしまう)のが個人的には残念です。自分のノートPCだと 12pt あった方が見やすいと思っているので。
しばらくはこのまま使ってみたいと思います。
Memory view を試してみる
まずは Plugin をインストールします。IntelliJ IDEA のメインメニューから「File」-「Settings」を選択して「Settings」ダイアログを表示します。
画面右側で「Plugins」を選択した後、画面左側の「Browse repositories...」ボタンを押します。

「Browse Repositories」ダイアログが表示されますので、画面上部の検索フィールドに "JVM Debugger Memory View" と入力します。画面左側のリストに「JVM Debugger Memory View」が表示されますので、画面右側の「Install」ボタンをクリックします。

プラグインがダウンロードされた後、IntelliJ IDEA を再起動します。再起動すると、画面右側に「Memory View」が表示されます。

Memory View を表示した後、「Debug with JRebel 'Application'」ボタン(「Debug 'Application'」ボタンでも可)をクリックして Debug 実行します。起動しただけでは Memory View には何も表示されませんね。

src/main/java/ksbysample/webapp/lending/web/admin/library/AdminLibraryController.java の deleteAndInsertLibraryForSearch メソッドに breakpoint を設定した後、画面を操作して breakpoint で処理が止まるところまで進めます。
breakpoint で処理が止まると Memory View に現在作成されているクラスとインスタンス数が表示されました。

java.lang.String をダブルクリックするとインスタンス一覧が表示されます。

breakpoint の1行上で LibraryForsearch libraryForsearch = new LibraryForsearch(); をしているので LibraryForsearch で検索してみると、1インスタンス作成されていることが分かります。

Tomcat を停止します。Memory View はこのまま入れておきます。
Parameter hints を設定してみる
IntelliJ IDEA のメインメニューから「File」-「Settings」を選択して「Settings」ダイアログを表示します。
画面左上の検索フィールドに "Show parameter name hints" を入力した後、画面左側で「Editor」-「General」-「Appearance」を選択します。画面右側を見ると「Show parameter name hints」が既にチェックされていました。デフォルトでチェックされるようです。

src/main/java/ksbysample/webapp/lending/service/file/BooklistCsvFileService.java を開くと、文字列リテラルと null を引数に渡しているところに変数名が表示されます。

これは便利なんでしょうか。。。? 便利そうな気がしますが、ちょっとすぐには分かりません。このまま設定してしばらく様子を見たいと思います。
Semantic highlighting を設定してみる
IntelliJ IDEA のメインメニューから「File」-「Settings」を選択して「Settings」ダイアログを表示します。
画面左上の検索フィールドに "Semantic highlighting" を入力した後、画面左側で「Editor」-「Colors & Fonts」-「Language Defaults」を選択します。画面右側の中央のリストで「Semantic highlighting」が選択されていますので、その右側に表示されている「Unique color for each parameter and local variable」をチェックします。

src/main/java/ksbysample/webapp/lending/web/lendingapproval/LendingapprovalController.java を開いてみると、メソッドの引数の変数に別々の色が付いています。ただし、背景を白色にしていると色が変わっていることが分かりづらくて全然便利な機能に思えませんでした。。。

これ、Darcula にしないとあまり意味がない機能のような気がします。「Settings」ダイアログで Darcula に変更してみます。Scheme を変更すると「Unique color for each parameter and local variable」のチェックも付け直す必要があります。

今度はさっきよりは色違いが分かりやすいです。

あまり背景が黒のテーマは好みでなかったので Darcula にはしていなかったのですが、Semantic highlighting という機能も出てきたので、しばらくこのまま Darcula を使ってみたいと思います。
上記以外に気づいた点のメモ
Spring Initializr でプロジェクトを作成する時に Dependencies の選択画面が変わっていました。ぱっと見て思いましたが、Cloud 系が増えすぎです。Spring Boot が出て Spring Framework が使いやすくなったかなと思いましたが、この画面を見ると絶対初心者は訳分からないですよね。。。

Spring Initializr でプロジェクトを作成して最初に開いた時に表示される「Import Module from Gradle」ダイアログで「Gradle JVM」の選択肢に「Use Project JDK」が追加されて、かつデフォルトで選択されていました。毎回手動で変更していたので、個人的にはこの変更は嬉しいです。

Spring Initializr でプロジェクトを Gradle Project として作成てプロジェクトが開き終わった時に、画面右側に「Gradle」アイコンが出ませんでした。IntelliJ IDEA を再起動すると出てきます。
