Spring Boot 1.5.x の Web アプリを 2.0.x へバージョンアップする ( その20 )( Docker で Redis の環境を構築する3(Redis を 5.0.1 → 5.0.2 にバージョンアップする+.env の環境変数を使用するよう変更する))
概要
記事一覧はこちらです。
Spring Boot 1.5.x の Web アプリを 2.0.x へバージョンアップする ( その19 )( Docker で Redis の環境を構築する2(Redis Cluster 構成)) の続きです。
- 今回の手順で確認できるのは以下の内容です。
- https://hub.docker.com/_/redis/ を見たら 5.0.2 の Docker Image が出ていました。Docker Compose で Redis 環境を構築する時の Docker Image を redis:5.0.1 → redis:5.0.2 へ変更します。
- redis のバージョン番号をいろいろなファイルに直接書いていますが、.env ファイルに環境変数を定義して、それを使用する方法に変更します。
参照したサイト・書籍
.env files support
https://plugins.jetbrains.com/plugin/9525--env-files-support https://github.com/adelf/idea-php-dotenv-plugin/EnvFile
https://plugins.jetbrains.com/plugin/7861-envfile https://github.com/Ashald/EnvFileDockerfile reference - Understand how ARG and FROM interact
https://docs.docker.com/engine/reference/builder/#understand-how-arg-and-from-interactdocker-compose.ymlでcommandの引数が長いのでエスケープして改行したい
https://qiita.com/minamijoyo/items/fbd4ec127f29283fb458
目次
- .env 用の IntelliJ IDEA Plugin である .env files support をインストールする
- .env に環境変数を追加する
- docker/redis/Dockerfile を環境変数を使用するよう変更する
- docker-compose.yml を環境変数を使用するよう変更する
- 動作確認
手順
.env 用の IntelliJ IDEA Plugin である .env files support をインストールする
.env ファイルを開くと Plugins supporting *.env files found. というメッセージが表示されました。「Install plugins」リンクをクリックします。

「Choose Plugins to Install or Enable」ダイアログが表示されて Plugin が2つ表示されました。JetBrains Plugins Repository で見るとどちらも★5つですが、.env files support のダウンロード数が多かったので .env files support をインストールしてみます。.env files support だけチェックした状態にして「OK」ボタンをクリックします。

Plugin をインストールした後、IntelliJ IDEA を再起動します。
.env ファイルを見ると今度は色が付くようになりました。一旦このまま使用してみます。

.env に環境変数を追加する
.env に環境変数を追加します。
HOST_IP_ADDRESS=172.23.136.33
REDIS_VERSION=5.0.2
REDIS_CLUSTER_1_PORT=6379
REDIS_CLUSTER_2_PORT=6380
REDIS_CLUSTER_3_PORT=6381
REDIS_CLUSTER_4_PORT=6382
REDIS_CLUSTER_5_PORT=6383
REDIS_CLUSTER_6_PORT=6384
- 以下の記述を追加します。redis のバージョンとホスト上のポート番号をここで指定します(Cluster Bus ポート番号は +10000 したものを使用します)。
REDIS_VERSION=5.0.2REDIS_CLUSTER_1_PORT=6379REDIS_CLUSTER_2_PORT=6380REDIS_CLUSTER_3_PORT=6381REDIS_CLUSTER_4_PORT=6382REDIS_CLUSTER_5_PORT=6383REDIS_CLUSTER_6_PORT=6384
docker/redis/Dockerfile を環境変数を使用するよう変更する
docker/redis/Dockerfile の以下の点を変更します。
ARG REDIS_VERSION
FROM redis:${REDIS_VERSION}
RUN apt-get update -qq && apt-get install -y expect
ADD redis.conf /etc/redis/
ARG REDIS_VERSIONを追加します。FROM redis:5.0.1→FROM redis:${REDIS_VERSION}に変更します。
このファイルでの ${REDIS_VERSION} は .env ファイルに定義されている環境変数ではなく、docker-compose.yml ファイルから build 時に引数で渡された値になります。docker-compose.yml の方で build時に渡す引数に .env ファイルに定義した環境変数を渡すよう記述します。
docker-compose.yml を環境変数を使用するよう変更する
docker-compose.yml の以下の点を変更します。
  # 起動したコンテナに /bin/sh でアクセスする場合には以下のコマンドを実行する
  # docker exec -it redis /bin/sh
  #
  # 起動したコンテナの redis に redis-cli でアクセスするには以下のコマンドを実行する
  # docker exec -it redis redis-cli
  #
  #############################################################################
  # 単体 Redis サーバ
  # redis:
  #   image: redis:${REDIS_VERSION}
  #   container_name: redis
  #   ports:
  #   - "6379:6379"
  #
  #############################################################################
  # Redis Cluster
  redis-cluster-1:
    build:
      context: ./docker/redis
      args:
        - REDIS_VERSION=${REDIS_VERSION}
    image: redis:${REDIS_VERSION}-custom
    container_name: redis-cluster-${REDIS_CLUSTER_1_PORT}
    ports:
    - "${REDIS_CLUSTER_1_PORT}:6379"
    - "1${REDIS_CLUSTER_1_PORT}:16379"
    command:
    - /bin/sh
    - -c
    - |
      redis-server /etc/redis/redis.conf \
                  --cluster-announce-ip ${HOST_IP_ADDRESS} \
                  --cluster-announce-port ${REDIS_CLUSTER_1_PORT} \
                  --cluster-announce-bus-port 1${REDIS_CLUSTER_1_PORT}
  redis-cluster-2:
    image: redis:${REDIS_VERSION}-custom
    container_name: redis-cluster-${REDIS_CLUSTER_2_PORT}
    ports:
    - "${REDIS_CLUSTER_2_PORT}:6379"
    - "1${REDIS_CLUSTER_2_PORT}:16379"
    command:
    - /bin/sh
    - -c
    - |
      redis-server /etc/redis/redis.conf \
                  --cluster-announce-ip ${HOST_IP_ADDRESS} \
                  --cluster-announce-port ${REDIS_CLUSTER_2_PORT} \
                  --cluster-announce-bus-port 1${REDIS_CLUSTER_2_PORT}
    depends_on:
    - redis-cluster-1
  redis-cluster-3:
    image: redis:${REDIS_VERSION}-custom
    container_name: redis-cluster-${REDIS_CLUSTER_3_PORT}
    ports:
    - "${REDIS_CLUSTER_3_PORT}:6379"
    - "1${REDIS_CLUSTER_3_PORT}:16379"
    command:
    - /bin/sh
    - -c
    - |
      redis-server /etc/redis/redis.conf \
                  --cluster-announce-ip ${HOST_IP_ADDRESS} \
                  --cluster-announce-port ${REDIS_CLUSTER_3_PORT} \
                  --cluster-announce-bus-port 1${REDIS_CLUSTER_3_PORT}
    depends_on:
    - redis-cluster-1
  redis-cluster-4:
    image: redis:${REDIS_VERSION}-custom
    container_name: redis-cluster-${REDIS_CLUSTER_4_PORT}
    ports:
    - "${REDIS_CLUSTER_4_PORT}:6379"
    - "1${REDIS_CLUSTER_4_PORT}:16379"
    command:
    - /bin/sh
    - -c
    - |
      redis-server /etc/redis/redis.conf \
                  --cluster-announce-ip ${HOST_IP_ADDRESS} \
                  --cluster-announce-port ${REDIS_CLUSTER_4_PORT} \
                  --cluster-announce-bus-port 1${REDIS_CLUSTER_4_PORT}
    depends_on:
    - redis-cluster-1
  redis-cluster-5:
    image: redis:${REDIS_VERSION}-custom
    container_name: redis-cluster-${REDIS_CLUSTER_5_PORT}
    ports:
    - "${REDIS_CLUSTER_5_PORT}:6379"
    - "1${REDIS_CLUSTER_5_PORT}:16379"
    command:
    - /bin/sh
    - -c
    - |
      redis-server /etc/redis/redis.conf \
                  --cluster-announce-ip ${HOST_IP_ADDRESS} \
                  --cluster-announce-port ${REDIS_CLUSTER_5_PORT} \
                  --cluster-announce-bus-port 1${REDIS_CLUSTER_5_PORT}
    depends_on:
    - redis-cluster-1
  redis-cluster-6:
    image: redis:${REDIS_VERSION}-custom
    container_name: redis-cluster-${REDIS_CLUSTER_6_PORT}
    ports:
    - "${REDIS_CLUSTER_6_PORT}:6379"
    - "1${REDIS_CLUSTER_6_PORT}:16379"
    command:
    - /bin/sh
    - -c
    - |
      redis-server /etc/redis/redis.conf \
                  --cluster-announce-ip ${HOST_IP_ADDRESS} \
                  --cluster-announce-port ${REDIS_CLUSTER_6_PORT} \
                  --cluster-announce-bus-port 1${REDIS_CLUSTER_6_PORT}
    depends_on:
    - redis-cluster-1
  redis-cluster-make:
    image: redis:${REDIS_VERSION}-custom
    container_name: redis-cluster-make
    command:
    - /bin/sh
    - -c
    - |
      expect -c "
      spawn redis-cli --cluster create \
                        ${HOST_IP_ADDRESS}:${REDIS_CLUSTER_1_PORT} \
                        ${HOST_IP_ADDRESS}:${REDIS_CLUSTER_2_PORT} \
                        ${HOST_IP_ADDRESS}:${REDIS_CLUSTER_3_PORT} \
                        ${HOST_IP_ADDRESS}:${REDIS_CLUSTER_4_PORT} \
                        ${HOST_IP_ADDRESS}:${REDIS_CLUSTER_5_PORT} \
                        ${HOST_IP_ADDRESS}:${REDIS_CLUSTER_6_PORT} \
                      --cluster-replicas 1
      expect \"Can I set the above configuration? (type 'yes' to accept): \"
      send \"yes\n\"
      expect eof
      "
    depends_on:
    - redis-cluster-1
    - redis-cluster-2
    - redis-cluster-3
    - redis-cluster-4
    - redis-cluster-5
    - redis-cluster-6

  redis_exporter:
    image: oliver006/redis_exporter:latest
    container_name: redis_exporter
    ports:
    - "9121:9121"
    environment:
    - REDIS_ADDR=redis://${HOST_IP_ADDRESS}:${REDIS_CLUSTER_1_PORT},redis://${HOST_IP_ADDRESS}:${REDIS_CLUSTER_2_PORT},redis://${HOST_IP_ADDRESS}:${REDIS_CLUSTER_3_PORT},redis://${HOST_IP_ADDRESS}:${REDIS_CLUSTER_4_PORT},redis://${HOST_IP_ADDRESS}:${REDIS_CLUSTER_5_PORT},redis://${HOST_IP_ADDRESS}:${REDIS_CLUSTER_6_PORT}
- サービス名を redis-cluster-6379 ~ redis-cluster-6384 → redis-cluster-1 ~ redis-cluster-6 に変更します。サービス名に環境変数は使用できないので、1~6 の連番にしました。
- redis-cluster-1 の build の記述を
build: ./docker/redisから build の下に context, args を記述する方式に変更します。args にREDIS_VERSION=${REDIS_VERSION}を記述することで build 時に Dockerfile に .env ファイルに記述した REDIS_VERSION の値が渡されます。 - image の記述を
redis:5.0.1-custom→redis:${REDIS_VERSION}-customに変更します。 - ポート番号が記述してある箇所を
${REDIS_CLUSTER_1_PORT}~${REDIS_CLUSTER_6_PORT}に変更します。Cluster Bus ポート番号の記述は16379→1${REDIS_CLUSTER_1_PORT}のように変更します。
動作確認
docker-compose up -d コマンドで起動します。5.0.2: Pulling from library/redis と出力されており 5.0.2 の Docker Image がダウンロードされています。
 (.....途中は長いので省略.....)

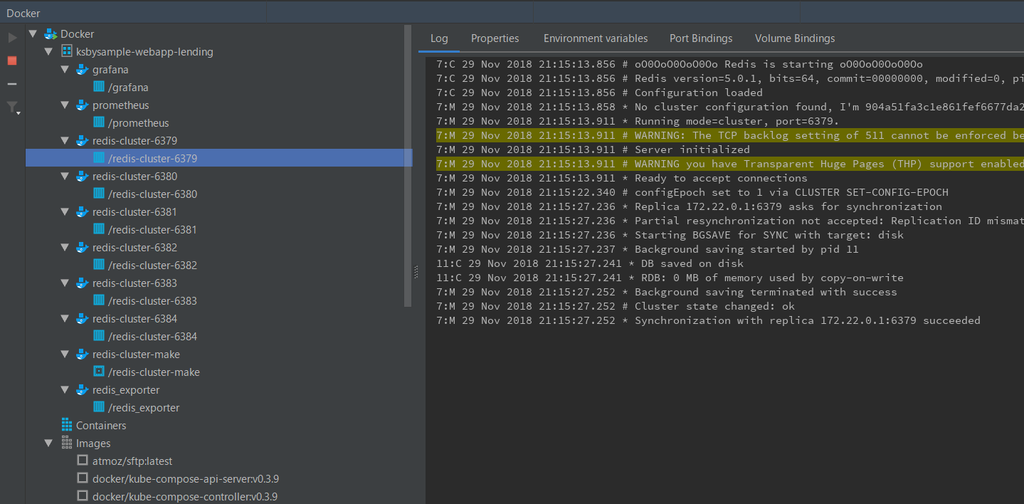
redis-cluster-make コンテナのログを見ると、Redis Cluster が正常に生成されているようです。

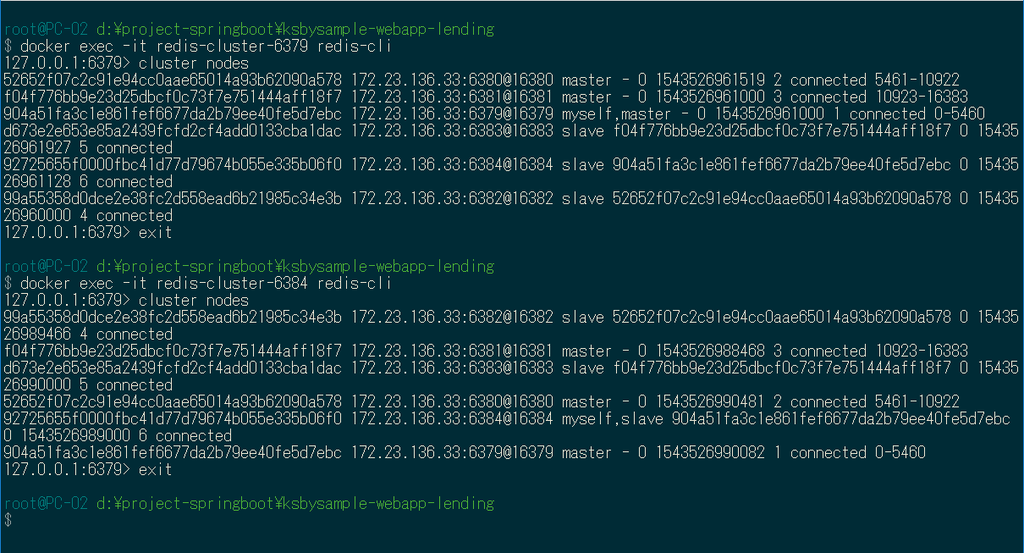
redis-cluster-6379 コンテナで redis-cli を起動し cluster nodes コマンドを実行すると、master, slave の情報が表示されます。

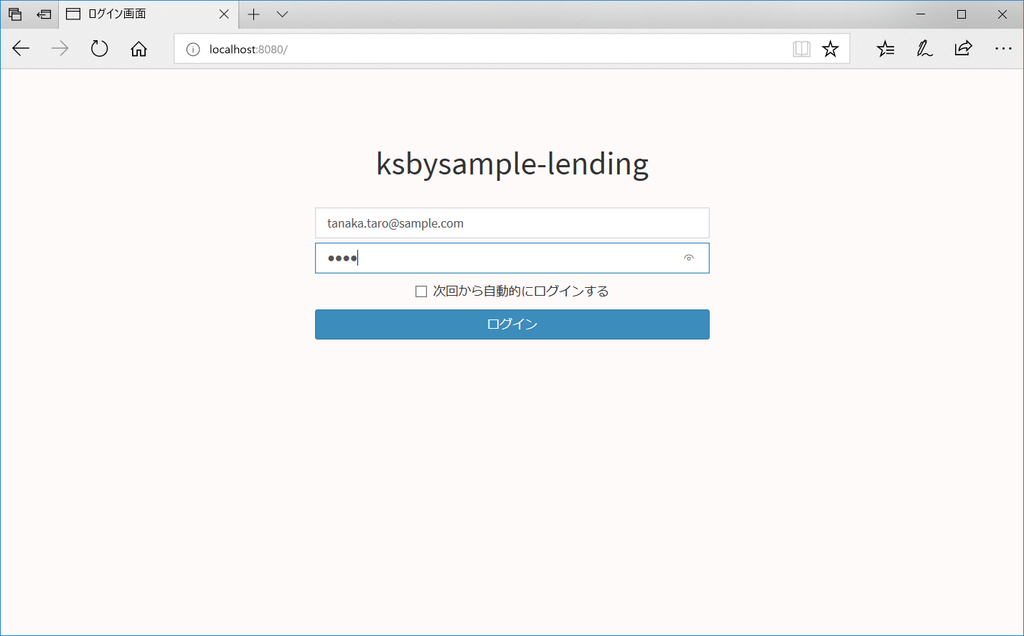
Tomcat を起動して http://localhost:8080/ にアクセスしてログイン画面を表示後、ログインすることもできました。
履歴
2018/12/01
初版発行。
Spring Boot 1.5.x の Web アプリを 2.0.x へバージョンアップする ( その19 )( Docker で Redis の環境を構築する2(Redis Cluster 構成))
概要
記事一覧はこちらです。
- 今回の手順で確認できるのは以下の内容です。
- Docker で Redis Cluster 環境を構築します。
参照したサイト・書籍
Redis 5 – bootstrapping a Redis Cluster with Docker
https://simplydistributed.wordpress.com/2018/08/31/redis-5-bootstrapping-a-redis-cluster-with-docker/Redis cluster tutorial
https://redis.io/topics/cluster-tutorial#creating-the-clusterA Redis Cluster of any size using Docker Compose and Redis 4.0 port-forwarding
https://get-reddie.com/blog/redis4-cluster-docker-compose/プロダクションでRedis Clusterを3年間運用し続けた所感
https://qiita.com/maruloop/items/a67b62d2a6a239c8fb67Spring Data Redis - 7. Redis Cluster
https://docs.spring.io/spring-data/redis/docs/2.0.11.RELEASE/reference/html/#clusterEnvironment variables in Compose
https://docs.docker.com/compose/environment-variables/
目次
- 方針
- コマンドラインから docker コマンドで Redis Cluster 環境を構築する
- ksbysample-webapp-lending から接続する + redis-cli で確認する
- Docker Compose で Redis Cluster 環境を構築する
手順
方針
- Docker イメージは Docker Hub の
redis:5.0.1を利用します。 - Docker コンテナで起動する Redis は、ポート番号を 6379、Cluster Bus ポート番号を 16379 にします(Redis Cluster ではポート番号 + 10000 のポート番号を Cluster Bus ポートとして使用します)。コンテナ側は 6379, 16379 固定です。
- ホスト側では 6379, 6380, 6381, 6382, 6383, 6384 と 16379, 16380, 16381, 16382, 16383, 16384 の 12個のポート番号を Docker コンテナの Redis に紐づけます。
- Docker コンテナで Redis を起動する時に以下のオプションを付けます。
--cluster-announce-ip 172.23.136.33(172.23.136.33 はホストの IP アドレスです)--cluster-announce-port 6379(6379 はコンテナ毎に 6379, 6380, 6381, 6382, 6383, 6384 に変更します)--cluster-announce-bus-port 16379(16379 はコンテナ毎に 16379, 16380, 16381, 16382, 16383, 16384 に変更します)
コマンドラインから docker コマンドで Redis Cluster 環境を構築する
docker-compose down コマンドを実行して起動している Docker コンテナを全て終了(削除)します。
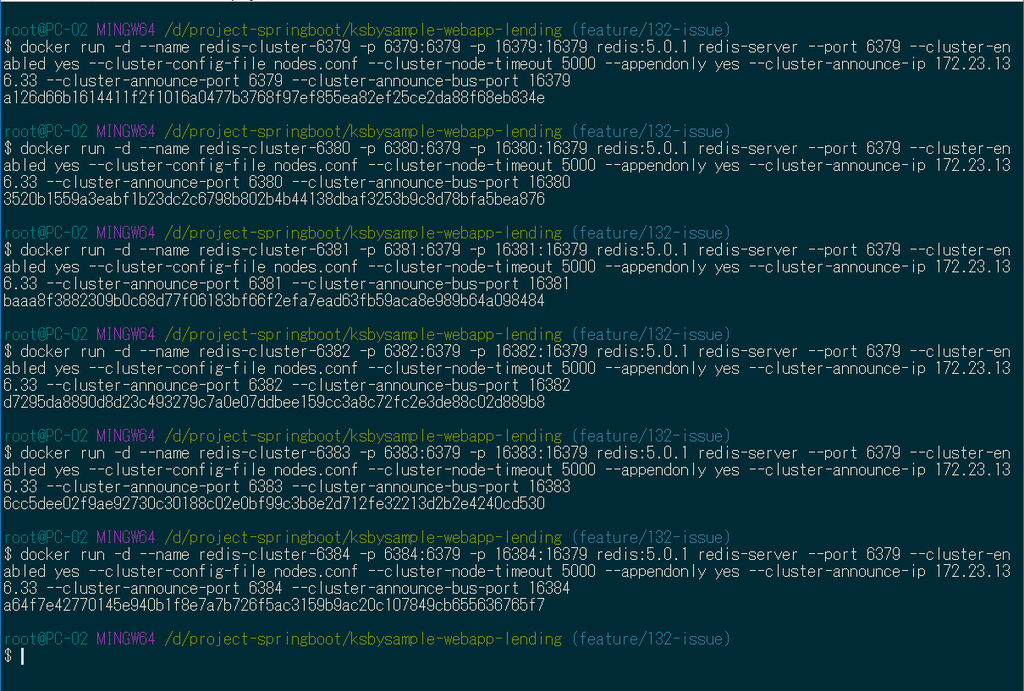
以下のコマンドを実行して Docker コンテナで Redis サーバを起動します。
docker run -d --name redis-cluster-6379 -p 6379:6379 -p 16379:16379 redis:5.0.1 redis-server --port 6379 --cluster-enabled yes --cluster-config-file nodes.conf --cluster-node-timeout 5000 --appendonly yes --cluster-announce-ip 172.23.136.33 --cluster-announce-port 6379 --cluster-announce-bus-port 16379docker run -d --name redis-cluster-6380 -p 6380:6379 -p 16380:16379 redis:5.0.1 redis-server --port 6379 --cluster-enabled yes --cluster-config-file nodes.conf --cluster-node-timeout 5000 --appendonly yes --cluster-announce-ip 172.23.136.33 --cluster-announce-port 6380 --cluster-announce-bus-port 16380docker run -d --name redis-cluster-6381 -p 6381:6379 -p 16381:16379 redis:5.0.1 redis-server --port 6379 --cluster-enabled yes --cluster-config-file nodes.conf --cluster-node-timeout 5000 --appendonly yes --cluster-announce-ip 172.23.136.33 --cluster-announce-port 6381 --cluster-announce-bus-port 16381docker run -d --name redis-cluster-6382 -p 6382:6379 -p 16382:16379 redis:5.0.1 redis-server --port 6379 --cluster-enabled yes --cluster-config-file nodes.conf --cluster-node-timeout 5000 --appendonly yes --cluster-announce-ip 172.23.136.33 --cluster-announce-port 6382 --cluster-announce-bus-port 16382docker run -d --name redis-cluster-6383 -p 6383:6379 -p 16383:16379 redis:5.0.1 redis-server --port 6379 --cluster-enabled yes --cluster-config-file nodes.conf --cluster-node-timeout 5000 --appendonly yes --cluster-announce-ip 172.23.136.33 --cluster-announce-port 6383 --cluster-announce-bus-port 16383docker run -d --name redis-cluster-6384 -p 6384:6379 -p 16384:16379 redis:5.0.1 redis-server --port 6379 --cluster-enabled yes --cluster-config-file nodes.conf --cluster-node-timeout 5000 --appendonly yes --cluster-announce-ip 172.23.136.33 --cluster-announce-port 6384 --cluster-announce-bus-port 16384
IntelliJ IDEA の Docker Plugin で Log を見ると以下のようになっています。

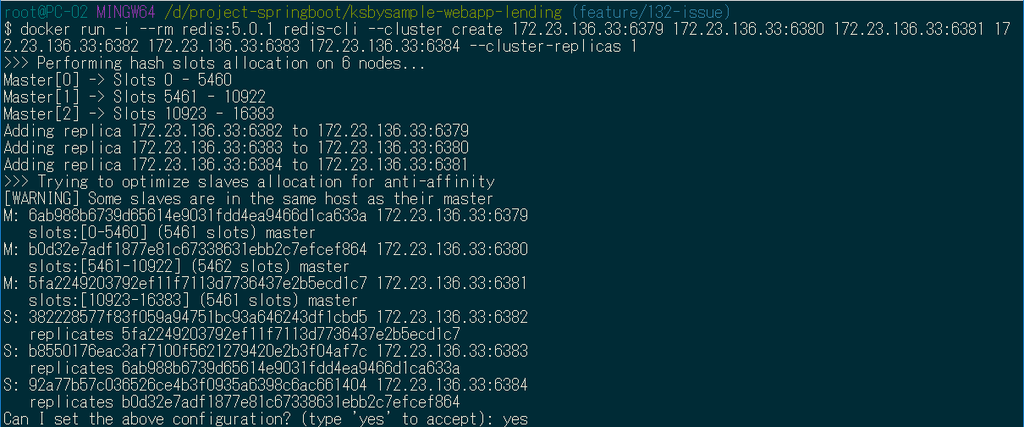
以下の redis-cli --cluster create コマンドで Redis Cluster を構築します。
docker run -i --rm redis:5.0.1 redis-cli --cluster create 172.23.136.33:6379 172.23.136.33:6380 172.23.136.33:6381 172.23.136.33:6382 172.23.136.33:6383 172.23.136.33:6384 --cluster-replicas 1
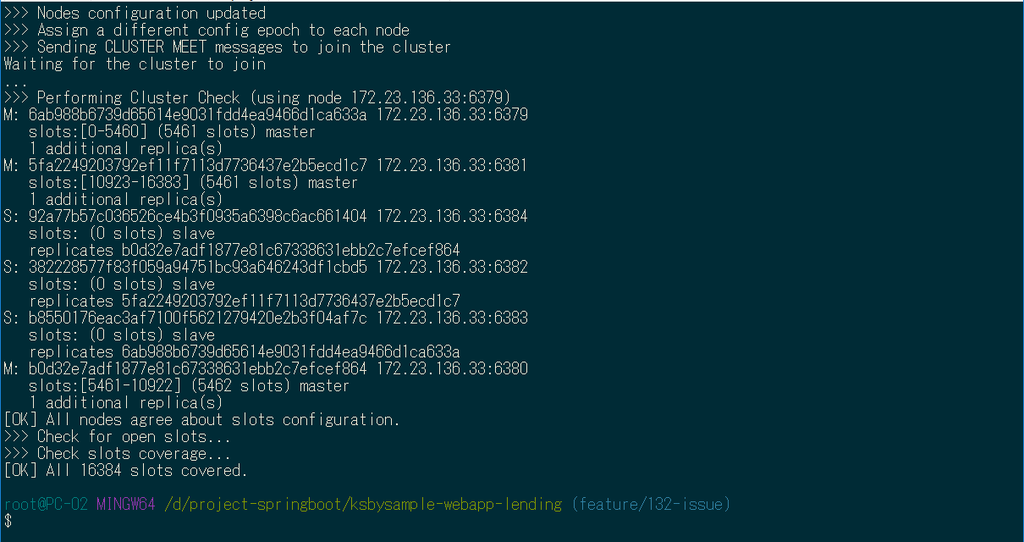
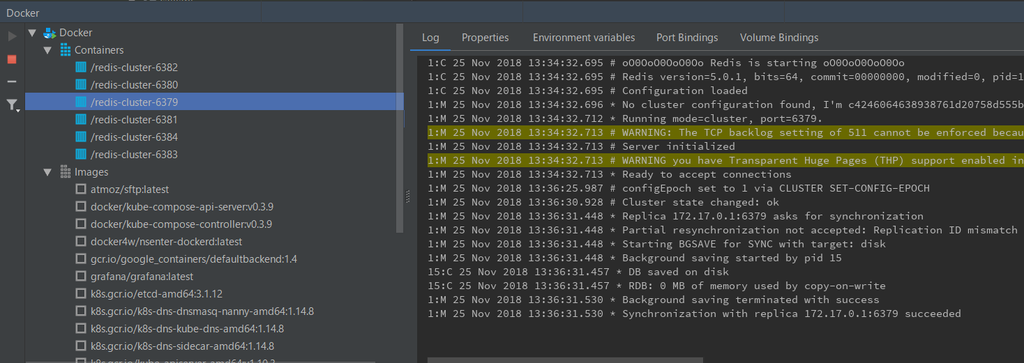
IntelliJ IDEA の Docker Plugin で Log を見ると以下のようになっています。
動作確認します。docker exec -it redis-cluster-6379 redis-cli コマンドで redis-cluster-6379 のコンテナで redis-cli を起動した後、cluster nodes コマンドを実行すると master, slave の情報が表示されます。

redis-cli から set "test" "1234" を実行すると (error) MOVED 6918 172.23.136.33:6380 とホストの IPアドレスとポート番号で MOVED の応答が返ってきます。

今度は docker exec -it redis-cluster-6380 redis-cli コマンドで redis-cluster-6380 のコンテナで redis-cli を起動した後、set "test" "1234" を実行するとデータがセットされます。

flushdb コマンドでセットしたデータをクリアした後、docker exec -it redis-cluster-6379 redis-cli -c コマンドで redis-cluster-6379 のコンテナで redis-cli を起動した後 set "test" "1234" を実行すると、自動的に redis-cluster-6380 のコンテナの redis に接続してセットします。

ksbysample-webapp-lending から接続する + redis-cli で確認する
Redis Cluster に接続する場合、設定ファイルだけでは対応できません。Spring Data Redis - 7. Redis Cluster を参考に実装します。設定ファイルだけ設定した場合でも最初は動作するのですが、master の redis を落とした時に slave へ切り替えてくれません。
build.gradle の以下の点を変更します。
dependencies {
    ..........
    implementation("io.micrometer:micrometer-registry-prometheus")
    implementation("redis.clients:jedis")
    testImplementation("org.springframework.boot:spring-boot-starter-test")
    ..........
- dependencies block に
implementation("redis.clients:jedis")を追加します。
変更後、Gradle Tool Window の左上にある「Refresh all Gradle projects」ボタンをクリックして更新します。
src/main/resources/application-develop.properties を以下のように変更します。
spring.redis.cluster.nodes[0]=172.23.136.33:6379
spring.redis.cluster.nodes[1]=172.23.136.33:6380
spring.redis.cluster.nodes[2]=172.23.136.33:6381
spring.redis.cluster.nodes[3]=172.23.136.33:6382
spring.redis.cluster.nodes[4]=172.23.136.33:6383
spring.redis.cluster.nodes[5]=172.23.136.33:6384
- 以下の設定を削除します。
- spring.redis.host=localhost
- spring.redis.port=6379
- 以下の設定を追加します。
- spring.redis.cluster.nodes[0]=172.23.136.33:6379
- spring.redis.cluster.nodes[1]=172.23.136.33:6380
- spring.redis.cluster.nodes[2]=172.23.136.33:6381
- spring.redis.cluster.nodes[3]=172.23.136.33:6382
- spring.redis.cluster.nodes[4]=172.23.136.33:6383
- spring.redis.cluster.nodes[5]=172.23.136.33:6384
src/main/java/ksbysample/webapp/lending/config/RedisClusterConfig.java を新規作成し、以下の内容を記述します。
package ksbysample.webapp.lending.config;

import lombok.Data;
import org.springframework.boot.context.properties.ConfigurationProperties;
import org.springframework.context.annotation.Bean;
import org.springframework.context.annotation.Configuration;
import org.springframework.data.redis.connection.RedisClusterConfiguration;
import org.springframework.data.redis.connection.RedisConnectionFactory;
import org.springframework.data.redis.connection.jedis.JedisConnectionFactory;

import java.util.List;

/**
 * Redis Cluster 用 Configuration クラス
 */
@Data
@Configuration
@ConfigurationProperties(prefix = "spring.redis.cluster")
public class RedisClusterConfig {

    List<String> nodes;

    /**
     * Redis Cluster に接続するための {@link JedisConnectionFactory} オブジェクトを生成する
     *
     * @return {@link JedisConnectionFactory} オブジェクト
     */
    @Bean
    public RedisConnectionFactory connectionFactory() {
        return new JedisConnectionFactory(new RedisClusterConfiguration(nodes));
    }

}
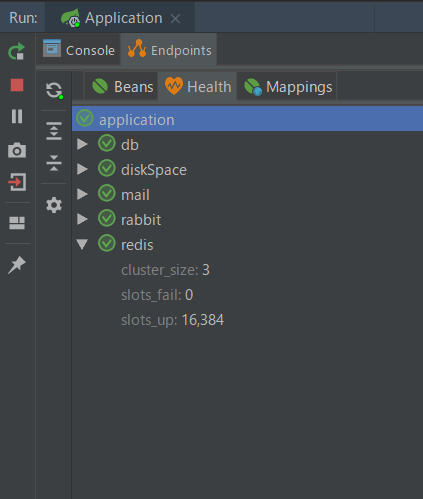
Tomcat を起動します。Spring Actuator の health check を見ると redis が認識されています。Redis Cluster 構成の場合、単体 Redis の時と表示が異なります。
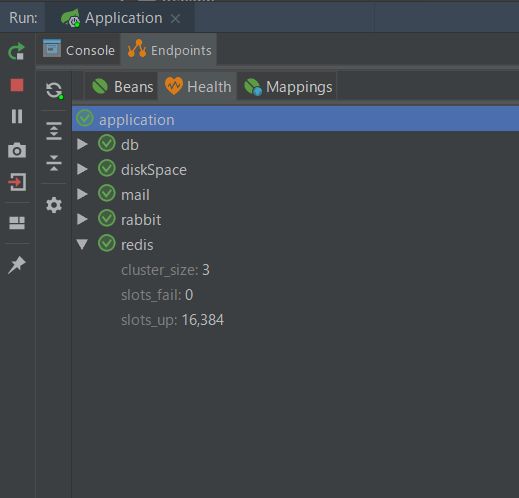
ブラウザから http://localhost:8080/ のログイン画面にアクセスしてログインを試みると、問題なくログインできました。
redis-cli でデータを確認すると、データは保存されていますがクラスタ内のサーバに分散されていました。


PRINCIPAL_NAME_INDEX_NAME:tanaka.taro@sample.com" がセットされているコンテナ redis-cluster-6381 を停止します。
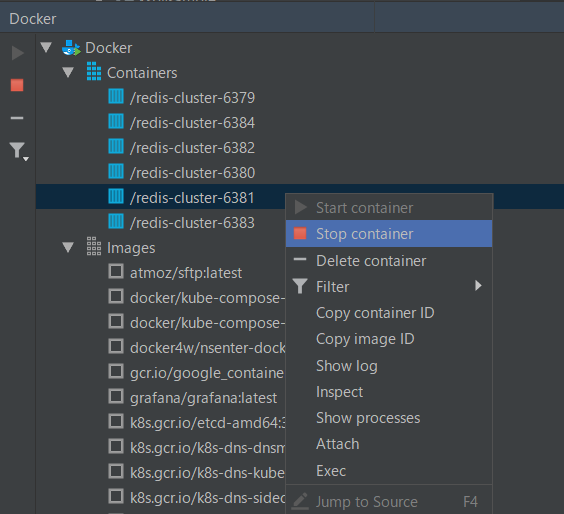
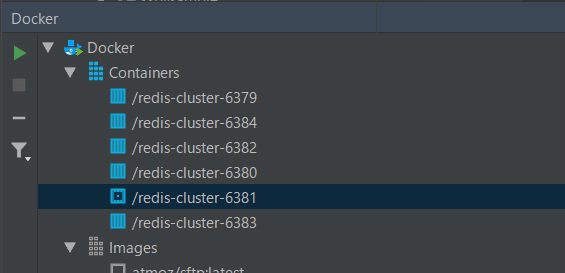
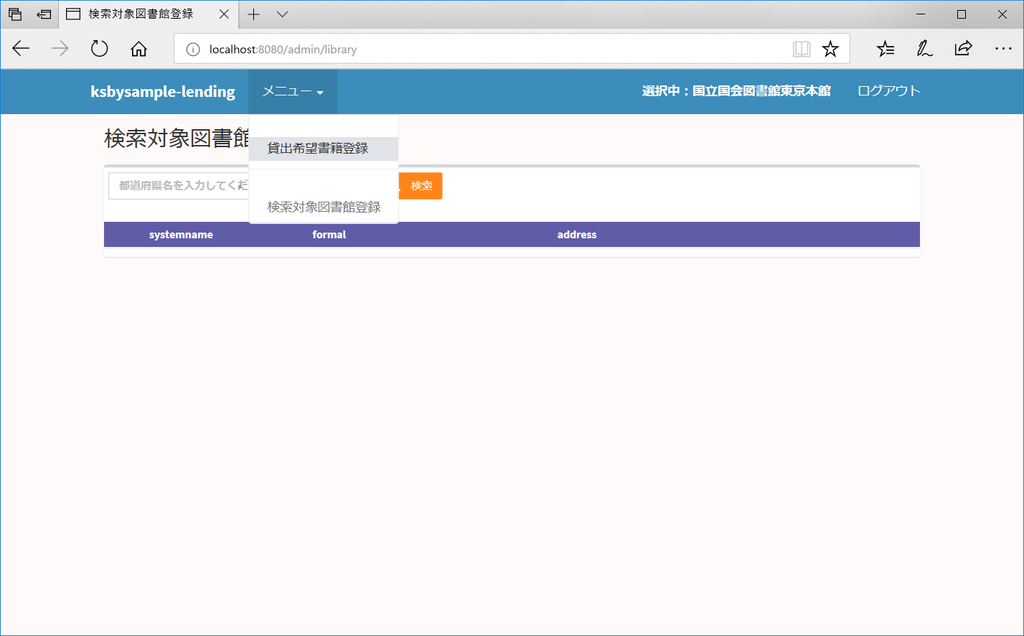
ログイン中の画面でメニューから「貸出希望書籍登録」を選択すると問題なく画面が切り替わります(slave への切り替えが出来ないとエラーになります)。
redis-cli でデータを確認すると、redis-cluster-6381 の slave になっていた redis-cluster-6383 に PRINCIPAL_NAME_INDEX_NAME:tanaka.taro@sample.com" のデータがセットされていました。


一旦作成した redis-cluster-XXXX のコンテナを全て削除します。
Docker Compose で Redis Cluster 環境を構築する
ホストのIPアドレスを環境変数にセットして docker-compose.yml 内で利用できるようにするために、プロジェクトのルートディレクトリの下に .env というファイルを新規作成し、以下の内容を記述します。
HOST_IP_ADDRESS=172.23.136.33
redis-server 起動時のオプションでサーバ共通のものを定義するファイルを作成します。docker/redis の下に redis.conf というファイルを新規作成し、以下の内容を記述します。
port 6379
cluster-enabled yes
cluster-config-file nodes.conf
cluster-node-timeout 5000
appendonly yes
Redis Cluster の各サーバを起動するための Docker Image を作成するための Dockerfile を作成します。docker/redis の下に Dockerfile というファイルを新規作成し、以下の内容を記述します。
FROM redis:5.0.1
RUN apt-get update -qq && apt-get install -y expect
ADD redis.conf /etc/redis/
redis-cli --cluster createコマンドで Redis Cluster を構築する時に yes の入力を求められるところがあるので、expect をインストールして自動入力できるようにします。- ただし、いきなり
apt-get install -y expectコマンドを実行しても失敗するので、その前にapt-get update -qqを実行します。 - docker/redis/redis.conf を /etc/redis の下にコピーします。
docker-compose.yml に Redis Cluster を構築するための設定を記述します。redis-cluster-6379 ~ redis-cluster-6384 は redis-server 起動用コンテナで、redis-cluster-make は Redis Cluster を作成するための redis-cli --cluster create コマンド実行用コンテナです。また redis_exporter の REDIS_ADDR に redis://172.23.136.33:6379 ~ redis://172.23.136.33:6384 をカンマ区切りで列挙して全ての Redis Server のメトリックスを収集できるようにします。
  # 起動したコンテナに /bin/sh でアクセスする場合には以下のコマンドを実行する
  # docker exec -it redis /bin/sh
  #
  # 起動したコンテナの redis に redis-cli でアクセスするには以下のコマンドを実行する
  # docker exec -it redis redis-cli
  #
  #############################################################################
  # 単体 Redis サーバ
  # redis:
  #   image: redis:5.0.1
  #   container_name: redis
  #   ports:
  #   - "6379:6379"
  #
  #############################################################################
  # Redis Cluster
  redis-cluster-6379:
    build: ./docker/redis
    image: redis:5.0.1-custom
    container_name: redis-cluster-6379
    ports:
    - "6379:6379"
    - "16379:16379"
    command:
    - /bin/sh
    - -c
    - |
      redis-server /etc/redis/redis.conf \
                  --cluster-announce-ip ${HOST_IP_ADDRESS} \
                  --cluster-announce-port 6379 \
                  --cluster-announce-bus-port 16379
  redis-cluster-6380:
    image: redis:5.0.1-custom
    container_name: redis-cluster-6380
    ports:
    - "6380:6379"
    - "16380:16379"
    command:
    - /bin/sh
    - -c
    - |
      redis-server /etc/redis/redis.conf \
                  --cluster-announce-ip ${HOST_IP_ADDRESS} \
                  --cluster-announce-port 6380 \
                  --cluster-announce-bus-port 16380
    depends_on:
    - redis-cluster-6379
  redis-cluster-6381:
    image: redis:5.0.1-custom
    container_name: redis-cluster-6381
    ports:
    - "6381:6379"
    - "16381:16379"
    command:
    - /bin/sh
    - -c
    - |
      redis-server /etc/redis/redis.conf \
                  --cluster-announce-ip ${HOST_IP_ADDRESS} \
                  --cluster-announce-port 6381 \
                  --cluster-announce-bus-port 16381
    depends_on:
    - redis-cluster-6379
  redis-cluster-6382:
    image: redis:5.0.1-custom
    container_name: redis-cluster-6382
    ports:
    - "6382:6379"
    - "16382:16379"
    command:
    - /bin/sh
    - -c
    - |
      redis-server /etc/redis/redis.conf \
                  --cluster-announce-ip ${HOST_IP_ADDRESS} \
                  --cluster-announce-port 6382 \
                  --cluster-announce-bus-port 16382
    depends_on:
    - redis-cluster-6379
  redis-cluster-6383:
    image: redis:5.0.1-custom
    container_name: redis-cluster-6383
    ports:
    - "6383:6379"
    - "16383:16379"
    command:
    - /bin/sh
    - -c
    - |
      redis-server /etc/redis/redis.conf \
                  --cluster-announce-ip ${HOST_IP_ADDRESS} \
                  --cluster-announce-port 6383 \
                  --cluster-announce-bus-port 16383
    depends_on:
    - redis-cluster-6379
  redis-cluster-6384:
    image: redis:5.0.1-custom
    container_name: redis-cluster-6384
    ports:
    - "6384:6379"
    - "16384:16379"
    command:
    - /bin/sh
    - -c
    - |
      redis-server /etc/redis/redis.conf \
                  --cluster-announce-ip ${HOST_IP_ADDRESS} \
                  --cluster-announce-port 6384 \
                  --cluster-announce-bus-port 16384
    depends_on:
    - redis-cluster-6379
  redis-cluster-make:
    image: redis:5.0.1-custom
    container_name: redis-cluster-make
    command:
    - /bin/sh
    - -c
    - |
      expect -c "
      spawn redis-cli --cluster create \
                        ${HOST_IP_ADDRESS}:6379 \
                        ${HOST_IP_ADDRESS}:6380 \
                        ${HOST_IP_ADDRESS}:6381 \
                        ${HOST_IP_ADDRESS}:6382 \
                        ${HOST_IP_ADDRESS}:6383 \
                        ${HOST_IP_ADDRESS}:6384 \
                      --cluster-replicas 1
      expect \"Can I set the above configuration? (type 'yes' to accept): \"
      send \"yes\n\"
      expect eof
      "
    depends_on:
    - redis-cluster-6379
    - redis-cluster-6380
    - redis-cluster-6381
    - redis-cluster-6382
    - redis-cluster-6383
    - redis-cluster-6384

  redis_exporter:
    image: oliver006/redis_exporter:latest
    container_name: redis_exporter
    ports:
    - "9121:9121"
    environment:
    - REDIS_ADDR=redis://${HOST_IP_ADDRESS}:6379,redis://${HOST_IP_ADDRESS}:6380,redis://${HOST_IP_ADDRESS}:6381,redis://${HOST_IP_ADDRESS}:6382,redis://${HOST_IP_ADDRESS}:6383,redis://${HOST_IP_ADDRESS}:6384
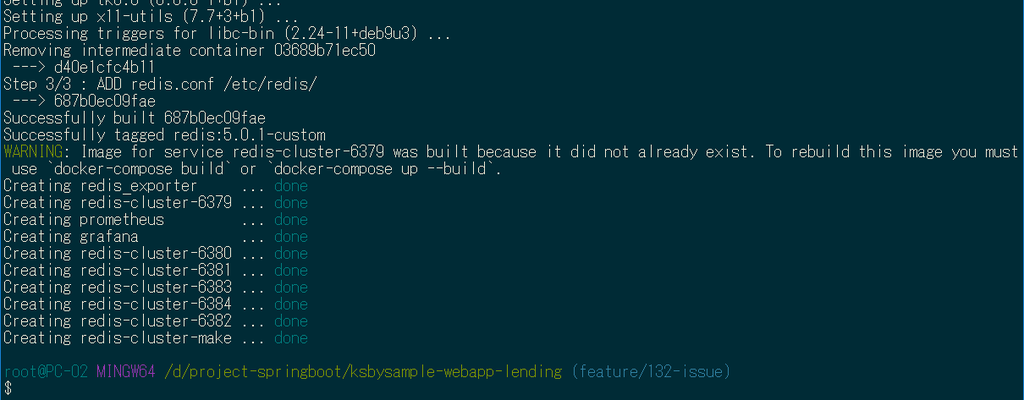
これで全ての準備が整いましたので docker-compose up -d コマンドを実行します。最初に redis:5.0.1-custom イメージを生成した後、各コンテナが生成されます。
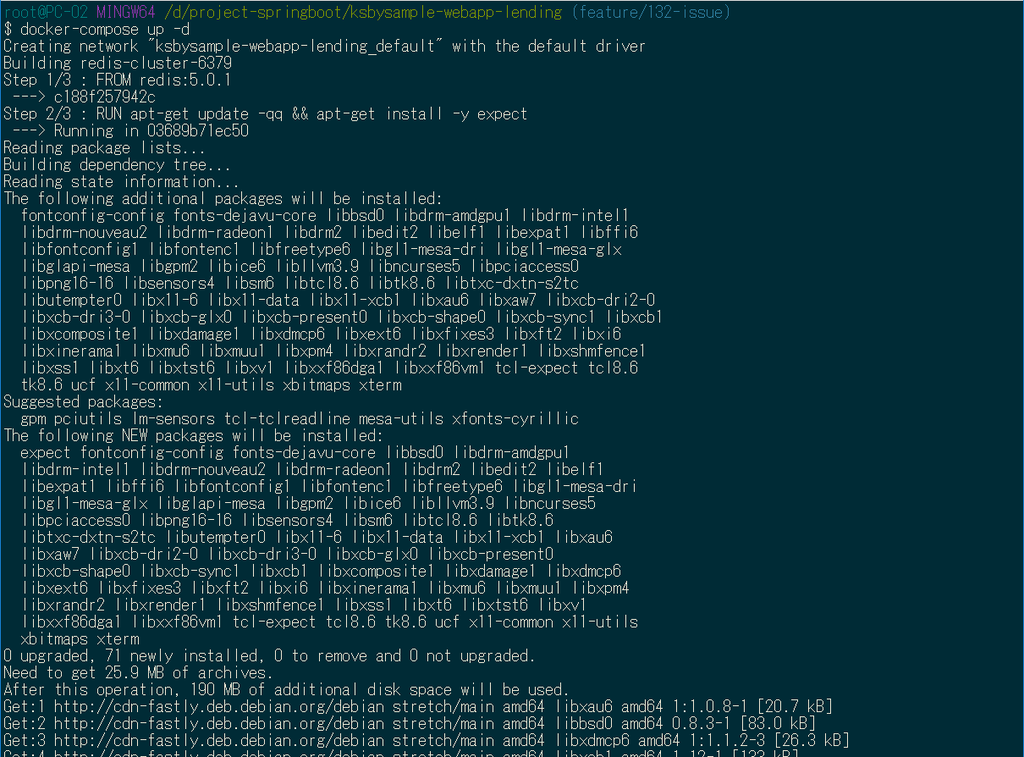 (.....途中は長いので省略.....)
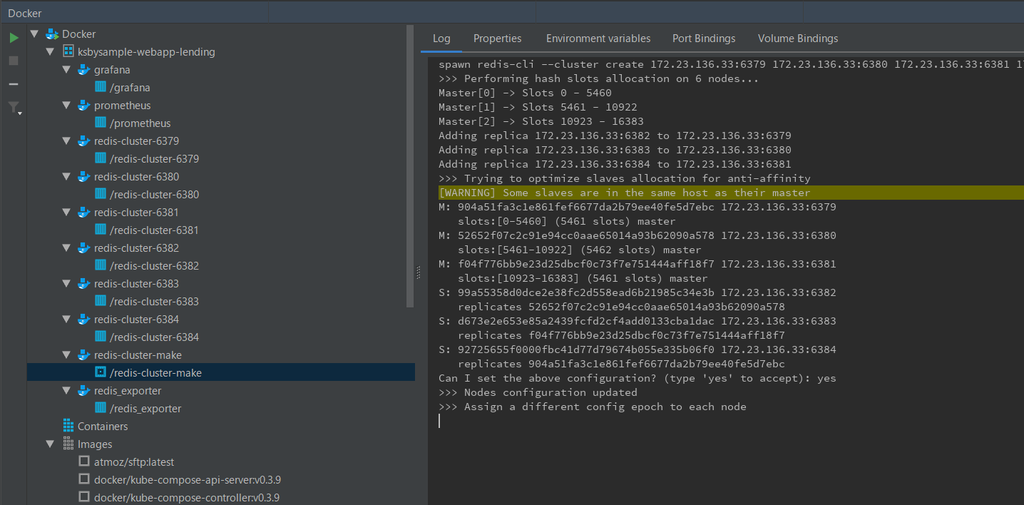
IntelliJ IDEA の docker plugin で見ると、各コンテナは起動しており redis-cluster-make や redis-cluster-6379 コンテナのログは以下のように出力されています(yes が自動入力されています)。
redis-cluster-6379 と redis-cluster-6384 コンテナで redis-cli コマンドを起動して cluster nodes コマンドを実行すると Redis Cluster が構築されていることが分かります。
Tomcat を起動して Spring Actuator の health check を見ると先程と同様に redis が cluster と認識されて表示されて、
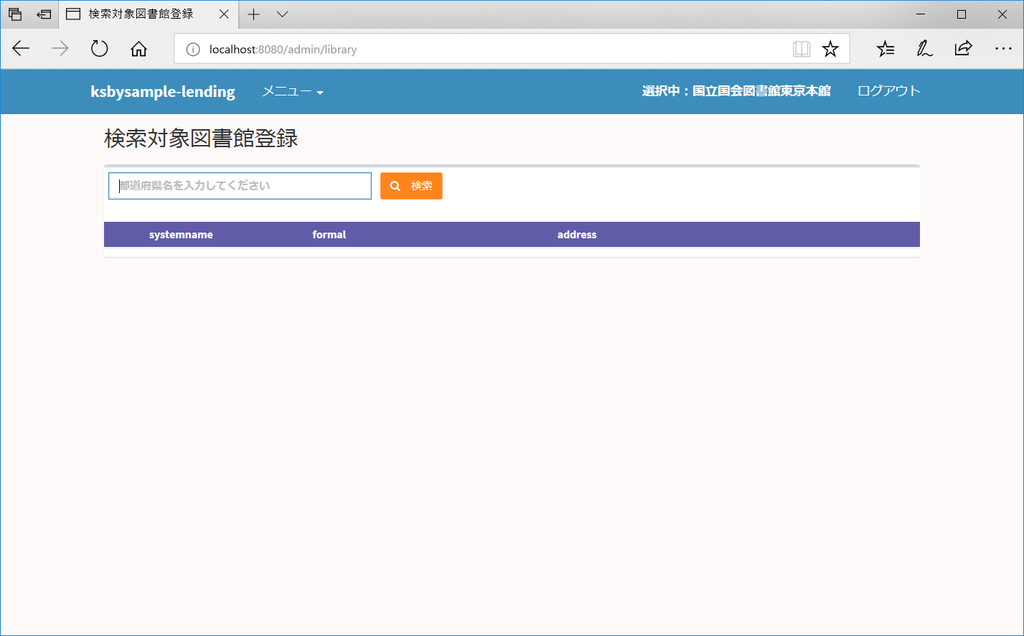
http://localhost:8080/ にアクセスしてログイン画面を表示してからログインした後、
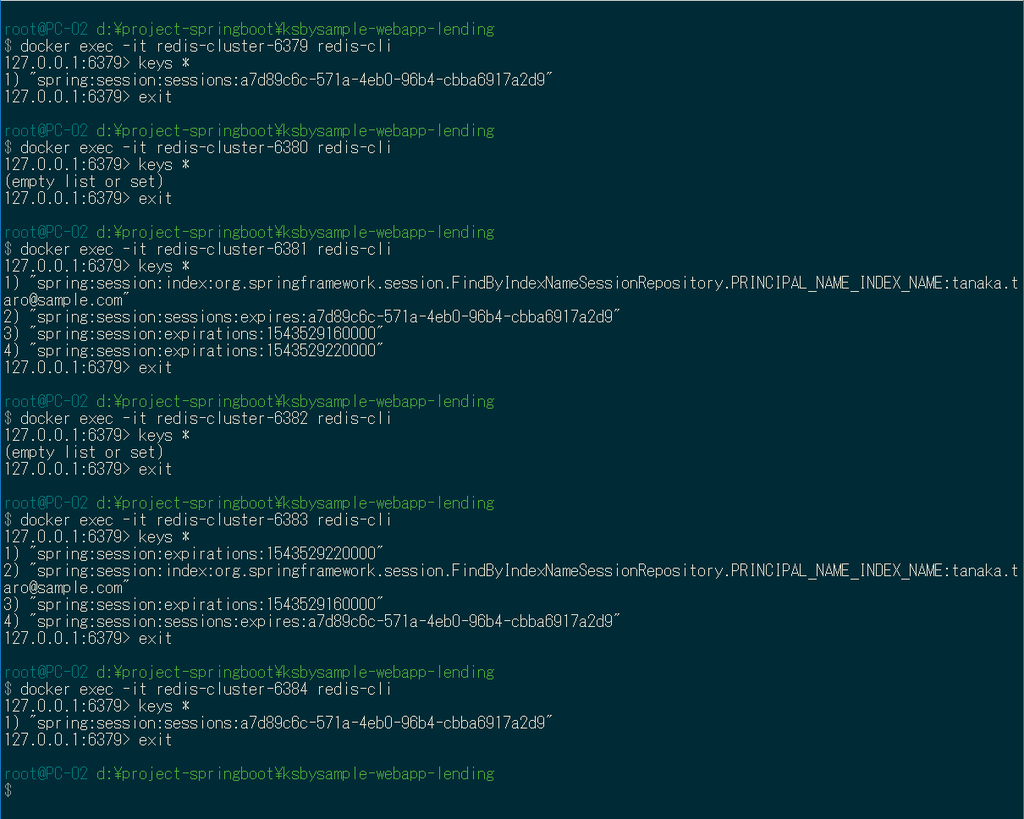
各 redis コンテナで redis-cli を起動して keys * コマンドを実行するとセッション情報が保存されていることが確認できます。
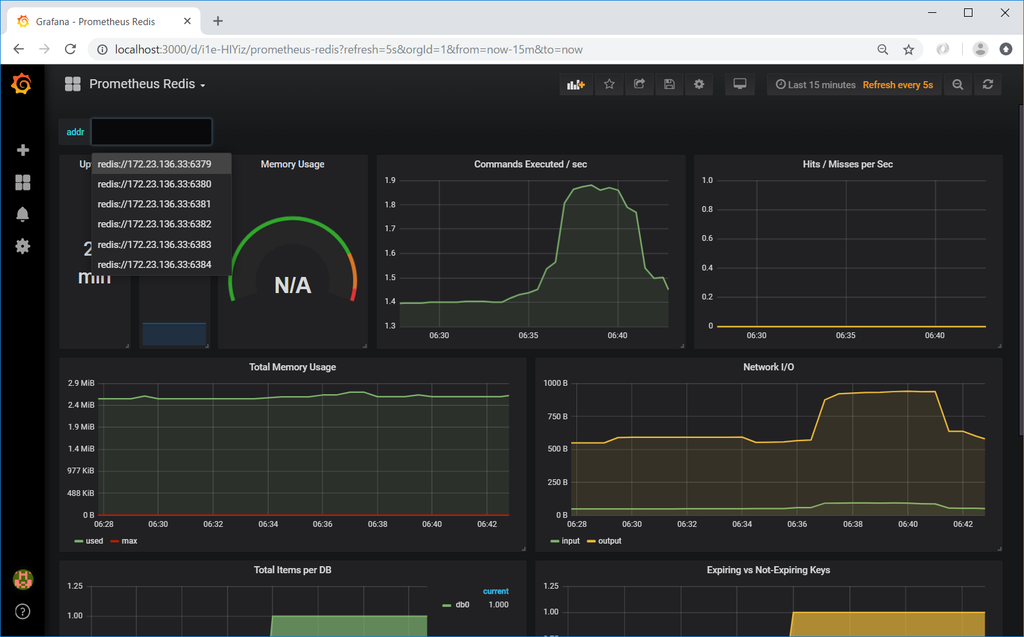
Grafana からも各 redis サーバのメトリックスが確認できます。
docker-compose down コマンドを実行すると、全てのコンテナが停止・削除されます。
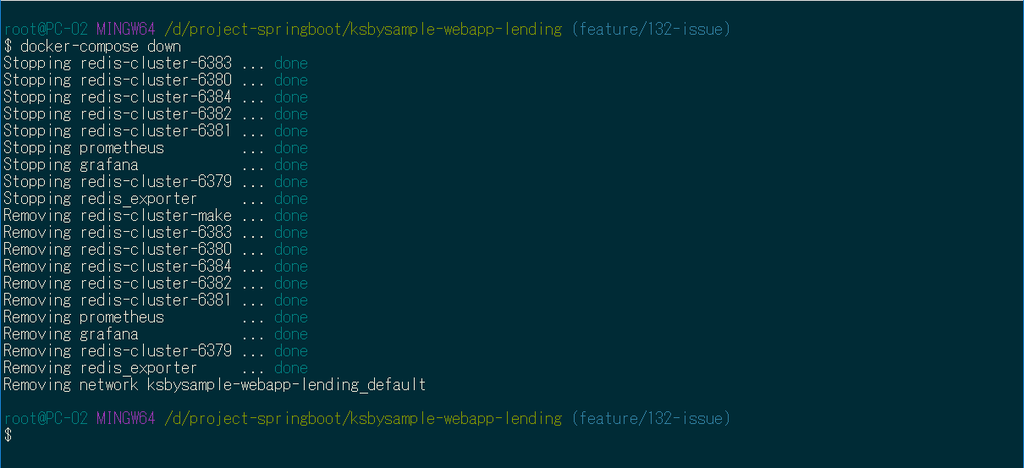

次から docker-compose up -d コマンドで起動する時は、redis:5.0.1-custom イメージが生成されているので1回目より短い時間で起動できます。

これで簡単に Redis Cluster が起動できる環境が出来ました。
履歴
2018/11/30
初版発行。
Spring Boot 1.5.x の Web アプリを 2.0.x へバージョンアップする ( その18 )( Docker で Redis の環境を構築する(単体サーバ構成)+Spring Actuator の Endpoint の Basic 認証ではセッション情報を生成しないようにする )
概要
記事一覧はこちらです。
- 今回の手順で確認できるのは以下の内容です。
参照したサイト・書籍
redis/5.0/Dockerfile
https://github.com/docker-library/redis/blob/a5d019077b46494751482512c200c4df34463dc6/5.0/Dockerfile- Redis の Dockerfile です。
RedisをCentOS7にインストールしてみた
http://www.denet.ad.jp/technology/2017/11/redis-centos7.htmlCalling redis-cli in docker-compose setup
https://stackoverflow.com/questions/33304388/calling-redis-cli-in-docker-compose-setupRedis 5.0 Update解説
https://qiita.com/maruloop/items/207654bfd0ed2a453300Prometheus Redis
https://grafana.com/dashboards/763oliver006/redis_exporter
https://github.com/oliver006/redis_exporterprometheus_exporters
https://supermarket.chef.io/cookbooks/prometheus_exporters/versions/0.6.0
目次
- 単体の Redis サーバの環境を構築する
- ksbysample-webapp-lending から接続する + redis-cli で確認する
- Spring Actuator の Endpoint の Basic 認証ではセッション情報を生成しないようにする
- Redis のメトリックスを Prometheus + Grafana で表示してみる
手順
単体の Redis サーバの環境を構築する
docker-compose.yml に redis の設定を追加します。
  redis:
    image: redis:5.0.1
    container_name: redis
    ports:
    - "6379:6379"
docker-compose up -d コマンドを実行して起動します。

IntelliJ IDEA の Docker Plugin からログを見てみると WARNING が2つ出力されていました。開発環境で問題になるような設定ではなさそうなので、このままにします。

WARNING: The TCP backlog setting of 511 cannot be enforced because /proc/sys/net/core/somaxconn is set to the lower value of 128.WARNING you have Transparent Huge Pages (THP) support enabled in your kernel. This will create latency and memory usage issues with Redis. To fix this issue run the command 'echo never > /sys/kernel/mm/transparent_hugepage/enabled' as root, and add it to your /etc/rc.local in order to retain the setting after a reboot. Redis must be restarted after THP is disabled.
ksbysample-webapp-lending から接続する + redis-cli で確認する
src/main/resources/application-develop.properties を以下のように変更します。
spring.redis.host=localhost
spring.redis.port=6379
- 以下の設定を削除します。
- 以下の設定を追加します。
- spring.redis.host=localhost
- spring.redis.port=6379
Tomcat を起動します。Spring Actuator の health check を見ると redis が認識されています。

ブラウザから http://localhost:8080/ のログイン画面にアクセスしてログインを試みると、問題なくログインできました。
redis-cli で redis のデータを確認してみます。docker exec -it redis redis-cli を実行すると redis-cli が起動して Docker 内の redis サーバにアクセスできるので keys * コマンドを実行してみます。

redis 起動後にログイン画面に1回アクセスして1回ログインしただけにしてはデータが多いですね。。。 おそらく犯人は "spring:session:index:org.springframework.session.FindByIndexNameSessionRepository.PRINCIPAL_NAME_INDEX_NAME:actuator" でしょう。Spring Actuator の Endpoint に設定した Basic 認証でログインした時にセッション情報が作成されていることが原因のようです。
Spring Actuator の Endpoint の Basic 認証ではセッション情報を生成しないようにする
src/main/java/ksbysample/webapp/lending/config/WebSecurityConfig.java の以下の点を変更します。
    @Configuration
    @Order(1)
    public static class ActuatorWebSecurityConfigurationAdapter extends WebSecurityConfigurerAdapter {

        @Override
        protected void configure(HttpSecurity http) throws Exception {
            http
                    // Spring Actuator の Endpoint のみ Basic認証を設定する
                    .requestMatcher(EndpointRequest.toAnyEndpoint())
                    .authorizeRequests()
                    .anyRequest().hasRole("ENDPOINT_ADMIN")
                    .and()
                    .httpBasic()
                    // Spring Actuator の Endpoint の Basic認証の時は認証するだけでサーバ側にセッションを作成しない
                    // これにより Spring Session のセッション情報保存先である Redis 上にデータが作成されなくなる
                    .and()
                    .sessionManagement()
                    .sessionCreationPolicy(SessionCreationPolicy.STATELESS);
        }

    }
http.requestMatcher(EndpointRequest.toAnyEndpoint()).sessionManagement().sessionCreationPolicy(SessionCreationPolicy.STATELESS);を追加します。
確認します。Tomcat を1度停止した後、redis-cli で flushdb コマンドを実行して redis のデータをクリアします。

Tomcat を起動 → http://localhost:8080/actuator/prometheus にアクセスした後、redis 上にデータが作成されていないことを確認します。


http://localhost:8080/ のログイン画面にアクセスしてログインした後、今度は redis 上にデータが作成されていることを確認します。


参考までに、今回実装した箇所をコメントアウトしてから http://localhost:8080/actuator/prometheus にアクセス → redis-cli で keys * を繰り返すと redis 上のデータが増えていくことが確認できます。

Redis のメトリックスを Prometheus + Grafana で表示してみる
Redis のメトリックスを Grafana で表示させる Dashboard があるのか調べてみたところ Prometheus Redis を見つけました。これを利用して表示させてみます。
Redis → Prometheus への exporter は oliver006/redis_exporter を Docker で起動して利用します。docker-compose.yml に redis_exporter の設定を追加します。
  redis_exporter:
    image: oliver006/redis_exporter:latest
    container_name: redis_exporter
    ports:
    - "9121:9121"
    environment:
    - REDIS_ADDR=redis://172.23.136.33:6379
docker/prometheus/prometheus.yml に redis_exporter からメトリックスを収集する設定を追加します。
scrape_configs:
..........

- job_name: 'redis_exporter'
  static_configs:
  - targets: ['172.23.136.33:9121']
docker-compose down、docker-compose up -d コマンドを実行します。

Grafana に Prometheus Redis の Dashboard を追加します。http://localhost:3000/ にアクセスした後、画面左側のメニューから「Create」-「Import」を選択します。

「Import」画面が表示されますので 763 の ID を入力します。

「prom」で「spring-actuator」を選択した後、「Import」ボタンをクリックします。

Prometheus Redis の Dashboard が表示されます(画面右上の表示間隔の設定を Last 24 hours Refresh every 30s → Last 30 minutes Refresh every 5s に変更しています)。


履歴
2018/11/25
初版発行。
2018/11/26
* .httpBasic() と .sessionManagement() を .and() で繋げる記述に変更しました。
Spring Boot 1.5.x の Web アプリを 2.0.x へバージョンアップする ( その17 )( Spock を 1.1-groovy-2.4 → 1.2-groovy-2.5 へバージョンアップする )
概要
記事一覧はこちらです。
- 今回の手順で確認できるのは以下の内容です。
参照したサイト・書籍
Allow usage of Groovy 2.5
https://github.com/spring-projects/spring-boot/issues/13444Release Notes - Peter Niederwieser, The Spock Framework Team Version 1.2
http://spockframework.org/spock/docs/1.2/release_notes.htmlChangelog for Groovy 2.5.0
http://www.groovy-lang.org/changelogs/changelog-2.5.0.htmlspock/docs/module_spring.adoc
https://github.com/spockframework/spock/blob/master/docs/module_spring.adocSpock 1.2 Annotations for Spring Integration Testing
https://objectpartners.com/2018/06/14/spock-1-2-annotations-for-spring-integration-testing/Spocklight: Indicate Specification As Pending Feature
http://mrhaki.blogspot.com/2017/06/spocklight-indicate-specification-as.htmlREST Client Testing With MockRestServiceServer
https://objectpartners.com/2013/01/09/rest-client-testing-with-mockrestserviceserver/SPR-14458 - Mock Exception happening pre/during http call
https://github.com/spring-projects/spring-framework/pull/1954/filesNo further requests expected while MockRestServiceServer was set to ExpectedCount.manyTimes()
https://stackoverflow.com/questions/50239757/no-further-requests-expected-while-mockrestserviceserver-was-set-to-expectedcoun/50241367#50241367
目次
手順
build.gradle を変更する
dependencyManagement {
    imports {
        // mavenBom は以下の URL のものを使用する
        // https://repo.spring.io/release/org/springframework/boot/spring-boot-starter-parent/2.0.6.RELEASE/
        // bomProperty に指定可能な property は以下の URL の BOM に記述がある
        // https://repo.spring.io/release/org/springframework/boot/spring-boot-dependencies/2.0.4.RELEASE/spring-boot-dependencies-2.0.6.RELEASE.pom
        mavenBom(org.springframework.boot.gradle.plugin.SpringBootPlugin.BOM_COORDINATES) {
            // Spring Boot の BOM に定義されているバージョンから変更する場合には、ここに以下のように記述する
            // bomProperty "thymeleaf.version", "3.0.9.RELEASE"
            bomProperty "groovy.version", "2.5.4"
        }
    }
}

dependencies {
    def jdbcDriver = "org.postgresql:postgresql:42.2.5"
    def spockVersion = "1.2-groovy-2.5"
    def domaVersion = "2.19.3"
    ..........
- https://repo.spring.io/release/org/springframework/boot/spring-boot-dependencies/2.0.6.RELEASE/spring-boot-dependencies-2.0.6.RELEASE.pom を見ると
<groovy.version>2.4.15</groovy.version>と記述されているので、dependencyManagement block 内にbomProperty "groovy.version", "2.5.4"を追加して Groovy のバージョンを 2.5系にバージョンアップします。 - dependencies block 内で
def spockVersion = "1.1-groovy-2.4"→def spockVersion = "1.2-groovy-2.5"に変更します。
Gradle Tool Window の左上にある「Refresh all Gradle projects」ボタンをクリックして更新します。
clean タスク実行 → Rebuild Project 実行 → build タスクを実行すると、"BUILD SUCCESSFUL" のメッセージが出力されました。

@SpringBean, @SpringSpy を試してみる
Spock 1.2 から @SpringBean, @SpringSpy というアノテーションが追加されました。
src/main/java/ksbysample/webapp/lending/helper/user/UserHelper.java のテストを作成して試してみます。
@Component
public class UserHelper {

    private final UserInfoDao userInfoDao;

    public UserHelper(UserInfoDao userInfoDao) {
        this.userInfoDao = userInfoDao;
    }

    public String[] getApprovalMailAddrList() {
        List<String> approvalMailAddrList = userInfoDao.selectApproverMailAddrList();
        return Iterables.toArray(approvalMailAddrList, String.class);
    }

}
まずは @SpringBean から。@SpringBean アノテーションを付けると Spock の Mock を Bean として自動的に Spring の Test 用 Context に追加してくれます。
package ksbysample.webapp.lending.helper.user

import ksbysample.webapp.lending.dao.UserInfoDao
import org.spockframework.spring.SpringBean
import org.springframework.beans.factory.annotation.Autowired
import org.springframework.boot.test.context.SpringBootTest
import spock.lang.Specification

@SpringBootTest
class UserHelper2Test extends Specification {

    // = Mock() を記述すること
    @SpringBean
    UserInfoDao userInfoDao = Mock()

    @Autowired
    UserHelper userHelper

    def "getApprovalMailAddrListメソッドのテスト"() {
        when:
        def approvalMailAddrList = userHelper.getApprovalMailAddrList()

        then:
        // 呼び出された回数のチェック("1 *")と、戻り値の定義が同時にできる
        1 * userInfoDao.selectApproverMailAddrList() >> ["tanaka.taro@sample.com"]
        approvalMailAddrList == ["tanaka.taro@sample.com"]
    }

}

次は @SpringSpy。@SpringSpy を付けると Mock ではなく実クラスのインスタンスを Bean として Spring の Test 用 Context に追加してくれます。またメソッド呼び出し回数を検査できるようにもなります。
package ksbysample.webapp.lending.helper.user

import ksbysample.webapp.lending.dao.UserInfoDao
import org.spockframework.spring.SpringSpy
import org.springframework.beans.factory.annotation.Autowired
import org.springframework.boot.test.context.SpringBootTest
import spock.lang.Specification

@SpringBootTest
class UserHelper2Test extends Specification {

    @SpringSpy
    UserInfoDao userInfoDao

    @Autowired
    UserHelper userHelper

    def "getApprovalMailAddrListメソッドのテスト"() {
        when:
        def approvalMailAddrList = userHelper.getApprovalMailAddrList()

        then:
        // 呼び出された回数のチェック("1 *")と、戻り値の定義が同時にできる
        // 戻り値を定義すればそれが使われるし、定義しなければ本来の Bean のメソッドの処理が実行される
//        1 * userInfoDao.selectApproverMailAddrList() >> ["tanaka.taro@sample.com"]
        1 * userInfoDao.selectApproverMailAddrList()
        approvalMailAddrList == ["tanaka.taro@sample.com", "suzuki.hanako@test.co.jp"]
    }

}

簡単なクラスなのにテストに 20数秒かかります。。。 これくらいならば、@SpringBean, @SpringSpy を使わずにシンプルに Mock() でテストした方が早いかもしれません。以下の書き方だと 2秒未満で終わります。
package ksbysample.webapp.lending.helper.user

import ksbysample.webapp.lending.dao.UserInfoDao
import spock.lang.Specification

class UserHelper2Test extends Specification {

    UserInfoDao userInfoDao = Mock()

    UserHelper userHelper

    def setup() {
        userHelper = new UserHelper(userInfoDao)
    }

    def "getApprovalMailAddrListメソッドのテスト"() {
        setup:
        userInfoDao.selectApproverMailAddrList() >> ["tanaka.taro@sample.com"]

        when:
        def approvalMailAddrList = userHelper.getApprovalMailAddrList()

        then:
        approvalMailAddrList == ["tanaka.taro@sample.com"]
    }

}

@PendingFeature を試してみる
@PendingFeature はテストが失敗する場合に failed ではなく ignored にするアノテーションです。1.2 から追加された機能ではありませんが、初めて見たので試してみます。
例えば、以下のように失敗するテストがあると通常 BUILD も失敗となりますが、
package ksbysample.webapp.lending.helper.user

import ksbysample.webapp.lending.dao.UserInfoDao
import spock.lang.Specification

class UserHelper2Test extends Specification {

    UserInfoDao userInfoDao = Mock()

    UserHelper userHelper

    def setup() {
        userHelper = new UserHelper(userInfoDao)
    }

    def "getApprovalMailAddrListメソッドのテスト"() {
        when:
        def approvalMailAddrList = userHelper.getApprovalMailAddrList()

        then:
        approvalMailAddrList == ["tanaka.taro@sample.com"]
    }

}

@PendingFeature が付与されたテストは失敗しても failed ではなく ignored となり、BUILD は成功します。
package ksbysample.webapp.lending.helper.user

import ksbysample.webapp.lending.dao.UserInfoDao
import spock.lang.PendingFeature
import spock.lang.Specification

class UserHelper2Test extends Specification {

    UserInfoDao userInfoDao = Mock()

    UserHelper userHelper

    def setup() {
        userHelper = new UserHelper(userInfoDao)
    }

    @PendingFeature
    def "getApprovalMailAddrListメソッドのテスト"() {
        when:
        def approvalMailAddrList = userHelper.getApprovalMailAddrList()

        then:
        approvalMailAddrList == ["tanaka.taro@sample.com"]
    }

}

ちょっと面白い機能だと思いますが、開発中なら merge しなければよさそうな気がしますし、これ使う場面あるのかな。。。
@Retry を試してみる
1.2 から追加された機能です。マニュアルは こちら 。
src/main/java/ksbysample/webapp/lending/service/calilapi/CalilApiService.java に定義している restTemplateForCalilApi と、
        @Bean
        public RestTemplate restTemplateForCalilApi() {
            return this.restTemplateBuilder
                    .setConnectTimeout(CONNECT_TIMEOUT)
                    .setReadTimeout(READ_TIMEOUT)
                    .rootUri(CalilApiService.URL_CALILAPI_ROOT)
                    .build();
        }
MockRestServiceServer を利用して @Retry のテストを作成してみましたが、以下のことが分かりました。
- MockRestServiceServer は RestTemplate の requestFactory の定義を変更してしまうため、RestTemplate の readTimeout のテストは作成できない。
- Spock のテストに
@Slf4jが記述できるが、これは groovy.util.logging.Slf4j。lombok.extern.slf4j.Slf4j では "log.~" と記述してもエラーになる。 - Groovy 2.5 から Java 8 の lambda は
.andRespond { request -> withTimeout().createResponse(request) }のように記述できる。
作成してみたテストは以下のものです。最後の def "リトライして4回目で200OKのレスポンスが返る場合のテスト"() に @Retry アノテーションを付加しており、3回は SocketTimeoutException が throw されますが 4回目で成功することでテスト自体は成功します。
※(2018/12/09追記)MockRestServiceServer を利用するテストクラスには @DirtiesContext アノテーションを付けること。RestTemplate のインスタンスを Bean として生成・利用している場合、MockRestServiceServer が RestTemplate Bean を変更するため、他のテストが失敗することがあります。
package ksbysample.webapp.lending.service.calilapi

import groovy.util.logging.Slf4j
import org.springframework.beans.factory.annotation.Autowired
import org.springframework.boot.test.context.SpringBootTest
import org.springframework.http.HttpMethod
import org.springframework.http.MediaType
import org.springframework.http.client.ClientHttpRequest
import org.springframework.http.client.ClientHttpResponse
import org.springframework.test.annotation.DirtiesContext
import org.springframework.test.web.client.MockRestServiceServer
import org.springframework.test.web.client.ResponseCreator
import org.springframework.web.client.ResourceAccessException
import org.springframework.web.client.RestTemplate
import spock.lang.Retry
import spock.lang.Specification

import static ksbysample.webapp.lending.service.calilapi.CalilApiService2Test.TimeoutResponseCreator.withTimeout
import static org.springframework.test.web.client.match.MockRestRequestMatchers.method
import static org.springframework.test.web.client.match.MockRestRequestMatchers.requestTo
import static org.springframework.test.web.client.response.MockRestResponseCreators.withSuccess

@Slf4j
@SpringBootTest
@DirtiesContext
class CalilApiServiceRetryTest extends Specification {

    /**
     * タイムアウト用 ResponseCreator
     * Spring Framework 5.1 になると
     * responseCreator = MockRestResponseCreators.withException(SocketTimeoutException).createResponse(null)
     * という書き方が出来るらしいので、おそらくこのようなクラスを定義する必要はない
     */
    static class TimeoutResponseCreator implements ResponseCreator {

        @Override
        ClientHttpResponse createResponse(ClientHttpRequest request) throws IOException {
            if (true) {
                throw new SocketTimeoutException("Testing timeout exception")
            }
            return null
        }

        static TimeoutResponseCreator withTimeout() {
            return new TimeoutResponseCreator()
        }

    }

    @Autowired
    RestTemplate restTemplateForCalilApi

    def responseJson = """
                        {
                            "key": "sample",
                            "value": 1
                        }
                    """.stripIndent()

    def retryCount

    def setup() {
        retryCount = 0
    }

    def "200OKでレスポンスが返る場合のテスト"() {
        given:
        MockRestServiceServer mockServer = MockRestServiceServer.bindTo(restTemplateForCalilApi).build()
        mockServer.expect(requestTo(CalilApiService.URL_CALILAPI_ROOT + "/sample/"))
                .andExpect(method(HttpMethod.GET))
                .andRespond(withSuccess(responseJson, MediaType.APPLICATION_JSON_UTF8))

        when:
        def result = restTemplateForCalilApi.getForObject("/sample/", String)

        then:
        result == responseJson
    }

    def "タイムアウトする場合のテスト"() {
        given:
        MockRestServiceServer mockServer = MockRestServiceServer.bindTo(restTemplateForCalilApi).build()
        mockServer.expect(requestTo(CalilApiService.URL_CALILAPI_ROOT + "/sample/"))
                .andExpect(method(HttpMethod.GET))
                .andRespond { request -> withTimeout().createResponse(request) }

        when:
        def result = restTemplateForCalilApi.getForObject("/sample/", String)

        then:
        ResourceAccessException e = thrown()
        e.cause instanceof SocketTimeoutException
    }

    @Retry
    def "リトライして4回目で200OKのレスポンスが返る場合のテスト"() {
        given:
        retryCount++
        ResponseCreator responseCreator
        if (retryCount == 4) {
            responseCreator = withSuccess(responseJson, MediaType.APPLICATION_JSON_UTF8)
        } else {
            responseCreator = { request -> withTimeout().createResponse(request) }
        }

        // MockRestServiceServer.bindTo(...).build() が呼ばれると RestTemplate の requestFactory が変更されるらしい
        // つまり restTemplateForCalilApi のタイムアウトの設定も変更されるので、restTemplateForCalilApi のタイムアウト
        // のテストにはならないようだ
        MockRestServiceServer mockServer = MockRestServiceServer.bindTo(restTemplateForCalilApi).build()
        mockServer.expect(requestTo(CalilApiService.URL_CALILAPI_ROOT + "/sample/"))
                .andExpect(method(HttpMethod.GET))
                .andRespond(responseCreator)

        when:
        log.warn("calling...")
        def result = restTemplateForCalilApi.getForObject("/sample/", String)
        log.error("finished!!")

        then:
        notThrown ResourceAccessException
        result == responseJson
    }

}

履歴
2018/11/23
初版発行。
2018/12/09
* IntelliJ IDEA を 2018.2.6 → 2018.2.7 → 2018.3.1 へバージョンアップ の記事を反映して、CalilApiServiceRetryTest テストクラスに @DirtiesContext アノテーションを追加しました。
Spring Boot 1.5.x の Web アプリを 2.0.x へバージョンアップする ( その16 )( Gradle を 4.10 → 4.10.2 へ、Spring Boot を 2.0.4 → 2.0.6 へバージョンアップする )
概要
記事一覧はこちらです。
Spring Boot 1.5.x の Web アプリを 2.0.x へバージョンアップする ( その15 )( Prometheus+Grafana メモ書き ) の続きです。
- 今回の手順で確認できるのは以下の内容です。
- Gradle を 4.10 → 4.10.2 へ、Spring Boot を 2.0.x 系の最新バージョンである 2.0.6 へバージョンアップします。
- Spock の 1.2 が出ていることに気づいたので、バージョンアップする前に Spring Boot を最新バージョンにします。
- ライブラリも Spock 以外を出来るだけ最新バージョンにします。
参照したサイト・書籍
目次
手順
gradle を 4.10 → 4.10.2 へバージョンアップする
build.gradle の wrapper タスクの記述を以下のように変更します。
wrapper {
    gradleVersion = "4.10.2"
    distributionType = Wrapper.DistributionType.ALL
}
gradleVersion = "4.10"→gradleVersion = "4.10.2"に変更します。
コマンドプロンプトから gradlew wrapper --gradle-version=4.10.2、gradlew --version コマンドを実行します。

gradle/wrapper/gradle-wrapper.properties は以下の内容になります。
distributionBase=GRADLE_USER_HOME
distributionPath=wrapper/dists
distributionUrl=https\://services.gradle.org/distributions/gradle-4.10.2-all.zip
zipStoreBase=GRADLE_USER_HOME
zipStorePath=wrapper/dists
Gradle Tool Window の左上にある「Refresh all Gradle projects」ボタンをクリックして更新した後、clean タスク実行 → Rebuild Project 実行 → build タスクを実行して、"BUILD SUCCESSFUL" のメッセージが出力されることを確認します(画面キャプチャはなし)。
build.gradle を変更する
buildscript {
    ext {
        group "ksbysample"
        version "2.0.6-RELEASE"
    }
    repositories {
        mavenCentral()
        maven { url "https://repo.spring.io/release/" }
        maven { url "https://plugins.gradle.org/m2/" }
    }
}

plugins {
    id "java"
    id "eclipse"
    id "idea"
    id "org.springframework.boot" version "2.0.6.RELEASE"
    id "io.spring.dependency-management" version "1.0.6.RELEASE"
    id "groovy"
    id "checkstyle"
    id "com.github.spotbugs" version "1.6.5"
    id "pmd"
    id "net.ltgt.errorprone" version "0.0.16"
    id "de.undercouch.download" version "3.4.3"
    id "com.gorylenko.gradle-git-properties" version "2.0.0-beta1"
}

sourceCompatibility = 1.8
targetCompatibility = 1.8

wrapper {
    gradleVersion = "4.10.2"
    distributionType = Wrapper.DistributionType.ALL
}

[compileJava, compileTestGroovy, compileTestJava]*.options*.encoding = "UTF-8"
[compileJava, compileTestGroovy, compileTestJava]*.options*.compilerArgs = [
        "-Xlint:all,-options,-processing,-path"
        , "-Xep:RemoveUnusedImports:WARN"
        , "-Xep:InsecureCryptoUsage:OFF"
        , "-Xep:ParameterName:OFF"
]

// for Doma 2
// JavaクラスとSQLファイルの出力先ディレクトリを同じにする
processResources.destinationDir = compileJava.destinationDir
// コンパイルより前にSQLファイルを出力先ディレクトリにコピーするために依存関係を逆転する
compileJava.dependsOn processResources

springBoot {
    buildInfo()
}

idea {
    module {
        inheritOutputDirs = false
        outputDir = file("$buildDir/classes/main/")
    }
}

configurations {
    // for Doma 2
    domaGenRuntime
}

checkstyle {
    configFile = file("${rootProject.projectDir}/config/checkstyle/google_checks.xml")
    toolVersion = "8.14"
    sourceSets = [project.sourceSets.main]
}

spotbugs {
    toolVersion = "3.1.8"
    ignoreFailures = true
    effort = "max"
    spotbugsTest.enabled = false
}
tasks.withType(com.github.spotbugs.SpotBugsTask) {
    reports {
        xml.enabled = false
        html.enabled = true
    }
}

pmd {
    toolVersion = "6.9.0"
    sourceSets = [project.sourceSets.main]
    ignoreFailures = true
    consoleOutput = true
    ruleSetFiles = rootProject.files("/config/pmd/pmd-project-rulesets.xml")
    ruleSets = []
}

repositories {
    mavenCentral()
}

dependencyManagement {
    imports {
        // mavenBom は以下の URL のものを使用する
        // https://repo.spring.io/release/org/springframework/boot/spring-boot-starter-parent/2.0.6.RELEASE/
        // bomProperty に指定可能な property は以下の URL の BOM に記述がある
        // https://repo.spring.io/release/org/springframework/boot/spring-boot-dependencies/2.0.4.RELEASE/spring-boot-dependencies-2.0.6.RELEASE.pom
        mavenBom(org.springframework.boot.gradle.plugin.SpringBootPlugin.BOM_COORDINATES) {
            // Spring Boot の BOM に定義されているバージョンから変更する場合には、ここに以下のように記述する
            // bomProperty "thymeleaf.version", "3.0.9.RELEASE"
        }
    }
}

dependencies {
    def jdbcDriver = "org.postgresql:postgresql:42.2.5"
    def spockVersion = "1.1-groovy-2.4"
    def domaVersion = "2.19.3"
    def lombokVersion = "1.18.4"
    def errorproneVersion = "2.3.1"
    def powermockVersion = "2.0.0-RC.4"
    def spotbugsVersion = "3.1.8"

    // dependency-management-plugin によりバージョン番号が自動で設定されるもの
    // Appendix F. Dependency versions ( https://docs.spring.io/spring-boot/docs/current/reference/html/appendix-dependency-versions.html ) 参照
    implementation("org.springframework.boot:spring-boot-starter-web")
    implementation("org.springframework.boot:spring-boot-starter-thymeleaf") {
        exclude group: "org.codehaus.groovy", module: "groovy"
    }
    implementation("org.thymeleaf.extras:thymeleaf-extras-springsecurity4")
    implementation("org.thymeleaf.extras:thymeleaf-extras-java8time")
    implementation("org.springframework.boot:spring-boot-starter-data-jpa")
    implementation("org.springframework.boot:spring-boot-starter-freemarker")
    implementation("org.springframework.boot:spring-boot-starter-mail")
    implementation("org.springframework.boot:spring-boot-starter-security")
    implementation("org.springframework.boot:spring-boot-starter-data-redis")
    implementation("org.springframework.boot:spring-boot-starter-amqp")
    implementation("org.springframework.boot:spring-boot-starter-actuator")
    runtimeOnly("org.springframework.boot:spring-boot-devtools")
    implementation("org.springframework.session:spring-session-core")
    implementation("org.springframework.session:spring-session-data-redis")
    implementation("org.springframework.retry:spring-retry")
    implementation("com.fasterxml.jackson.datatype:jackson-datatype-jsr310")
    implementation("com.fasterxml.jackson.dataformat:jackson-dataformat-xml")
    implementation("org.apache.commons:commons-lang3")
    implementation("org.codehaus.janino:janino")
    implementation("io.micrometer:micrometer-registry-prometheus")
    testImplementation("org.springframework.boot:spring-boot-starter-test")
    testImplementation("org.springframework.security:spring-security-test")
    testImplementation("org.yaml:snakeyaml")
    testImplementation("org.mockito:mockito-core")
    runtimeOnly("org.springframework.boot:spring-boot-properties-migrator")

    // dependency-management-plugin によりバージョン番号が自動で設定されないもの、あるいは最新バージョンを指定したいもの
    runtimeOnly("${jdbcDriver}")
    implementation("com.integralblue:log4jdbc-spring-boot-starter:1.0.2")
    implementation("org.simpleframework:simple-xml:2.7.1")
    implementation("com.univocity:univocity-parsers:2.7.6")
    implementation("com.google.guava:guava:27.0-jre")
    testImplementation("org.dbunit:dbunit:2.6.0")
    testImplementation("com.icegreen:greenmail:1.5.8")
    testImplementation("org.assertj:assertj-core:3.11.1")
    testImplementation("com.jayway.jsonpath:json-path:2.4.0")
    testImplementation("org.jsoup:jsoup:1.11.3")
    testImplementation("cglib:cglib-nodep:3.2.9")
    testImplementation("org.spockframework:spock-core:${spockVersion}")
    testImplementation("org.spockframework:spock-spring:${spockVersion}")

    // for lombok
    annotationProcessor("org.projectlombok:lombok:${lombokVersion}")
    compileOnly("org.projectlombok:lombok:${lombokVersion}")
    testCompileOnly("org.projectlombok:lombok:${lombokVersion}")

    // for Doma
    annotationProcessor("org.seasar.doma:doma:${domaVersion}")
    implementation("org.seasar.doma:doma:${domaVersion}")
    domaGenRuntime("org.seasar.doma:doma-gen:${domaVersion}")
    domaGenRuntime("${jdbcDriver}")

    // for Error Prone ( http://errorprone.info/ )
    errorprone("com.google.errorprone:error_prone_core:${errorproneVersion}")
    compileOnly("com.google.errorprone:error_prone_annotations:${errorproneVersion}")

    // PowerMock
    testImplementation("org.powermock:powermock-module-junit4:${powermockVersion}")
    testImplementation("org.powermock:powermock-api-mockito2:${powermockVersion}")

    // for SpotBugs
    compileOnly("com.github.spotbugs:spotbugs:${spotbugsVersion}")
    compileOnly("net.jcip:jcip-annotations:1.0")
    compileOnly("com.github.spotbugs:spotbugs-annotations:${spotbugsVersion}")
    testImplementation("com.google.code.findbugs:jsr305:3.0.2")
}

..........
- buildscript block 内で
version "2.0.4-RELEASE"→version "2.0.6-RELEASE"に変更します。 - plugins block の以下の点を変更します。
id "org.springframework.boot" version "2.0.4.RELEASE"→id "org.springframework.boot" version "2.0.6.RELEASE"id "com.github.spotbugs" version "1.6.4"→id "com.github.spotbugs" version "1.6.5"id "com.gorylenko.gradle-git-properties" version "1.5.2"→id "com.gorylenko.gradle-git-properties" version "2.0.0-beta1"
- checkstyle タスクで
toolVersion = "8.12"→toolVersion = "8.14"に変更します。 - spotbugs タスクで
toolVersion = "3.1.7"→toolVersion = "3.1.8"に変更します。 - pmd タスクで
toolVersion = "6.7.0"→toolVersion = "6.9.0"に変更します。 - dependencies block の以下の点を変更します。
def jdbcDriver = "org.postgresql:postgresql:42.2.4"→def jdbcDriver = "org.postgresql:postgresql:42.2.5"def lombokVersion = "1.18.2"→def lombokVersion = "1.18.4"def powermockVersion = "2.0.0-beta.5"→def powermockVersion = "2.0.0-RC.4"def spotbugsVersion = "3.1.7"→def spotbugsVersion = "3.1.8"implementation("com.univocity:univocity-parsers:2.7.5")→implementation("com.univocity:univocity-parsers:2.7.6")implementation("com.google.guava:guava:26.0-jre")→implementation("com.google.guava:guava:27.0-jre")testImplementation("org.dbunit:dbunit:2.5.4")→testImplementation("org.dbunit:dbunit:2.6.0")testImplementation("org.assertj:assertj-core:3.11.0")→testImplementation("org.assertj:assertj-core:3.11.1")testImplementation("cglib:cglib-nodep:3.2.7")→testImplementation("cglib:cglib-nodep:3.2.9")
Gradle Tool Window の左上にある「Refresh all Gradle projects」ボタンをクリックして更新します。
clean タスク実行 → Rebuild Project 実行 → build タスクを実行して、"BUILD SUCCESSFUL" のメッセージが出力されることを確認します。

履歴
2018/11/18
初版発行。
IntelliJ IDEA を 2018.2.5 → 2018.2.6 へバージョンアップ
IntelliJ IDEA を 2018.2.5 → 2018.2.6 へバージョンアップする
IntelliJ IDEA の 2018.2.6 がリリースされているのでバージョンアップします。
- IntelliJ IDEA 2018.2.6 is released!
https://blog.jetbrains.com/idea/2018/11/intellij-idea-2018-2-6-is-released/
※ksbysample-webapp-lending プロジェクトを開いた状態でバージョンアップしています。
IntelliJ IDEA のメインメニューから「Help」-「Check for Updates...」を選択します。
「IDE and Plugin Updates」ダイアログが表示されます。左下に「Update and Restart」ボタンが表示されていますので、「Update and Restart」ボタンをクリックします。

Plugin の update も表示されました。このまま「Update and Restart」ボタンをクリックします。

Patch がダウンロードされて IntelliJ IDEA が再起動します。
IntelliJ IDEA が起動すると画面下部に「Indexing…」のメッセージが表示されますので、終了するまで待機します。

IntelliJ IDEA のメインメニューから「Help」-「About」を選択し、2018.2.6 へバージョンアップされていることを確認します。
Gradle Tool Window のツリーを見ると「Tasks」の下に「other」しかない状態になっているので、左上にある「Refresh all Gradle projects」ボタンをクリックして更新します。

clean タスク実行 → Rebuild Project 実行 → build タスクを実行して、"BUILD SUCCESSFUL" のメッセージが出力されることを確認します。

Project Tool Window で src/test を選択した後、コンテキストメニューを表示して「Run with Coverage」-「All Tests」を選択し、テストが全て成功することを確認します。

Spring Boot 1.5.x の Web アプリを 2.0.x へバージョンアップする ( その15 )( Prometheus+Grafana メモ書き )
概要
記事一覧はこちらです。
- 今回の手順で確認できるのは以下の内容です。
- Dashboards Official & community built dashboards にある Dashboard をいくつか利用してメトリックスを表示してみます。
- また疑問に思った点を調べてメモ書きしています。
参照したサイト・書籍
JVM (Micrometer)
https://grafana.com/dashboards/4701Grafana - Variables
http://docs.grafana.org/reference/templating/Allow adding Micrometer Common Tags declaratively using the application properties
https://github.com/spring-projects/spring-boot/issues/12933Is it possible to define additional tags for default Spring Boot 2 metrics?
https://stackoverflow.com/questions/51552889/is-it-possible-to-define-additional-tags-for-default-spring-boot-2-metricsHikariCP (Micrometer.io)
https://grafana.com/dashboards/6083Spring Boot Statistics
https://grafana.com/dashboards/6756Spring Boot Actuator 2.0 & Micrometer
https://www.slideshare.net/makingx/spring-boot-actuator-20-micrometer-jjugccc-ccca1Prometheus入門から運用まで徹底解説
https://www.slideshare.net/ssuser88ff5b/prometheus-79183671次世代監視の大本命! Prometheus を実運用してみた
https://qiita.com/sugitak/items/ff8f5ad845283c5915d2Micrometer/Prometheusによる大規模システムモニタリング #jsug #sf_26
https://www.slideshare.net/techblogyahoo/micrometerprometheus-jsug-sf26
目次
- JVM (Micrometer) で JVM のメトリックスを表示させる
- HikariCP (Micrometer.io) で HikariCP のメトリックを表示させる
- Spring Boot Statistics でメトリックを表示させる
- Grafana に設定する query はどこを見ればよいのか?
- Prometheus で収集したデータや Grafana で使用する Data Source や Dashboard の内容を永続的に保存しておくには?
- 最後に
手順
JVM (Micrometer) で JVM のメトリックスを表示させる
JVM のメトリックスは何をどのように表示させればよいのか参考になるものがないか調べてみたところ、JVM (Micrometer) という Grafana の Dashboard を見つけました。これを使って表示させてみます。
まず application という label を定義します。JVM (Micrometer) ではメトリックスを取得するのに以下のように設定されていますが、

この中で application="$application" と記述されていますので application という label が必要になります。instance="$instance" の方は何も定義しなくても問題ありません。
docker/prometheus/prometheus.yml を以下のように変更します。
global:
  scrape_interval: 15s # By default, scrape targets every 15 seconds.
  evaluation_interval: 15s # Evaluate rules every 15 seconds.

# A scrape configuration containing exactly one endpoint to scrape:
# Here it's Prometheus itself.
scrape_configs:
# The job name is added as a label `job=<job_name>` to any timeseries scraped from this config.
- job_name: 'prometheus'
  scrape_interval: 15s
  static_configs:
  - targets: ['localhost:9090']

- job_name: 'spring-actuator'
  metrics_path: '/actuator/prometheus'
  scrape_interval: 15s
  basic_auth:
    username: actuator
    password: xxxxxxxx
  static_configs:
  # Docker で起動した Prometheus からローカルPCで起動している Spring Boot のアプリケーション
  # にアクセスするので、localhost ではなくローカルPCに割り当てられているIPアドレスを設定する
  - targets: ['172.23.136.33:8080']
    labels:
      application: 'lending'
labels: application: 'lending'を追加します。
Spring Boot 2.1 になると application.properties に以下のように定義できるようになるらしいです。
management.metrics.tags.application=lending
docker-compose down、docker-compose up -d コマンドを実行して Prometheus+Grafana を再起動します。
JVM (Micrometer) のページで「Copy ID to Clipboard」ボタンをクリックします。
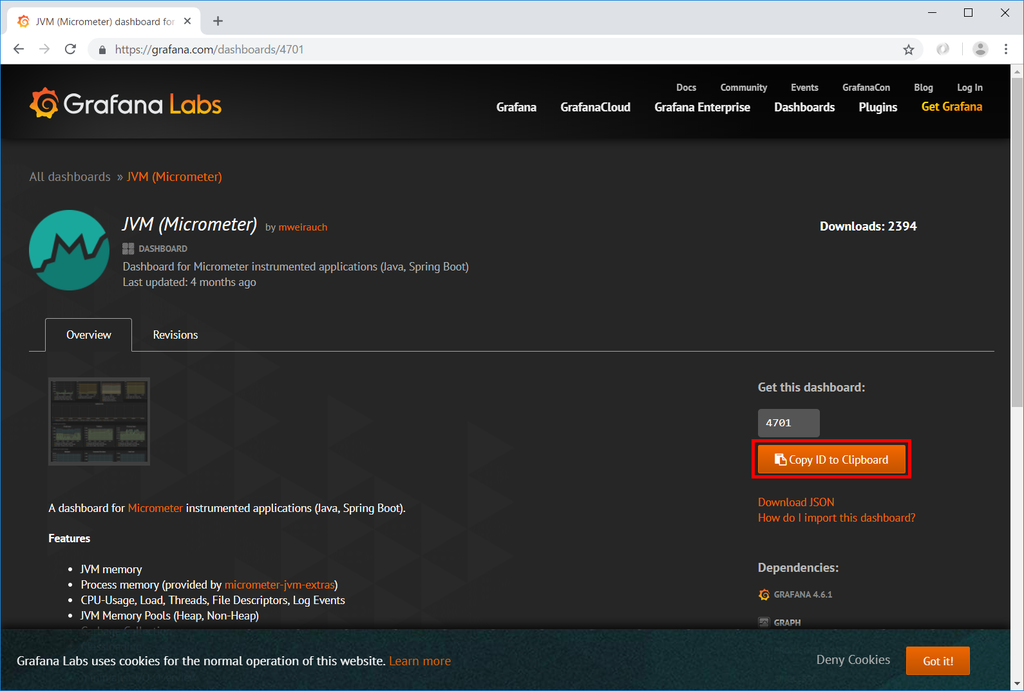
Grafana に admin でログインして Data Source の定義を再度追加した後、画面左側のメニューから「+」-「Import」をクリックします。

「Import」画面が表示されます。「Grafana.com Dashboard」に先程コピーした ID 4701 をペーストします。

JVM (Micrometer) の設定画面が表示されます。「Options」-「Prometheus」の項目で Data Source を選択した後、「Import」ボタンをクリックします。

JVM (Micrometer) の Dashboard が表示されます。今は Web アプリケーションが起動していないので何も表示されていません。

Tomcat を起動してしばらくすると以下のように表示されます(画面右上の設定から表示期間を Last 15 minutes に変更しています)。


メトリックスが表示されない場合には、画面左側のメニューから「Dashboards」-「Home」を選択した後、

「Recently viewed dashboards」から「JVM (Micrometer)」を選択します。何度か繰り返すと表示されるようになります。(この辺、実はよく分かっていなくて、もっと良い方法があるのかな。。。)

HikariCP (Micrometer.io) で HikariCP のメトリックを表示させる
HikariCP (Micrometer.io) という Grafana の Dashboard で HikariCP のメトリックスを表示させてみます。
log4jdbc が有効になっていると HikariCP のメトリックスが取得できないので、application.properties に一時的に spring.autoconfigure.exclude=com.integralblue.log4jdbc.spring.Log4jdbcAutoConfiguration を追加します。
spring.autoconfigure.exclude=com.integralblue.log4jdbc.spring.Log4jdbcAutoConfiguration
spring.datasource.hikari.jdbc-url=jdbc:postgresql://localhost/ksbylending
..........
「Import」画面の「Grafana.com Dashboard」に HikariCP (Micrometer.io) に表示されている ID 6083 を入力した後、
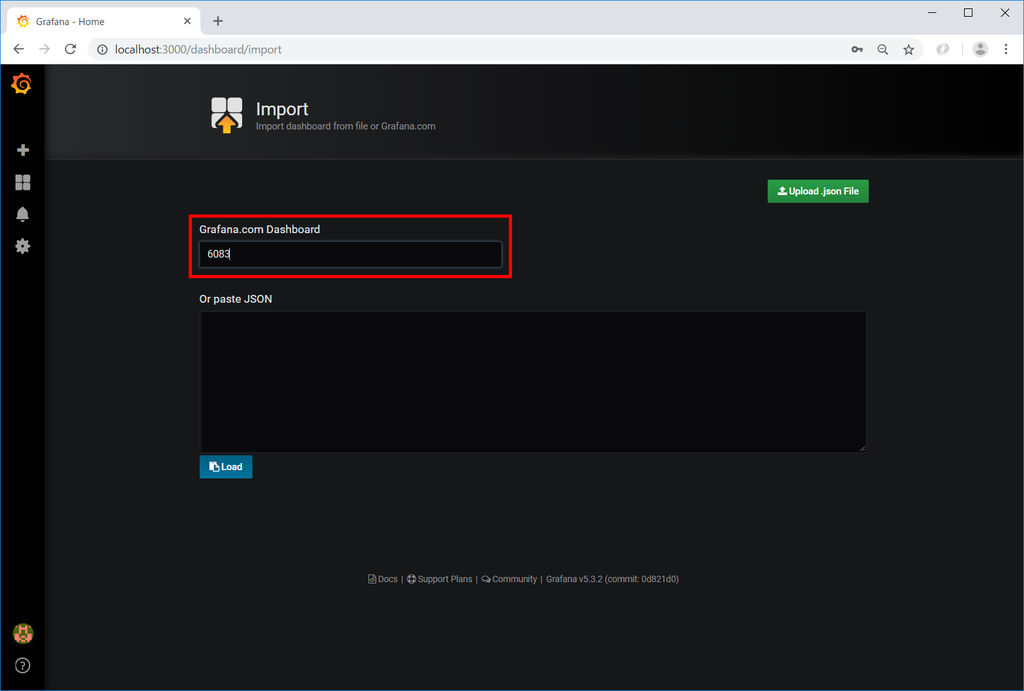
「Options」-「Prometheus」の項目で Data Source を選択した後、「Import」ボタンをクリックします。
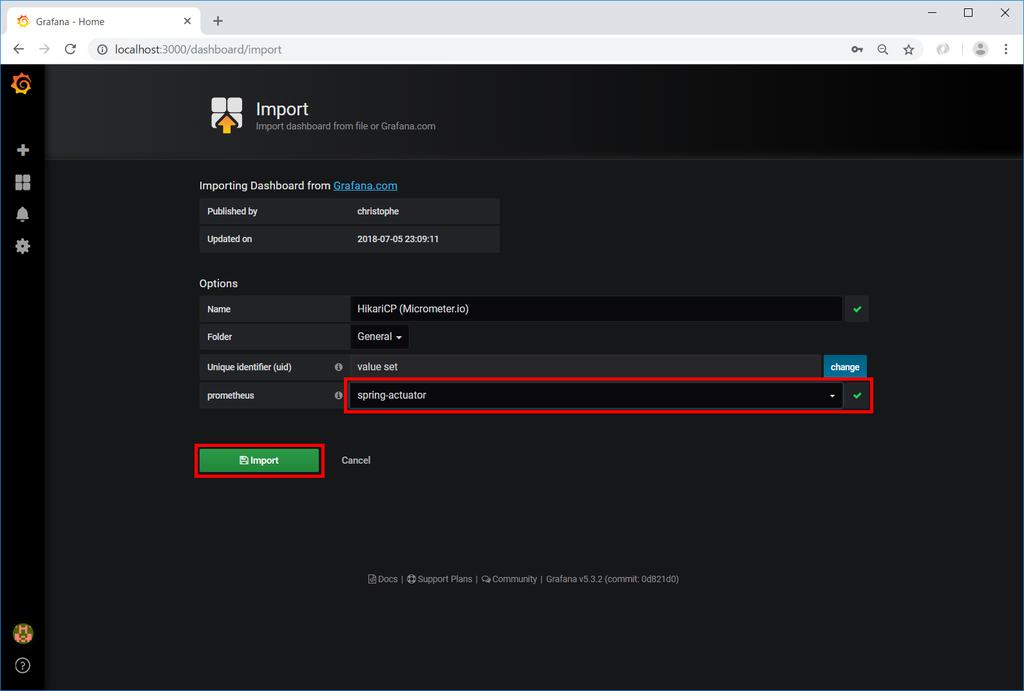
HikariCP (Micrometer.io) の Dashboard が表示されます。


Spring Boot Statistics でメトリックを表示させる
Spring Boot Statistics という Grafana の Dashboard を見つけました。この Dashboard だと JVM、HikariCP のメトリックス以外に URI 毎の Request Count や Response Time 等も表示されます。Spring Boot + Spring Actuator でメトリックスを表示させたいなら、これが一番便利そうな気がします。
「Import」画面の「Grafana.com Dashboard」に Spring Boot Statistics に表示されている ID 6756 を入力した後、

「Options」-「Prometheus」の項目で Data Source を選択した後、「Import」ボタンをクリックします。

Spring Boot Statistics の Dashboard が表示されます。


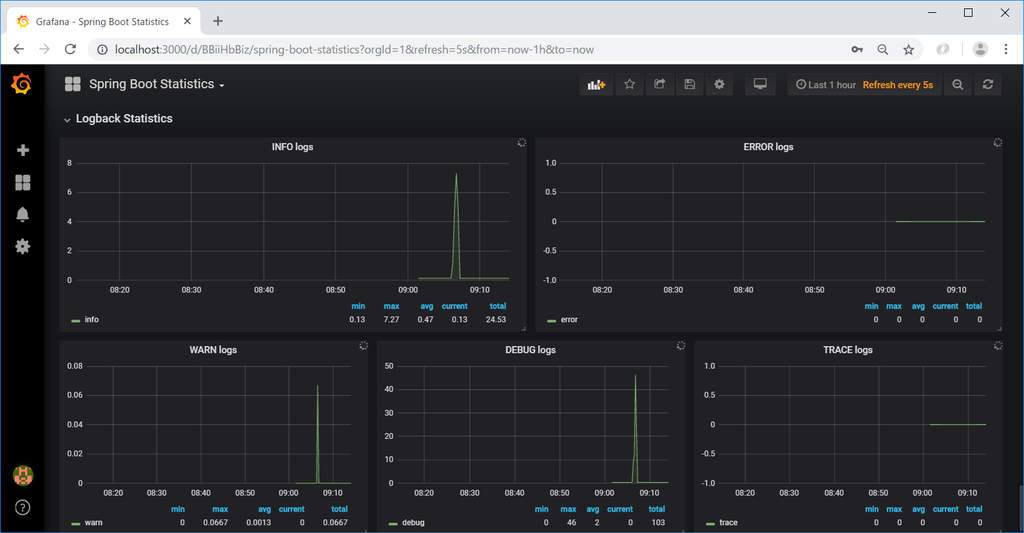
Grafana に設定する query はどこを見れたよいのか?
JVM (Micrometer) が表示に使用している query を見ると sum(rate(http_server_requests_seconds_count{application="$application", instance="$instance"}[1m])) のように記述されていますが、この辺の書き方は Prometheus の Document の以下のページに記載されています。PromQL(Prometheus Query Language)という名称らしいです。
https://prometheus.io/docs/prometheus/latest/querying/basics/ https://prometheus.io/docs/prometheus/latest/querying/operators/ https://prometheus.io/docs/prometheus/latest/querying/functions/ https://prometheus.io/docs/prometheus/latest/querying/examples/
Prometheus で収集したデータや Grafana で使用する Data Source や Dashboard の内容を永続的に保存しておくには?
Dashboard を試すのに何度も docker-compose で Promethes + Grafana の環境を down, up させていたのですが、起動し直す度に収集していたメトリックスのデータが消えるのと Grafana を再設定しないといけなくて面倒だったので、コンテナではなくホストのディレクリにデータが保存されるようにします。
Prometheus は prometheus/Dockerfile を見ると "--storage.tsdb.path=/prometheus" という記述があるので /prometheus にホストのディレクトリをマウントすればよいはずです。
Grafana は grafana/Dockerfile を見ると GF_PATHS_DATA="/var/lib/grafana" という記述があり、Grafana container with persistent storage (recommended) に -v grafana-storage:/var/lib/grafana という記述があるので /var/lib/grafana にホストのディレクトリをマウントすればよいはずです。
まずはプロジェクト内に docker/prometheus/storage、docker/grafana/storage の2つのディレクトリを作成します。
次に docker-compose.yml を以下のように変更します。
version: '3'

services:
  prometheus:
    image: prom/prometheus:latest
    container_name: prometheus
    ports:
    - "9090:9090"
    volumes:
    - ./docker/prometheus/prometheus.yml:/etc/prometheus/prometheus.yml
    - ./docker/prometheus/storage:/prometheus

  grafana:
    image: grafana/grafana:latest
    container_name: grafana
    ports:
    - "3000:3000"
    volumes:
    - ./docker/grafana/storage:/var/lib/grafana
- 以下の行を追加します。
- ./docker/prometheus/storage:/prometheus- ./docker/grafana/storage:/var/lib/grafana
これで docker-compose down、docker-compose up -d コマンドで再起動しても Prometheus が収集していたデータは消えず、Grafana も設定し直す必要がなくなりました。
最後に
- 最初は Dashboards Official & community built dashboards にある Dashboard を利用するのが分かりやすそうです。Spring Boot を使っているならば Spring Boot Statistics が良い気がします。
- PromQL は公式ドキュメント、Dashboards Official & community built dashboards のサンプルや Web の記事を見ればよさそうです。
- Prometheus + Grafana 関連は以前はドキュメントがなかったそうですが、今回調べてみた感じだと結構いろいろ出てきているように思えます。
- Docker が使えると Spring Boot + Spring Acutoator + Prometheus + Grafana の環境を構築してメトリックスを表示するのは本当に楽ですね。
他にもカスタムメトリックスを表示させたりもしてみたかったのですが、本編が全然進まないので Prometheus + Grafana をいじるのはこれで一旦止めます。でも Spring Actuator を入れて Prometheus + Grafana でメトリックスを表示するのは Spring Boot 2.0 にバージョンアップして一番面白いなと思いました。
履歴
2018/11/18
初版発行。