Spring Boot 2.3.x の Web アプリを 2.4.x へバージョンアップする ( その1 )( 概要 )
概要
記事一覧はこちらです。
- 「Spring Boot で書籍の貸出状況確認・貸出申請する Web アプリケーションを作る」で作成した Web アプリケーション ( ksbysample-webapp-lending ) の Spring Boot のバージョンを 2.3.7 → 2.4.x へバージョンアップします。
- 進め方は以下の方針とします。
- Git のブランチは 2.4.x を作成して、そちらで作業します。Spring Boot のバージョンと合わせます。
- Spring Boot のバージョンを 2.3 系の最新バージョンである 2.3.9 へ、Gradle のバージョンを 6.x 系の最新バージョンである 6.8.3 に上げて build できることを確認します。この時点ではライブラリはバージョンアップしません。
- Spring Boot のバージョンを 2.4.x にします。
- Spring Initializr で 2.4.x のプロジェクトを作成して、修正した方がよさそうな点があれば反映します。
- ライブラリは最新バージョンにアップデートします。ただし、この時点では checkstyle, spotbugs, pmd, Error Prone のバージョンは上げません。
- プロジェクトを build し直してエラーが出る点があれば修正し、まずはここまでで動くようにします。
- その後で 2.4 系ではこう書くべきという点があるか確認し、変更した方がよいところを変更します。
- checkstyle, spotbugs, pmd, Error Prone を1つずつ最新バージョンに上げます。変更した方がよいところがあれば変更します。
- docker-compose で使用している image を最新バージョンに上げます。
- 今回のバージョンアップで Redis 6+lettuce-core 6 の構成になるので、Redis 6 の新機能を試してみます。
2.4 の Release Notes はこちらです。
Spring Boot 2.4 Release Notes
https://github.com/spring-projects/spring-boot/wiki/Spring-Boot-2.4-Release-Notes
また Spring Framework も 5.3 にバージョンアップされているとのこと。
What's New in Version 5.3
https://github.com/spring-projects/spring-framework/wiki/What%27s-New-in-Spring-Framework-5.x#whats-new-in-version-53
履歴
2021/02/28
初版発行。
Spring Boot 2.3.x の Web アプリを 2.4.x へバージョンアップする ( 大目次 )
- その1 ( 概要 )
- その2 ( Spring Boot を 2.3.7 → 2.3.9 へ、Gradle を 6.5.1 → 6.8.3 へバージョンアップする )
- その3 ( Spring Boot を 2.3.9 → 2.4.3 へバージョンアップする )
- その4 ( Release Notes を見て必要な箇所を変更する。。。ことがなさそうなので Checkstyle を 8.35 → 8.41 へバージョンアップする )
- その5 ( PMD を 6.26.0 → 6.32.0 へバージョンアップする )
- その6 ( Error Prone を 2.4.0 → 2.5.1 へバージョンアップする )
- その7 ( SpotBugs を 4.1.1 → 4.2.1 へバージョンアップする )
- その8 ( Docker コンテナの image をバージョンアップする )
- その9 ( RedisClusterConfig の RedisConnectionFactory Bean を削除し、application.properties で設定する方法に切り替える )
- その10 ( Docker で複数の Tomcat を起動して動作確認する )
- 感想
- その11 ( exclude junit-vintage-engine の記述を削除する+domaGen タスクで SQL ファイルが作成されない問題を解消する )
Antora で PlantUML 等の diagram を埋め込む
Translate to English
https://translate.google.com/translate?sl=auto&tl=en&u=https%3A%2F%2Fksby.hatenablog.com%2Fentry%2F2021%2F02%2F13%2F194234
概要
記事一覧はこちらです。
Antora でも Kroki を利用して PlantUML 等の diagram を埋め込んでみます。
参照したサイト・書籍
Mogztter / asciidoctor-kroki
https://github.com/Mogztter/asciidoctor-krokiAsciiDoc Keys
https://docs.antora.org/antora/2.3/playbook/configure-asciidoc/#extensions
目次
- ksbysample-antora-playbook プロジェクトに Kroki のコンテナを起動するための docker-compose.yml をコピーしてコンテナを起動する
- ksbysample-antora プロジェクトに diagram のファイルと adoc ファイルをコピーする
- ksbysample-antora-playbook プロジェクトに asciidoctor-kroki をインストールする
npx antora --fetch antora-playbook.ymlを実行してドキュメントサイトを生成する
手順
ksbysample-antora-playbook プロジェクトに Kroki のコンテナを起動するための docker-compose.yml をコピーしてコンテナを起動する
ksbysample-asciidoctor プロジェクトに docker-compose.yml を作成し、Kroki のコンテナを起動するための設定を記述する で作成した docker-compose.yml を ksbysample-antora-playbook プロジェクトのルートディレクトリ直下にコピーします。
docker-compose up -d コマンドを実行し、Kroki のコンテナを起動します。

ksbysample-antora プロジェクトに diagram のファイルと adoc ファイルをコピーする
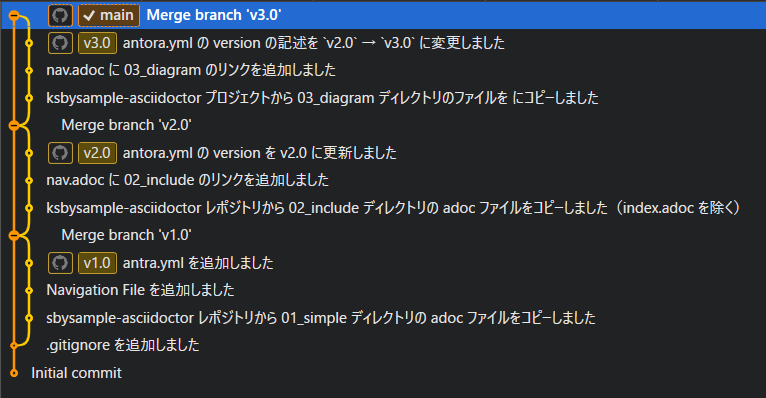
v3.0 ブランチを作成し、ksbysample-asciidoctor プロジェクトから 03_diagram ディレクトリのファイルを にコピーする
main ブランチから v3.0 ブランチを作成します。
ksbysample-asciidoctor プロジェクトから 03_diagram ディレクトリのファイルをコピーします。adoc ファイルは pages ディレクトリの下にコピーし、diagram のファイルは images ディレクトリの下にコピーします(Hierarchy and reserved names に attachments や partials のディレクトリが記述されていますが diagram は svg になるので images ディレクトリにしました)。
- modules/ROOT/pages の下に 03_diagram ディレクトリを作成します。
- ksbysample-asciidoctor プロジェクトの src/docs/asciidoc/03_diagram/index.adoc を modules/ROOT/pages の下にコピーします。
- modules/ROOT/images の下に 03_diagram ディレクトリを作成します。
- modules/ROOT/images/03_diagram の下に ksbysample-asciidoctor プロジェクトの src/docs/asciidoc/03_diagram の下の diagram のファイルをコピーします。
- src/docs/asciidoc/03_diagram/example-bpmn.xml
- src/docs/asciidoc/03_diagram/example-bytefield.clj
- src/docs/asciidoc/03_diagram/example-c4model.puml
- src/docs/asciidoc/03_diagram/example-class.puml
- src/docs/asciidoc/03_diagram/example-ditaa.txt
- src/docs/asciidoc/03_diagram/example-sequence.puml
- modules/ROOT/images の下に 02_include ディレクトリを作成し、modules/ROOT/images の下の以下のファイルを移動します。
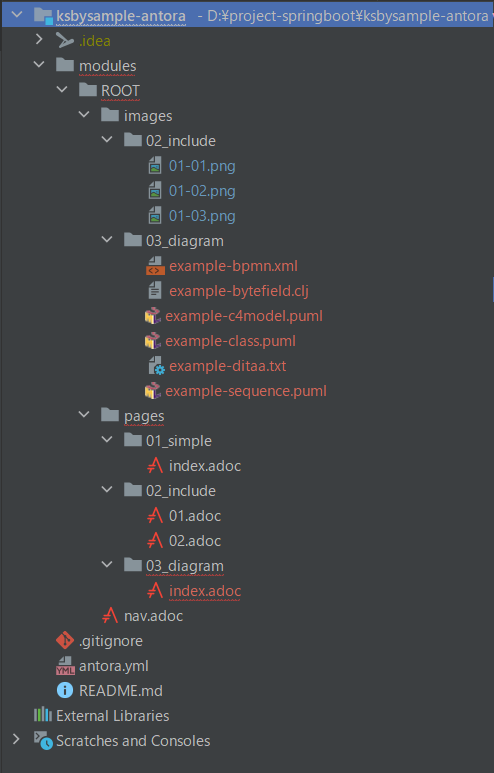
コピー後のディレクトリ構成は以下のようになります。
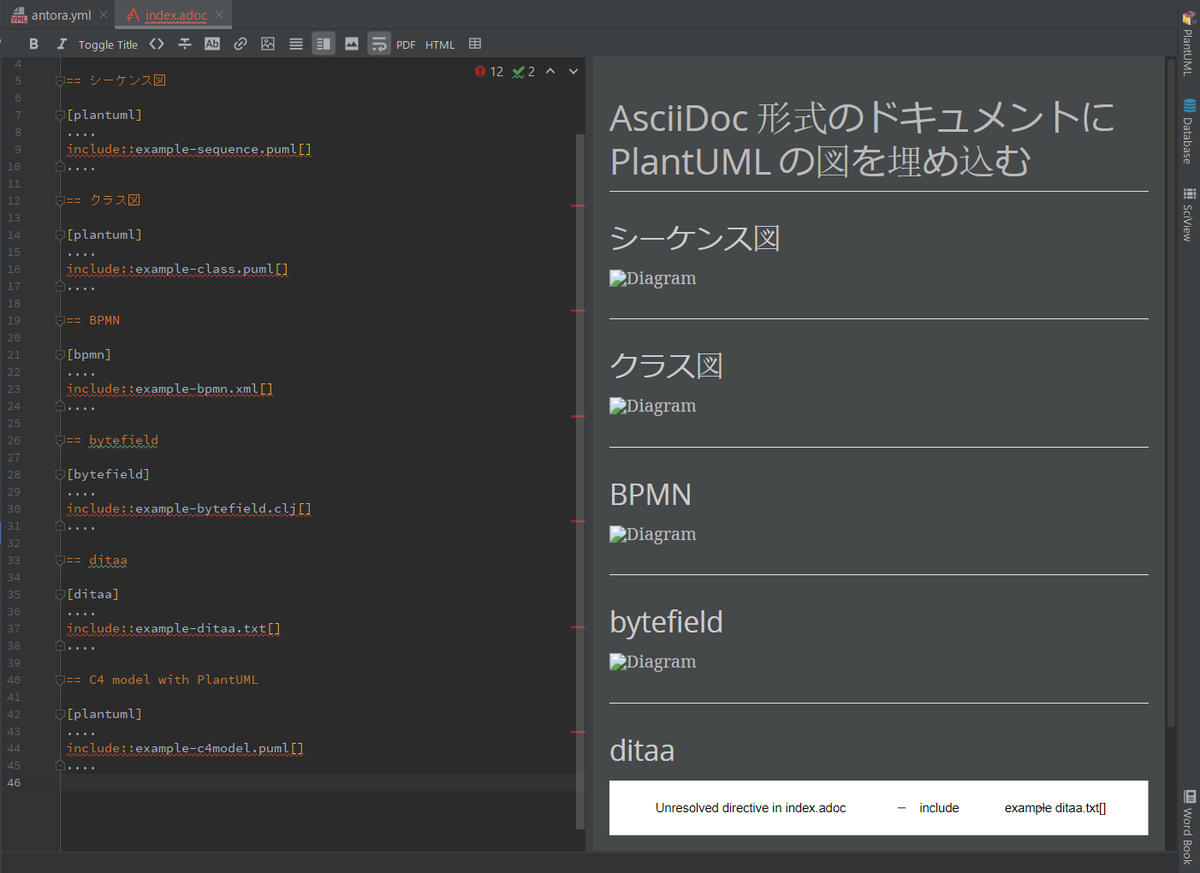
この時点では modules/ROOT/pages/03_diagram/index.adoc に赤波下線が出ており、AsciiDoc Plugin の preview にまだ diagram は表示されません。
modules/ROOT/pages/03_diagram/index.adoc を変更する
AsciiDoc Plugin の preview に diagram が表示されるよう modules/ROOT/pages/03_diagram/index.adoc を変更します。
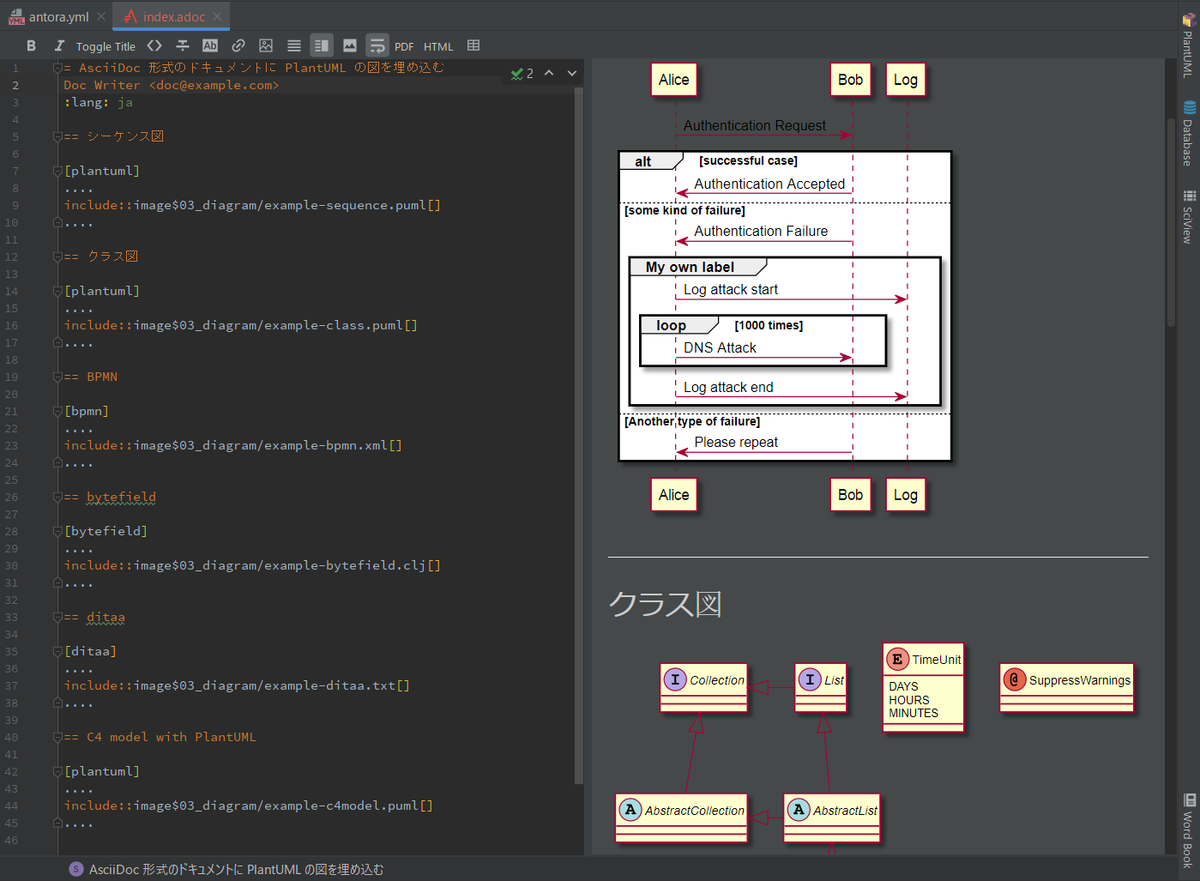
Antora の Document の Include a Page を参考に、今回 diagram のファイルは images ディレクトリの下に配置したので include::example-sequence.puml[] → include::image$03_diagram/example-sequence.puml[] のように image$03_diagram/ を追加します(ディレクトリ名の末尾の s を取り除いて $ を追加した文字列を付けると、そのディレクトリの下のファイルを参照できます)。
= AsciiDoc 形式のドキュメントに PlantUML の図を埋め込む
Doc Writer <doc@example.com>
:lang: ja

== シーケンス図

[plantuml]
....
include::image$03_diagram/example-sequence.puml[]
....

== クラス図

[plantuml]
....
include::image$03_diagram/example-class.puml[]
....

== BPMN

[bpmn]
....
include::image$03_diagram/example-bpmn.xml[]
....

== bytefield

[bytefield]
....
include::image$03_diagram/example-bytefield.clj[]
....

== ditaa

[ditaa]
....
include::image$03_diagram/example-ditaa.txt[]
....

== C4 model with PlantUML

[plantuml]
....
include::image$03_diagram/example-c4model.puml[]
....
そうすると adoc ファイル内の赤波下線が消えて AsciiDoc Plugin の preview に diagram が表示されるようになります。
modules/ROOT/pages/02_include/01.adoc を変更する
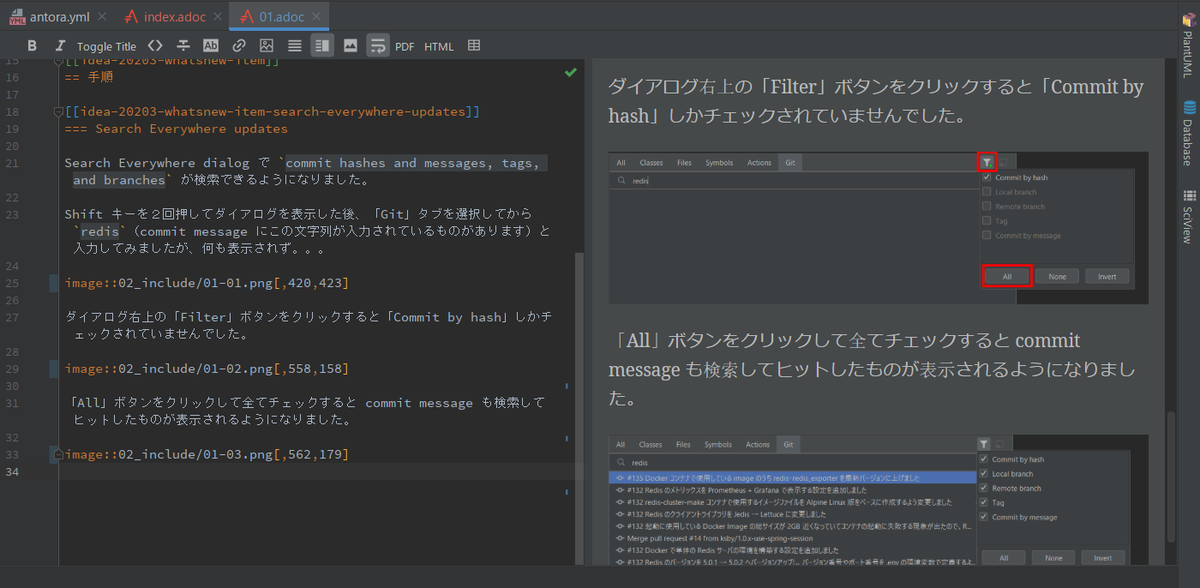
01-01.png ~ 01-03.png の画像ファイルを modules/ROOT/images/02_include の下へ移動したので modules/ROOT/pages/02_include/01.adoc の image::... のパスを image::01-01.png → 02_include/image::01-01.png のように変更します。
..........

Shift キーを2回押してダイアログを表示した後、「Git」タブを選択してから `redis`(commit message にこの文字列が入力されているものがあります)と入力してみましたが、何も表示されず。。。

image::02_include/01-01.png[,420,423]

ダイアログ右上の「Filter」ボタンをクリックすると「Commit by hash」しかチェックされていませんでした。

image::02_include/01-02.png[,558,158]

「All」ボタンをクリックして全てチェックすると commit message も検索してヒットしたものが表示されるようになりました。

image::02_include/01-03.png[,562,179]
こちらも AsciiDoc Plugin の preview に画像が表示されました。
modules/ROOT/nav.adoc を変更する
modules/ROOT/nav.adoc に modules/ROOT/pages/03_diagram/index.adoc へのリンク(.AsciiDoc 形式のドキュメントに PlantUML の図を埋め込む 以降の記述)を追加します。
* xref:ROOT:01_simple/index.adoc[Hello, AsciiDoc!]

.include directive で章毎にファイルを分けてみる
* xref:ROOT:02_include/01.adoc[IntelliJ IDEA 2020.3 新機能メモ書き]
* xref:ROOT:02_include/02.adoc[Asciidoctor+Gradle の環境で AsciiDoc 形式のドキュメントから HTML ファイルを生成してみる]

.AsciiDoc 形式のドキュメントに PlantUML の図を埋め込む
* xref:ROOT:03_diagram/index.adoc[サンプル]
antora.yml を変更する
antora.yml の version の記述を v2.0 → v3.0 に変更します。
name: ksbysample-antora
title: ksbysample-antora
version: v3.0
start_page: ROOT:01_simple/index.adoc
nav:
  - modules/ROOT/nav.adoc
v3.0 ブランチを main ブランチへマージする
v3.0 ブランチを main ブランチへマージします。
ksbysample-antora-playbook プロジェクトに asciidoctor-kroki をインストールする
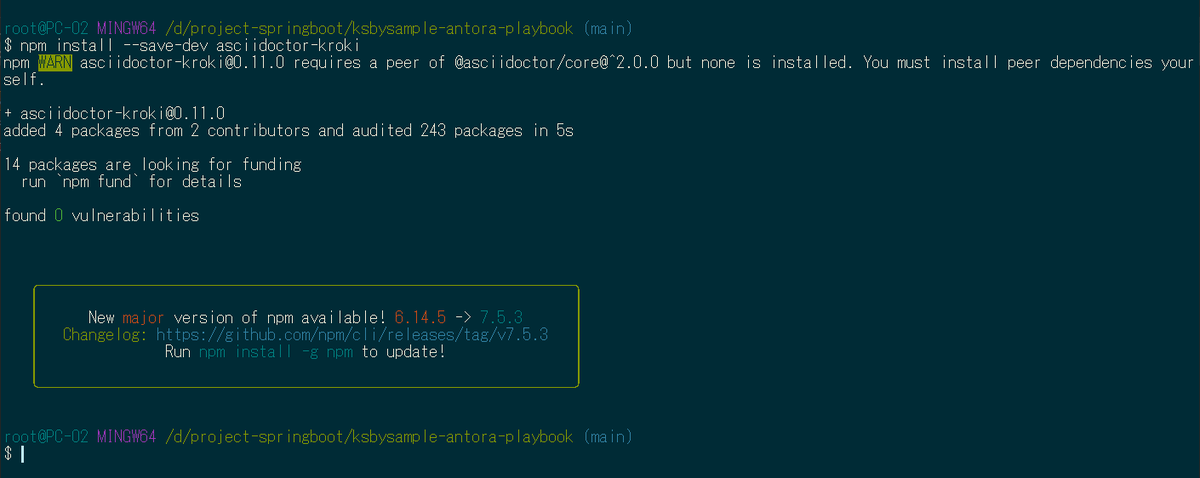
npm install --save-dev asciidoctor-kroki を実行する
Antora から Kroki のコンテナにアクセスするには asciidoctor-kroki を使用します。
ksbysample-antora-playbook プロジェクトで npm install --save-dev asciidoctor-kroki コマンドを実行してインストールします。
antora-playbook.yml を変更する
antora-playbook.yml で branches: [v2.0, v1.0] → branches: [v2.0, v1.0] に変更し、asciidoctor-kroki を利用するために asciidoc: の行以降の記述を追加します。
site:
  title: ksbysample-document-site
  start_page: ksbysample-antora::01_simple/index.adoc
content:
  sources:
    - url: https://github.com/ksby/ksbysample-antora.git
      branches: [v3.0, v2.0, v1.0]
ui:
  bundle:
    url: https://gitlab.com/antora/antora-ui-default/-/jobs/artifacts/master/raw/build/ui-bundle.zip?job=bundle-stable
    snapshot: true

asciidoc:
  attributes:
    kroki-server-url: http://localhost:8000
    kroki-fetch-diagram: true
  extensions:
    - asciidoctor-kroki
npx antora --fetch antora-playbook.yml を実行してドキュメントサイトを生成する
npx antora --fetch antora-playbook.yml を実行すると、Skipping preprocessing of PlantUML include, because reading the referenced ... というメッセージが出力されました。

modules/ROOT/images/03_diagram/example-c4model.puml を開いてみると、先頭に以下の記述があり、
@startuml "messagebus"
!include https://raw.githubusercontent.com/plantuml-stdlib/C4-PlantUML/master/C4_Container.puml
' uncomment the following line and comment the first to use locally
' !include C4_Container.puml
https://raw.githubusercontent.com/plantuml-stdlib/C4-PlantUML/master/C4_Container.puml を見てみると、以下の記述がありました。
' convert it with additional command line argument -DRELATIVE_INCLUDE="." to use locally
!if %variable_exists("RELATIVE_INCLUDE")
  !include %get_variable_value("RELATIVE_INCLUDE")/C4_Context.puml
!else
  !include https://raw.githubusercontent.com/plantuml-stdlib/C4-PlantUML/master/C4_Context.puml
!endif
調べてみると、最初は RELATIVE_INCLUDE という環境変数が設定されているから !include %get_variable_value("RELATIVE_INCLUDE")/C4_Context.puml が実行されていると思ったのですが、PlantUML の !include は Preprocessing なので最初に全て実行されている(!if ... !endif で実行されないように判断されるのは Preprocessing の後)だけのようです。
コマンド実行後の build ディレクトリの下のディレクトリ構成は以下のようになっており(Kroki で生成された svg ファイルは _images/03_diagram の下ではなく _images の下に生成されていました)、
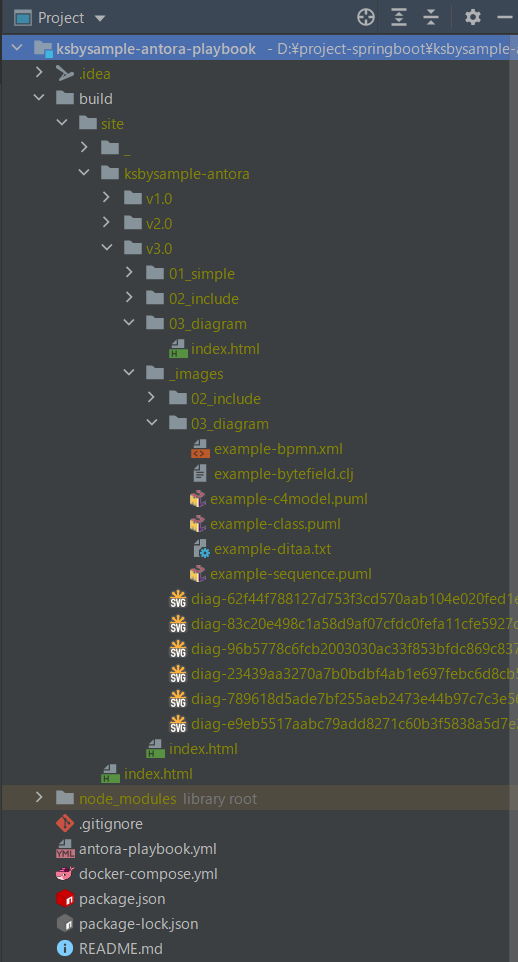
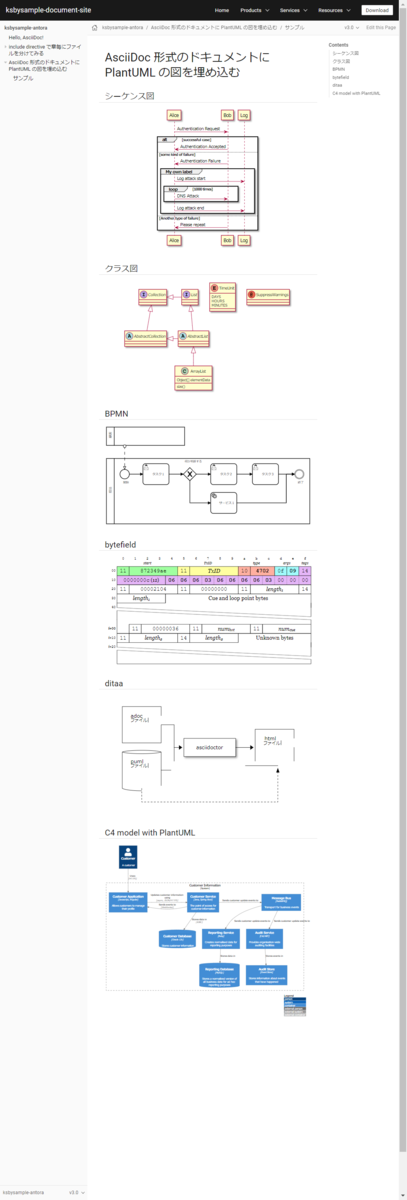
build/site/index.html を開くと diagram は全て表示されました。
メッセージはエラー出力に出力されているので npx antora --fetch antora-playbook.yml 2>/dev/null で実行すれば出力されません。

履歴
2021/02/13
初版発行。
AdoptOpenJDK を 11.0.9.1+1 → 11.0.10+9 へ、IntelliJ IDEA を 2020.3.1 → 2020.3.2 へ、Git for Windows を 2.30.0 → 2.30.0.2 へバージョンアップ
AdoptOpenJDK を 11.0.9.1+1 → 11.0.10+9 へバージョンアップする
※ksbysample-webapp-lending プロジェクトを開いた状態でバージョンアップしています。
https://adoptopenjdk.net/ を見ると 11.0.10+9 がダウンロードできるようになっていましたので、11.0.10+9 へバージョンアップします。

インストール時に削除されるかもしれないので D:\Java\jdk-11.0.9.101-hotspot → D:\Java\jdk-11.0.9.101-hotspotx にリネームします。
OpenJDK11U-jdk_x64_windows_hotspot_11.0.10_9.msi をダウンロードして D:\Java\jdk-11.0.10.9-hotspot へインストールした後、環境変数 JAVA_HOME のパスを D:\Java\jdk-11.0.10.9-hotspot へ変更します。
コマンドプロンプトから
java -versionを実行し、11.0.10に変更されていることを確認します。
D:\Java\jdk-11.0.9.101-hotspotx → D:\Java\jdk-11.0.9.101-hotspot に戻します。
IntelliJ IDEA を再起動します。
新規プロジェクトを作成する時に使用する JDK を 11.0.10+9 へ変更しようと思いましたが、IntelliJ IDEA の 2020.3 の新しい「Welcome to IntelliJ IDEA」ダイアログには 「Configure」-「Structure for New Projects」のメニューがありませんでした。

新規プロジェクトを作成する時にはダイアログ右上の「New Project」ボタンをクリックして表示される「New Project」の画面の「Project SDK」で選択すればよいようです。

「Welcome to IntelliJ IDEA」ダイアログで ksbysample-webapp-lending プロジェクトを開いて、プロジェクトが使用する JDK を 11.0.10+9 に変更します。
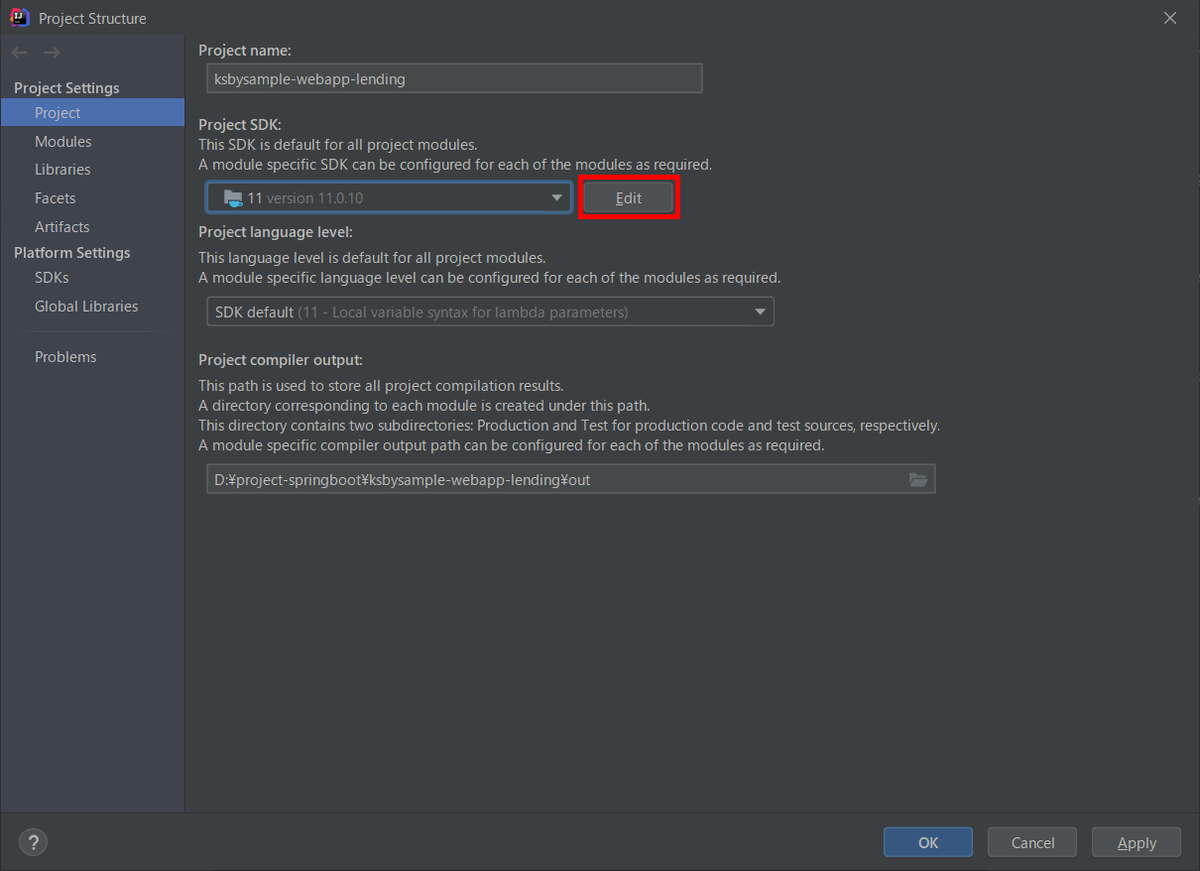
IntelliJ IDEA のメイン画面が開いたら、メニューから「File」-「Project Structure...」を選択します。
「Project Structure」ダイアログが表示されます。「Project SDK」で D:\Java\jdk-11.0.10.9-hotspot を選択します。

「Project SDK」の「Edit」ボタンをクリックします。
「Project Structure」ダイアログが表示されます。画面左側で「Platform Settings」-「SDKs」を選択して、中央のリストから「11.0.9.101」を選択した後、リストの上の「-」ボタンをクリックして削除します。

中央のリストから「11」を選択した後、"11" → "11.0.10.9" へ変更します。

「OK」ボタンをクリックして「Project Structure for New Projects」ダイアログを閉じます。
メイン画面に戻ると画面右下に「Indexing...」の表示が出るので、終了するまで待ちます。
Gradle Tool Window の左上にある「Refresh all Gradle projects」ボタンをクリックして更新します。
clean タスク実行 → Rebuild Project 実行 → build タスクを実行して、"BUILD SUCCESSFUL" のメッセージが出力されることを確認します。

Project Tool Window で src/test でコンテキストメニューを表示して「Run 'All Tests' with Coverage」を選択し、テストが全て成功することを確認します。

特に問題は発生しませんでした。11.0.10+9 で開発を進めます。
IntelliJ IDEA を 2020.3.1 → 2020.3.2 へバージョンアップする
IntelliJ IDEA の 2020.3.2 がリリースされているのでバージョンアップします。
- IntelliJ IDEA 2020.3.2 Is Available
https://blog.jetbrains.com/idea/2021/01/intellij-idea-2020-3-2/
※ksbysample-webapp-lending プロジェクトを開いた状態でバージョンアップしています。
IntelliJ IDEA のメインメニューから「Help」-「Check for Updates...」を選択します。
「IDE and Plugin Updates」ダイアログが表示されます。右下に「Update and Restart」ボタンが表示されていますので、「Update and Restart」ボタンをクリックします。
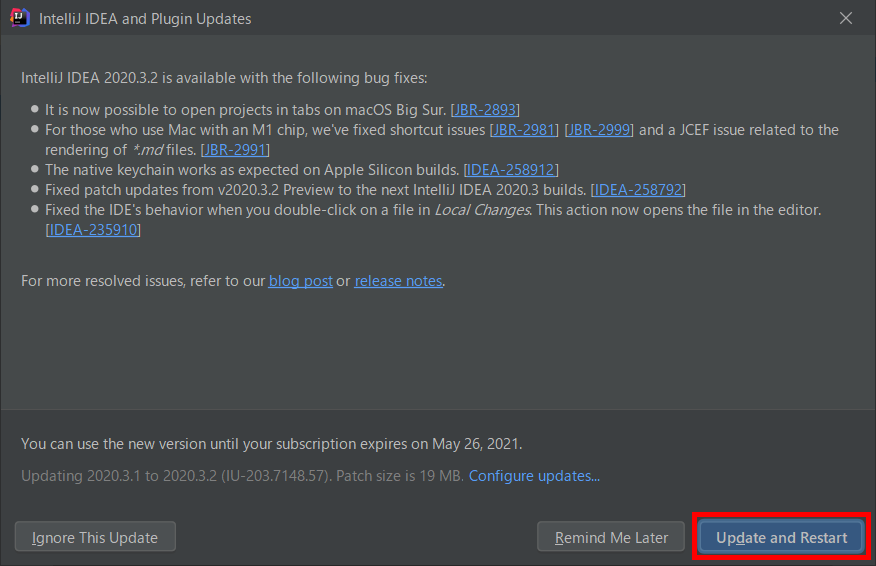
Plugin の update も表示されました。このまま「Update and Restart」ボタンをクリックします。

Patch がダウンロードされて IntelliJ IDEA が再起動します。
IntelliJ IDEA が起動すると画面下部に「Indexing」のメッセージが表示されますので、終了するまで待機します。

IntelliJ IDEA のメインメニューから「Help」-「About」を選択し、2020.3.2 へバージョンアップされていることを確認します。
clean タスク実行 → Rebuild Project 実行 → build タスクを実行して、"BUILD SUCCESSFUL" のメッセージが出力されることを確認します。

Project Tool Window で src/test でコンテキストメニューを表示して「Run 'All Tests' with Coverage」を選択し、テストが全て成功することを確認します。

Git for Windows を 2.30.0 → 2.30.0.2 へバージョンアップする
Git for Windows の 2.30.0.2 がリリースされていたのでバージョンアップします。
https://gitforwindows.org/ の「Download」ボタンをクリックして Git-2.30.0.2-64-bit.exe をダウンロードします。
Git-2.30.0.2-64-bit.exe を実行します。
「Git 2.30.0.2 Setup」ダイアログが表示されます。インストーラーの画面を一通り見たいので「Only show new options」のチェックを外してから [Next >] ボタンをクリックします。
「Select Components」画面が表示されます。「Git LFS(Large File Support)」だけチェックした状態で [Next >]ボタンをクリックします。
「Choosing the default editor used by Git」画面が表示されます。「Use Vim (the ubiquitous text editor) as Git's default editor」が選択された状態で [Next >]ボタンをクリックします。
「Adjusting the name of the initial branch in new repositories」画面が表示されます。「Let Git decide」が選択されていることを確認後、[Next >]ボタンをクリックします。
「Adjusting your PATH environment」画面が表示されます。中央の「Git from the command line and also from 3rd-party software」が選択されていることを確認後、[Next >]ボタンをクリックします。
「Choosing HTTPS transport backend」画面が表示されます。「Use the OpenSSL library」が選択されていることを確認後、[Next >]ボタンをクリックします。
「Configuring the line ending conversions」画面が表示されます。一番上の「Checkout Windows-style, commit Unix-style line endings」が選択されていることを確認した後、[Next >]ボタンをクリックします。
「Configuring the terminal emulator to use with Git Bash」画面が表示されます。「Use Windows'default console window」が選択されていることを確認した後、[Next >]ボタンをクリックします。
「Choose the default behavior of
git pull」画面が表示されます。「Default (fast-forward or merge)」が選択されていることを確認した後、[Next >]ボタンをクリックします。「Choose a credential helper」画面が表示されます。「None」が選択されていることを確認した後、[Next >]ボタンをクリックします。
「Configuring extra options」画面が表示されます。「Enable file system caching」だけがチェックされていることを確認した後、[Next >]ボタンをクリックします。
「Configuring experimental options」画面が表示されます。何もチェックせずに [Install]ボタンをクリックします。
インストールが完了すると「Completing the Git Setup Wizard」のメッセージが表示された画面が表示されます。中央の「View Release Notes」のチェックを外した後、[Next >]ボタンをクリックしてインストーラーを終了します。
コマンドプロンプトを起動して
git --versionを実行し、git のバージョンがgit version 2.30.0.windows.2になっていることを確認します。
特に問題はないようですので、2.30.0.2 で作業を進めたいと思います。
PlantUML 以外の diagram を AsciiDoc のドキュメントに埋め込んで見る(ditaa、C4 model 編)
Translate to English
https://translate.google.com/translate?sl=auto&tl=en&u=https%3A%2F%2Fksby.hatenablog.com%2Fentry%2F2021%2F02%2F03%2F222042
概要
記事一覧はこちらです。
前回からの続きです。今回は ditaa、C4 model の2つです。
参照したサイト・書籍
stathissideris / ditaa
https://github.com/stathissideris/ditaaASCII Art Studio (Freeware)
http://www.torchsoft.com/en/aas_information.htmlAsciidoctor PDFとditaaと日本語の組み合わせに苦戦した話
https://backport.net/blog/2019/09/21/asciidoctor_pdf_ditaa_japanese/plantuml-stdlib / C4-PlantUML
https://github.com/plantuml-stdlib/C4-PlantUMLThe C4 model for visualising software architecture
https://c4model.com/
目次
手順
ditaa の diagram を埋め込む
ASCII Art Studio をインストールする
ditaa は ascii art が画像ファイルになるユーティリティなので ascii art を書くのに便利なソフトがないか探したところ、ASCII Art Studio (Freeware) を見つけました。
http://www.torchsoft.com/en/download.html から ASCII Art Studio の English 版のインストーラをダウンロードしてインストールします。
インストールした ASCII Art Studio を起動すると以下のような画面が表示されました。

インストール直後はグリッドのサイズが小さかったので、メインメニューから「File」-「Settings...」を選択して「Settings」ダイアログを表示した後、「Font and Colors」タブで「Font size」を少し大きくしています。

ASCII Art Studio で ditaa の diagram を作成し TXT ファイルを出力する
http://ditaa.sourceforge.net/ に書かれている diagram をコピーしてもいいのですが、ASCII Art Studio を見つけたので自分で作成してみることにします。
適当に ascii art を書いてから、

src/docs/asciidoc/03_diagram の下に example-ditaa.txt を新規作成して、そこにコピペします。
コピペするとなぜか IntelliJ IDEA がチェックして赤波下線を表示していました。txt ファイルがチェックされる?

ファイルを選択してコンテキストメニューを表示させてから「Analyze」-「Inspect Code...」を選択してみると
<option>, <uri reference>, RequirementsTokenType.EOL, RequirementsTokenType.IDENTIFIER or RequirementsTokenType.WHITE_SPACE expected, got '+' と表示されました。

Web で検索すると stackoverflow で PyCharm treats all txt files like requirements file を見つけました。どうも Requirements プラグインをインストールしていると requirements.txt と同じチェックが行われるらしいです。どうしようもなさそうなので何もしないことにします。
AsciiDoc のドキュメントに TXT ファイルを include する
src/docs/asciidoc/03_diagram/index.adoc に example-ditaa.txt を include します。
..........

== bytefield

[bytefield]
....
include::example-bytefield.clj[]
....

== ditaa

[ditaa]
....
include::example-ditaa.txt[]
....
AsciiDoc Plugin の preview にも Kroki のコンテナで生成された diagram が表示されますが、きれいな図になっていません。。。

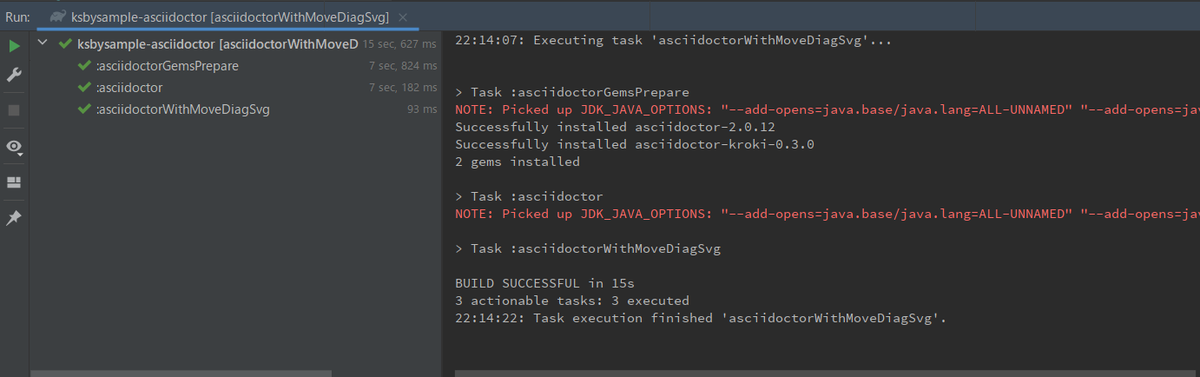
asciidoctorWithMoveDiagSvg タスクを実行して動作確認する
asciidoctorWithMoveDiagSvg タスクを実行すると BUILD SUCCESSFUL が表示されて、

build/docs/asciidoc/03_diagram/index.html をブラウザで表示すると ditaa の diagram が表示されましたが、やっぱりきれいな図になっていませんね。。。

検索すると Asciidoctor PDFとditaaと日本語の組み合わせに苦戦した話 という記事を見つけました。どうも ditaa は日本語が含まれるとうまく出力してくれないようです。
C4 model の diagram を埋め込む
https://github.com/plantuml-stdlib/C4-PlantUML#message-bus-and-microservices の C4 model with PlantUML のコードをファイルに保存する
https://github.com/plantuml-stdlib/C4-PlantUML の Advanced Samples にきれいなサンプルがいくつもあるので、その中から Message Bus and Microservices のサンプルをコピペします。
src/docs/asciidoc/03_diagram の下に example-c4model.puml というファイルを作成してコピペします。PlantUML Plugin では diagram が表示されました。

AsciiDoc のドキュメントにファイルを include する
src/docs/asciidoc/03_diagram/index.adoc に example-c4model.puml を include します。
..........

== ditaa

[ditaa]
....
include::example-ditaa.txt[]
....

== C4 model with PlantUML

[plantuml]
....
include::example-c4model.puml[]
....
AsciiDoc Plugin の preview にも Kroki のコンテナで生成された diagram が表示されます。

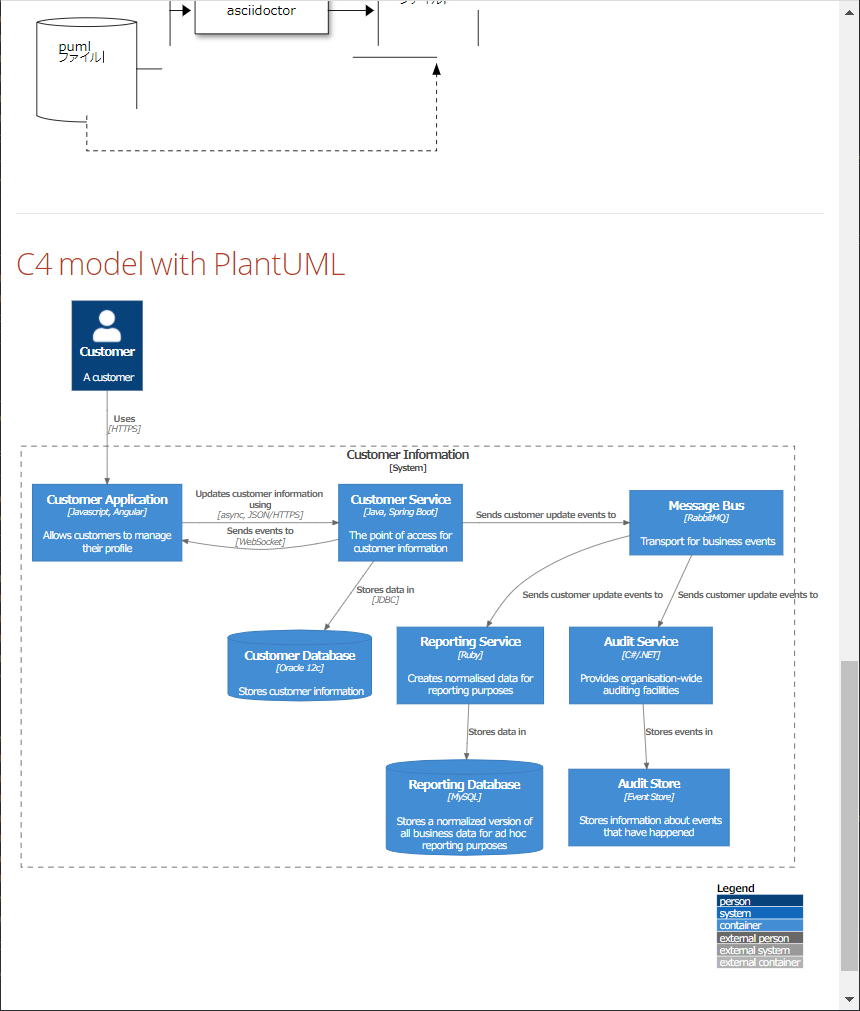
asciidoctorWithMoveDiagSvg タスクを実行して動作確認する
asciidoctorWithMoveDiagSvg タスクを実行すると BUILD SUCCESSFUL が表示されて、
build/docs/asciidoc/03_diagram/index.html をブラウザで表示すると C4 model with PlantUML の diagram が表示されました。
履歴
2021/02/03
初版発行。
PlantUML 以外の diagram を AsciiDoc のドキュメントに埋め込んで見る(bpmn、bytefield 編)
Translate to English
https://translate.google.com/translate?sl=auto&tl=en&u=https%3A%2F%2Fksby.hatenablog.com%2Fentry%2F2021%2F01%2F31%2F191055
概要
記事一覧はこちらです。
AsciiDoc のドキュメントには PlantUML 以外の diagram も埋め込めるので、いくつか興味を持ったものを試してみます。diagram の生成には Kroki のコンテナを使用します。
全部で bpmn、bytefield、ditaa、C4 model の4つ試します。今回は bpmn、bytefield の2つです。
参照したサイト・書籍
gtudan / bpmn-js-cmd
https://github.com/gtudan/bpmn-js-cmdbpmn-js
https://bpmn.io/toolkit/bpmn-js/ABOUT THE BUSINESS PROCESS MODEL AND NOTATION SPECIFICATION VERSION 2.0.2
https://www.omg.org/spec/BPMNDeep-Symmetry / bytefield-svg
https://github.com/Deep-Symmetry/bytefield-svgByte Field SVG Builder
https://bytefield-svg.deepsymmetry.org/bytefield-svg/intro.htmlThe Clojure Programming Language
https://clojure.org/
目次
手順
bpmn の diagram を埋め込む
https://demo.bpmn.io/ で BPMN のワークフローを描き XML ファイルを出力する
https://bpmn.io/toolkit/bpmn-js/ の「Try Online」のボタンをクリックすると

BPMN diagram のエディタのページが開くので create リンクをクリックします。

以下のページが表示されるので、

BPMN の diagram を作成して画面左下の「Download as BPMN 2.0 file」ボタンをクリックします。このエディタ、かなり使い勝手がいいです。BPMN でなくてもフローチャートのようなものを描きたい時にも使えそうです。

diagram.bpmn というファイルがダウンロードされるので、

ファイル名を example-bpmn.xml に変更してから src/docs/asciidoc/03_diagram の下にコピーします。ファイルには以下の内容が出力されていました。
<?xml version="1.0" encoding="UTF-8"?>
<bpmn:definitions xmlns:xsi="http://www.w3.org/2001/XMLSchema-instance" xmlns:bpmn="http://www.omg.org/spec/BPMN/20100524/MODEL" xmlns:bpmndi="http://www.omg.org/spec/BPMN/20100524/DI" xmlns:dc="http://www.omg.org/spec/DD/20100524/DC" xmlns:di="http://www.omg.org/spec/DD/20100524/DI" id="Definitions_1v0204h" targetNamespace="http://bpmn.io/schema/bpmn" exporter="bpmn-js (https://demo.bpmn.io)" exporterVersion="8.2.0">
  <bpmn:collaboration id="Collaboration_0esz28g">
    <bpmn:participant id="Participant_1wt0hx7" name="担当" processRef="Process_1yvf2u7" />
    <bpmn:participant id="Participant_1ekcrhk" name="顧客" processRef="Process_0y1378r" />
    <bpmn:messageFlow id="Flow_0sr1ydc" sourceRef="Participant_1ekcrhk" targetRef="Event_0bfbply" />
  </bpmn:collaboration>
  <bpmn:process id="Process_1yvf2u7">
    <bpmn:startEvent id="Event_0bfbply" name="開始">
      <bpmn:outgoing>Flow_1bjdsif</bpmn:outgoing>
    </bpmn:startEvent>
    <bpmn:exclusiveGateway id="Gateway_0z7l85o" name="何か判断する">
      <bpmn:incoming>Flow_0awhuxb</bpmn:incoming>
      <bpmn:outgoing>Flow_1valj6w</bpmn:outgoing>
      <bpmn:outgoing>Flow_0zc3okk</bpmn:outgoing>
    </bpmn:exclusiveGateway>
    <bpmn:intermediateThrowEvent id="Event_1jvqnpo" name="終了">
      <bpmn:incoming>Flow_0txzrxj</bpmn:incoming>
      <bpmn:incoming>Flow_00oerl8</bpmn:incoming>
    </bpmn:intermediateThrowEvent>
    <bpmn:userTask id="Activity_0qztpf7" name="タスク1">
      <bpmn:incoming>Flow_1bjdsif</bpmn:incoming>
      <bpmn:outgoing>Flow_0awhuxb</bpmn:outgoing>
    </bpmn:userTask>
    <bpmn:userTask id="Activity_1vn6vl3" name="タスク2">
      <bpmn:incoming>Flow_1valj6w</bpmn:incoming>
      <bpmn:outgoing>Flow_0ads6v6</bpmn:outgoing>
    </bpmn:userTask>
    <bpmn:userTask id="Activity_1um5mkv" name="タスク3">
      <bpmn:incoming>Flow_0ads6v6</bpmn:incoming>
      <bpmn:outgoing>Flow_0txzrxj</bpmn:outgoing>
    </bpmn:userTask>
    <bpmn:serviceTask id="Activity_0p4qw7j" name="サービス1">
      <bpmn:incoming>Flow_0zc3okk</bpmn:incoming>
      <bpmn:outgoing>Flow_00oerl8</bpmn:outgoing>
    </bpmn:serviceTask>
    <bpmn:sequenceFlow id="Flow_1bjdsif" sourceRef="Event_0bfbply" targetRef="Activity_0qztpf7" />
    <bpmn:sequenceFlow id="Flow_0awhuxb" sourceRef="Activity_0qztpf7" targetRef="Gateway_0z7l85o" />
    <bpmn:sequenceFlow id="Flow_1valj6w" sourceRef="Gateway_0z7l85o" targetRef="Activity_1vn6vl3" />
    <bpmn:sequenceFlow id="Flow_0ads6v6" sourceRef="Activity_1vn6vl3" targetRef="Activity_1um5mkv" />
    <bpmn:sequenceFlow id="Flow_0txzrxj" sourceRef="Activity_1um5mkv" targetRef="Event_1jvqnpo" />
    <bpmn:sequenceFlow id="Flow_0zc3okk" sourceRef="Gateway_0z7l85o" targetRef="Activity_0p4qw7j" />
    <bpmn:sequenceFlow id="Flow_00oerl8" sourceRef="Activity_0p4qw7j" targetRef="Event_1jvqnpo" />
  </bpmn:process>
  <bpmn:process id="Process_0y1378r" />
  <bpmndi:BPMNDiagram id="BPMNDiagram_1">
    <bpmndi:BPMNPlane id="BPMNPlane_1" bpmnElement="Collaboration_0esz28g">
      <bpmndi:BPMNShape id="Participant_1wt0hx7_di" bpmnElement="Participant_1wt0hx7" isHorizontal="true">
        <dc:Bounds x="160" y="200" width="780" height="250" />
      </bpmndi:BPMNShape>
      <bpmndi:BPMNEdge id="Flow_1bjdsif_di" bpmnElement="Flow_1bjdsif">
        <di:waypoint x="248" y="260" />
        <di:waypoint x="300" y="260" />
      </bpmndi:BPMNEdge>
      <bpmndi:BPMNEdge id="Flow_0awhuxb_di" bpmnElement="Flow_0awhuxb">
        <di:waypoint x="400" y="260" />
        <di:waypoint x="455" y="260" />
      </bpmndi:BPMNEdge>
      <bpmndi:BPMNEdge id="Flow_1valj6w_di" bpmnElement="Flow_1valj6w">
        <di:waypoint x="505" y="260" />
        <di:waypoint x="560" y="260" />
      </bpmndi:BPMNEdge>
      <bpmndi:BPMNEdge id="Flow_0ads6v6_di" bpmnElement="Flow_0ads6v6">
        <di:waypoint x="660" y="260" />
        <di:waypoint x="720" y="260" />
      </bpmndi:BPMNEdge>
      <bpmndi:BPMNEdge id="Flow_0txzrxj_di" bpmnElement="Flow_0txzrxj">
        <di:waypoint x="820" y="260" />
        <di:waypoint x="882" y="260" />
      </bpmndi:BPMNEdge>
      <bpmndi:BPMNEdge id="Flow_0zc3okk_di" bpmnElement="Flow_0zc3okk">
        <di:waypoint x="480" y="285" />
        <di:waypoint x="480" y="370" />
        <di:waypoint x="560" y="370" />
      </bpmndi:BPMNEdge>
      <bpmndi:BPMNEdge id="Flow_00oerl8_di" bpmnElement="Flow_00oerl8">
        <di:waypoint x="660" y="370" />
        <di:waypoint x="850" y="370" />
        <di:waypoint x="850" y="260" />
        <di:waypoint x="882" y="260" />
      </bpmndi:BPMNEdge>
      <bpmndi:BPMNShape id="Event_0bfbply_di" bpmnElement="Event_0bfbply">
        <dc:Bounds x="212" y="242" width="36" height="36" />
        <bpmndi:BPMNLabel>
          <dc:Bounds x="219" y="285" width="23" height="14" />
        </bpmndi:BPMNLabel>
      </bpmndi:BPMNShape>
      <bpmndi:BPMNShape id="Gateway_0z7l85o_di" bpmnElement="Gateway_0z7l85o" isMarkerVisible="true">
        <dc:Bounds x="455" y="235" width="50" height="50" />
        <bpmndi:BPMNLabel>
          <dc:Bounds x="447" y="205" width="66" height="14" />
        </bpmndi:BPMNLabel>
      </bpmndi:BPMNShape>
      <bpmndi:BPMNShape id="Event_1jvqnpo_di" bpmnElement="Event_1jvqnpo">
        <dc:Bounds x="882" y="242" width="36" height="36" />
        <bpmndi:BPMNLabel>
          <dc:Bounds x="889" y="285" width="23" height="14" />
        </bpmndi:BPMNLabel>
      </bpmndi:BPMNShape>
      <bpmndi:BPMNShape id="Activity_104sj26_di" bpmnElement="Activity_0qztpf7">
        <dc:Bounds x="300" y="220" width="100" height="80" />
      </bpmndi:BPMNShape>
      <bpmndi:BPMNShape id="Activity_0sjnmyp_di" bpmnElement="Activity_1vn6vl3">
        <dc:Bounds x="560" y="220" width="100" height="80" />
      </bpmndi:BPMNShape>
      <bpmndi:BPMNShape id="Activity_079ttch_di" bpmnElement="Activity_1um5mkv">
        <dc:Bounds x="720" y="220" width="100" height="80" />
      </bpmndi:BPMNShape>
      <bpmndi:BPMNShape id="Activity_0mul251_di" bpmnElement="Activity_0p4qw7j">
        <dc:Bounds x="560" y="330" width="100" height="80" />
      </bpmndi:BPMNShape>
      <bpmndi:BPMNShape id="Participant_1ekcrhk_di" bpmnElement="Participant_1ekcrhk" isHorizontal="true">
        <dc:Bounds x="160" y="80" width="300" height="70" />
      </bpmndi:BPMNShape>
      <bpmndi:BPMNEdge id="Flow_0sr1ydc_di" bpmnElement="Flow_0sr1ydc">
        <di:waypoint x="230" y="153" />
        <di:waypoint x="230" y="242" />
      </bpmndi:BPMNEdge>
    </bpmndi:BPMNPlane>
  </bpmndi:BPMNDiagram>
</bpmn:definitions>
AsciiDoc のドキュメントに出力した XML ファイルを include する
src/docs/asciidoc/03_diagram/index.adoc に example-bpmn.xml を include します。
..........

== クラス図

[plantuml]
....
include::example-class.puml[]
....

== BPMN

[bpmn]
....
include::example-bpmn.xml[]
....
AsciiDoc Plugin の preview にも Kroki のコンテナで生成された diagram が表示されます。

asciidoctorWithMoveDiagSvg タスクを実行して動作確認する
asciidoctorWithMoveDiagSvg タスクを実行すると BUILD SUCCESSFUL が表示されて、
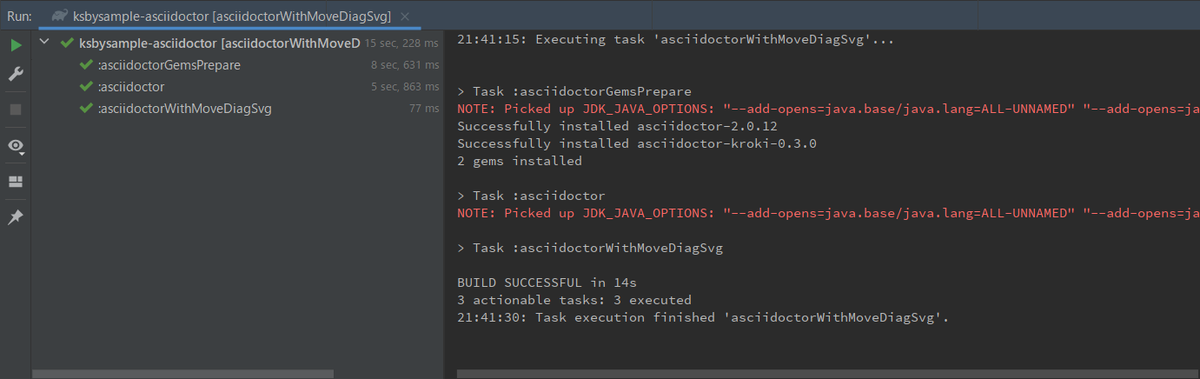
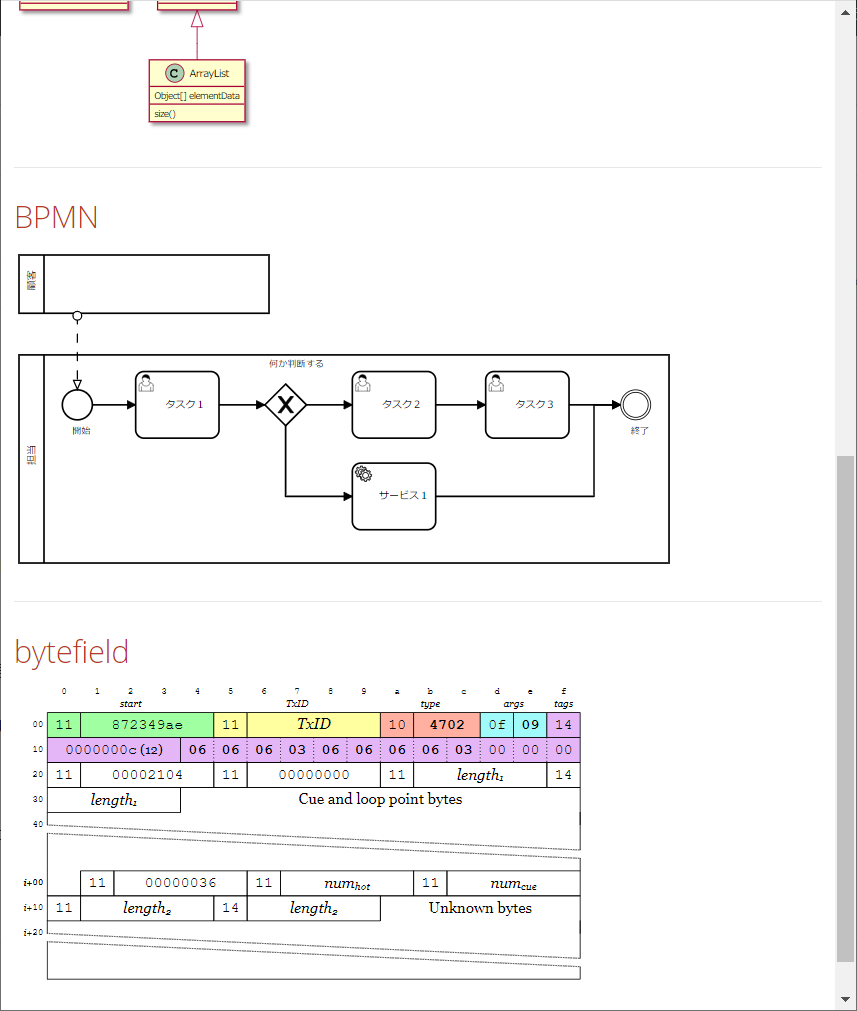
build/docs/asciidoc/03_diagram/index.html をブラウザで表示すると BPMN の diagram が表示されました。

bytefield の diagram を埋め込む
https://kroki.io/ の Bytefield のコードをファイルに保存する
こちらは https://kroki.io/ で Bytefield を選択して表示されたコードをコピーすることにします。Deep-Symmetry / bytefield-svg によると Clojure ベースの DSL とのことなので、src/docs/asciidoc/03_diagram の下に example-bytefield.clj というファイルを作成してコピペします。
拡張子 .clj のファイルに保存すると Clojure のコードと識別されて IntelliJ IDEA のエディタ上でシンタックスハイライトされます。

AsciiDoc のドキュメントに Bytefield のコードのファイルを include する
src/docs/asciidoc/03_diagram/index.adoc に example-bytefield.clj を include します。
..........

== BPMN

[bpmn]
....
include::example-bpmn.xml[]
....

== bytefield

[bytefield]
....
include::example-bytefield.clj[]
....
AsciiDoc Plugin の preview にも Kroki のコンテナで生成された diagram が表示されます。

asciidoctorWithMoveDiagSvg タスクを実行して動作確認する
asciidoctorWithMoveDiagSvg タスクを実行すると BUILD SUCCESSFUL が表示されて、

build/docs/asciidoc/03_diagram/index.html をブラウザで表示すると bytefield の diagram が表示されました。
履歴
2021/01/31
初版発行。
PlantUML の図を生成するモジュールを Asciidoctor Diagram → Kroki に変更する
Translate to English
https://translate.google.com/translate?sl=auto&tl=en&u=https%3A%2F%2Fksby.hatenablog.com%2Fentry%2F2021%2F01%2F26%2F234903
概要
記事一覧はこちらです。
Creating a Diagram には Asciidoctor Diagram が対応している Diagram Type が PlantUML 以外にも列挙されていますが、例えば mermaid のコードを adoc ファイル内に記述しても Failed to generate image: Could not find the 'mermaid' executable in PATH; と外部プログラムが見つからないというエラーが出て図が生成・表示されません。


また plantuml-stdlib / C4-PlantUML というものを見つけたのですが、Asciidoctor Diagram はこの PlantUML で C4 model を記述する方法に対応していません。
Kroki を利用すれば外部プログラムを個別にインストールせずに PlantUML やそれ以外の diagram を生成したり、C4 model を PlantUML で記述したコードから図を生成したりできるようなので試してみます。
参照したサイト・書籍
Kroki
https://kroki.io/Kroki Documentation
https://docs.kroki.io/kroki/【12/24にGitLab対応!】テキストで自在に「描く」- KrokiではじめるDiagram as Code
https://qiita.com/tomo_makes/items/7c42a736b30554e15c35plantuml-stdlib / C4-PlantUML
https://github.com/plantuml-stdlib/C4-PlantUMLThe C4 model for visualising software architecture
https://c4model.com/asciidoctor-kroki
https://rubygems.org/gems/asciidoctor-kroki/Mogztter / asciidoctor-kroki
https://github.com/Mogztter/asciidoctor-krokiRuby GEM support
https://asciidoctor.github.io/asciidoctor-gradle-plugin/development-3.x/user-guide/#asciidoctorj-gems-pluginHow can I configure the gradle asciidoctor 2.0 plugin to use pygments.rb as higlighter?
https://github.com/asciidoctor/asciidoctor-gradle-plugin/issues/326Copy
https://docs.gradle.org/current/dsl/org.gradle.api.tasks.Copy.htmlGradle - Delete files with certain extension
https://stackoverflow.com/questions/27285885/gradle-delete-files-with-certain-extension
目次
- Ruby の gem の asciidoctor-kroki を使用して asciidoctor タスク実行時に Kroki で図を生成するよう build.gradle を変更する
- asciidoctor タスクを実行して動作確認する
- Kroki の Docker image を利用してローカルでサーバを起動し、画像ファイルがローカルに保存されるようにする
手順
Ruby の gem の asciidoctor-kroki を使用して asciidoctor タスク実行時に Kroki で図を生成するよう build.gradle を変更する
Asciidoctor+Gradle の環境で Kroki を利用するにはどうすればよいのか調べてみたところ、
- Mogztter / asciidoctor-kroki が見つかりましたが、これは
An extension for Asciidoctor.jsとのこと。 - 他にも探すと Ruby の gem である asciidoctor-kroki が見つかりました。このページ右上の GitHub のアイコンをクリックすると Mogztter / asciidoctor-kroki に遷移しますので同じ機能を持つモジュールのようです。
- Asciidoctor Gradle Plugin のドキュメントを見ると Ruby GEM support の記述があり、Asciidoctor+Gradle の環境で Ruby の gem が利用できるとのこと。
ということで Ruby の gem の asciidoctor-kroki を利用するよう build.gradle を変更すれば Kroki を利用できるようです。
build.gradle を以下のように変更します。
plugins {
    id "org.asciidoctor.jvm.convert" version "3.3.0"
    id "org.asciidoctor.jvm.gems" version "3.3.0"
}

repositories {
    mavenCentral()
    ruby.gems()
}

dependencies {
    asciidoctorGems "rubygems:asciidoctor-kroki:0.3.0"
}

asciidoctor {
    dependsOn asciidoctorGemsPrepare
    sourceDir file("src/docs/asciidoc")
    baseDirFollowsSourceFile()
    sources {
        include "**/index.adoc"
    }
    resources {
        from("${sourceDir}") {
            include "**/*.png",
                    "**/*.js"
        }
    }
}

asciidoctorj {
    requires = [
            "asciidoctor-kroki"
    ]
    attributes "source-highlighter" : "rouge"
}
- plugins block に以下の行を追加します。
id "org.asciidoctor.jvm.gems" version "3.3.0"
- repositories block に以下の行を追加します。
ruby.gems()
dependencies { asciidoctorGems "rubygems:asciidoctor-kroki:0.3.0" }を追加します。- asciidoctor block に
dependsOn asciidoctorGemsPrepareを追加します。この記述を追加することが最初分からず asciidoctor タスクを実行すると以下の画像のエラーが出たのですが、 How can I configure the gradle asciidoctor 2.0 plugin to use pygments.rb as higlighter? の Issue に記述されているサンプルを見つけたのと、Asciidoctor Gradle Plugin のドキュメントにも asciidoctorGemsPrepare の記述があり、マネしてみたらうまく動きました。
 - asciidoctorj block の以下の点を変更します。
- Asciidoctor Diagram の設定は不要になるので
modules { diagram.use() diagram.version "2.1.0" }を削除します。 requires = [ "asciidoctor-kroki" ]を追加します。
- Asciidoctor Diagram の設定は不要になるので
asciidoctor タスクを実行して動作確認する
asciidoctor タスクを実行すると BUILD SUCCESSFUL が出力されますが、asciidoctor タスクの前に asciidoctorGemsPrepare タスクが実行されるようになり、また Java 11 を使っていることに伴う WARNING メッセージが出力されました。

WARNING メッセージが出力されないようにします。IntelliJ IDEA のメインメニューから「Run」-「Edit Configurations...」を選択して「Run/Debug Configurations」ダイアログを表示した後、「ksbysample-asciidoctor [asciidoctor]」 の Environment variables に "--add-opens=java.base/java.security=ALL-UNNAMED" を追加します。Environment variables にセットされている文字列は全体で JDK_JAVA_OPTIONS="--add-opens=java.base/java.lang=ALL-UNNAMED" "--add-opens=java.base/java.util=ALL-UNNAMED" "--add-opens=java.base/java.security=ALL-UNNAMED" "-Xverify:none" "-XX:TieredStopAtLevel=1" になります。

clean タスク実行 → asciidoctor タスク実行をすると今度は WARNING メッセージが出ませんでした。

build/docs/asciidoc/03_diagram/index.html が出力されており、それ以外に、
- build/.asciidoctorGems というディレクトリが出来ていました。Ruby の gem はここにダウンロードされるようです。
- build/docs/asciidoc/03_diagram の下に index.html は作成されていますが、example-sequence.svg、example-class.svg は作成されていませんでした。

index.html をエディタで開いてみると、<img src="https://kroki.io/plantuml/svg/..." alt="example-sequence"> のような img タグが記述されていました。svg の画像は Kroki のサーバ(https://kroki.io/)上に生成されているようです。

index.html をブラウザで開くと PlantUML の図が表示されました。

Kroki の Docker image を利用してローカルでサーバを起動し、画像ファイルがローカルに保存されるようにする
画像ファイルはローカルに保存しておきたいのと、Kroki は Docker image が提供されていてローカルでサーバを起動できるので、Docker で Kroki のコンテナを起動して、生成した画像ファイルもローカルにダウンロードして保存するようにします。
docker-compose.yml を作成し、Kroki のコンテナを起動するための設定を記述する
プロジェクトのルートディレクトリ直下に docker-compose.yml を新規作成し、Install Kroki に記載されている docker-compose.yml の記述をそのままコピペします。
version: "3"
services:
  core:
    image: yuzutech/kroki
    environment:
      - KROKI_BLOCKDIAG_HOST=blockdiag
      - KROKI_MERMAID_HOST=mermaid
      - KROKI_BPMN_HOST=bpmn
    ports:
      - "8000:8000"
  blockdiag:
    image: yuzutech/kroki-blockdiag
    expose:
      - "8001"
  mermaid:
    image: yuzutech/kroki-mermaid
    expose:
      - "8002"
  bpmn:
    image: yuzutech/kroki-bpmn
    expose:
      - "8003"
  excalidraw:
    image: yuzutech/kroki-excalidraw
    expose:
      - "8004"
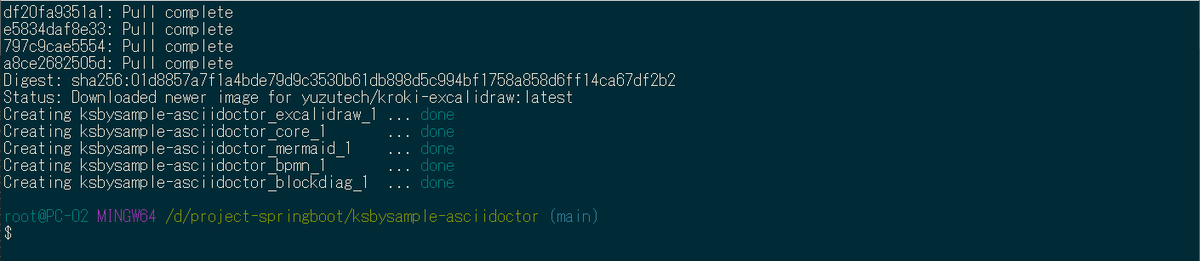
docker-compose up -d を実行して Kroki のコンテナを起動する
docker-compose up -d を実行して Kroki のコンテナを起動します。

AsciiDoc Plugin の Preview が Kroki を利用するよう設定を変更する
AsciiDoc Plugin の Preview は Asciidoctor Diagram だけでなく Kroki にも対応しているので、ローカルで起動した Kroki のコンテナを利用するように設定を変更します。
IntelliJ IDEA の「Settings」ダイアログを開いてから画面左上の検索フィールドに Kroki と入力すると「Languages & Frameworks」-「AsciiDoc」が表示されるので選択します。その後画面左側の「Use Kroki to render diagrams instead of Asciidoctor Diagram」をチェックし、「URL of custom Kroki instance」に http://localhost:8000 を入力して「OK」ボタンをクリックします。

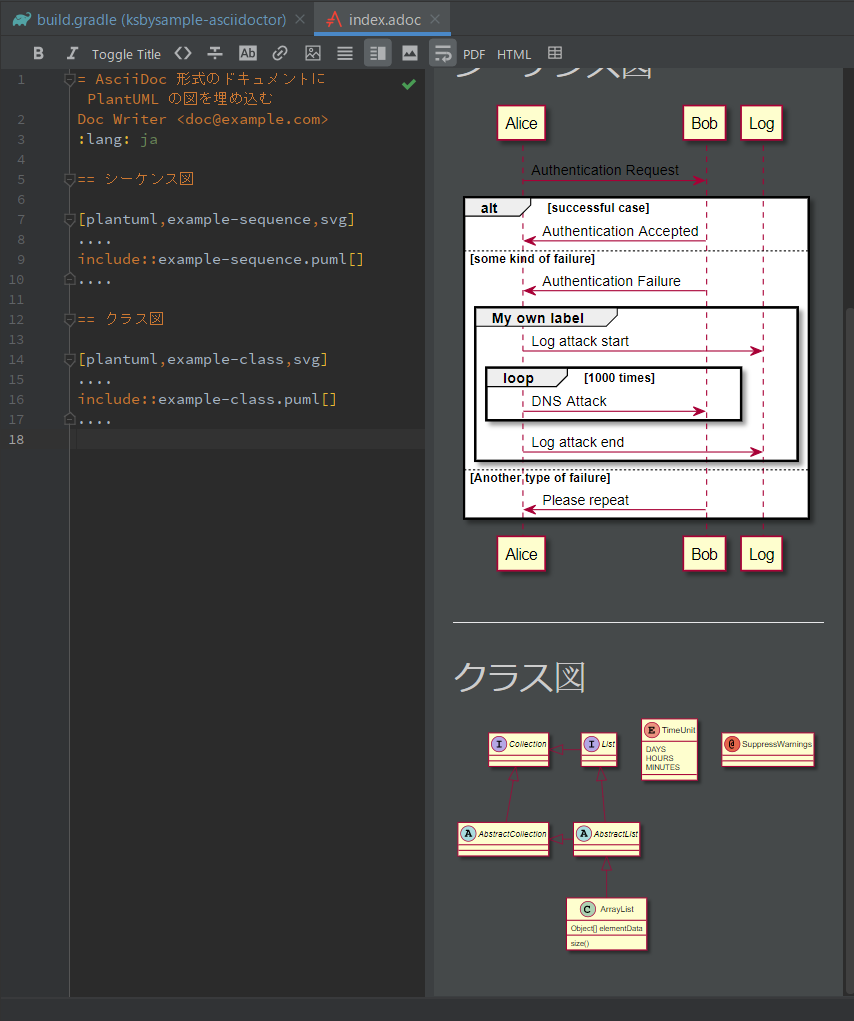
AsciiDoc Plugin の Preview で index.adoc を表示すると今度はクラス図も表示されるようになりました。
PlantUML integration Plugin には Kroki を利用する設定はないので、こちらは何もしません(何もしなくても C4 model を PlantUML で記述したコードから図を表示してくれました)。
asciidoctor タスク実行時にローカルで起動した Kroki のコンテナを利用するよう build.gradle を変更する
build.gradle を以下のように変更します。
..........

asciidoctorj {
    requires = [
            "asciidoctor-kroki"
    ]
    attributes "source-highlighter" : "rouge"
    attributes "kroki-server-url": "http://localhost:8000"
    attributes "kroki-fetch-diagram": "true"
}

// Kroki で生成してローカルにダウンロードした画像ファイルを asciidoctor.outputDir に移動する
task asciidoctorWithMoveDiagSvg(group: "documentation") {
    doLast {
        def moveFilePattern = "**/diag-*.svg"

        copy() {
            from(asciidoctor.sourceDir) {
                include moveFilePattern
            }
            into asciidoctor.outputDir
        }

        delete fileTree(asciidoctor.sourceDir) { include moveFilePattern }
    }
}
asciidoctorWithMoveDiagSvg.dependsOn asciidoctor
- asciidoctorj block に以下の2行を追加します。
attributes "kroki-server-url": "http://localhost:8000"attributes "kroki-fetch-diagram": "true"
task asciidoctorWithMoveDiagSvg(group: "documentation") { ... }、asciidoctorWithMoveDiagSvg.dependsOn asciidoctorを追加します。
上の変更から asciidoctorWithMoveDiagSvg タスクがない状態で asciidoctor タスクを実行すると build/docs/asciidoc/03_diagram/index.html の img タグには以下のように出力されるのですが、

Kroki で生成された画像ファイルは build ディレクトリではなく src/docs/asciidoc/03_diagram の下にダウンロードされるため、index.html をブラウザで表示させた時に PlantUML の図が表示されません。

src/docs/asciidoc/03_diagram/index.adoc の中で [plantuml,example-sequence,svg] → [plantuml,opts=inline] に変更すれば index.html の中に SVG のコードが出力されるので SVG のファイルを移動しなくてもよくなるのですが、今度は AsciiDoc Plugin の Preview に図が表示されません。

ブラウザの表示も AsciiDoc Plugin の Preview の表示もできるようにするために、asciidoctorWithMoveDiagSvg タスクを追加して asciidoctor タスク実行後に svg のファイルを移動することにしました。
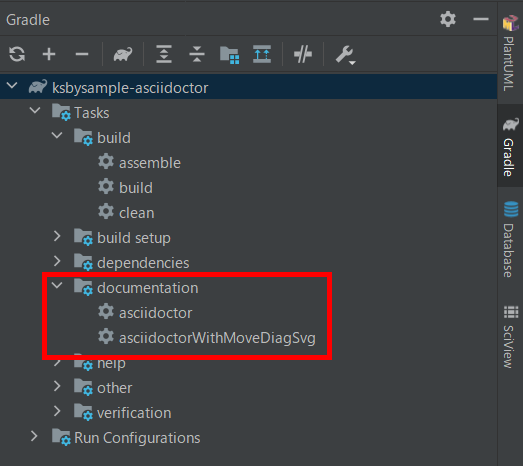
Gradle Tool Window 左上の「Reload All Gradle Projects」ボタンをクリックして更新すると、documentation の下に asciidoctorWithMoveDiagSvg タスクが表示されます。
index.adoc の plantuml の記述を変更する
Kroki を利用する場合、画像ファイル名を指定できないので、src/docs/asciidoc/03_diagram/index.adoc の [plantuml] の記述から画像ファイル名と画像のタイプの指定を削除します。
= AsciiDoc 形式のドキュメントに PlantUML の図を埋め込む
Doc Writer <doc@example.com>
:lang: ja

== シーケンス図

[plantuml]
....
include::example-sequence.puml[]
....

== クラス図

[plantuml]
....
include::example-class.puml[]
....
asciidoctorWithMoveDiagSvg タスクを実行して動作確認する
asciidoctorWithMoveDiagSvg タスクを実行すると Java 11 を使っていることに伴う WARNING メッセージが出力されました。asciidoctor タスクでなくなったので当然ですね。。。

「Run/Debug Configurations」ダイアログを表示した後、asciidoctor タスクの Environment variables に設定していた文字列を asciidoctorWithMoveDiagSvg タスクにも設定します。

再度 asciidoctorWithMoveDiagSvg タスクを実行すると今度は WARNING メッセージが出力されませんでした。

画像ファイルは build/docs/asciidoc/03_diagram の下に移動しており、

build/docs/asciidoc/03_diagram/index.html をブラウザで表示すると PlantUML の図も表示されました。

履歴
2021/01/26
初版発行。