Spring Boot + Spring Integration でいろいろ試してみる ( その27 )( Spring Integration Extension for AWS で S3 へファイルをアップロード・ダウンロードする )
概要
記事一覧 はこちらです。
今回作成したソースの GitHub レポジトリ はこちらです。
Spring Integration のアプリケーションから AWS の S3 へファイルをアップロード・ダウンロードするのに使えそうな Spring のライブラリとして以下の2種類がありますが、
それぞれのサンプルを作成してみます。まずは Spring Integration Extension for Amazon Web Services (AWS) から。
ちなみにこの2つのライブラリの違いですが、Spring Integration Extension for Amazon Web Services (AWS) に Note the Spring Integration AWS Extension is based on the Spring Cloud AWS project. と記載されていました。Spring Integration Extension for AWS は Spring Cloud for AWS をベースに Spring Integration の Adapter 等を作成したもののようです。
参照したサイト・書籍
spring-projects/spring-integration-aws
https://github.com/spring-projects/spring-integration-awsAWS CloudFormation - AWS Identity and Access Management のテンプレートスニペット
https://docs.aws.amazon.com/ja_jp/AWSCloudFormation/latest/UserGuide/quickref-iam.htmlAmazon Simple Storage Service - AWS SDK for Java を使用したオブジェクトのアップロード
https://docs.aws.amazon.com/ja_jp/AmazonS3/latest/dev/UploadObjSingleOpJava.htmlAWS SDK for Java - AWS 認証情報の使用
https://docs.aws.amazon.com/ja_jp/sdk-for-java/v1/developer-guide/credentials.htmlAmazon Simple Storage Service - ユーザーポリシーの例
https://docs.aws.amazon.com/ja_jp/AmazonS3/latest/dev/example-policies-s3.htmlAmazon Simple Storage Service - ポリシーでのアクセス許可の指定
https://docs.aws.amazon.com/ja_jp/AmazonS3/latest/dev/using-with-s3-actions.html
目次
- 仕様を決める
- ksbysample-eipapp-integrationaws プロジェクトを作成する
- S3 Bucket とアップロード・ダウンロード用の IAM ユーザを作成する
- upload ディレクトリ → S3 へアップロードする処理を実装する
- S3 → download ディレクトリへダウンロード → upload ディレクトリへ移動する処理を実装する
- 動作確認
手順
仕様を決める
- S3 Bucket を1つ作成します。
- 作成した S3 Bucket へアップロード・ダウンロードするための IAM ユーザを1つ作成します。
- アプリケーションは AWS 側ではなく PC 上で実行します。
- 作成したアプリケーションを実行するディレクトリ構成を以下のようにします。
D:\eipapp\ksbysample-eipapp-integrationaws
├ download
├ upload
├ uploading
└ ksbysample-eipapp-integrationaws-0.0.1-SNAPSHOT.jar
- 最初に upload ディレクトリの下に画像ファイルを 30ファイル配置します。1ファイル 3~4MB 程度のファイルです。
- 一定時間毎に upload ディレクトリを監視し、ファイルがあれば S3 Buket へアップロードします。アップロードするファイルは upload ディレクトリから uploading ディレクトリへ移動してから S3 へアップロードします(ディレクトリ監視に引っかからないようにするため)。
- S3 へのアップロードはマルチスレッドで並列処理します。
- 一定時間毎に S3 Bucket を監視し、ファイルがあれば PC にダウンロードします。こちらはシングルスレッドで処理します。
- upload ディレクトリ →(アップロードFlow)→ S3 Bucket
→(ダウンロードFlow)→ download ディレクトリ → upload ディレクトリ
→(続く)
という流れになります。
ksbysample-eipapp-integrationaws プロジェクトを作成する
Spring Initializr でプロジェクトの雛形を作成します。


作成後、build.gradle を以下のように変更します。
buildscript {
    ext {
        springBootVersion = '2.0.4.RELEASE'
    }
    repositories {
        mavenCentral()
    }
    dependencies {
        classpath("org.springframework.boot:spring-boot-gradle-plugin:${springBootVersion}")
    }
}

apply plugin: 'java'
apply plugin: 'eclipse'
apply plugin: 'org.springframework.boot'
apply plugin: 'io.spring.dependency-management'

group = 'ksbysample'
version = '0.0.1-SNAPSHOT'
sourceCompatibility = 1.8

repositories {
    mavenCentral()
}

dependencyManagement {
    imports {
        mavenBom org.springframework.boot.gradle.plugin.SpringBootPlugin.BOM_COORDINATES
    }
}

dependencies {
    def lombokVersion = "1.18.2"

    implementation('org.springframework.boot:spring-boot-starter-integration')
    implementation('org.springframework.integration:spring-integration-aws:2.0.0.RELEASE')
    implementation('org.springframework.integration:spring-integration-file')
    testImplementation('org.springframework.boot:spring-boot-starter-test')

    // for lombok
    annotationProcessor("org.projectlombok:lombok:${lombokVersion}")
    compileOnly("org.projectlombok:lombok:${lombokVersion}")
}
- dependencyManagement block を追加します。
- dependencies block に以下の2行を追加します。
implementation('org.springframework.integration:spring-integration-aws:2.0.0.RELEASE')implementation('org.springframework.integration:spring-integration-file')
- lombok の
@Slf4jアノテーションを使いたいので、dependencies block に以下の3行を追加します。def lombokVersion = "1.18.2"annotationProcessor("org.projectlombok:lombok:${lombokVersion}")compileOnly("org.projectlombok:lombok:${lombokVersion}")
メインクラス名を KsbysampleEipappIntegrationawsApplication → Application に変更した後、clean タスク実行 → Rebuild Project 実行 → build タスクを実行して "BUILD SUCCESSFUL" のメッセージが出力されることを確認します。
S3 Bucket とアップロード・ダウンロード用の IAM ユーザを作成する
※AWS アカウントがすでに作成されていること、AWS CLI をインストール済であること、AWS CloudFormation を実行可能な環境を作成済であること、が前提で以下の手順を記載しています。
プロジェクトのルート直下に create-s3bucket.yaml を新規作成し、以下の内容を記述します。
AWSTemplateFormatVersion: 2010-09-09
Description: Spring Integration Test Stack

Resources:
  #########################
  # S3 Bucket
  #########################
  IntegrationTestS3Bucket:
    Type: AWS::S3::Bucket
    Properties:
      BucketName: "s3bucket-integration-test-ksby"

  #########################
  # IAM User & IAM Policy
  #########################
  IntegrationTestUser:
    Type: AWS::IAM::User
    Properties:
      UserName: "iam-user-integration-test"
  IntegrationTestUserAccessKey:
    Type: AWS::IAM::AccessKey
    Properties:
      UserName: !Ref IntegrationTestUser
  IntegrationTestPolicy:
    Type: AWS::IAM::Policy
    Properties:
      PolicyName: "iam-policy-integration-test"
      PolicyDocument:
        Version: 2012-10-17
        Statement:
          - Effect: Allow
            Action:
              - s3:ListBucket
              - s3:GetBucketLocation
            Resource: !Join [ "", [ "arn:aws:s3:::", !Ref IntegrationTestS3Bucket ] ]
          - Effect: Allow
            Action:
              - s3:PutObject
              - s3:PutObjectAcl
              - s3:GetObject
              - s3:GetObjectAcl
              - s3:DeleteObject
            Resource: !Join [ "", [ "arn:aws:s3:::", !Ref IntegrationTestS3Bucket, "/*" ] ]
      Users:
        - !Ref IntegrationTestUser

Outputs:
  AccessKeyId:
    Value: !Ref IntegrationTestUserAccessKey
  SecretAccessKey:
    Value: !GetAtt IntegrationTestUserAccessKey.SecretAccessKey
git-cmd.exe を起動した後、以下のコマンドを実行してテストで使用する S3 Bucket とアップロード・ダウンロード用の IAM ユーザを作成します。


upload ディレクトリ → S3 へアップロードする処理を実装する
src/main/java/ksbysample/eipapp/integrationaws の下に flow パッケージを作成した後、その下に FlowConfig.java を新規作成して、以下の内容を記述します。
@Slf4j
@Configuration
public class FlowConfig {

    private static final String EIPAPP_ROOT_DIR_PATH = "D:/eipapp/ksbysample-eipapp-integrationaws";
    private static final String UPLOAD_DIR_PATH = EIPAPP_ROOT_DIR_PATH + "/upload";
    private static final String UPLOADING_DIR_PATH = EIPAPP_ROOT_DIR_PATH + "/uploading";
    private static final String S3_BUCKET = "s3bucket-integration-test-ksby";

    // リージョンは環境変数 AWS_REGION に(東京リージョンなら ap-northeast-1)、
    // AccessKeyId, SecretAccessKey はそれぞれ環境変数 AWS_ACCESS_KEY_ID, AWS_SECRET_ACCESS_KEY にセットする
    @Bean
    public AmazonS3 amazonS3() {
        return AmazonS3ClientBuilder.standard().build();
    }

    /********************************************************
     * upload ディレクトリ --> S3 ファイルアップロード処理        *
     ********************************************************/

    @Bean
    public FileReadingMessageSource uploadFileMessageSource() {
        FileReadingMessageSource source = new FileReadingMessageSource();
        source.setDirectory(new File(UPLOAD_DIR_PATH));
        source.setFilter(new AcceptAllFileListFilter<>());
        return source;
    }

    @Bean
    public MessageHandler uploadToS3MessageHandler() {
        return new S3MessageHandler(amazonS3(), S3_BUCKET);
    }

    @Bean
    public IntegrationFlow uploadToS3Flow() {
        return IntegrationFlows.from(
                // 200ミリ秒毎に upload ディレクトリを監視し、ファイルがあれば処理を進める
                uploadFileMessageSource(), c -> c.poller(Pollers.fixedDelay(200)))
                // ファイルを uploading ディレクトリへ移動する
                .<File>handle((p, h) -> {
                    try {
                        Path movedFilePath = Files.move(p.toPath(), Paths.get(UPLOADING_DIR_PATH, p.getName())
                                , StandardCopyOption.REPLACE_EXISTING);
                        return new GenericMessage<>(movedFilePath.toFile(), h);
                    } catch (IOException e) {
                        throw new RuntimeException(e);
                    }
                })
                // ここから下はマルチスレッドで並列処理する
                .channel(c -> c.executor(Executors.newFixedThreadPool(5)))
                // 処理開始のログを出力する
                // 上の .channel(...) の直後に .log(...) を書くと並列処理されないため、.handle(...) を書いてその中でログに出力する
                .<File>handle((p, h) -> {
                    log.warn(String.format("☆☆☆ %s を S3 にアップロードします", p.getName()));
                    return new GenericMessage<>(p, h);
                })
                // S3 へアップロードする
                // S3MessageHandler は Outbound Channel Adapter で .handle(...) メソッドに渡しただけでは次の処理に行かないので、
                // .wireTap(...) で呼び出す
                .wireTap(sf -> sf
                        .handle(uploadToS3MessageHandler()))
                // アップロードしたファイルを削除し、処理終了のログを出力する
                .<File>handle((p, h) -> {
                    p.delete();
                    log.warn(String.format("★★★ %s を S3 にアップロードしました", p.getName()));
                    return null;
                })
                .get();
    }

}
upload ディレクトリに5ファイルだけ配置して動作確認してみます。最初に IntelliJ IDEA のメインメニューから「Run」-「Edit Configurations...」を選択して「Run/Debug Configurations」ダイアログを表示後、AWS_REGION、AWS_ACCESS_KEY_ID、AWS_SECRET_ACCESS_KEY を設定します。

s3bucket-integration-test-ksby バケットが空の状態であることを確認します。

アプリケーションを起動し upload ディレクトリに5ファイル配置すると、ファイルがアップロードされます。

再び s3bucket-integration-test-ksby バケットを見ると5ファイルアップロードされていました。ダウンロードして元の画像と比較すると同じファイルで問題ありませんでした。

S3 → download ディレクトリへダウンロード → upload ディレクトリへ移動する処理を実装する
src/main/java/ksbysample/eipapp/integrationaws/flow/FlowConfig.java に以下の処理を追加します。
@Slf4j
@Configuration
public class FlowConfig {

    ..........
    private static final String DOWNLOAD_DIR_PATH = EIPAPP_ROOT_DIR_PATH + "/download";
    ..........

    /********************************************************
     * S3 --> download ディレクトリ ファイルダウンロード処理      *
     ********************************************************/

    @Bean
    public S3InboundFileSynchronizer s3InboundFileSynchronizer() {
        S3InboundFileSynchronizer synchronizer = new S3InboundFileSynchronizer(amazonS3());
        synchronizer.setDeleteRemoteFiles(true);
        synchronizer.setPreserveTimestamp(true);
        synchronizer.setRemoteDirectory(S3_BUCKET);
        return synchronizer;
    }

    @Bean
    public S3InboundFileSynchronizingMessageSource s3InboundFileSynchronizingMessageSource() {
        S3InboundFileSynchronizingMessageSource messageSource =
                new S3InboundFileSynchronizingMessageSource(s3InboundFileSynchronizer());
        messageSource.setLocalDirectory(new File(DOWNLOAD_DIR_PATH));
        messageSource.setLocalFilter(new AcceptAllFileListFilter<>());
        return messageSource;
    }

    @Bean
    public IntegrationFlow downloadFromS3Flow() {
        return IntegrationFlows.from(
                // 1秒毎に S3 Bucket を監視し、ファイルがあれば処理を進める
                s3InboundFileSynchronizingMessageSource(), c -> c.poller(Pollers
                        .fixedDelay(1000)
                        // 1度に最大100ファイルダウンロードする
                        // .maxMessagesPerPoll(...) を書かないと 1ファイルずつダウンロードされる
                        .maxMessagesPerPoll(100)))
                // download ディレクトリに保存されたファイルを upload ディレクトリに移動する
                // ちなみに download ディレクトリからファイルを移動か削除しないと s3InboundFileSynchronizingMessageSource()
                // から Message が延々と送信され続けるので、必ず移動か削除する必要がある
                .<File>handle((p, h) -> {
                    try {
                        Files.move(p.toPath(), Paths.get(UPLOAD_DIR_PATH, p.getName())
                                , StandardCopyOption.REPLACE_EXISTING);
                        log.error(String.format("◎◎◎ %s をダウンロードしました", p.getName()));
                        return null;
                    } catch (IOException e) {
                        throw new RuntimeException(e);
                    }
                })
                .get();
    }

}
アップロードの処理をコメントアウトして、先程アップロードしたファイルをダウンロードしてみます。
アプリケーションを起動すると S3 Bucket にあるファイルが download ディレクトリにダウンロード → upload ディレクトリへ移動されて、

S3 Bucket の中は空になっていました。

ダウンロードされたファイルは元々アップロードしたファイルと全く同じで問題ありませんでした。
動作確認
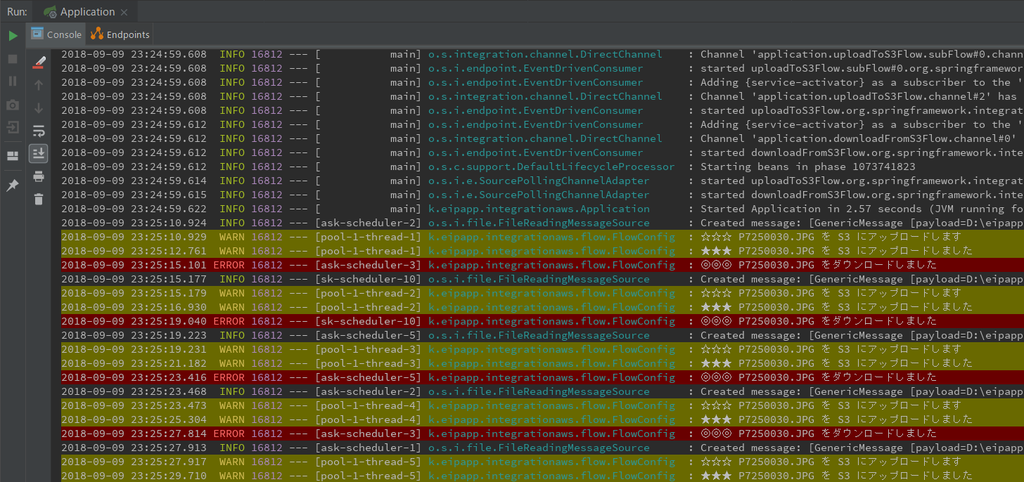
アプリケーションを起動後、最初は upload ディレクトリにファイルを1つだけ配置してみます。

ファイルのアップロードとダウンロードを繰り返し、エラーも発生しませんでした。
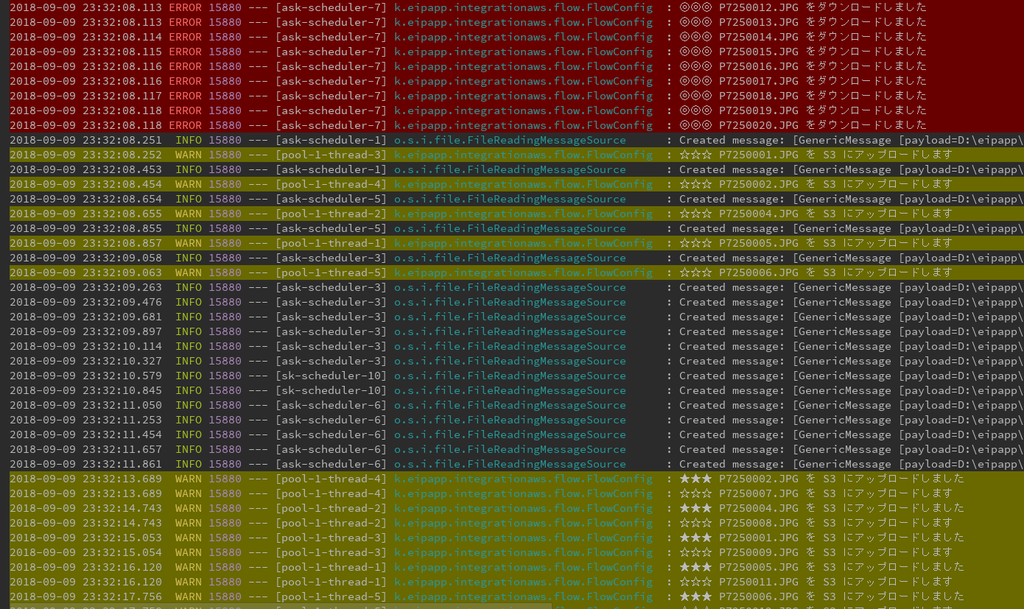
今度は 30ファイル配置してみます。


なんか想定と違う動きをしています。。。
- アップロード処理がマルチスレッドなので当然処理は多くて当たり前なのですが、ダウンロード処理がほとんど動きません。
org.springframework.messaging.MessagingException: Problem occurred while synchronizing remote to local directory; nested exception is org.springframework.messaging.MessagingException: Failure occurred while copying 's3bucket-integration-test-ksby/P7250021.JPG' from the remote to the local directory; nested exception is java.net.SocketTimeoutException: Read timed outというエラーも出ています。- エラーの後に一気にダウンロードが実行されています。
1CPU2Core の PC で動かしているのですが、おそらく 5スレッドだと重いのと、ダウロード処理がどうも S3 Bucket 内に見つけたファイルを全て PC にダウンロードしてから処理を進めているようなので(ダウンロードのログが出ていないのに download ディレクトリにファイルが出来ていました)、以下の点を変更します。
    @Bean
    public IntegrationFlow uploadToS3Flow() {
                ..........
                // ここから下はマルチスレッドで並列処理する
                .channel(c -> c.executor(Executors.newFixedThreadPool(2)))
                ..........
    }

    ..........

    @Bean
    public S3InboundFileSynchronizingMessageSource s3InboundFileSynchronizingMessageSource() {
        S3InboundFileSynchronizingMessageSource messageSource =
                new S3InboundFileSynchronizingMessageSource(s3InboundFileSynchronizer());
        messageSource.setLocalDirectory(new File(DOWNLOAD_DIR_PATH));
        messageSource.setLocalFilter(new AcceptAllFileListFilter<>());
        messageSource.setMaxFetchSize(1);
        return messageSource;
    }

    @Bean
    public IntegrationFlow downloadFromS3Flow() {
        return IntegrationFlows.from(
                // 1秒毎に S3 Bucket を監視し、ファイルがあれば処理を進める
                s3InboundFileSynchronizingMessageSource(), c -> c.poller(Pollers
                        .fixedDelay(200)))
                ..........
    }

}
- uploadToS3Flow 内のマルチスレッド数を 5 → 2 に変更します。
- s3InboundFileSynchronizingMessageSource 内に
messageSource.setMaxFetchSize(1);を追加し、S3 Bucket に見つけたファイルを全てダウンロードするのではなく 1ファイルだけダウンロードするようにします。 - downloadFromS3Flow のポーリング間隔を uploadToS3Flow と同じ 200ミリ秒にし、
.maxMessagesPerPoll(100)を削除します。
変更後に再度実行すると、最初はアップロードばかりが動きますが、途中からアップロードとダウンロードがバランスよく動くようになりました。

jar ファイルを作成してコマンドラインから実行してみます。まずは jar ファイルを生成して D:\eipapp\ksbysample-eipapp-integrationaws の下にコピーします。
コピー後、環境変数 AWS_REGION、AWS_ACCESS_KEY_ID、AWS_SECRET_ACCESS_KEY を設定してからアプリケーションを実行します。

ksbysample-eipapp-integrationaws.log を IntelliJ IDEA のメインメニューの「Tools」-「Tail File in Console...」で開いておきます。

upload ディレクトリに 30ファイル配置すると、ダウンロード・アップロードが実行されました。


Ctrl+C でアプリケーションを終了させた後、S3 にアップロードされたファイルを削除しておきます。
履歴
2018/09/11
初版発行。