Grooy スクリプトをそのまま渡して実行する Spring Boot+Picocli ベースのコマンドラインアプリを作成する ( その8 )( @SpringBootApplication アノテーションを付与した Groovy スクリプトで REST API サーバを作成する )
概要
記事一覧はこちらです。
今回は特別なことは何もしていないのに、妙に難しかったです。。。
参照したサイト・書籍
目次
- 今回実装する Groovy スクリプトの全体図
- build.gradle に記述しているモジュールを spring-boot-starter → spring-boot-starter-web に変更する
- Application.java の main メソッド内の処理を spring.main.web-application-type の値で切り替えるよう変更する
- application.properties に spring.main.web-application-type=none を追加する
- gse-servlet.bat を新規作成する
- JSON データを返す REST API サーバを起動する Groovy スクリプトを作成する
- 動作確認
手順
今回実装する Groovy スクリプトの全体図
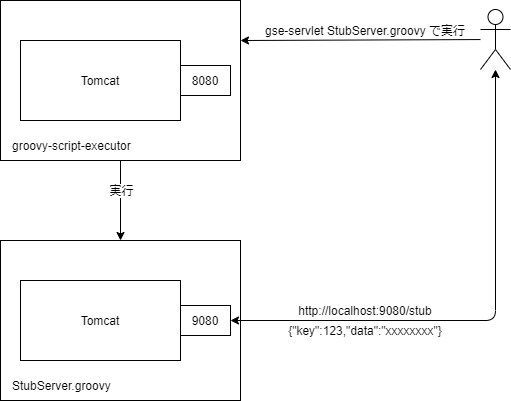
- StubServer.groovy という Groovy スクリプトを作成します。
- groovy-script-executor と StubServer.groovy の2つで Tomcat が起動します。ポート番号は同じものが使用できませんので、groovy-script-executor は 8080番ポートを、StubServer.groovy は 9080番ポートを使用します。
build.gradle に記述しているモジュールを spring-boot-starter → spring-boot-starter-web に変更する
groovy-script-executor/build.gradle を以下のように変更します。
dependencies {
    ..........

    // dependency-management-plugin によりバージョン番号が自動で設定されるもの
    // Dependency Versions ( https://docs.spring.io/spring-boot/docs/current/reference/html/dependency-versions.html#dependency-versions ) 参照
    implementation("org.springframework.boot:spring-boot-starter-web")
    implementation("org.springframework.integration:spring-integration-sftp")
    ..........
implementation("org.springframework.boot:spring-boot-starter")→implementation("org.springframework.boot:spring-boot-starter-web")に変更します。
Gradle Tool Window の左上にある「Refresh all Gradle projects」ボタンをクリックして更新します。
Application.java の main メソッド内の処理を spring.main.web-application-type の値で切り替えるよう変更する
groovy-script-executor/src/main/java/ksby/cmdapp/groovyscriptexecutor/Application.java を以下のように変更します。
@SpringBootApplication
public class Application implements CommandLineRunner, ExitCodeGenerator {

    ..........

    public static void main(String[] args) {
        String springMainWebApplicationType = System.getProperty("spring.main.web-application-type");
        ApplicationContext context = SpringApplication.run(Application.class, args);
        if (StringUtils.equals(springMainWebApplicationType, "none")) {
            System.exit(SpringApplication.exit(context));
        }
    }

    ..........
application.properties に spring.main.web-application-type=none を追加する
デフォルトでは groovy-script-executor で Tomcat が起動しないようにしたいので、groovy-script-executor/src/main/resources/application.properties に spring.main.web-application-type=none を追加します。
spring.main.banner-mode=off
spring.main.web-application-type=none

logging.level.root=ERROR
logging.level.com.jcraft.jsch=ERROR
logging.level.ksby.cmdapp.groovyscriptexecutor.script=INFO
logging.level.org.springframework.integration.expression.ExpressionUtils=ERROR
build タスクを実行し、生成した groovy-script-executor.jar を D:\tmp にコピーします。
gse-servlet.bat を新規作成する
groovy-script-executor/src/main/groovy/ksby/cmdapp/groovyscriptexecutor/script の下に gse.bat をコピーして gse-servlet.bat を新規作成し、以下の内容を記述します。
@echo off

java -Dfile.encoding=UTF-8 ^
     -XX:TieredStopAtLevel=1 ^
     -Dspring.main.lazy-initialization=true ^
     -Dspring.main.web-application-type=servlet ^
     -Dlogging.level.root=INFO ^
     -jar groovy-script-executor-1.0.0-RELEASE.jar ^
     %*
- gse.bat との違いは以下の2行を追記している点です。
-Dspring.main.web-application-type=servlet ^-Dlogging.level.root=INFO ^
-Dlogging.level.root=INFO ^は Tomcat 起動時のログを出力しておいた方が動作が分かりやすいので追加しています。
gse-servlet.bat を D:\tmp にコピーします。
JSON データを返す REST API サーバを起動する Groovy スクリプトを作成する
groovy-script-executor/src/main/groovy/ksby/cmdapp/groovyscriptexecutor/script の下に StubServer.groovy を新規作成し、以下のコードを記述します。
package ksby.cmdapp.groovyscriptexecutor.script


import org.springframework.boot.SpringApplication
import org.springframework.boot.autoconfigure.SpringBootApplication
import org.springframework.web.bind.annotation.GetMapping
import org.springframework.web.bind.annotation.RequestMapping
import org.springframework.web.bind.annotation.RestController

@SpringBootApplication
// @RestController アノテーションはここに付ける
@RestController
@RequestMapping("/stub")
class StubServer {

    static void main(String[] args) {
        // application.properties で指定した設定は groovy-script-executor に反映されて
        // Groovy スクリプトには反映されないので、Groovy スクリプトに設定したい項目は
        // main メソッドで System.setProperty(...) を呼び出して設定する
        System.setProperty("server.port", "9080")

        // args に null が渡されるが、null のまま SpringApplication.run(...) を呼び出すと
        // エラーになるので、args = new String[0] をセットする
        if (args == null) {
            args = new String[0]
        }
        SpringApplication.run(StubServer.class, args)
    }

    // フィールドに private を付けないこと
    static class ResponseData {

        int key

        String data

    }

    @GetMapping
    ResponseData stub() {
        return new ResponseData(key: 123, data: "xxxxxxxx")
    }

}
StubServer.groovy を D:\tmp にコピーします。
動作確認
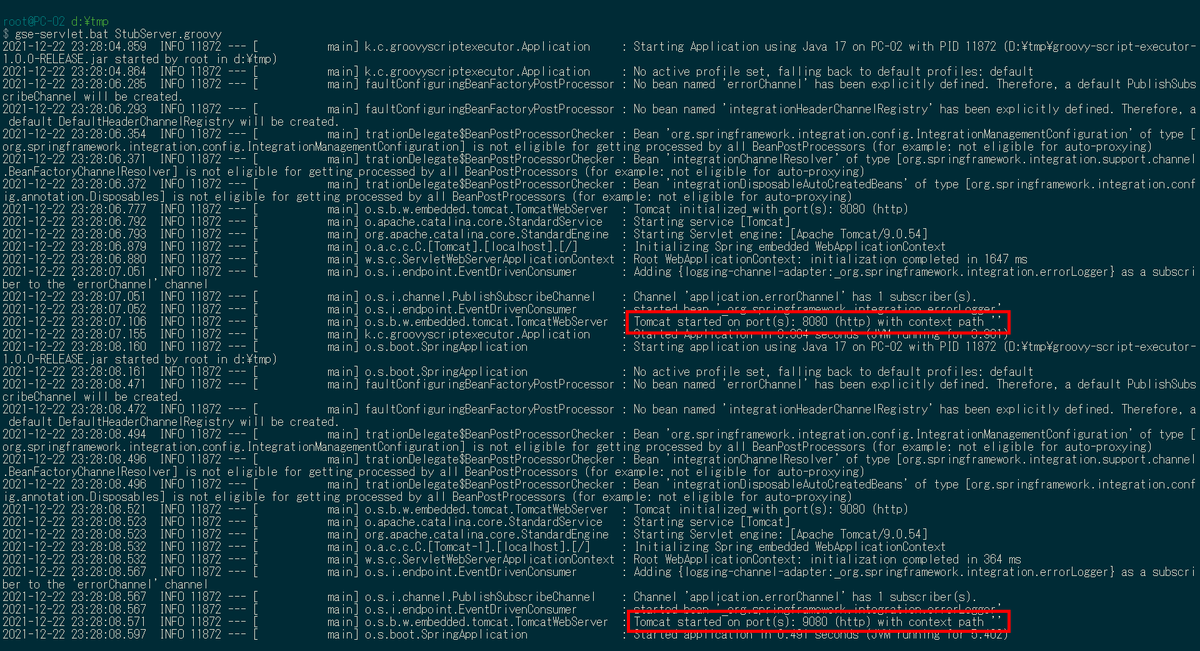
gse-servlet.bat StubServer.groovy コマンドを実行すると Tomcat が 8080番ポートと 9080番ポートで起動します。
curl -v http://localhost:8080/stub コマンドで 8080番ポートにアクセスしても HTTP ステータスコード = 404 が返ってきます。

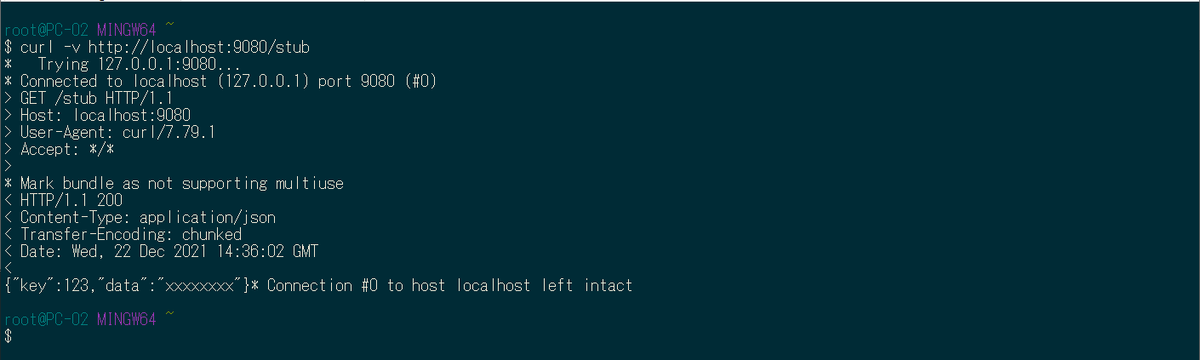
curl -v http://localhost:9080/stub コマンドで 9080番ポートにアクセスすると HTTP ステータスコード = 200 と {"key":123,"data":"xxxxxxxx"} の JSON データが返ってきます。
Ctrl+C を入力して groovy-script-executor を終了します。
docker-compose up -d コマンドを実行して SFTP サーバを起動した後、gse SftpClient.groovy --user=user01 --password=pass01 --upload-dir=upload --upload-file=publications.csv コマンドを実行すると SFTP クライアントの Groovy スクリプトも問題なく動作してファイルをアップロードしました。

履歴
2021/12/22
初版発行。