PlantUML 以外の diagram を AsciiDoc のドキュメントに埋め込んで見る(bpmn、bytefield 編)
Translate to English
https://translate.google.com/translate?sl=auto&tl=en&u=https%3A%2F%2Fksby.hatenablog.com%2Fentry%2F2021%2F01%2F31%2F191055
概要
記事一覧はこちらです。
AsciiDoc のドキュメントには PlantUML 以外の diagram も埋め込めるので、いくつか興味を持ったものを試してみます。diagram の生成には Kroki のコンテナを使用します。
全部で bpmn、bytefield、ditaa、C4 model の4つ試します。今回は bpmn、bytefield の2つです。
参照したサイト・書籍
gtudan / bpmn-js-cmd
https://github.com/gtudan/bpmn-js-cmdbpmn-js
https://bpmn.io/toolkit/bpmn-js/ABOUT THE BUSINESS PROCESS MODEL AND NOTATION SPECIFICATION VERSION 2.0.2
https://www.omg.org/spec/BPMNDeep-Symmetry / bytefield-svg
https://github.com/Deep-Symmetry/bytefield-svgByte Field SVG Builder
https://bytefield-svg.deepsymmetry.org/bytefield-svg/intro.htmlThe Clojure Programming Language
https://clojure.org/
目次
手順
bpmn の diagram を埋め込む
https://demo.bpmn.io/ で BPMN のワークフローを描き XML ファイルを出力する
https://bpmn.io/toolkit/bpmn-js/ の「Try Online」のボタンをクリックすると

BPMN diagram のエディタのページが開くので create リンクをクリックします。

以下のページが表示されるので、

BPMN の diagram を作成して画面左下の「Download as BPMN 2.0 file」ボタンをクリックします。このエディタ、かなり使い勝手がいいです。BPMN でなくてもフローチャートのようなものを描きたい時にも使えそうです。

diagram.bpmn というファイルがダウンロードされるので、

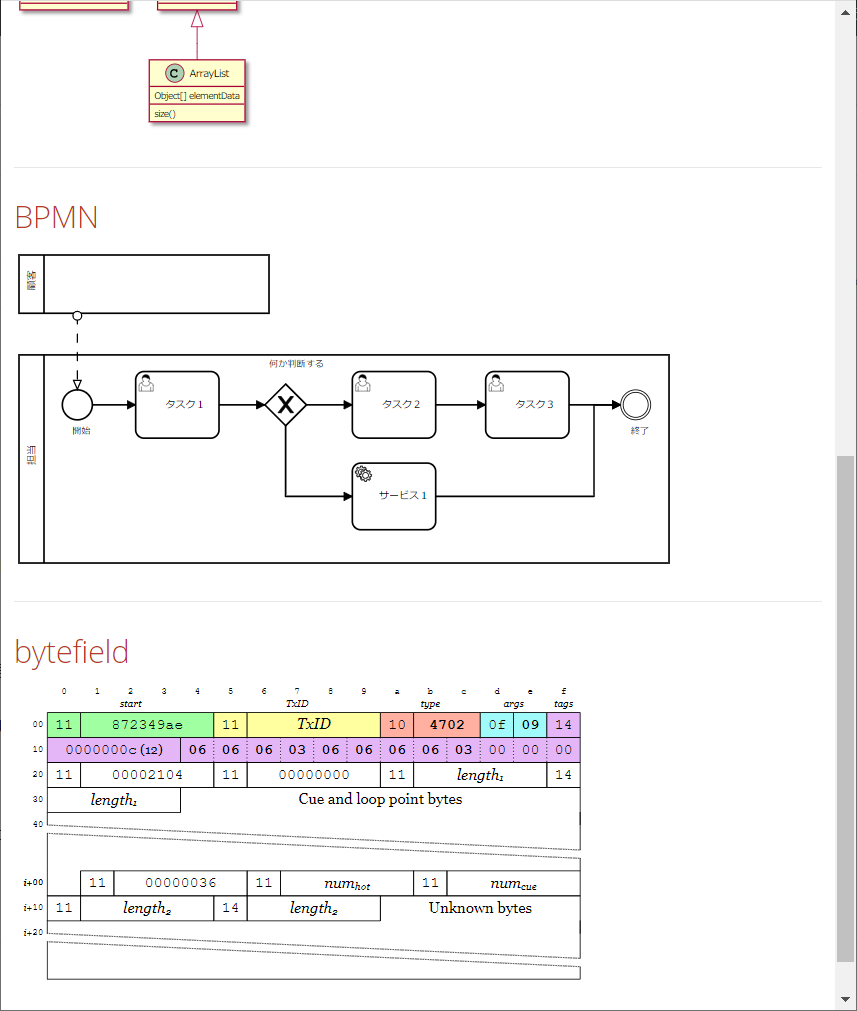
ファイル名を example-bpmn.xml に変更してから src/docs/asciidoc/03_diagram の下にコピーします。ファイルには以下の内容が出力されていました。
<?xml version="1.0" encoding="UTF-8"?>
<bpmn:definitions xmlns:xsi="http://www.w3.org/2001/XMLSchema-instance" xmlns:bpmn="http://www.omg.org/spec/BPMN/20100524/MODEL" xmlns:bpmndi="http://www.omg.org/spec/BPMN/20100524/DI" xmlns:dc="http://www.omg.org/spec/DD/20100524/DC" xmlns:di="http://www.omg.org/spec/DD/20100524/DI" id="Definitions_1v0204h" targetNamespace="http://bpmn.io/schema/bpmn" exporter="bpmn-js (https://demo.bpmn.io)" exporterVersion="8.2.0">
  <bpmn:collaboration id="Collaboration_0esz28g">
    <bpmn:participant id="Participant_1wt0hx7" name="担当" processRef="Process_1yvf2u7" />
    <bpmn:participant id="Participant_1ekcrhk" name="顧客" processRef="Process_0y1378r" />
    <bpmn:messageFlow id="Flow_0sr1ydc" sourceRef="Participant_1ekcrhk" targetRef="Event_0bfbply" />
  </bpmn:collaboration>
  <bpmn:process id="Process_1yvf2u7">
    <bpmn:startEvent id="Event_0bfbply" name="開始">
      <bpmn:outgoing>Flow_1bjdsif</bpmn:outgoing>
    </bpmn:startEvent>
    <bpmn:exclusiveGateway id="Gateway_0z7l85o" name="何か判断する">
      <bpmn:incoming>Flow_0awhuxb</bpmn:incoming>
      <bpmn:outgoing>Flow_1valj6w</bpmn:outgoing>
      <bpmn:outgoing>Flow_0zc3okk</bpmn:outgoing>
    </bpmn:exclusiveGateway>
    <bpmn:intermediateThrowEvent id="Event_1jvqnpo" name="終了">
      <bpmn:incoming>Flow_0txzrxj</bpmn:incoming>
      <bpmn:incoming>Flow_00oerl8</bpmn:incoming>
    </bpmn:intermediateThrowEvent>
    <bpmn:userTask id="Activity_0qztpf7" name="タスク1">
      <bpmn:incoming>Flow_1bjdsif</bpmn:incoming>
      <bpmn:outgoing>Flow_0awhuxb</bpmn:outgoing>
    </bpmn:userTask>
    <bpmn:userTask id="Activity_1vn6vl3" name="タスク2">
      <bpmn:incoming>Flow_1valj6w</bpmn:incoming>
      <bpmn:outgoing>Flow_0ads6v6</bpmn:outgoing>
    </bpmn:userTask>
    <bpmn:userTask id="Activity_1um5mkv" name="タスク3">
      <bpmn:incoming>Flow_0ads6v6</bpmn:incoming>
      <bpmn:outgoing>Flow_0txzrxj</bpmn:outgoing>
    </bpmn:userTask>
    <bpmn:serviceTask id="Activity_0p4qw7j" name="サービス1">
      <bpmn:incoming>Flow_0zc3okk</bpmn:incoming>
      <bpmn:outgoing>Flow_00oerl8</bpmn:outgoing>
    </bpmn:serviceTask>
    <bpmn:sequenceFlow id="Flow_1bjdsif" sourceRef="Event_0bfbply" targetRef="Activity_0qztpf7" />
    <bpmn:sequenceFlow id="Flow_0awhuxb" sourceRef="Activity_0qztpf7" targetRef="Gateway_0z7l85o" />
    <bpmn:sequenceFlow id="Flow_1valj6w" sourceRef="Gateway_0z7l85o" targetRef="Activity_1vn6vl3" />
    <bpmn:sequenceFlow id="Flow_0ads6v6" sourceRef="Activity_1vn6vl3" targetRef="Activity_1um5mkv" />
    <bpmn:sequenceFlow id="Flow_0txzrxj" sourceRef="Activity_1um5mkv" targetRef="Event_1jvqnpo" />
    <bpmn:sequenceFlow id="Flow_0zc3okk" sourceRef="Gateway_0z7l85o" targetRef="Activity_0p4qw7j" />
    <bpmn:sequenceFlow id="Flow_00oerl8" sourceRef="Activity_0p4qw7j" targetRef="Event_1jvqnpo" />
  </bpmn:process>
  <bpmn:process id="Process_0y1378r" />
  <bpmndi:BPMNDiagram id="BPMNDiagram_1">
    <bpmndi:BPMNPlane id="BPMNPlane_1" bpmnElement="Collaboration_0esz28g">
      <bpmndi:BPMNShape id="Participant_1wt0hx7_di" bpmnElement="Participant_1wt0hx7" isHorizontal="true">
        <dc:Bounds x="160" y="200" width="780" height="250" />
      </bpmndi:BPMNShape>
      <bpmndi:BPMNEdge id="Flow_1bjdsif_di" bpmnElement="Flow_1bjdsif">
        <di:waypoint x="248" y="260" />
        <di:waypoint x="300" y="260" />
      </bpmndi:BPMNEdge>
      <bpmndi:BPMNEdge id="Flow_0awhuxb_di" bpmnElement="Flow_0awhuxb">
        <di:waypoint x="400" y="260" />
        <di:waypoint x="455" y="260" />
      </bpmndi:BPMNEdge>
      <bpmndi:BPMNEdge id="Flow_1valj6w_di" bpmnElement="Flow_1valj6w">
        <di:waypoint x="505" y="260" />
        <di:waypoint x="560" y="260" />
      </bpmndi:BPMNEdge>
      <bpmndi:BPMNEdge id="Flow_0ads6v6_di" bpmnElement="Flow_0ads6v6">
        <di:waypoint x="660" y="260" />
        <di:waypoint x="720" y="260" />
      </bpmndi:BPMNEdge>
      <bpmndi:BPMNEdge id="Flow_0txzrxj_di" bpmnElement="Flow_0txzrxj">
        <di:waypoint x="820" y="260" />
        <di:waypoint x="882" y="260" />
      </bpmndi:BPMNEdge>
      <bpmndi:BPMNEdge id="Flow_0zc3okk_di" bpmnElement="Flow_0zc3okk">
        <di:waypoint x="480" y="285" />
        <di:waypoint x="480" y="370" />
        <di:waypoint x="560" y="370" />
      </bpmndi:BPMNEdge>
      <bpmndi:BPMNEdge id="Flow_00oerl8_di" bpmnElement="Flow_00oerl8">
        <di:waypoint x="660" y="370" />
        <di:waypoint x="850" y="370" />
        <di:waypoint x="850" y="260" />
        <di:waypoint x="882" y="260" />
      </bpmndi:BPMNEdge>
      <bpmndi:BPMNShape id="Event_0bfbply_di" bpmnElement="Event_0bfbply">
        <dc:Bounds x="212" y="242" width="36" height="36" />
        <bpmndi:BPMNLabel>
          <dc:Bounds x="219" y="285" width="23" height="14" />
        </bpmndi:BPMNLabel>
      </bpmndi:BPMNShape>
      <bpmndi:BPMNShape id="Gateway_0z7l85o_di" bpmnElement="Gateway_0z7l85o" isMarkerVisible="true">
        <dc:Bounds x="455" y="235" width="50" height="50" />
        <bpmndi:BPMNLabel>
          <dc:Bounds x="447" y="205" width="66" height="14" />
        </bpmndi:BPMNLabel>
      </bpmndi:BPMNShape>
      <bpmndi:BPMNShape id="Event_1jvqnpo_di" bpmnElement="Event_1jvqnpo">
        <dc:Bounds x="882" y="242" width="36" height="36" />
        <bpmndi:BPMNLabel>
          <dc:Bounds x="889" y="285" width="23" height="14" />
        </bpmndi:BPMNLabel>
      </bpmndi:BPMNShape>
      <bpmndi:BPMNShape id="Activity_104sj26_di" bpmnElement="Activity_0qztpf7">
        <dc:Bounds x="300" y="220" width="100" height="80" />
      </bpmndi:BPMNShape>
      <bpmndi:BPMNShape id="Activity_0sjnmyp_di" bpmnElement="Activity_1vn6vl3">
        <dc:Bounds x="560" y="220" width="100" height="80" />
      </bpmndi:BPMNShape>
      <bpmndi:BPMNShape id="Activity_079ttch_di" bpmnElement="Activity_1um5mkv">
        <dc:Bounds x="720" y="220" width="100" height="80" />
      </bpmndi:BPMNShape>
      <bpmndi:BPMNShape id="Activity_0mul251_di" bpmnElement="Activity_0p4qw7j">
        <dc:Bounds x="560" y="330" width="100" height="80" />
      </bpmndi:BPMNShape>
      <bpmndi:BPMNShape id="Participant_1ekcrhk_di" bpmnElement="Participant_1ekcrhk" isHorizontal="true">
        <dc:Bounds x="160" y="80" width="300" height="70" />
      </bpmndi:BPMNShape>
      <bpmndi:BPMNEdge id="Flow_0sr1ydc_di" bpmnElement="Flow_0sr1ydc">
        <di:waypoint x="230" y="153" />
        <di:waypoint x="230" y="242" />
      </bpmndi:BPMNEdge>
    </bpmndi:BPMNPlane>
  </bpmndi:BPMNDiagram>
</bpmn:definitions>
AsciiDoc のドキュメントに出力した XML ファイルを include する
src/docs/asciidoc/03_diagram/index.adoc に example-bpmn.xml を include します。
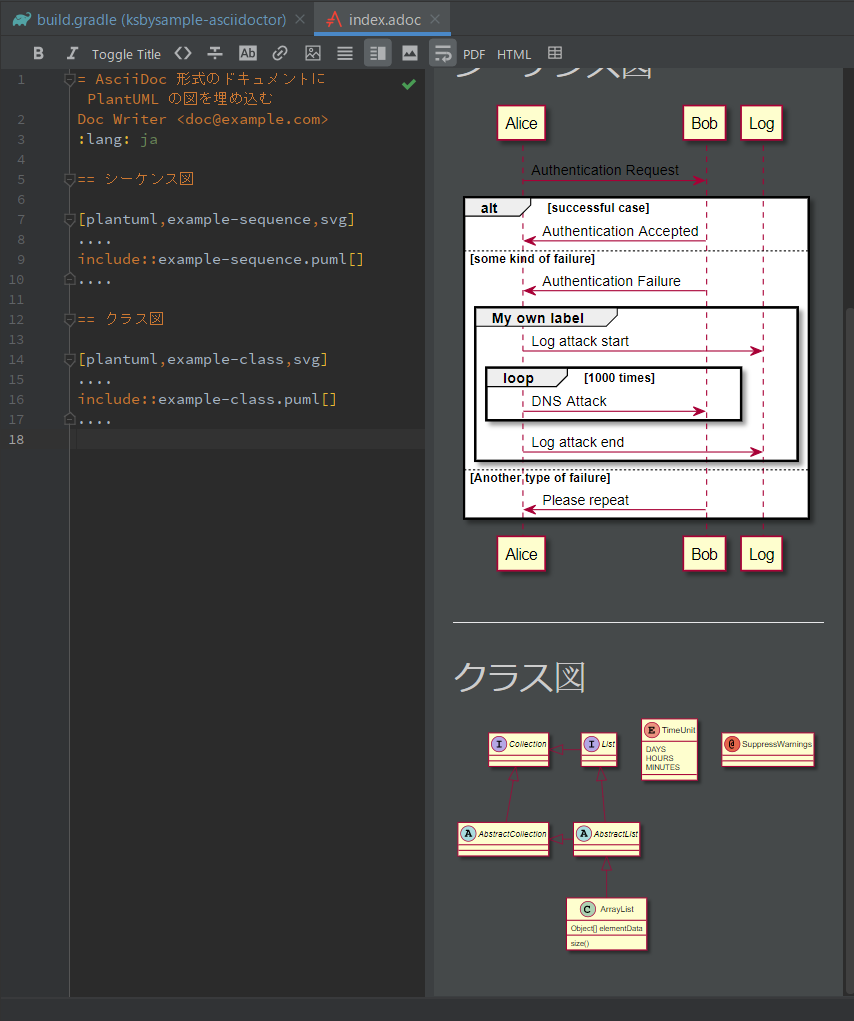
..........

== クラス図

[plantuml]
....
include::example-class.puml[]
....

== BPMN

[bpmn]
....
include::example-bpmn.xml[]
....
AsciiDoc Plugin の preview にも Kroki のコンテナで生成された diagram が表示されます。

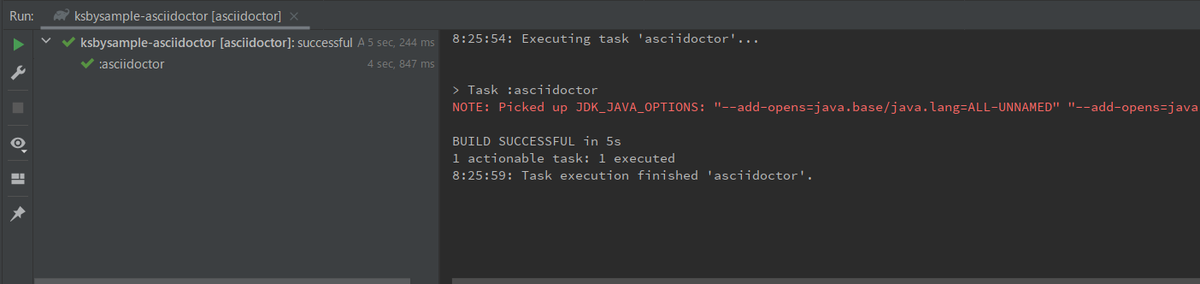
asciidoctorWithMoveDiagSvg タスクを実行して動作確認する
asciidoctorWithMoveDiagSvg タスクを実行すると BUILD SUCCESSFUL が表示されて、
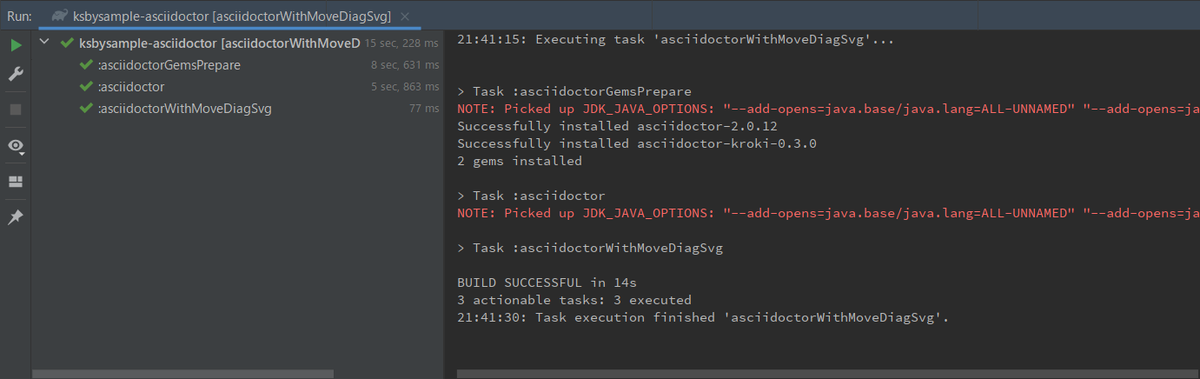
build/docs/asciidoc/03_diagram/index.html をブラウザで表示すると BPMN の diagram が表示されました。

bytefield の diagram を埋め込む
https://kroki.io/ の Bytefield のコードをファイルに保存する
こちらは https://kroki.io/ で Bytefield を選択して表示されたコードをコピーすることにします。Deep-Symmetry / bytefield-svg によると Clojure ベースの DSL とのことなので、src/docs/asciidoc/03_diagram の下に example-bytefield.clj というファイルを作成してコピペします。
拡張子 .clj のファイルに保存すると Clojure のコードと識別されて IntelliJ IDEA のエディタ上でシンタックスハイライトされます。

AsciiDoc のドキュメントに Bytefield のコードのファイルを include する
src/docs/asciidoc/03_diagram/index.adoc に example-bytefield.clj を include します。
..........

== BPMN

[bpmn]
....
include::example-bpmn.xml[]
....

== bytefield

[bytefield]
....
include::example-bytefield.clj[]
....
AsciiDoc Plugin の preview にも Kroki のコンテナで生成された diagram が表示されます。

asciidoctorWithMoveDiagSvg タスクを実行して動作確認する
asciidoctorWithMoveDiagSvg タスクを実行すると BUILD SUCCESSFUL が表示されて、

build/docs/asciidoc/03_diagram/index.html をブラウザで表示すると bytefield の diagram が表示されました。
履歴
2021/01/31
初版発行。
PlantUML の図を生成するモジュールを Asciidoctor Diagram → Kroki に変更する
Translate to English
https://translate.google.com/translate?sl=auto&tl=en&u=https%3A%2F%2Fksby.hatenablog.com%2Fentry%2F2021%2F01%2F26%2F234903
概要
記事一覧はこちらです。
Creating a Diagram には Asciidoctor Diagram が対応している Diagram Type が PlantUML 以外にも列挙されていますが、例えば mermaid のコードを adoc ファイル内に記述しても Failed to generate image: Could not find the 'mermaid' executable in PATH; と外部プログラムが見つからないというエラーが出て図が生成・表示されません。


また plantuml-stdlib / C4-PlantUML というものを見つけたのですが、Asciidoctor Diagram はこの PlantUML で C4 model を記述する方法に対応していません。
Kroki を利用すれば外部プログラムを個別にインストールせずに PlantUML やそれ以外の diagram を生成したり、C4 model を PlantUML で記述したコードから図を生成したりできるようなので試してみます。
参照したサイト・書籍
Kroki
https://kroki.io/Kroki Documentation
https://docs.kroki.io/kroki/【12/24にGitLab対応!】テキストで自在に「描く」- KrokiではじめるDiagram as Code
https://qiita.com/tomo_makes/items/7c42a736b30554e15c35plantuml-stdlib / C4-PlantUML
https://github.com/plantuml-stdlib/C4-PlantUMLThe C4 model for visualising software architecture
https://c4model.com/asciidoctor-kroki
https://rubygems.org/gems/asciidoctor-kroki/Mogztter / asciidoctor-kroki
https://github.com/Mogztter/asciidoctor-krokiRuby GEM support
https://asciidoctor.github.io/asciidoctor-gradle-plugin/development-3.x/user-guide/#asciidoctorj-gems-pluginHow can I configure the gradle asciidoctor 2.0 plugin to use pygments.rb as higlighter?
https://github.com/asciidoctor/asciidoctor-gradle-plugin/issues/326Copy
https://docs.gradle.org/current/dsl/org.gradle.api.tasks.Copy.htmlGradle - Delete files with certain extension
https://stackoverflow.com/questions/27285885/gradle-delete-files-with-certain-extension
目次
- Ruby の gem の asciidoctor-kroki を使用して asciidoctor タスク実行時に Kroki で図を生成するよう build.gradle を変更する
- asciidoctor タスクを実行して動作確認する
- Kroki の Docker image を利用してローカルでサーバを起動し、画像ファイルがローカルに保存されるようにする
手順
Ruby の gem の asciidoctor-kroki を使用して asciidoctor タスク実行時に Kroki で図を生成するよう build.gradle を変更する
Asciidoctor+Gradle の環境で Kroki を利用するにはどうすればよいのか調べてみたところ、
- Mogztter / asciidoctor-kroki が見つかりましたが、これは
An extension for Asciidoctor.jsとのこと。 - 他にも探すと Ruby の gem である asciidoctor-kroki が見つかりました。このページ右上の GitHub のアイコンをクリックすると Mogztter / asciidoctor-kroki に遷移しますので同じ機能を持つモジュールのようです。
- Asciidoctor Gradle Plugin のドキュメントを見ると Ruby GEM support の記述があり、Asciidoctor+Gradle の環境で Ruby の gem が利用できるとのこと。
ということで Ruby の gem の asciidoctor-kroki を利用するよう build.gradle を変更すれば Kroki を利用できるようです。
build.gradle を以下のように変更します。
plugins {
    id "org.asciidoctor.jvm.convert" version "3.3.0"
    id "org.asciidoctor.jvm.gems" version "3.3.0"
}

repositories {
    mavenCentral()
    ruby.gems()
}

dependencies {
    asciidoctorGems "rubygems:asciidoctor-kroki:0.3.0"
}

asciidoctor {
    dependsOn asciidoctorGemsPrepare
    sourceDir file("src/docs/asciidoc")
    baseDirFollowsSourceFile()
    sources {
        include "**/index.adoc"
    }
    resources {
        from("${sourceDir}") {
            include "**/*.png",
                    "**/*.js"
        }
    }
}

asciidoctorj {
    requires = [
            "asciidoctor-kroki"
    ]
    attributes "source-highlighter" : "rouge"
}
- plugins block に以下の行を追加します。
id "org.asciidoctor.jvm.gems" version "3.3.0"
- repositories block に以下の行を追加します。
ruby.gems()
dependencies { asciidoctorGems "rubygems:asciidoctor-kroki:0.3.0" }を追加します。- asciidoctor block に
dependsOn asciidoctorGemsPrepareを追加します。この記述を追加することが最初分からず asciidoctor タスクを実行すると以下の画像のエラーが出たのですが、 How can I configure the gradle asciidoctor 2.0 plugin to use pygments.rb as higlighter? の Issue に記述されているサンプルを見つけたのと、Asciidoctor Gradle Plugin のドキュメントにも asciidoctorGemsPrepare の記述があり、マネしてみたらうまく動きました。
 - asciidoctorj block の以下の点を変更します。
- Asciidoctor Diagram の設定は不要になるので
modules { diagram.use() diagram.version "2.1.0" }を削除します。 requires = [ "asciidoctor-kroki" ]を追加します。
- Asciidoctor Diagram の設定は不要になるので
asciidoctor タスクを実行して動作確認する
asciidoctor タスクを実行すると BUILD SUCCESSFUL が出力されますが、asciidoctor タスクの前に asciidoctorGemsPrepare タスクが実行されるようになり、また Java 11 を使っていることに伴う WARNING メッセージが出力されました。

WARNING メッセージが出力されないようにします。IntelliJ IDEA のメインメニューから「Run」-「Edit Configurations...」を選択して「Run/Debug Configurations」ダイアログを表示した後、「ksbysample-asciidoctor [asciidoctor]」 の Environment variables に "--add-opens=java.base/java.security=ALL-UNNAMED" を追加します。Environment variables にセットされている文字列は全体で JDK_JAVA_OPTIONS="--add-opens=java.base/java.lang=ALL-UNNAMED" "--add-opens=java.base/java.util=ALL-UNNAMED" "--add-opens=java.base/java.security=ALL-UNNAMED" "-Xverify:none" "-XX:TieredStopAtLevel=1" になります。

clean タスク実行 → asciidoctor タスク実行をすると今度は WARNING メッセージが出ませんでした。

build/docs/asciidoc/03_diagram/index.html が出力されており、それ以外に、
- build/.asciidoctorGems というディレクトリが出来ていました。Ruby の gem はここにダウンロードされるようです。
- build/docs/asciidoc/03_diagram の下に index.html は作成されていますが、example-sequence.svg、example-class.svg は作成されていませんでした。

index.html をエディタで開いてみると、<img src="https://kroki.io/plantuml/svg/..." alt="example-sequence"> のような img タグが記述されていました。svg の画像は Kroki のサーバ(https://kroki.io/)上に生成されているようです。

index.html をブラウザで開くと PlantUML の図が表示されました。

Kroki の Docker image を利用してローカルでサーバを起動し、画像ファイルがローカルに保存されるようにする
画像ファイルはローカルに保存しておきたいのと、Kroki は Docker image が提供されていてローカルでサーバを起動できるので、Docker で Kroki のコンテナを起動して、生成した画像ファイルもローカルにダウンロードして保存するようにします。
docker-compose.yml を作成し、Kroki のコンテナを起動するための設定を記述する
プロジェクトのルートディレクトリ直下に docker-compose.yml を新規作成し、Install Kroki に記載されている docker-compose.yml の記述をそのままコピペします。
version: "3"
services:
  core:
    image: yuzutech/kroki
    environment:
      - KROKI_BLOCKDIAG_HOST=blockdiag
      - KROKI_MERMAID_HOST=mermaid
      - KROKI_BPMN_HOST=bpmn
    ports:
      - "8000:8000"
  blockdiag:
    image: yuzutech/kroki-blockdiag
    expose:
      - "8001"
  mermaid:
    image: yuzutech/kroki-mermaid
    expose:
      - "8002"
  bpmn:
    image: yuzutech/kroki-bpmn
    expose:
      - "8003"
  excalidraw:
    image: yuzutech/kroki-excalidraw
    expose:
      - "8004"
docker-compose up -d を実行して Kroki のコンテナを起動する
docker-compose up -d を実行して Kroki のコンテナを起動します。

AsciiDoc Plugin の Preview が Kroki を利用するよう設定を変更する
AsciiDoc Plugin の Preview は Asciidoctor Diagram だけでなく Kroki にも対応しているので、ローカルで起動した Kroki のコンテナを利用するように設定を変更します。
IntelliJ IDEA の「Settings」ダイアログを開いてから画面左上の検索フィールドに Kroki と入力すると「Languages & Frameworks」-「AsciiDoc」が表示されるので選択します。その後画面左側の「Use Kroki to render diagrams instead of Asciidoctor Diagram」をチェックし、「URL of custom Kroki instance」に http://localhost:8000 を入力して「OK」ボタンをクリックします。

AsciiDoc Plugin の Preview で index.adoc を表示すると今度はクラス図も表示されるようになりました。
PlantUML integration Plugin には Kroki を利用する設定はないので、こちらは何もしません(何もしなくても C4 model を PlantUML で記述したコードから図を表示してくれました)。
asciidoctor タスク実行時にローカルで起動した Kroki のコンテナを利用するよう build.gradle を変更する
build.gradle を以下のように変更します。
..........

asciidoctorj {
    requires = [
            "asciidoctor-kroki"
    ]
    attributes "source-highlighter" : "rouge"
    attributes "kroki-server-url": "http://localhost:8000"
    attributes "kroki-fetch-diagram": "true"
}

// Kroki で生成してローカルにダウンロードした画像ファイルを asciidoctor.outputDir に移動する
task asciidoctorWithMoveDiagSvg(group: "documentation") {
    doLast {
        def moveFilePattern = "**/diag-*.svg"

        copy() {
            from(asciidoctor.sourceDir) {
                include moveFilePattern
            }
            into asciidoctor.outputDir
        }

        delete fileTree(asciidoctor.sourceDir) { include moveFilePattern }
    }
}
asciidoctorWithMoveDiagSvg.dependsOn asciidoctor
- asciidoctorj block に以下の2行を追加します。
attributes "kroki-server-url": "http://localhost:8000"attributes "kroki-fetch-diagram": "true"
task asciidoctorWithMoveDiagSvg(group: "documentation") { ... }、asciidoctorWithMoveDiagSvg.dependsOn asciidoctorを追加します。
上の変更から asciidoctorWithMoveDiagSvg タスクがない状態で asciidoctor タスクを実行すると build/docs/asciidoc/03_diagram/index.html の img タグには以下のように出力されるのですが、

Kroki で生成された画像ファイルは build ディレクトリではなく src/docs/asciidoc/03_diagram の下にダウンロードされるため、index.html をブラウザで表示させた時に PlantUML の図が表示されません。

src/docs/asciidoc/03_diagram/index.adoc の中で [plantuml,example-sequence,svg] → [plantuml,opts=inline] に変更すれば index.html の中に SVG のコードが出力されるので SVG のファイルを移動しなくてもよくなるのですが、今度は AsciiDoc Plugin の Preview に図が表示されません。

ブラウザの表示も AsciiDoc Plugin の Preview の表示もできるようにするために、asciidoctorWithMoveDiagSvg タスクを追加して asciidoctor タスク実行後に svg のファイルを移動することにしました。
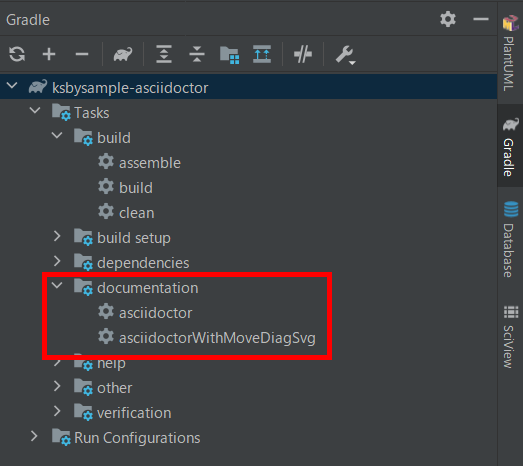
Gradle Tool Window 左上の「Reload All Gradle Projects」ボタンをクリックして更新すると、documentation の下に asciidoctorWithMoveDiagSvg タスクが表示されます。
index.adoc の plantuml の記述を変更する
Kroki を利用する場合、画像ファイル名を指定できないので、src/docs/asciidoc/03_diagram/index.adoc の [plantuml] の記述から画像ファイル名と画像のタイプの指定を削除します。
= AsciiDoc 形式のドキュメントに PlantUML の図を埋め込む
Doc Writer <doc@example.com>
:lang: ja

== シーケンス図

[plantuml]
....
include::example-sequence.puml[]
....

== クラス図

[plantuml]
....
include::example-class.puml[]
....
asciidoctorWithMoveDiagSvg タスクを実行して動作確認する
asciidoctorWithMoveDiagSvg タスクを実行すると Java 11 を使っていることに伴う WARNING メッセージが出力されました。asciidoctor タスクでなくなったので当然ですね。。。

「Run/Debug Configurations」ダイアログを表示した後、asciidoctor タスクの Environment variables に設定していた文字列を asciidoctorWithMoveDiagSvg タスクにも設定します。

再度 asciidoctorWithMoveDiagSvg タスクを実行すると今度は WARNING メッセージが出力されませんでした。

画像ファイルは build/docs/asciidoc/03_diagram の下に移動しており、

build/docs/asciidoc/03_diagram/index.html をブラウザで表示すると PlantUML の図も表示されました。

履歴
2021/01/26
初版発行。
Asciidoctor Diagram を使用して AsciiDoc 形式のドキュメントに PlantUML の図を埋め込む
Translate to English
https://translate.google.com/translate?sl=auto&tl=en&u=https%3A%2F%2Fksby.hatenablog.com%2Fentry%2F2021%2F01%2F24%2F094643
概要
記事一覧はこちらです。
Asciidoctor Diagram を使用することで AsciiDoc 形式のドキュメントに PlantUML の図を埋め込めるようなので試してみます。
参照したサイト・書籍
Asciidoctor Diagram
https://asciidoctor.org/docs/asciidoctor-diagram/asciidoctor / asciidoctor-diagram
https://github.com/asciidoctor/asciidoctor-diagramPlantUML 概要
https://plantuml.com/ja/Graphviz - Graph Visualization Software
https://graphviz.org/
目次
- build.gradle に Asciidoctor Diagram の設定を追加する
- src/docs/asciidoc/03_diagram ディレクトリを作成する
- index.adoc を作成し PlantUML の diagram を記述する
- asdiidoctor タスクを実行して PlantUML の図が表示されることを確認する
- Asciidoctor Diagram の 2.1.0 では Graphviz をインストールしていなくても画像ファイルが生成できるようになった模様
- PlantUML integration Plugin をインストールし、PlantUML のコードを拡張子 .puml の別ファイルに分ける
手順
build.gradle に Asciidoctor Diagram の設定を追加する
Using AsciidoctorJ Diagram を参考に build.gradle を以下のように変更します。
..........

asciidoctorj {
    modules {
        diagram.use()
        diagram.version "2.1.0"
    }
    attributes "source-highlighter" : "rouge"
}
- asciidoctorj block に
modules { ... }を追加します。Asciidoctor Diagram の最新バージョンは https://github.com/asciidoctor/asciidoctor-diagram で確認しました。
src/docs/asciidoc/03_diagram ディレクトリを作成する
src/docs/asciidoc の下に 03_diagram ディレクトリを作成します。
index.adoc を作成し PlantUML の diagram を記述する
src/docs/asciidoc/03_diagram の下に index.adoc を新規作成し、以下の内容を記述します。PlantUML のコードは https://plantuml.com/ja/ に掲載されていたものをコピーしました。
[plantuml, ...]を記述してから....~.....の間に PlantUML のコードを記述します。[plantuml, ...]の2番目のパラメータに生成する画像ファイル名、3番目のパラメータに生成する画像のタイプを記述します。- 各 diagram 毎の生成可能な画像のタイプは Creating a Diagram に記載されています。plantuml は png, svg, txt がサポートされていました。今回は svg を指定します。
= AsciiDoc 形式のドキュメントに PlantUML の図を埋め込む
Doc Writer <doc@example.com>
:lang: ja

== シーケンス図

[plantuml,example-sequence,svg]
....
@startuml
Alice -> Bob: Authentication Request

alt successful case

    Bob -> Alice: Authentication Accepted

else some kind of failure

    Bob -> Alice: Authentication Failure
    group My own label
    Alice -> Log : Log attack start
        loop 1000 times
            Alice -> Bob: DNS Attack
        end
    Alice -> Log : Log attack end
    end

else Another type of failure

   Bob -> Alice: Please repeat

end
@enduml
....

== クラス図

[plantuml,example-class,svg]
....
@startuml

abstract class AbstractList
abstract AbstractCollection
interface List
interface Collection

List <|-- AbstractList
Collection <|-- AbstractCollection

Collection <|- List
AbstractCollection <|- AbstractList
AbstractList <|-- ArrayList

class ArrayList {
  Object[] elementData
  size()
}

enum TimeUnit {
  DAYS
  HOURS
  MINUTES
}

annotation SuppressWarnings

@enduml
....
AsciiDoc Plugin の preview を見ると PlantUML の図が表示されません。エディタ上部に To be able to show diagrams in the preview, download asciidoctorj-diagram or enable Kroki in the settings. というメッセージが表示されていますので Yes, download now! をクリックします。

asciidoctorj-diagram の jar ファイルがダウンロードされて、今度は preview に PlantUML の図が表示されるようになりました。

ただし asciidoctorj-diagram の jar ファイルが 2.1.0 でないようで、クラス図の方は図が表示されませんでした。
asdiidoctor タスクを実行する
asciidoctor タスクを実行すると BUILD SUCCESSFUL が出力されました。

build/docs/asciidoc/03_diagram の下に index.html と画像ファイルが出力されており、

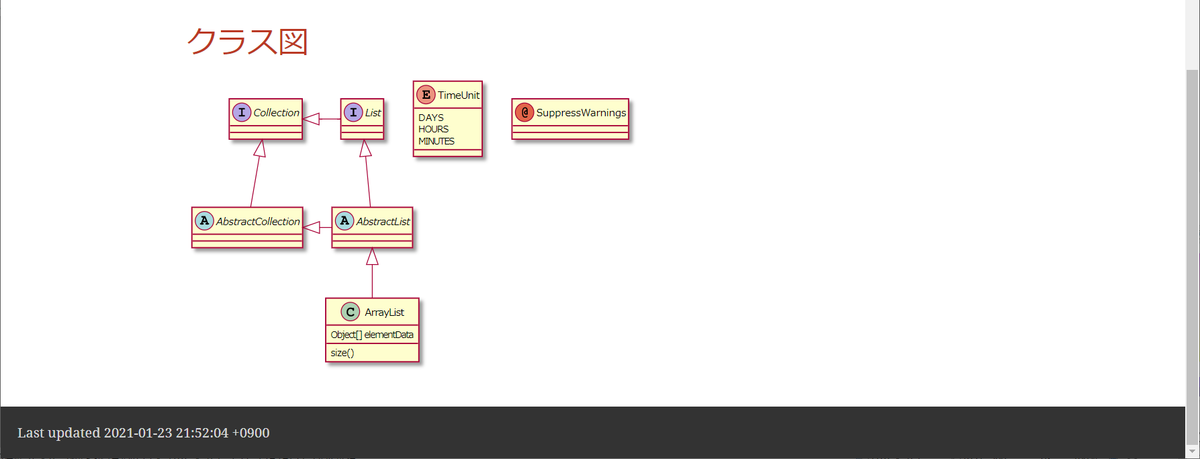
index.html をブラウザで開くと PlantUML の図が表示されました。

Asciidoctor Diagram の 2.1.0 では Graphviz をインストールしていなくても画像ファイルが生成できるようになった模様
build.gradle の diagram.version を 2.0.5 にしてから clean タスク実行 → asciidoctor タスク実行を行うと、
.........

asciidoctorj {
    modules {
        diagram.use()
        diagram.version "2.0.5"
    }
    attributes "source-highlighter" : "rouge"
}
build/docs/asciidoc/03_diagram/example-sequence.svg は図が表示されますが、

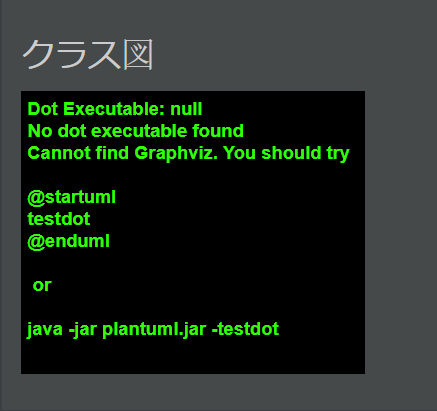
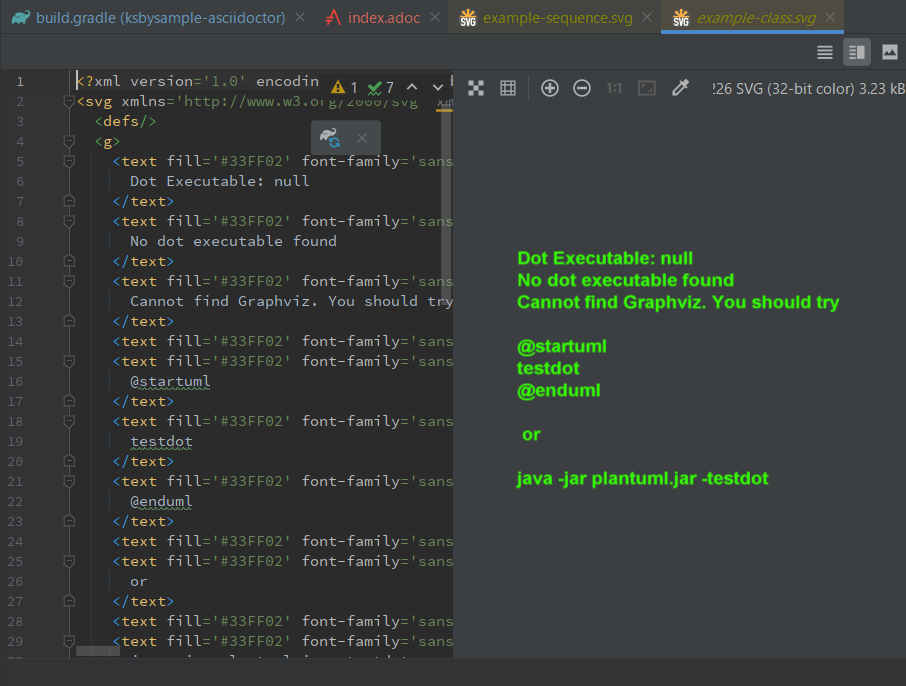
build/docs/asciidoc/03_diagram/example-class.svg は Dot Executable: null No dot executable found Cannot find Graphviz. のメッセージが表示されて図が生成されません。
このメッセージが表示された場合、Graphviz - Graph Visualization Software から Windows のインストーラーをダウンロードしてインストールすれば図が生成されるのですが、diagram.version を 2.1.0 にすると Graphviz がインストールされていなくてもどちらの図も生成されるようになりました。
PlantUML integration Plugin をインストールし、PlantUML のコードを拡張子 .puml の別ファイルに分ける
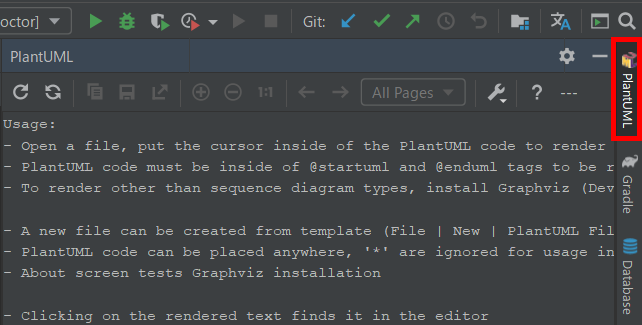
AsciiDoc Plugin の preview ではクラス図の方が表示されませんでしたが、IntelliJ IDEA には PlantUML integration Plugin があり、PlantUML のコードを拡張子 .puml のファイルに分けると PlantUML integration Plugin の画面に表示させることができます。PlantUML integration Plugin をインストールしてコードを別ファイルに分けてみます。
IntelliJ IDEA で「Settings」ダイアログを開き、plantuml で検索して PlantUML integration Plugin をインストールします。
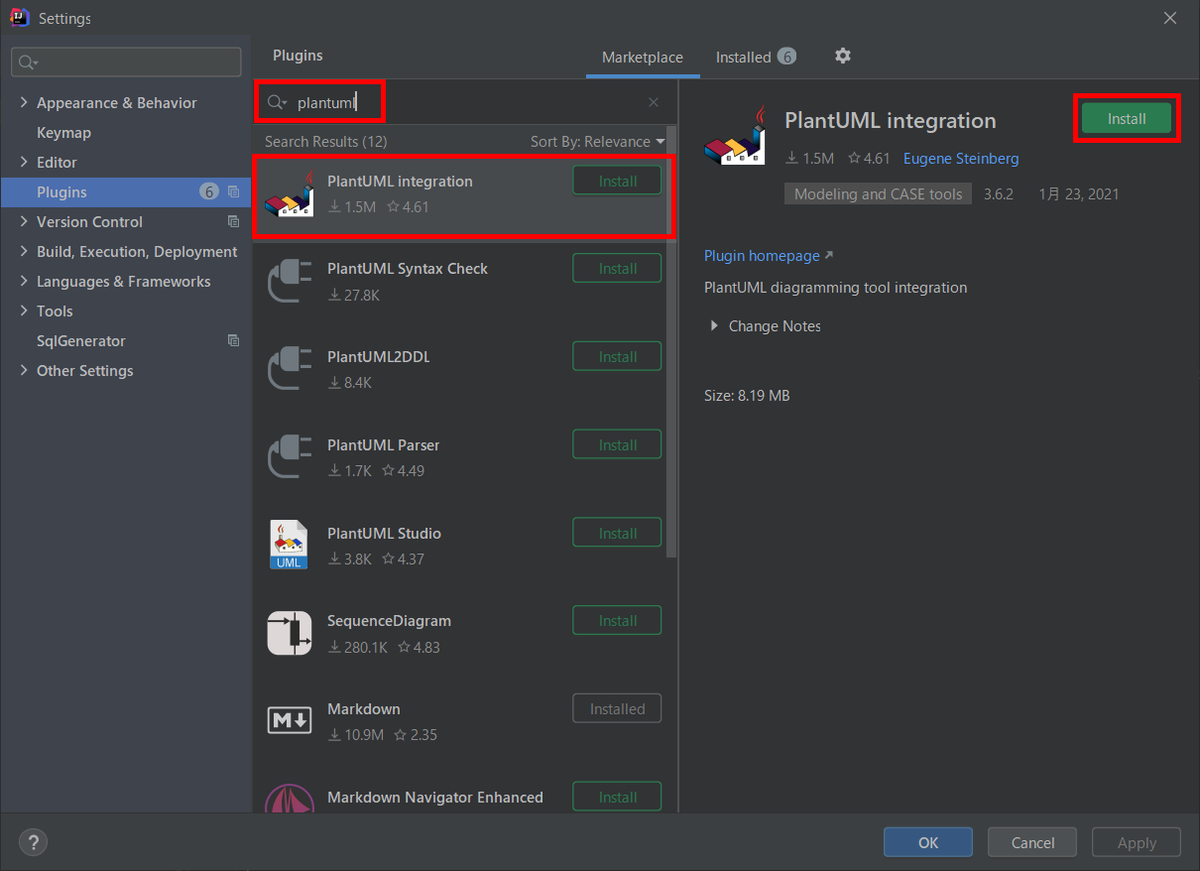
インストールすると IntelliJ IDEA の画面右側に「PlantUML」が表示されます。
src/docs/asciidoc/03_diagram の下に example-sequence.puml を新規作成し、index.adoc の [plantuml,example-sequence,svg] .... ~ .... の中のコードをこのファイルに移動します。生成されたシーケンス図が PlantUML integration Plugin の画面に表示されます。

src/docs/asciidoc/03_diagram の下に example-class.puml を新規作成し、index.adoc の [plantuml,example-class,svg] .... ~ .... の中のコードをこのファイルに移動します。生成されたクラス図が PlantUML integration Plugin の画面に表示されます。
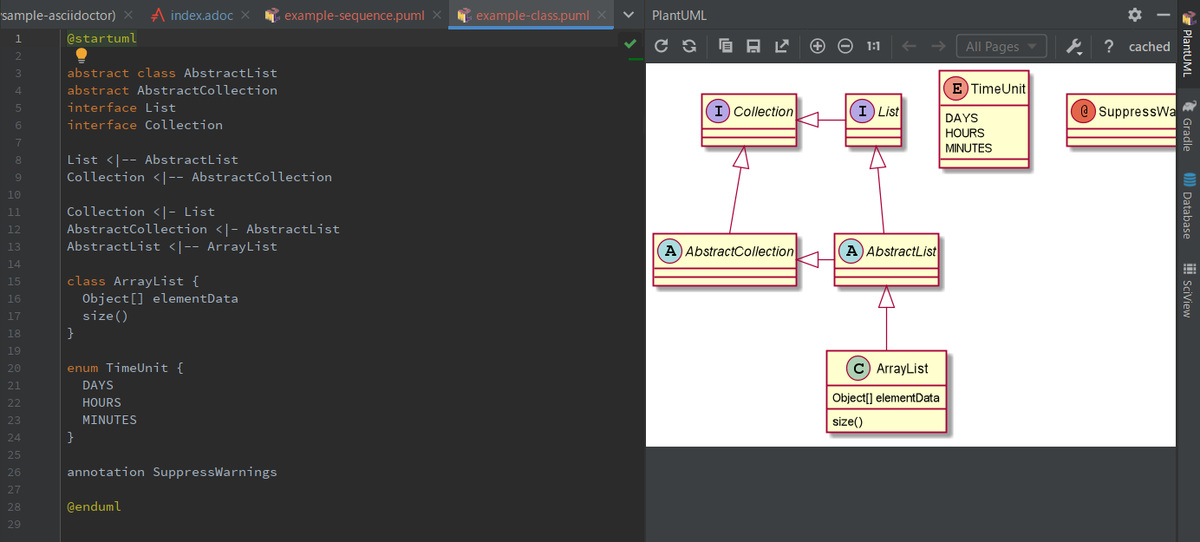
index.adoc では example-sequence.puml、example-class.puml を include するよう変更します。
= AsciiDoc 形式のドキュメントに PlantUML の図を埋め込む
Doc Writer <doc@example.com>
:lang: ja

== シーケンス図

[plantuml,example-sequence,svg]
....
include::example-sequence.puml[]
....

== クラス図

[plantuml,example-class,svg]
....
include::example-class.puml[]
....
include directive で別ファイルを取り込んでも AsciiDoc Plugin の preview に PlantUML の図が表示されます。

clean タスク実行 → asciidoctor タスク実行をすると BUILD SUCCESSFUL が表示されて、

build/docs/asciidoc/03_diagram の下にファイル分割前と同じように index.html 等が生成されており(拡張子 .puml のアイコンが PlantUML integration Plugin と同じアイコンになっています)、

index.html をブラウザで開くと PlantUML の図が表示されました。

履歴
2021/01/24
初版発行。
Antora で AsciiDoc 形式のドキュメントが保存されたレポジトリからドキュメントサイトを生成してみる
Translate to English
https://translate.google.com/translate?sl=auto&tl=en&u=https%3A%2F%2Fksby.hatenablog.com%2Fentry%2F2021%2F01%2F21%2F101651
概要
記事一覧はこちらです。
AsciiDoctor は AsciiDoc 形式のドキュメントから HTML ファイル等を作成するためのツールですが、Antora は AsciiDoc 形式のドキュメントが保存されたマルチレポジトリからファイルを取得してドキュメントサイトを生成するためのツールとのこと。TOC を作るだけでなく HTML ファイルを含めてサイト全体を作ってくれるらしい。
AsciiDoctor を使った方がよいのか Antora を使った方がよいのか少し悩みましたが、よく見ると開発している人は同じようです。Antora のページの一番下にどちらも記載されていました。
そもそも Antora の使い方を知らないので、環境を構築してドキュメントサイトを生成してみることにします。
参照したサイト・書籍
Antora
https://antora.org/Antora Documentation
https://docs.antora.org/antora/2.3/Announcing Antora
https://discuss.asciidoctor.org/Announcing-Antora-td6049.htmlConverting existing AsciiDoc into an Antora project
https://blog.anoff.io/2019-02-15-antora-first-steps/
目次
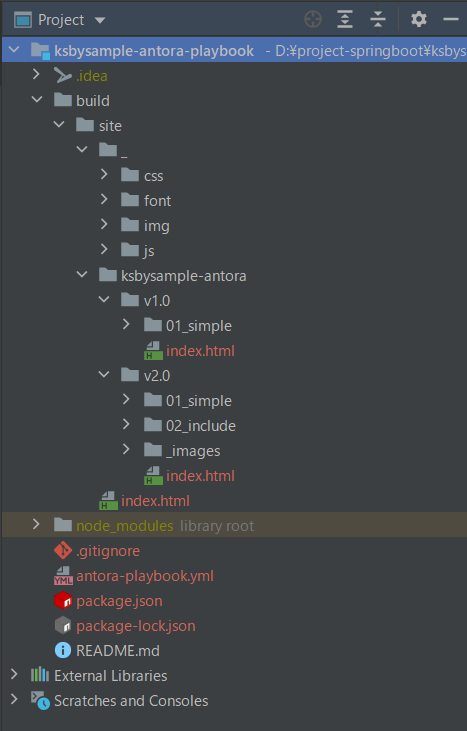
- Antora で生成されたサイトの画面構成のメモ書き
- サンプル作成の方針をまとめる
- ksbysample-antora レポジトリ(AsciiDoc 形式のドキュメントを置くレポジトリ)を作成する
- v1.0 ブランチを作成し ksbysample-asciidoctor レポジトリから 01_simple ディレクトリの adoc ファイルをコピーする
- v2.0 ブランチを作成し ksbysample-asciidoctor レポジトリから 02_include ディレクトリの adoc ファイルをコピーする
- ksbysample-antora-playbook レポジトリ(Antora をインストールしてドキュメントサイトを生成するためのレポジトリ)を作成する
- antora-playbook.yml を作成する
npm install --save-dev @antora/cli @antora/site-generator-defaultを実行するnpx antora --fetch antora-playbook.ymlを実行してドキュメントサイトを生成する
手順
Antora で生成されたサイトの画面構成のメモ書き
Antora で生成された画面とドキュメントが保存されたレポジトリ及びレポジトリ内のファイルの関係が分からなかったので、調べた内容のメモ書きです。

復数のレポジトリからドキュメントを収集して HTML ファイルを生成することができ、収集元のレポジトリが ② に表示されます。レポジトリから復数バージョン取得した時には以下のように表示される模様。表示させたいドキュメント(バージョン番号が表示されている部分)をクリックすると、①③④の表示が選択されたドキュメントに切り替わります。
①に表示されるのは Navigation と呼ばれており(https://docs.antora.org/antora/2.3/navigation/ 参照)、各レポジトリ内で nav.adoc のようなファイルに記述し(自動生成されるのではなく自分で記述します)、各レポジトリの antora.yml の
nav:に Navigation の adoc ファイルを列挙します。- ④の部分は普通に adoc ファイルを作成して AsciiDoc 形式で記述します。
- ③の部分(④に表示されるドキュメントの TOC)は Antora で HTML ファイルを生成する時に自動生成されます。
- ⑤の部分は antora-playbook.yml の ui.bundle.url で指定します。ただし「Search the docs」という入力フィールドがありますが、これは DocSearch というサービスによるもので Antora で生成できるものではありませんでした。
サンプル作成の方針をまとめる
- 1つのレポジトリ内に antora.yml、antora-playbook.yml を配置してドキュメントサイトを生成することもできるようですが、Antora は復数のレポジトリに作成されている AsciiDoc 形式のドキュメントを収集してドキュメントサイトを生成するためのツールなので、AsciiDoc 形式のドキュメントを置くレポジトリを1つ、Antora をインストールしてドキュメントサイトを生成するためのレポジトリを1つ作成することにします。
- ksbysample-antora(AsciiDoc 形式のドキュメントを置くレポジトリ)
- ksbysample-antora-playbook(Antora をインストールしてドキュメントサイトを生成するためのレポジトリ)
- ksbysample-antora レポジトリに置く AsciiDoc 形式のドキュメントは ksbysample-asciidoctor レポジトリからコピーします。
- ksbysample-antora レポジトリには v1.0 ブランチ(01_simple ディレクトリの adoc ファイルだけ格納する)、v2.0 ブランチ(02_include ディレクトリの adoc ファイルも格納する)の2つのブランチを作成し、ドキュメントサイト生成時にこの2つのブランチを指定します。
ksbysample-antora レポジトリ(AsciiDoc 形式のドキュメントを置くレポジトリ)を作成する
- Github で ksbysample-antora レポジトリ を作成します。
- D:\project-springboot\ksbysample-antora に clone します。
- プロジェクトのルートディレクトリの下に modules/ROOT/pages ディレクトリを作成します。ディレクトリ構成は Standard File and Directory Set 参照。
- .gitignore に以下の内容を記述します。
# Intellij project files
*.iml
*.ipr
*.iws
.idea/
v1.0 ブランチを作成し ksbysample-asciidoctor レポジトリから 01_simple ディレクトリの adoc ファイルをコピーする
main ブランチから v1.0 ブランチを作成する
main ブランチから v1.0 ブランチを作成します。
ksbysample-asciidoctor レポジトリから 01_simple ディレクトリの adoc ファイルをコピーする
ksbysample-asciidoctor レポジトリの src/docs/asciidoc ディレクトリの下の 01_simple/index.adoc をコピーし、modules/ROOT/pages の下にペーストします。
nav.adoc を作成する
modules/ROOT の下に nav.adoc を新規作成し、以下の内容を記述します。Navigation Files and Lists 参照。
* xref:ROOT:01_simple/index.adoc[Hello, AsciiDoc!]
antora.yml を作成する
プロジェクトのルートディレクトリ直下に antora.yml を新規作成し、以下の内容を記述します。What’s antora.yml? 参照。
name: ksbysample-antora
title: ksbysample-antora
version: v1.0
start_page: ROOT:01_simple/index.adoc
nav:
  - modules/ROOT/nav.adoc
v1.0 ブランチを main ブランチへマージする
v1.0 ブランチを main ブランチへマージします。ここまでで以下のディレクトリ構成になります。

v2.0 ブランチを作成し ksbysample-asciidoctor レポジトリから 02_include ディレクトリの adoc ファイルをコピーする
main ブランチから v2.0 ブランチを作成する
main ブランチから v2.0 ブランチを作成します。
ksbysample-asciidoctor レポジトリから 02_include ディレクトリの adoc ファイルをコピーする
ksbysample-asciidoctor レポジトリの src/docs/asciidoc ディレクトリの下の 02_include ディレクトリ をコピーし、modules/ROOT/pages の下にペーストします。index.adoc は使用しないので削除します。
次に Hierarchy and reserved names に従い、modules/ROOT/pages/02_include の下の images ディレクトリを modules/ROOT の下へ移動します。
画像のパスが変わるので modules/ROOT/pages/02_include/01.adoc を以下のように変更します。
.....

Shift キーを2回押してダイアログを表示した後、「Git」タブを選択してから `redis`(commit message にこの文字列が入力されているものがあります)と入力してみましたが、何も表示されず。。。

image::01-01.png[,420,423]

ダイアログ右上の「Filter」ボタンをクリックすると「Commit by hash」しかチェックされていませんでした。

image::01-02.png[,558,158]

「All」ボタンをクリックして全てチェックすると commit message も検索してヒットしたものが表示されるようになりました。

image::images/01-03.png[,562,179]
images::の後のimages/を取り除きます。image::images/01-01.png[,420,423]→image::01-01.png[,420,423]image::images/01-02.png[,558,158]→image::01-02.png[,558,158]image::images/01-03.png[,562,179]→image::01-03.png[,562,179]
変更すると AsciiDoc Plugin の preview に画像が表示されるようになりました。Antora のディレクトリ構成にしておくと自動で判別して表示くれるようです。
またエディタ上部に表示されている It seems you are editing a document that is part of an Antora module. Do you want to learn more how this plugin can support you? のメッセージの Yes, tell me more! のリンクをクリックすると AsciiDoc Plugin の Antora に関するドキュメント にジャンプします(このページも Antora で作成されていました)。
nav.adoc を変更する
modules/ROOT/nav.adoc に .include directive で章毎にファイルを分けてみる 以降の記述を追加します。
* xref:ROOT:01_simple/index.adoc[Hello, AsciiDoc!]

.include directive で章毎にファイルを分けてみる
* xref:ROOT:02_include/01.adoc[IntelliJ IDEA 2020.3 新機能メモ書き]
* xref:ROOT:02_include/02.adoc[Asciidoctor+Gradle の環境で AsciiDoc 形式のドキュメントから HTML ファイルを生成してみる]
antora.yml を変更する
antora.yml を以下のように変更します(version を変更しただけです)。
name: ksbysample-antora
title: ksbysample-antora
version: v2.0
start_page: ROOT:01_simple/index.adoc
nav:
  - modules/ROOT/nav.adoc
v2.0 ブランチを main ブランチへマージする
v2.0 ブランチを main ブランチへマージします。ここまでで以下のディレクトリ構成になります。

Git のレポジトリは以下のようになっています。

ksbysample-antora-playbook レポジトリ(Antora をインストールしてドキュメントサイトを生成するためのレポジトリ)を作成する
- Github で ksbysample-antora-playbook レポジトリ を作成します。
- D:\project-springboot\ksbysample-antora-playbook に clone します。
- .gitignore に以下の内容を記述します。
# Intellij project files
*.iml
*.ipr
*.iws
.idea/

# Node.js, npm
node_modules/
npm-debug.log

# Antora
build/
antora-playbook.yml を作成する
プロジェクトのルートディレクトリ直下に antora-playbook.yml を新規作成し、以下の内容を記述します。Set Up a Playbook を参考に記述しており、ui.bundle はそのままコピーしています。
site:
  title: ksbysample-document-site
  start_page: ksbysample-antora::01_simple/index.adoc
content:
  sources:
    - url: https://github.com/ksby/ksbysample-antora.git
      branches: [v2.0, v1.0]
ui:
  bundle:
    url: https://gitlab.com/antora/antora-ui-default/-/jobs/artifacts/master/raw/build/ui-bundle.zip?job=bundle-stable
    snapshot: true
npm install --save-dev @antora/cli @antora/site-generator-default を実行する
Install Antora を見て、以下のコマンドを実行します。ドキュメントには global にインストールするよう記述されていますが、今回はプロジェクト内にインストールします。
npm init -ynpm install --save-dev @antora/cli @antora/site-generator-default


npx antora --fetch antora-playbook.yml を実行してドキュメントサイトを生成する
npx antora --fetch antora-playbook.yml を実行します。

ドキュメントサイトのファイルが build ディレクトリの下に生成されます。以下のディレクトリ構成になりました。
build/site/index.html を開くと v2.0 のドキュメントが表示されます。日本語の表示はそのままでも十分見やすい印象です。


左下のレポジトリ一覧を表示させると ksbysample-antora に v2.0、v1.0 が表示されており、

v1.0 をクリックすると 01_simple ディレクトリのドキュメントだけが表示されました。

AsciiDoctor もいいけど Antora もいいですね。Web で調べていた時には少し使いづらい、Sphinx の方がよい(Doma 2 のドキュメントが Sphinx ですね)、というコメントも見かけましたが個人的には好みです。
あと Spring の Documentation の左側の TOC(自動的に開閉するタイプ)があまり好みではないので、Antora で作って、かつ DocSearch を入れてくれないかな。。。と、今回調べていてちょっと思いました。
履歴
2021/01/21
初版発行。
TOC(Table of Contents)を自動生成して表示させる
Translate to English
https://translate.google.com/translate?sl=auto&tl=en&u=https%3A%2F%2Fksby.hatenablog.com%2Fentry%2F2021%2F01%2F16%2F180857
概要
記事一覧はこちらです。
AsciiDoc で作成されたドキュメントを見ると右か左に TOC(Table of Contents)が表示されています。Spring Boot や JUnit 5 のドキュメントだと下にスクロールさせると TOC が自動的に展開されて現在見ている section が分かるようになっています。TOC(Table of Contents)があるとドキュメントが見やすいので、同じように表示させてみます。
- AsciiDoc Writer’s Guide
- Asciidoctor Gradle Plugin Suite
- Spring Boot Reference Documentation
- JUnit 5 User Guide
- Draw.io Integration for IntelliJ
個人的には以下のドキュメントの TOC(Table of Contents)の方が好みなので、この TOC の実現方法も調べてみます。
参照したサイト・書籍
Automatic Table of Contents
https://docs.asciidoctor.org/asciidoc/latest/toc/unit-team / junit5/documentation/src/docs/asciidoc/
https://github.com/junit-team/junit5/tree/main/documentation/src/docs/asciidocAdd expandable/collapsable TOC
https://github.com/asciidoctor/asciidoctor/issues/699copyfiles
https://www.npmjs.com/package/copyfilesAsciidoctor Gradle Examples
https://asciidoctor.github.io/asciidoctor-gradle-examples/- 今回の記事とは直接関係がありませんが、見つけたのでメモとして書いておきます。
目次
- document header に
:toc: left、:toclevels: 4を追加して TOC を表示させる - Tocbot を導入して TOC が自動展開される+参照中の section が分かるようにする
- AsciiDoc Language Documentation、Asciidoctor Documentation と同じ TOC の実現は次回へ
手順
document header に :toc: left、:toclevels: 4 を追加して TOC を表示させる
Spring Boot Reference Documentation の adoc ファイルを参考に document header を追加する で追加しなかった :toc: left、:toclevels: 4 を document header に追加して TOC を自動生成させてみます。
src/docs/asciidoc/02_include/index.adoc を以下のように変更します。
= include directive で章毎にファイルを分けてみる
:lang: ja
:doctype: book
:idprefix:
:idseparator: -
:toc: left
:toclevels: 4
:tabsize: 4
:sectanchors:
:sectnums:
:icons: font
:hide-uri-scheme:
:docinfo: shared,private
:docinfodir: ../../docinfo

include::01.adoc[leveloffset=+1]
include::02.adoc[leveloffset=+1]
- 以下の2行を追加します。
:toc: left:toclevels: 4
asciidoctor タスクを実行して html を表示させてみると左側に TOC が表示されましたが、TOC は展開済みの状態で、下にスクロールした時に TOC が自動的に展開されて現在見ている section が分かるようにはなっていませんでした。:toc: を追加するだけでは実現できないようです。

Tocbot を導入して TOC が自動展開される+参照中の section が分かるようにする
TOC を自動的に展開して現在見ている section が分かるようにする方法を調べたところ、JUnit 5 のドキュメントのソース https://github.com/junit-team/junit5/tree/main/documentation/src/docs/asciidoc で Tocbot を使って実現していることが分かりました。
asciidoctor の GitHub にも Add expandable/collapsable TOC の Issue がありました。
同じようにすれば実現できそうです。
npm init -y を実行する
Tocbot のファイルは npm でダウンロードするので、まずは npm init -y を実行します(Node.js、npm のインストールは以下の記事参照)。
- Spring Boot + npm + Geb で入力フォームを作ってテストする ( その4 )( nodist + Node.js のインストール )
- Spring Boot + npm + Geb で入力フォームを作ってテストする ( その80 )( nodist を 0.8.8 → 0.9.1 へ、Node.js を 8.11.4 → 10.15.3 へ、npm を 6.2.0-next.1 → 6.9.0 へバージョンアップする )
- Spring Boot + npm + Geb で入力フォームを作ってテストする ( その85 )( Node.js を 10.15.3 → 12.16.3 へ、npm を 6.9.0 → 6.14.5 へバージョンアップする )

npm install --save tocbot を実行する
npm install --save tocbot を実行して Tocbot のファイルをダウンロードします。

node_modules ディレクトリが作成されたので .gitignore に無視するよう設定を追加します。
# Gradle
.gradle/
build/

# Intellij project files
*.iml
*.ipr
*.iws
.idea/

# Node.js, npm
node_modules/
npm-debug.log
src/docs/asciidoc/js ディレクトリを作成して Tocbot の js ファイルをコピーする
npm scripts でファイルをコピーするのに以前は cpx をインストールして使っていましたが、最近使われているモジュールを調べてみるとダウンロード数が多いのは ncp らしいです。
copy vs copyfiles vs cpx vs ncp vs npm-build-tools というサイトを見つけました。ncp は最後のリリースは 6年前ですが圧倒的にダウンロード数が多く、次の copyfiles は最後のリリースが2ヶ月前ですが ncp よりダウンロード数は少ない模様。
今回は copyfiles をインストールして使うことにします。また rimraf、npm-run-all もインストールしたいので、以下のコマンドを実行します。
npm install --save-dev copyfilesnpm install --save-dev rimrafnpm install --save-dev npm-run-all

package.json に postinstall と copy:tocbot の npm scripts を追加してから、
  ..........
  "scripts": {
    "postinstall": "run-s copy:tocbot",
    "copy:tocbot": "copyfiles -f node_modules/tocbot/dist/*.js src/docs/asciidoc/js"
  },
  ..........
npm ci コマンドを実行すると、

src/docs/asciidoc/js ディレクトリが作成されて、その下に tocbot.js、tocbot.min.js がコピーされます。

asciidoctor タスク実行時に js ファイルが build ディレクトリにコピーされるようにする
build.gradle を以下のように変更します。
..........

asciidoctor {
    sourceDir file("src/docs/asciidoc")
    baseDirFollowsSourceFile()
    sources {
        include "**/index.adoc"
    }
    resources {
        from("${sourceDir}") {
            include "**/*.png",
                    "**/*.js"
        }
    }
}

..........
- asciidoctor block の resources の中に
"**/*.js"を追加します。
docinfo.html、docinfo-footer.html に Tocbot を使用するために必要なコードを記述する
Add expandable/collapsable TOC に docinfo.html、docinfo-footer.html に記述するサンプルがありますので、それを流用して記述します(ほとんどコピーですが流用元の URL の追加と Tocbot の最新版 4.12.1 を使うための設定の追加をしています)。
まずは docinfo.html から。
<style>
..........

/* Source: https://github.com/asciidoctor/asciidoctor/issues/699#issuecomment-321066006 */
#tocbot a.toc-link.node-name--H1{ font-style: italic }
@media screen{
    #tocbot > ul.toc-list{ margin-bottom: 0.5em; margin-left: 0.125em }
    #tocbot ul.sectlevel0, #tocbot a.toc-link.node-name--H1 + ul{
        padding-left: 0 }
    #tocbot a.toc-link{ height:100% }
    .is-collapsible{ max-height:3000px; overflow:hidden; }
    .is-collapsed{ max-height:0 }
    .is-active-link{ font-weight:700 }
}
@media print{
    #tocbot a.toc-link.node-name--H4{ display:none }
}
</style>
次に docinfo-footer.html。ファイル自体がないので src/docs/docinfo ディレクトリの下に新規作成してから以下の内容を記述します。こちらは Ctrl+Alt+L でフォーマットした後、先頭のコードを <script src="/assets/js/tocbot.js"></script> → <script src="../js/tocbot.min.js"></script> へ、tocbot のバージョン番号を 3.0.2 → 4.12.1 へ変更しています。
<!--Source: https://github.com/asciidoctor/asciidoctor/issues/699#issuecomment-321066006-->
<script src="../js/tocbot.min.js"></script>
<script>
  /* Tocbot dynamic TOC, works with tocbot 4.12.1 */
  var oldtoc = document.getElementById('toctitle').nextElementSibling;
  var newtoc = document.createElement('div');
  newtoc.setAttribute('id', 'tocbot');
  newtoc.setAttribute('class', 'js-toc');
  oldtoc.parentNode.replaceChild(newtoc, oldtoc);
  tocbot.init({
    contentSelector: '#content',
    headingSelector: 'h1, h2, h3, h4',
    smoothScroll: false
  });
  var handleTocOnResize = function () {
    var width = window.innerWidth
      || document.documentElement.clientWidth
      || document.body.clientWidth;
    if (width < 768) {
      tocbot.refresh({
        contentSelector: '#content',
        headingSelector: 'h1, h2, h3, h4',
        collapseDepth: 6,
        activeLinkClass: 'ignoreactive',
        throttleTimeout: 1000,
        smoothScroll: false
      });
    } else {
      tocbot.refresh({
        contentSelector: '#content',
        headingSelector: 'h1, h2, h3, h4',
        smoothScroll: false
      });
    }
  };
  window.addEventListener('resize', handleTocOnResize);
  handleTocOnResize();
</script>
asciidoctor タスクを実行して動作確認する
asciidoctor タスクを実行すると BUILD SUCCESSFUL のメッセージが出力されて、
build/docs/asciidoc/js が作成されて、その下に tocbot.js がコピーされており、

index.html を開くと左側に TOC が表示されて、下にスクロールすると TOC が自動的に展開されて現在見ている section が分かるようになりました。

実現できた!と思ったのですが、よく見ると一番上位の階層になぜか番号が余計に付いています。。。

http://tscanlin.github.io/tocbot/ の「API」-「Options」を見ると orderedList という項目があり orderedList can be set to false to generate unordered lists (ul) instead of ordered lists (ol) との記述がありました。おそらくこれを false に設定すれば番号は付かなくなるはず。
src/docs/docinfo/docinfo-footer.html を以下のように変更します。
<!--Source: https://github.com/asciidoctor/asciidoctor/issues/699#issuecomment-321066006-->
<script src="../js/tocbot.min.js"></script>
<script>
  /* Tocbot dynamic TOC, works with tocbot 4.12.1 */
  var oldtoc = document.getElementById('toctitle').nextElementSibling;
  var newtoc = document.createElement('div');
  newtoc.setAttribute('id', 'tocbot');
  newtoc.setAttribute('class', 'js-toc');
  oldtoc.parentNode.replaceChild(newtoc, oldtoc);
  tocbot.init({
    contentSelector: '#content',
    headingSelector: 'h1, h2, h3, h4',
    smoothScroll: false
  });
  var handleTocOnResize = function () {
    var width = window.innerWidth
      || document.documentElement.clientWidth
      || document.body.clientWidth;
    if (width < 768) {
      tocbot.refresh({
        contentSelector: '#content',
        headingSelector: 'h1, h2, h3, h4',
        collapseDepth: 6,
        activeLinkClass: 'ignoreactive',
        throttleTimeout: 1000,
        smoothScroll: false,
        orderedList: false
      });
    } else {
      tocbot.refresh({
        contentSelector: '#content',
        headingSelector: 'h1, h2, h3, h4',
        smoothScroll: false,
        orderedList: false
      });
    }
  };
  window.addEventListener('resize', handleTocOnResize);
  handleTocOnResize();
</script>
tocbot.refresh({ ... });を呼び出しているところ(2ヶ所)にorderedList: falseを追加しました。
asciidoctor タスクを実行して index.html を開くと、今度は番号が付いていませんでした。

AsciiDoc Language Documentation、Asciidoctor Documentation と同じ TOC の実現は次回へ
AsciiDoc Language Documentation のソース https://github.com/asciidoctor/asciidoc-docs の記述を見るとと The documentation site is built using Antora. の記述があり、Antora で構築されているとのこと。
Antora で検索すると以下のサイトが見つかりました。
今回はここで区切って Antora を使用するのは次回にします。
履歴
2021/01/16
初版発行。
include directive で adoc ファイルを分ける時に AsciiDoc Plugin の preview が表示されるようにする
Translate to English
https://translate.google.com/translate?sl=auto&tl=en&u=https%3A%2F%2Fksby.hatenablog.com%2Fentry%2F2021%2F01%2F13%2F193258
概要
記事一覧はこちらです。
前回の include directive で章毎に adoc ファイルを分けてみる で、adoc ファイルを include した時に AsciiDoc Plugin の preview にイメージが表示されず、かつ index.adoc 内の記述に赤波下線が表示されていたので、それらを解消します。
参照したサイト・書籍
- Include directives and base directory
https://asciidoctor.github.io/asciidoctor-gradle-plugin/master/user-guide/#_include_directives_and_base_directory
目次
- build.gradle に
baseDirFollowsSourceFile()を追加する - src/docs/asciidoc/02_include/index.adoc を変更する
- asciidoctor タスクを実行して結果を確認する
手順
build.gradle に baseDirFollowsSourceFile() を追加する
Asciidoctor Gradle Plugin Suite の Include directives and base directory を見ると include directive は baseDir に設定されたディレクトリを基準にファイルの位置を判断する模様。
この section には baseDir... で始まるメソッドが4つ記載されていますが、index.adoc のあるディレクトリが baseDir になると AsciiDoc Plugin の preview も表示されるようになるので baseDirFollowsSourceFile() を使用することにします。
build.gradle の asciidoctor block に baseDirFollowsSourceFile() を追加します。
..........

asciidoctor {
    sourceDir file("src/docs/asciidoc")
    baseDirFollowsSourceFile()
    sources {
        include "**/index.adoc"
    }
    resources {
        from("${sourceDir}") {
            include "**/*.png"
        }
    }
}

..........
src/docs/asciidoc/02_include/index.adoc を変更する
src/docs/asciidoc/02_include/index.adoc を以下のように変更します。
= include directive で章毎にファイルを分けてみる
:lang: ja
:doctype: book
:idprefix:
:idseparator: -
:tabsize: 4
:sectanchors:
:sectnums:
:icons: font
:hide-uri-scheme:
:docinfo: shared,private
:docinfodir: ../../docinfo

include::01.adoc[leveloffset=+1]
include::02.adoc[leveloffset=+1]
- docinfodir の Path も baseDir のディレクトリを基準に判断されるので、
:docinfodir: src/docs/docinfo→:docinfodir: ../../docinfoに変更します。 - include directive で指定している Path から
src/docs/asciidoc/02_include/を削除してファイル名だけにします。
index.adoc に赤波下線が表示されなくなり、AsciiDoc Plugin の preview 上に include した adoc ファイルの内容が表示されるようになりました。

asciidoctor タスクを実行して結果を確認する
asciidoctor タスクを実行すると特にエラーメッセージは出ずに BUILD SUCCESSFUL が出力されて、

build/docs/asciidoc/02_include/index.html を表示すると include したファイルの内容が表示されており、docinfo.html の css も適用されて本文のフォントがゴシック体になっていました。

adoc ファイルを同じディレクトリ内に配置するならばこの方法で良さそうです。
履歴
2021/01/13
初版発行。
include directive で章毎に adoc ファイルを分けてみる
Translate to English
https://translate.google.com/translate?sl=auto&tl=en&u=https%3A%2F%2Fksby.hatenablog.com%2Fentry%2F2021%2F01%2F13%2F002928
概要
記事一覧はこちらです。
Spring Boot Reference Documentation の AsciiDoc 形式のドキュメントのソースが https://github.com/spring-projects/spring-boot/tree/master/spring-boot-project/spring-boot-docs/src/docs/asciidoc にありますが、index.singleadoc の中を見てみると各章は個別のファイルに記述してそれを include directive で取り込んでいました。
同じことを試してみます。
参照したサイト・書籍
目次
- src/docs/asciidoc/index.adoc を src/docs/asciidoc/01_simple の下に移動する
- src/docs/asciidoc の下に 02_include ディレクトリを作成する
- 01.adoc を作成する
- 02.adoc を作成する
- index.adoc を作成して 01.adoc、02.adoc を include する
- build.gradle を変更し asciidoctor タスクを実行する
- Spring Boot Reference Documentation の adoc ファイルを参考に document header を追加する
- dockinfo.html に css を記述して出力された html の見た目を変更する
手順
src/docs/asciidoc/index.adoc を src/docs/asciidoc/01_simple の下に移動する
今後のサンプルは src/docs/asciidoc ディレクトリの下に 01、02、..... と連番の付いたディレクトリを作成してその下に作成するようにしたいので、src/docs/asciidoc の下に 01_simple ディレクトリを作成して src/docs/asciidoc/index.adoc をその下に移動します。
build.gradle を以下のように変更します。
..........

asciidoctor {
    sourceDir file("src/docs/asciidoc")
    sources {
        include "01_simple/index.adoc"
    }
}

..........
- asciidoctor block で
include "index.adoc"→include "01_simple/index.adoc"に変更します。
src/docs/asciidoc の下に 02_include ディレクトリを作成する
src/docs/asciidoc の下に 02_include ディレクトリを作成します。
01.adoc を作成する
include directive で取り込むファイルとして 01.adoc、02.adoc の2つのファイルを作成します。
まずは 01.adoc から。IntelliJ IDEA 2020.3 新機能メモ書き の記事の一部をコピーして作成します。画像ファイルを3つ src/docs/asciidoc/02_include/images の下に 01-01.png、01-02.png、01-03.png のファイル名で配置します。
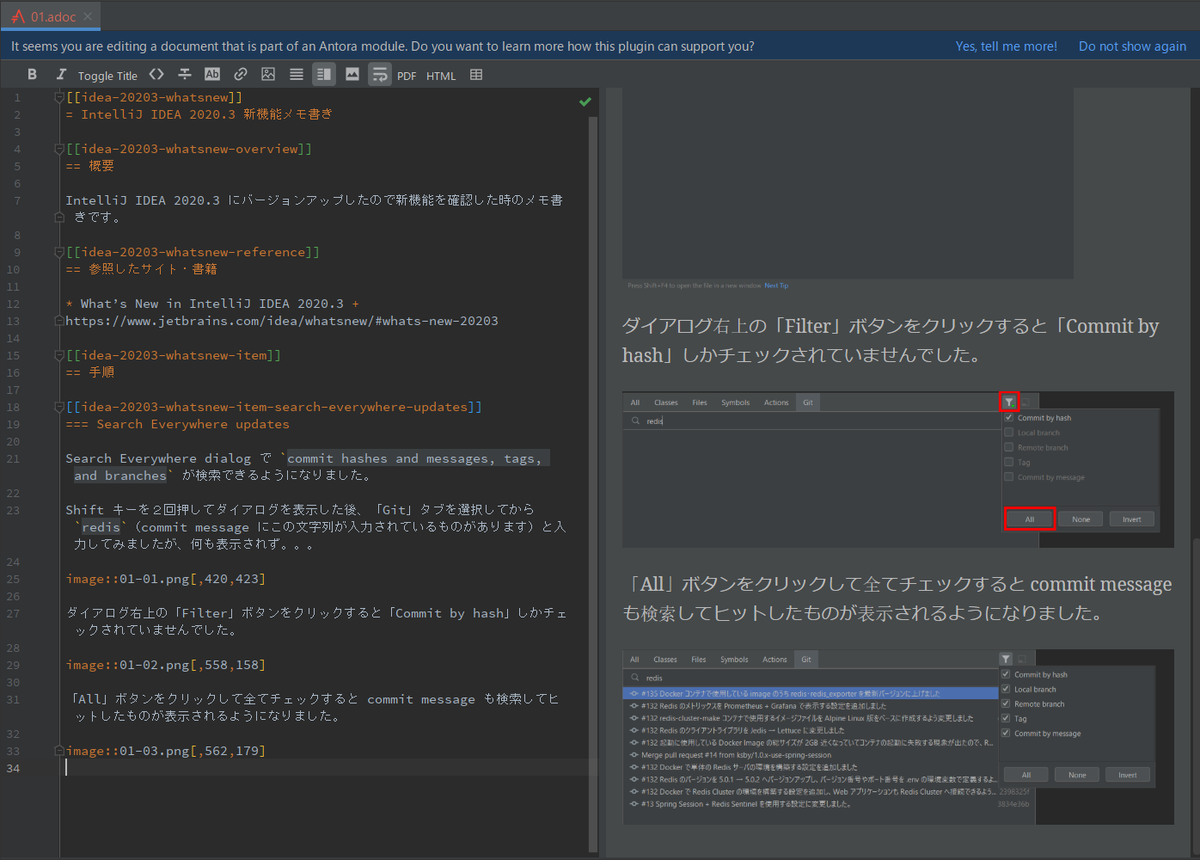
[[idea-20203-whatsnew]]
= IntelliJ IDEA 2020.3 新機能メモ書き

[[idea-20203-whatsnew-overview]]
== 概要

IntelliJ IDEA 2020.3 にバージョンアップしたので新機能を確認した時のメモ書きです。

[[idea-20203-whatsnew-reference]]
== 参照したサイト・書籍

* What’s New in IntelliJ IDEA 2020.3 +
https://www.jetbrains.com/idea/whatsnew/#whats-new-20203

[[idea-20203-whatsnew-item]]
== 手順

[[idea-20203-whatsnew-item-search-everywhere-updates]]
=== Search Everywhere updates

Search Everywhere dialog で `commit hashes and messages, tags, and branches` が検索できるようになりました。

Shift キーを2回押してダイアログを表示した後、「Git」タブを選択してから `redis`(commit message にこの文字列が入力されているものがあります)と入力してみましたが、何も表示されず。。。

image::images/01-01.png[,420,423]

ダイアログ右上の「Filter」ボタンをクリックすると「Commit by hash」しかチェックされていませんでした。

image::images/01-02.png[,558,158]

「All」ボタンをクリックして全てチェックすると commit message も検索してヒットしたものが表示されるようになりました。

image::images/01-03.png[,562,179]
02.adoc を作成する
次は 02.adoc。Asciidoctor+Gradle の環境で AsciiDoc 形式のドキュメントから HTML ファイルを生成してみる の記事の一部をコピーして作成します。
[[asciidoctor-gradle-makehtml]]
= Asciidoctor+Gradle の環境で AsciiDoc 形式のドキュメントから HTML ファイルを生成してみる
[[asciidoctor-gradle-makehtml-overview]]
== 概要
https://docs.spring.io/spring-boot/docs/current/reference/htmlsingle/[Spring Boot Reference Documentation] が AsciiDoc 形式のドキュメントで記述されていることは知っていたのですが、これまで AsciiDoc 形式で記述したことがありませんでした。 https://junit.org/junit5/docs/current/user-guide/[JUnit 5 のドキュメント] やこの前 https://ksby.hatenablog.com/entry/2020/12/26/233231[Spring Boot 2.2.x の Web アプリを 2.3.x へバージョンアップする ( 番外編 )( IntelliJ IDEA の docToolchain/diagrams.net-intellij-plugin を追加する )] でインストールした https://drawio-intellij-plugin.netlify.app/[diagrams.net-intellij-plugin のドキュメント] も AsciiDoc で記述されており、興味が湧いたので使い方を調べてみます。
AsciiDoc でドキュメントを生成するツールとして Asciidoctor があり、Asciidoctor には Gradle の Plugin が存在するので、Asciidoctor+Gradle で環境を構築します。
[[asciidoctor-gradle-makehtml-item]]
== 手順
[[asciidoctor-gradle-makehtml-item-makeproject]]
=== ksbysample-asciidoctor プロジェクトを作成する
. Github で ksbysample-asciidoctor レポジトリ を作成します。
. D:\project-springboot\ksbysample-asciidoctor に clone します。
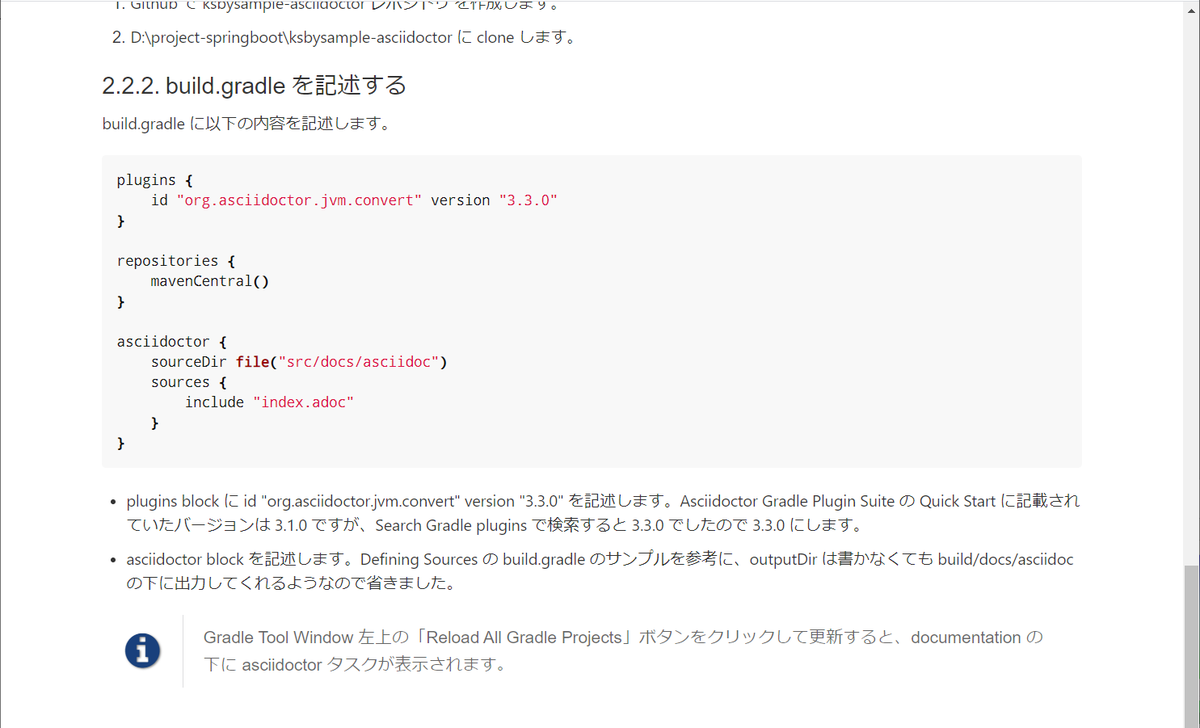
[[asciidoctor-gradle-makehtml-item-write-buildgradle]]
=== build.gradle を記述する
build.gradle に以下の内容を記述します。
[source,groovy]
----
plugins {
id "org.asciidoctor.jvm.convert" version "3.3.0"
}
repositories {
mavenCentral()
}
asciidoctor {
sourceDir file("src/docs/asciidoc")
sources {
include "index.adoc"
}
}
----
* plugins block に id "org.asciidoctor.jvm.convert" version "3.3.0" を記述します。Asciidoctor Gradle Plugin Suite の Quick Start に記載されていたバージョンは 3.1.0 ですが、Search Gradle plugins で検索すると 3.3.0 でしたので 3.3.0 にします。
* asciidoctor block を記述します。Defining Sources の build.gradle のサンプルを参考に、outputDir は書かなくても build/docs/asciidoc の下に出力してくれるようなので省きました。
NOTE: Gradle Tool Window 左上の「Reload All Gradle Projects」ボタンをクリックして更新すると、documentation の下に asciidoctor タスクが表示されます。
index.adoc を作成して 01.adoc、02.adoc を include する
index.adoc を作成します。
= include directive で章毎にファイルを分けてみる
:lang: ja

include::src/docs/asciidoc/02_include/01.adoc[leveloffset=+1]
include::src/docs/asciidoc/02_include/02.adoc[leveloffset=+1]
include するファイルのパスは project のルートディレクトリからのパスを指定すれば読み込んでくれるのですが、この記述の仕方だと赤波下線が表示されて、かつ preview に 01.adoc、02.adoc の内容が表示されません。。。
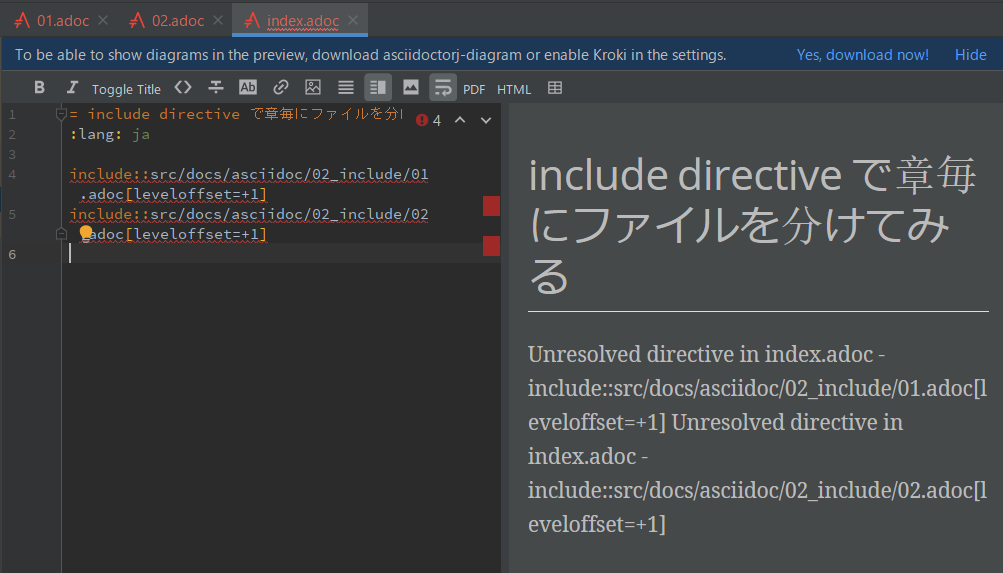
build.gradle を変更し asciidoctor タスクを実行する
build.gradle を以下のように変更します。
..........

asciidoctor {
    sourceDir file("src/docs/asciidoc")
    sources {
        include "**/index.adoc"
    }
    resources {
        from("${sourceDir}") {
            include "**/*.png"
        }
    }
}

..........
- asciidoctor block の以下の点を変更します。
- sources block の include を
"01_simple/index.adoc"→"**/index.adoc"に変更します。 resources { ... }を追加して、asciidoctor タスク実行時に画像ファイルが build ディレクトリにコピーされるようにします。
- sources block の include を
asciidoctor タスクを実行すると無事 BUILD SUCCESSFUL が出力されました。

ディレクトリ構成は以下のようになり、
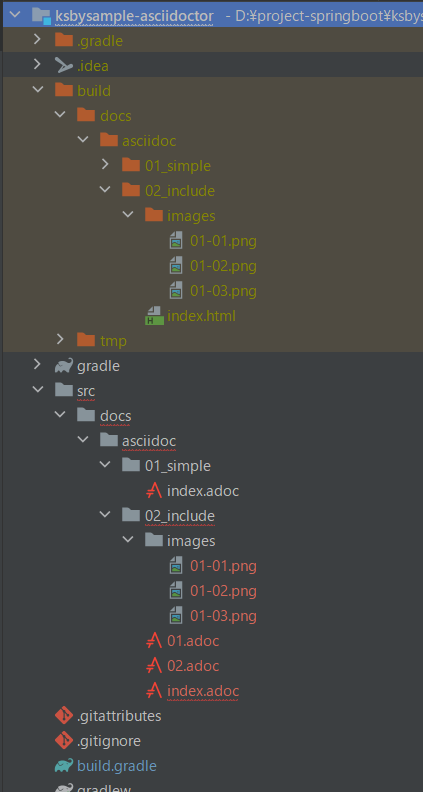
build/docs/asciidoc/02_include/index.html をブラウザで開くと以下の画像のように表示されました。

Spring Boot Reference Documentation の adoc ファイルを参考に document header を追加する
https://github.com/spring-projects/spring-boot/blob/master/spring-boot-project/spring-boot-docs/src/docs/asciidoc/attributes.adoc のファイルを参考にして document header をいくつか追加します。
:doctype: book- https://docs.asciidoctor.org/asciidoc/latest/document/doctypes/ 参照。
- adoc ファイルを include しているところで
[leveloffset=+1]を指定しているので:doctype: bookの記述がなくてもいいのですが、今回は追加しておくことにします。
:idprefix:、:idseparator: -- https://docs.asciidoctor.org/asciidoc/latest/sections/id-prefix-and-separator/ 参照。
- 今回作成している 01.adoc、02.adoc では section 毎に
[[...]]で id を記述していて section ID が autogenerate されないので関係ないのですが、同じように追加することにします。
:toc: left、:toclevels: 4- 目次を作るための document header です。今回は作成しないので追加しません。
:tabsize: 4- https://docs.asciidoctor.org/asciidoc/latest/attributes/document-attributes-reference/#general-content-and-formatting-attributes 参照。
- 設定しておくと tab を space に変換してくれます。IDEA で adoc ファイルを記述していれば自動で space になりますが、同じように追加しておくことにします。
:numbered:- 各 section 毎に番号を振ってくれるのは
:sectnums:があれば十分で、こちらが何の機能なのかがよく分からず。今は追加しないことにします。
- 各 section 毎に番号を振ってくれるのは
:sectanchors:- https://docs.asciidoctor.org/asciidoc/latest/sections/title-links/#anchor 参照。
- section の左側に
§の anchor を付けてくれます。便利なので追加します。
:sectnums:- https://docs.asciidoctor.org/asciidoc/latest/sections/numbers/ 参照。
- section 毎に番号を振ってくれるようになります。便利なので追加します。
:icons: font- https://docs.asciidoctor.org/asciidoc/latest/macros/icons/ 参照。
- https://asciidoctor.org/docs/asciidoc-writers-guide/#admonitions に記述されている
NOTE等の文字の後に文章を書くと以下の画像のようになりますが、
:icons: fontを document header に書いておくと左の表示がアイコンになります。アイコンの方が分かりやすいので追加します。
:hide-uri-scheme:- https://docs.asciidoctor.org/asciidoc/latest/macros/links/#hide-uri-scheme 参照。
- リンク URL から scheme の部分を取り除いてくれるらしい(今回 adoc ファイル内にリンクを書いていないのでよく分からず)。とりあえず追加しておきます。
:docinfo: shared,private- https://docs.asciidoctor.org/asciidoctor/latest/docinfo/ 参照。
sharedを指定しておくと:docinfodir:で指定したディレクトリの下にあるdockinfo.htmlの内容を header に、dockinfo-footer.htmlの内容を footer に差し込んでくれます。privateを指定しておくと:docinfodir:で指定したディレクトリの下にある<docname>-dockinfo.htmlの内容を header に、<docname>-dockinfo-footer.htmlの内容を footer に差し込んでくれます。- 便利そうなので同じように追加します。
index.adoc は以下のようになります。
= include directive で章毎にファイルを分けてみる
:lang: ja
:doctype: book
:idprefix:
:idseparator: -
:tabsize: 4
:sectanchors:
:sectnums:
:icons: font
:hide-uri-scheme:
:docinfo: shared,private

include::src/docs/asciidoc/02_include/01.adoc[leveloffset=+1]
include::src/docs/asciidoc/02_include/02.adoc[leveloffset=+1]
dockinfo.html に css を記述して出力された html の見た目を変更する
build.gradle を変更し asciidoctor タスクを実行する で生成した html ですが、default の css だと個人的には以下の点が好みではありませんでした。
- 各章の文字の色が赤だが、個人的には黒のままの方が好み。
- 通常の文章(p タグで囲まれている模様)のフォントが明朝体だが、ゴシック体の方が好み。
- 全体的に余白はもう少しだけ狭めた方が好み。
- ソースコードのフォントはもう少し小さい方が好み。
docinfo.html に css を記述すれば生成した html に適用されるようなので、src/docs/docinfo ディレクトリを作成した後、その下に docinfo.html を新規作成して以下の内容を記述します。
<style>
body {
    font-family: -apple-system, "BlinkMacSystemFont", "Helvetica Neue", Helvetica, "Arial", "ヒラギノ角ゴ ProN W3", "Hiragino Kaku Gothic ProN", "メイリオ", Meiryo, sans-serif, "Apple Color Emoji", "Segoe UI Emoji", "Segoe UI Symbol", "Noto Color Emoji";
}
h1, h2, h3, #toctitle, .sidebarblock > .content > .title, h4, h5, h6 {
    font-family: inherit;
    color: inherit;
}
p {
    font-family: -apple-system, BlinkMacSystemFont, Segoe UI, Helvetica, Arial, sans-serif, Apple Color Emoji, Segoe UI Emoji;
    font-size: 16px;
    line-height: 1.5;
}
pre code, pre pre {
    font-size: 14px;
}
</style>
body { ... }を追加し、font-family を設定します。font-family の設定は Honoka - 日本語も美しく表示できるBootstrapテーマ のものをコピーしました。h1, h2, h3, #toctitle, .sidebarblock > .content > .title, h4, h5, h6 { font-family: inherit; color: inherit; }を設定して章のフォントはbody { ... }に設定したものを使用し、文字色は黒になるようにします。p { ... }を追加し、font-family、font-size、line-height を設定します。GitHub の .markdown-body の設定からコピーしました。pre code, pre pre { font-size: 14px; }を追加し、ソースコードのフォントサイズを少し小さくします。
index.adoc に docinfodir の document header を追加します。
= include directive で章毎にファイルを分けてみる
..........
:docinfo: shared,private
:docinfodir: src/docs/docinfo
asciidoctor タスクを実行すると変更前は以下のように表示されていましたが、

変更後は以下のようになります。
貼り付けた画面キャプチャを見ると明朝体の方が見やすそうですが、ブラウザで見ると下のゴシック体の方が個人的には見やすいですね。
履歴
2021/01/13
初版発行。