include directive で章毎に adoc ファイルを分けてみる
Translate to English
https://translate.google.com/translate?sl=auto&tl=en&u=https%3A%2F%2Fksby.hatenablog.com%2Fentry%2F2021%2F01%2F13%2F002928
概要
記事一覧はこちらです。
Spring Boot Reference Documentation の AsciiDoc 形式のドキュメントのソースが https://github.com/spring-projects/spring-boot/tree/master/spring-boot-project/spring-boot-docs/src/docs/asciidoc にありますが、index.singleadoc の中を見てみると各章は個別のファイルに記述してそれを include directive で取り込んでいました。
同じことを試してみます。
参照したサイト・書籍
目次
- src/docs/asciidoc/index.adoc を src/docs/asciidoc/01_simple の下に移動する
- src/docs/asciidoc の下に 02_include ディレクトリを作成する
- 01.adoc を作成する
- 02.adoc を作成する
- index.adoc を作成して 01.adoc、02.adoc を include する
- build.gradle を変更し asciidoctor タスクを実行する
- Spring Boot Reference Documentation の adoc ファイルを参考に document header を追加する
- dockinfo.html に css を記述して出力された html の見た目を変更する
手順
src/docs/asciidoc/index.adoc を src/docs/asciidoc/01_simple の下に移動する
今後のサンプルは src/docs/asciidoc ディレクトリの下に 01、02、..... と連番の付いたディレクトリを作成してその下に作成するようにしたいので、src/docs/asciidoc の下に 01_simple ディレクトリを作成して src/docs/asciidoc/index.adoc をその下に移動します。
build.gradle を以下のように変更します。
..........

asciidoctor {
    sourceDir file("src/docs/asciidoc")
    sources {
        include "01_simple/index.adoc"
    }
}

..........
- asciidoctor block で
include "index.adoc"→include "01_simple/index.adoc"に変更します。
src/docs/asciidoc の下に 02_include ディレクトリを作成する
src/docs/asciidoc の下に 02_include ディレクトリを作成します。
01.adoc を作成する
include directive で取り込むファイルとして 01.adoc、02.adoc の2つのファイルを作成します。
まずは 01.adoc から。IntelliJ IDEA 2020.3 新機能メモ書き の記事の一部をコピーして作成します。画像ファイルを3つ src/docs/asciidoc/02_include/images の下に 01-01.png、01-02.png、01-03.png のファイル名で配置します。
[[idea-20203-whatsnew]]
= IntelliJ IDEA 2020.3 新機能メモ書き

[[idea-20203-whatsnew-overview]]
== 概要

IntelliJ IDEA 2020.3 にバージョンアップしたので新機能を確認した時のメモ書きです。

[[idea-20203-whatsnew-reference]]
== 参照したサイト・書籍

* What’s New in IntelliJ IDEA 2020.3 +
https://www.jetbrains.com/idea/whatsnew/#whats-new-20203

[[idea-20203-whatsnew-item]]
== 手順

[[idea-20203-whatsnew-item-search-everywhere-updates]]
=== Search Everywhere updates

Search Everywhere dialog で `commit hashes and messages, tags, and branches` が検索できるようになりました。

Shift キーを2回押してダイアログを表示した後、「Git」タブを選択してから `redis`(commit message にこの文字列が入力されているものがあります)と入力してみましたが、何も表示されず。。。

image::images/01-01.png[,420,423]

ダイアログ右上の「Filter」ボタンをクリックすると「Commit by hash」しかチェックされていませんでした。

image::images/01-02.png[,558,158]

「All」ボタンをクリックして全てチェックすると commit message も検索してヒットしたものが表示されるようになりました。

image::images/01-03.png[,562,179]
02.adoc を作成する
次は 02.adoc。Asciidoctor+Gradle の環境で AsciiDoc 形式のドキュメントから HTML ファイルを生成してみる の記事の一部をコピーして作成します。
[[asciidoctor-gradle-makehtml]]
= Asciidoctor+Gradle の環境で AsciiDoc 形式のドキュメントから HTML ファイルを生成してみる
[[asciidoctor-gradle-makehtml-overview]]
== 概要
https://docs.spring.io/spring-boot/docs/current/reference/htmlsingle/[Spring Boot Reference Documentation] が AsciiDoc 形式のドキュメントで記述されていることは知っていたのですが、これまで AsciiDoc 形式で記述したことがありませんでした。 https://junit.org/junit5/docs/current/user-guide/[JUnit 5 のドキュメント] やこの前 https://ksby.hatenablog.com/entry/2020/12/26/233231[Spring Boot 2.2.x の Web アプリを 2.3.x へバージョンアップする ( 番外編 )( IntelliJ IDEA の docToolchain/diagrams.net-intellij-plugin を追加する )] でインストールした https://drawio-intellij-plugin.netlify.app/[diagrams.net-intellij-plugin のドキュメント] も AsciiDoc で記述されており、興味が湧いたので使い方を調べてみます。
AsciiDoc でドキュメントを生成するツールとして Asciidoctor があり、Asciidoctor には Gradle の Plugin が存在するので、Asciidoctor+Gradle で環境を構築します。
[[asciidoctor-gradle-makehtml-item]]
== 手順
[[asciidoctor-gradle-makehtml-item-makeproject]]
=== ksbysample-asciidoctor プロジェクトを作成する
. Github で ksbysample-asciidoctor レポジトリ を作成します。
. D:\project-springboot\ksbysample-asciidoctor に clone します。
[[asciidoctor-gradle-makehtml-item-write-buildgradle]]
=== build.gradle を記述する
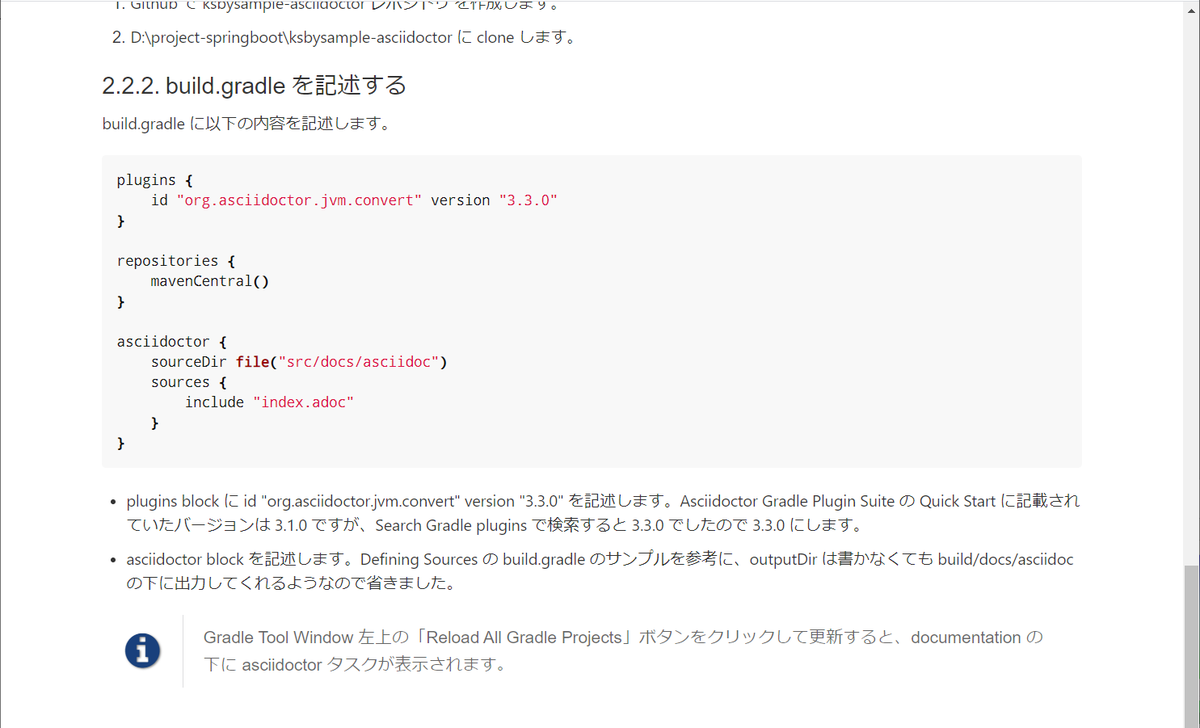
build.gradle に以下の内容を記述します。
[source,groovy]
----
plugins {
id "org.asciidoctor.jvm.convert" version "3.3.0"
}
repositories {
mavenCentral()
}
asciidoctor {
sourceDir file("src/docs/asciidoc")
sources {
include "index.adoc"
}
}
----
* plugins block に id "org.asciidoctor.jvm.convert" version "3.3.0" を記述します。Asciidoctor Gradle Plugin Suite の Quick Start に記載されていたバージョンは 3.1.0 ですが、Search Gradle plugins で検索すると 3.3.0 でしたので 3.3.0 にします。
* asciidoctor block を記述します。Defining Sources の build.gradle のサンプルを参考に、outputDir は書かなくても build/docs/asciidoc の下に出力してくれるようなので省きました。
NOTE: Gradle Tool Window 左上の「Reload All Gradle Projects」ボタンをクリックして更新すると、documentation の下に asciidoctor タスクが表示されます。
index.adoc を作成して 01.adoc、02.adoc を include する
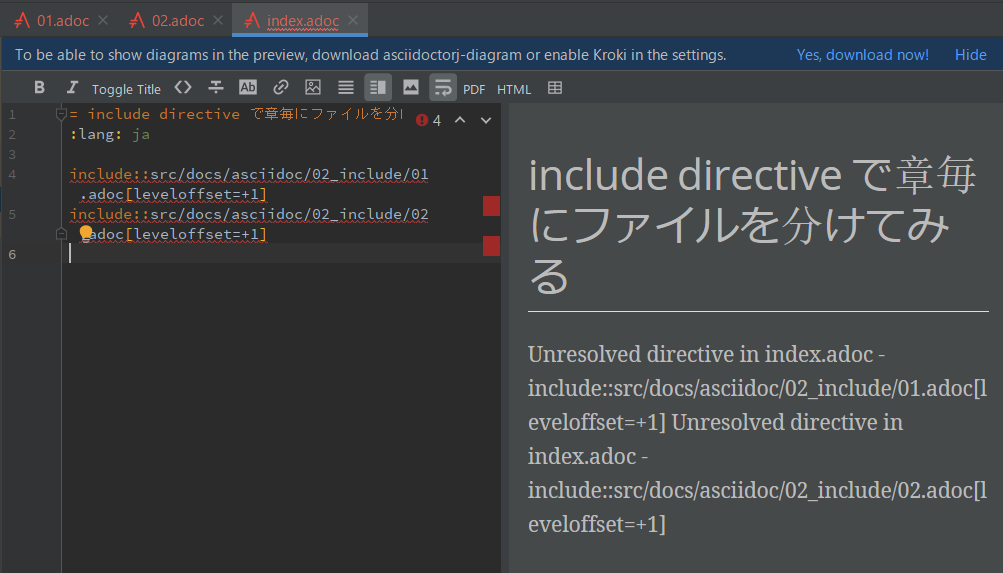
index.adoc を作成します。
= include directive で章毎にファイルを分けてみる
:lang: ja

include::src/docs/asciidoc/02_include/01.adoc[leveloffset=+1]
include::src/docs/asciidoc/02_include/02.adoc[leveloffset=+1]
include するファイルのパスは project のルートディレクトリからのパスを指定すれば読み込んでくれるのですが、この記述の仕方だと赤波下線が表示されて、かつ preview に 01.adoc、02.adoc の内容が表示されません。。。
build.gradle を変更し asciidoctor タスクを実行する
build.gradle を以下のように変更します。
..........

asciidoctor {
    sourceDir file("src/docs/asciidoc")
    sources {
        include "**/index.adoc"
    }
    resources {
        from("${sourceDir}") {
            include "**/*.png"
        }
    }
}

..........
- asciidoctor block の以下の点を変更します。
- sources block の include を
"01_simple/index.adoc"→"**/index.adoc"に変更します。 resources { ... }を追加して、asciidoctor タスク実行時に画像ファイルが build ディレクトリにコピーされるようにします。
- sources block の include を
asciidoctor タスクを実行すると無事 BUILD SUCCESSFUL が出力されました。

ディレクトリ構成は以下のようになり、
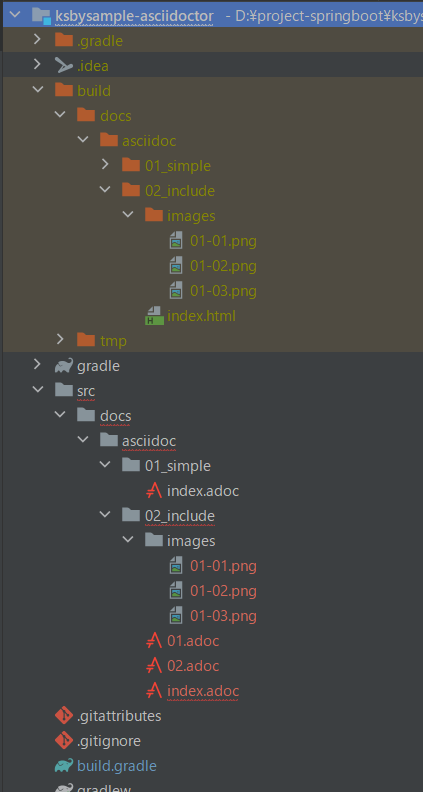
build/docs/asciidoc/02_include/index.html をブラウザで開くと以下の画像のように表示されました。

Spring Boot Reference Documentation の adoc ファイルを参考に document header を追加する
https://github.com/spring-projects/spring-boot/blob/master/spring-boot-project/spring-boot-docs/src/docs/asciidoc/attributes.adoc のファイルを参考にして document header をいくつか追加します。
:doctype: book- https://docs.asciidoctor.org/asciidoc/latest/document/doctypes/ 参照。
- adoc ファイルを include しているところで
[leveloffset=+1]を指定しているので:doctype: bookの記述がなくてもいいのですが、今回は追加しておくことにします。
:idprefix:、:idseparator: -- https://docs.asciidoctor.org/asciidoc/latest/sections/id-prefix-and-separator/ 参照。
- 今回作成している 01.adoc、02.adoc では section 毎に
[[...]]で id を記述していて section ID が autogenerate されないので関係ないのですが、同じように追加することにします。
:toc: left、:toclevels: 4- 目次を作るための document header です。今回は作成しないので追加しません。
:tabsize: 4- https://docs.asciidoctor.org/asciidoc/latest/attributes/document-attributes-reference/#general-content-and-formatting-attributes 参照。
- 設定しておくと tab を space に変換してくれます。IDEA で adoc ファイルを記述していれば自動で space になりますが、同じように追加しておくことにします。
:numbered:- 各 section 毎に番号を振ってくれるのは
:sectnums:があれば十分で、こちらが何の機能なのかがよく分からず。今は追加しないことにします。
- 各 section 毎に番号を振ってくれるのは
:sectanchors:- https://docs.asciidoctor.org/asciidoc/latest/sections/title-links/#anchor 参照。
- section の左側に
§の anchor を付けてくれます。便利なので追加します。
:sectnums:- https://docs.asciidoctor.org/asciidoc/latest/sections/numbers/ 参照。
- section 毎に番号を振ってくれるようになります。便利なので追加します。
:icons: font- https://docs.asciidoctor.org/asciidoc/latest/macros/icons/ 参照。
- https://asciidoctor.org/docs/asciidoc-writers-guide/#admonitions に記述されている
NOTE等の文字の後に文章を書くと以下の画像のようになりますが、
:icons: fontを document header に書いておくと左の表示がアイコンになります。アイコンの方が分かりやすいので追加します。
:hide-uri-scheme:- https://docs.asciidoctor.org/asciidoc/latest/macros/links/#hide-uri-scheme 参照。
- リンク URL から scheme の部分を取り除いてくれるらしい(今回 adoc ファイル内にリンクを書いていないのでよく分からず)。とりあえず追加しておきます。
:docinfo: shared,private- https://docs.asciidoctor.org/asciidoctor/latest/docinfo/ 参照。
sharedを指定しておくと:docinfodir:で指定したディレクトリの下にあるdockinfo.htmlの内容を header に、dockinfo-footer.htmlの内容を footer に差し込んでくれます。privateを指定しておくと:docinfodir:で指定したディレクトリの下にある<docname>-dockinfo.htmlの内容を header に、<docname>-dockinfo-footer.htmlの内容を footer に差し込んでくれます。- 便利そうなので同じように追加します。
index.adoc は以下のようになります。
= include directive で章毎にファイルを分けてみる
:lang: ja
:doctype: book
:idprefix:
:idseparator: -
:tabsize: 4
:sectanchors:
:sectnums:
:icons: font
:hide-uri-scheme:
:docinfo: shared,private

include::src/docs/asciidoc/02_include/01.adoc[leveloffset=+1]
include::src/docs/asciidoc/02_include/02.adoc[leveloffset=+1]
dockinfo.html に css を記述して出力された html の見た目を変更する
build.gradle を変更し asciidoctor タスクを実行する で生成した html ですが、default の css だと個人的には以下の点が好みではありませんでした。
- 各章の文字の色が赤だが、個人的には黒のままの方が好み。
- 通常の文章(p タグで囲まれている模様)のフォントが明朝体だが、ゴシック体の方が好み。
- 全体的に余白はもう少しだけ狭めた方が好み。
- ソースコードのフォントはもう少し小さい方が好み。
docinfo.html に css を記述すれば生成した html に適用されるようなので、src/docs/docinfo ディレクトリを作成した後、その下に docinfo.html を新規作成して以下の内容を記述します。
<style>
body {
    font-family: -apple-system, "BlinkMacSystemFont", "Helvetica Neue", Helvetica, "Arial", "ヒラギノ角ゴ ProN W3", "Hiragino Kaku Gothic ProN", "メイリオ", Meiryo, sans-serif, "Apple Color Emoji", "Segoe UI Emoji", "Segoe UI Symbol", "Noto Color Emoji";
}
h1, h2, h3, #toctitle, .sidebarblock > .content > .title, h4, h5, h6 {
    font-family: inherit;
    color: inherit;
}
p {
    font-family: -apple-system, BlinkMacSystemFont, Segoe UI, Helvetica, Arial, sans-serif, Apple Color Emoji, Segoe UI Emoji;
    font-size: 16px;
    line-height: 1.5;
}
pre code, pre pre {
    font-size: 14px;
}
</style>
body { ... }を追加し、font-family を設定します。font-family の設定は Honoka - 日本語も美しく表示できるBootstrapテーマ のものをコピーしました。h1, h2, h3, #toctitle, .sidebarblock > .content > .title, h4, h5, h6 { font-family: inherit; color: inherit; }を設定して章のフォントはbody { ... }に設定したものを使用し、文字色は黒になるようにします。p { ... }を追加し、font-family、font-size、line-height を設定します。GitHub の .markdown-body の設定からコピーしました。pre code, pre pre { font-size: 14px; }を追加し、ソースコードのフォントサイズを少し小さくします。
index.adoc に docinfodir の document header を追加します。
= include directive で章毎にファイルを分けてみる
..........
:docinfo: shared,private
:docinfodir: src/docs/docinfo
asciidoctor タスクを実行すると変更前は以下のように表示されていましたが、

変更後は以下のようになります。
貼り付けた画面キャプチャを見ると明朝体の方が見やすそうですが、ブラウザで見ると下のゴシック体の方が個人的には見やすいですね。
履歴
2021/01/13
初版発行。