Spring Boot + npm + Geb で入力フォームを作ってテストする ( その4 )( nodist + Node.js のインストール )
概要
記事一覧はこちらです。
Spring Boot + npm + Geb で入力フォームを作ってテストする ( その3 )( Project の作成2 ) の続きです。
- 今回の手順で確認できるのは以下の内容です。
- Node.js のインストール
- Node.js は https://nodejs.org/ja/ からダウンロードできるインストーラーでインストールせず、Node.js のバージョン管理ツールである nodist を利用してインストールします。
参照したサイト・書籍
Node.js
https://nodejs.org/ja/nodistでNode.jsをバージョン管理
http://qiita.com/satoyan419/items/56e0b5f35912b9374305nodist 〜 Node.jsのバージョンを管理する for Windows 〜
http://tech.pjin.jp/blog/2016/12/12/how_to_use_nodist/
目次
手順
nodist をインストールする
https://github.com/marcelklehr/nodist/releases から NodistSetup-v0.8.8.exe をダウンロードします。
NodistSetup-v0.8.8.exe を実行します。
「Welcome to Nodist Setup」画面が表示されます。「Next >」ボタンをクリックします。
「License Agreement」画面が表示されます。「I Agree」ボタンをクリックします。
「Choose Install Location」画面が表示されます。「Destination Folder」を
C:\Nodistへ変更した後、「Install」ボタンをクリックします。インストールが実行されます。完了すると「Completing Nodist Setup」画面が表示されますので、「Finish」ボタンをクリックします。
コマンドプロンプトを起動し、
nodist -vコマンドを実行してバージョン番号が表示されることを確認します。
Node.js をインストールする
nodist distコマンドを実行してインストール可能な Node.js のバージョン一覧を表示します。

https://nodejs.org/ja/ を見ると現在の推奨版は 6.11.1 ですので、6.11.1 をインストールします。

以下の画像のコマンドを実行して 6.11.1 をインストールした後、Node.js のカレントのバージョンを 6.11.1 へ切り替えます。
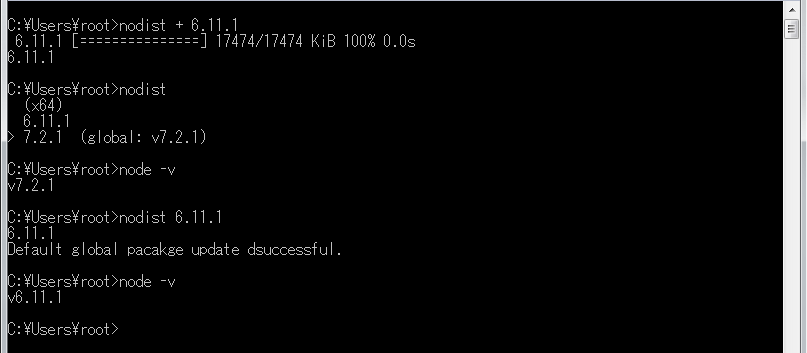
npm はアップデートしても 4.0.5 のままでした。

履歴
2017/07/22
初版発行。
Spring Boot + npm + Geb で入力フォームを作ってテストする ( その3 )( Project の作成2 )
概要
記事一覧はこちらです。
Spring Boot + npm + Geb で入力フォームを作ってテストする ( その2 )( Project の作成 ) の続きです。
- 今回の手順で確認できるのは以下の内容です。
- Project の作成
- 前回長くなったので2回に分けています。今回は前回からの続きです。
参照したサイト・書籍
DBCP - validationQuery for different Databases
https://stackoverflow.com/questions/10684244/dbcp-validationquery-for-different-databases- H2 Database の validationQuery を調べた時に参照しました。H2 Database 以外の validationQuery も記載されています。ほとんどの DB で
select 1なんですね。
- H2 Database の validationQuery を調べた時に参照しました。H2 Database 以外の validationQuery も記載されています。ほとんどの DB で
目次
- ksbysample-webapp-lending からファイルをコピーする(その2)
- 「Spring Configuration Check」のメッセージが表示されないようにする
- Tomcat が起動することを確認する
手順
ksbysample-webapp-lending からファイルをコピーする(その2)
ksbysample-webapp-lending から以下のファイルをコピーします。
※リンクのあるファイルはリンク先の内容に変更します。
■src/main/resources
- /application.properties
→ /application.properties - /application-develop.properties
→ /application-develop.properties - /application-product.properties
→ /application-product.properties - /application-unittest.properties
→ /application-unittest.properties - /applicationContext-develop.xml
→ /applicationContext-develop.xml - /applicationContext-product.xml
→ /applicationContext-product.xml - /applicationContext-unittest.xml
→ /applicationContext-unittest.xml - /logback-spring.xml
→ /logback-spring.xml - /messages.properties
→ /messages.properties - /messages_ja_JP.properties
→ /messages_ja_JP.properties
- /application.properties
ファイルコピー後は以下のディレクトリ構成になります。


「Spring Configuration Check」のメッセージが表示されないようにする
IntelliJ IDEA を再起動します。
画面右下に「Spring Configuration Check」のメッセージが表示されます。

下矢印ボタンを押してメッセージの全てを表示した後、「boot-npm-geb-sample_main」リンクをクリックします。

「Project Structure」ダイアログが表示されます。「+」ボタンをクリックして下に表示されているファイルを追加します。

「New Application Context」ダイアログが表示されます。以下の画像のファイルをチェックした後、「OK」ボタンをクリックします。
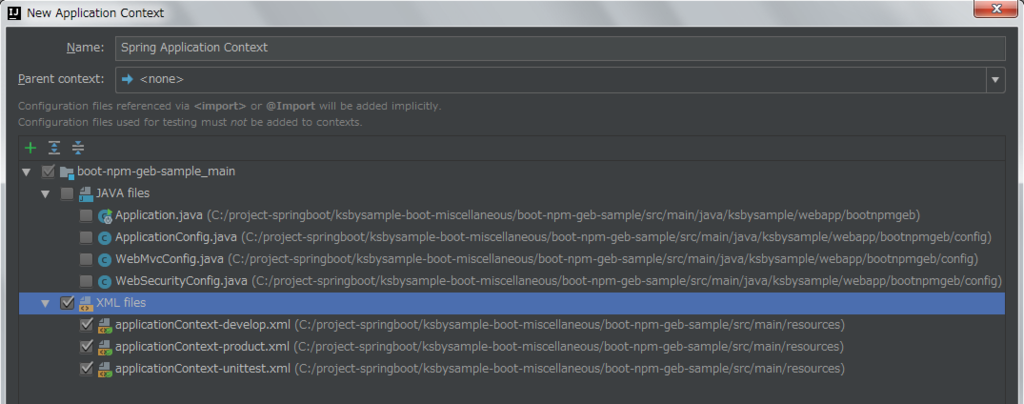
「Project Structure」ダイアログに戻ると以下の画像のように表示されます。下の画像では下半分を表示していませんが、まだこの段階では警告メッセージは消えていません。

再び IntelliJ IDEA を再起動して、画面右下に「Spring Configuration Check」のメッセージが表示されないことを確認します。この後「Project Structure」ダイアログを表示すると警告メッセージは消えていました。
Tomcat が起動することを確認する
Gradle Tool Window から bootRun タスクを実行します。Tomcat が起動して “Started Application in …” のログが出力されることを確認します。

Tomcat を停止します。
ソースコード
application.properties
doma.dialect=org.seasar.doma.jdbc.dialect.H2Dialect

spring.datasource.tomcat.url=jdbc:h2:mem:bootnpmgebdb
spring.datasource.tomcat.username=sa
spring.datasource.tomcat.password=
spring.datasource.tomcat.driverClassName=org.h2.Driver
spring.datasource.tomcat.initialSize=1
spring.datasource.tomcat.maxActive=1
spring.datasource.tomcat.maxIdle=1
spring.datasource.tomcat.minIdle=1
spring.datasource.tomcat.testOnBorrow=true
spring.datasource.tomcat.validationQuery=select 1
spring.datasource.tomcat.validationQueryTimeout=5
spring.datasource.tomcat.removeAbandoned=true
spring.datasource.tomcat.removeAbandonedTimeout=30
spring.datasource.tomcat.jdbc-interceptors=SlowQueryReport(threshold=5000)
# spring.datasource.jmx-enabled は spring.datasource.tomcat.jmx-enabled と書かないこと。
# spring.datasource.tomcat.jmx-enabled だと機能しない。
spring.datasource.jmx-enabled=true

spring.session.store-type=hash_map

spring.freemarker.cache=true
spring.freemarker.settings.number_format=computer
spring.freemarker.charset=UTF-8
spring.freemarker.enabled=false
spring.freemarker.prefer-file-system-access=false

spring.thymeleaf.mode=HTML

logging.level.root=INFO
logging.level.org.seasar.doma=ERROR
application-develop.properties
spring.mail.host=localhost
spring.mail.port=25

# Spring MVC
logging.level.org.springframework.web=DEBUG
# log4jdbc-log4j2
logging.level.jdbc.sqlonly=DEBUG
logging.level.jdbc.sqltiming=INFO
logging.level.jdbc.audit=INFO
logging.level.jdbc.resultset=ERROR
logging.level.jdbc.resultsettable=ERROR
logging.level.jdbc.connection=DEBUG
application-product.properties
server.tomcat.basedir=C:/webapps/boot-npm-geb-sample
logging.file=${server.tomcat.basedir}/logs/boot-npm-geb-sample.log
slowquery.logging.file=${server.tomcat.basedir}/logs/slow-query.log

spring.autoconfigure.exclude=com.integralblue.log4jdbc.spring.Log4jdbcAutoConfiguration
spring.datasource.tomcat.initialSize=1
spring.datasource.tomcat.maxActive=1
spring.datasource.tomcat.maxIdle=1
spring.datasource.tomcat.minIdle=1

spring.mail.host=localhost
spring.mail.port=25
application-unittest.properties
spring.autoconfigure.exclude=com.integralblue.log4jdbc.spring.Log4jdbcAutoConfiguration

spring.mail.host=localhost
spring.mail.port=25

logging.level.root=OFF
applicationContext-develop.xml
    <aop:config>
        <aop:pointcut id="pointcutService" expression="execution(* ksbysample.webapp.bootnpmgeb..*Service.*(..))"/>
        <aop:advisor advice-ref="txAdvice" pointcut-ref="pointcutService"/>
    </aop:config>
execution(* ksbysample.webapp.lending..*Service.*(..))→execution(* ksbysample.webapp.bootnpmgeb..*Service.*(..))に変更します。
applicationContext-product.xml
    <aop:config>
        <aop:pointcut id="pointcutService" expression="execution(* ksbysample.webapp.bootnpmgeb..*Service.*(..))"/>
        <aop:advisor advice-ref="txAdvice" pointcut-ref="pointcutService"/>
    </aop:config>
execution(* ksbysample.webapp.lending..*Service.*(..))→execution(* ksbysample.webapp.bootnpmgeb..*Service.*(..))に変更します。
applicationContext-unittest.xml
    <aop:config>
        <aop:pointcut id="pointcutService" expression="execution(* ksbysample.webapp.bootnpmgeb..*Service.*(..))"/>
        <aop:advisor advice-ref="txAdvice" pointcut-ref="pointcutService"/>
    </aop:config>
execution(* ksbysample.webapp.lending..*Service.*(..))→execution(* ksbysample.webapp.bootnpmgeb..*Service.*(..))に変更します。
messages_ja_JP.properties
- 中は空にします。
履歴
2017/07/22
初版発行。
Spring Boot + npm + Geb で入力フォームを作ってテストする ( その2 )( Project の作成 )
概要
記事一覧はこちらです。
Spring Boot + npm + Geb で入力フォームを作ってテストする ( その1 )( 概要 ) の続きです。
- 今回の手順で確認できるのは以下の内容です。
- Project の作成
参照したサイト・書籍
- spring-projects/spring-session - Add @EnableSpringHttpSession
https://github.com/spring-projects/spring-session/issues/231
目次
- GitHub 上で ksbysample-boot-miscellaneous レポジトリを新規作成してクローンする
- IntelliJ IDEA の起動し、Project を新規作成する
- build.gradle を変更する
- Gradle の設定を変更する
- Project language level を SDK default に変更する
- JUnit によるテスト実行時の spring.profiles.active を設定する
- src/main/resources の下に static, templates ディレクトリを作成する
- ksbysample-webapp-lending からファイルをコピーする(その1)
- 続く。。。
手順
GitHub 上で ksbysample-boot-miscellaneous レポジトリを新規作成してクローンする
GitHub 上で ksbysample-boot-miscellaneous レポジトリを新規作成します。
SourceTree で作成した ksbysample-boot-miscellaneous レポジトリを C:\project-springboot\ksbysample-boot-miscellaneous へクローンします。
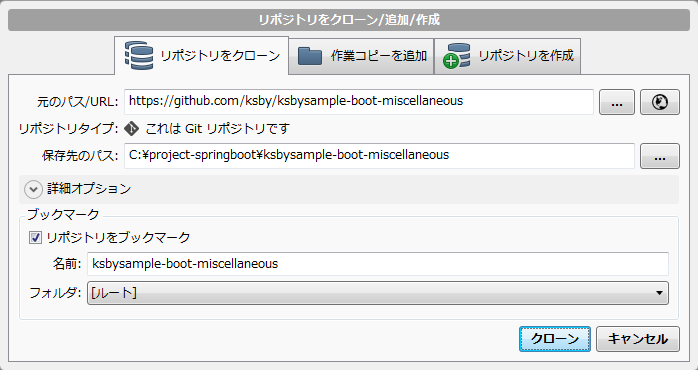
C:\project-springboot\ksbysample-boot-miscellaneous の下に .gitignore を新規作成し、リンク先の内容 に変更します。この .gitignore は Spring Integration のサンプルを作成している ksbysample-boot-integration レポジトリ のものをコピーしたものです。
develop ブランチ、feature/1-issue ブランチを作成します。
IntelliJ IDEA の起動し、Project を新規作成する
IntelliJ IDEA を起動します。他の Project を開いている場合には、メイン画面のメニューから「File」->「Close Project」を選択して Project をクローズします。
「Welcome to IntelliJ IDEA」画面が表示されます。画面中央の「Create New Project」をクリックします。
「New Project」画面が表示されます。画面左側のリストから「Gradle」を選択し、画面右側は以下の画像の状態にして「Next」ボタンをクリックします。
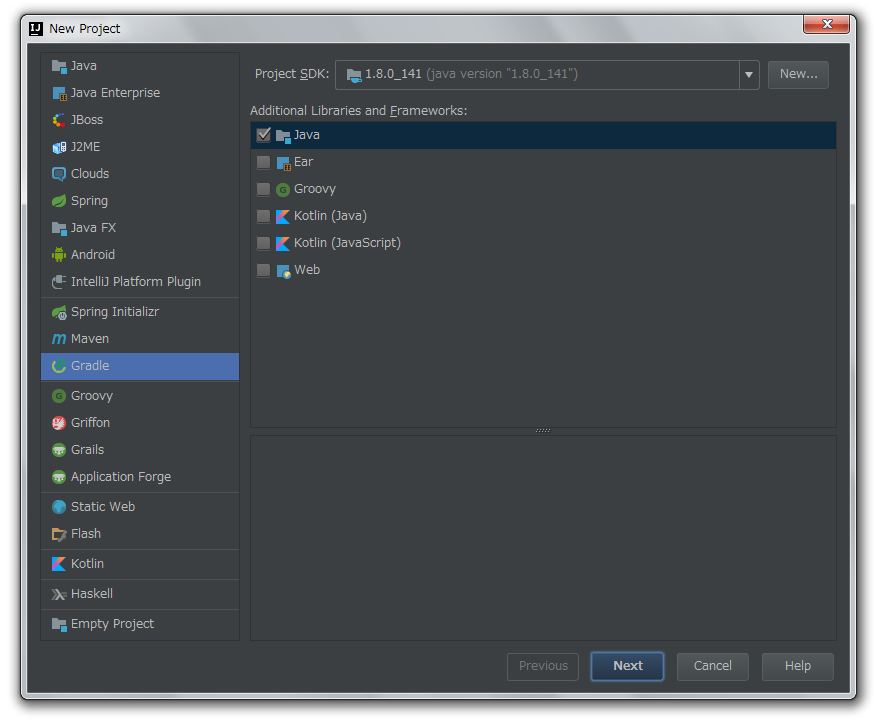
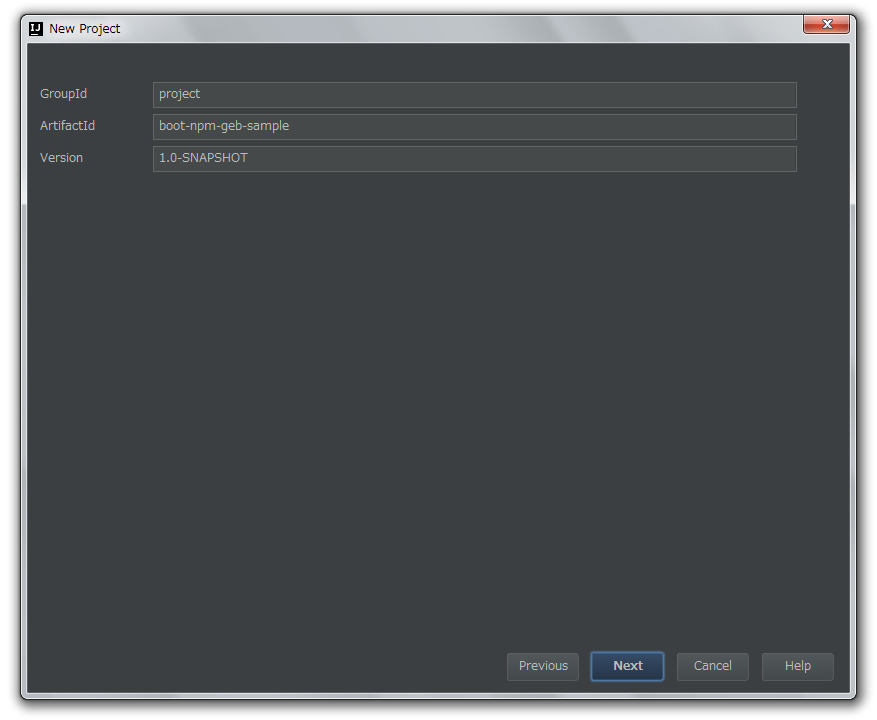
GroupId、ArtifactId、Version を入力する画面が表示されます。以下の点を変更した後、「Next」ボタンをクリックします。
- 「GroupdId」に “project” を入力します。
- 「ArtifactId」に “boot-npm-geb-sample” を入力します。
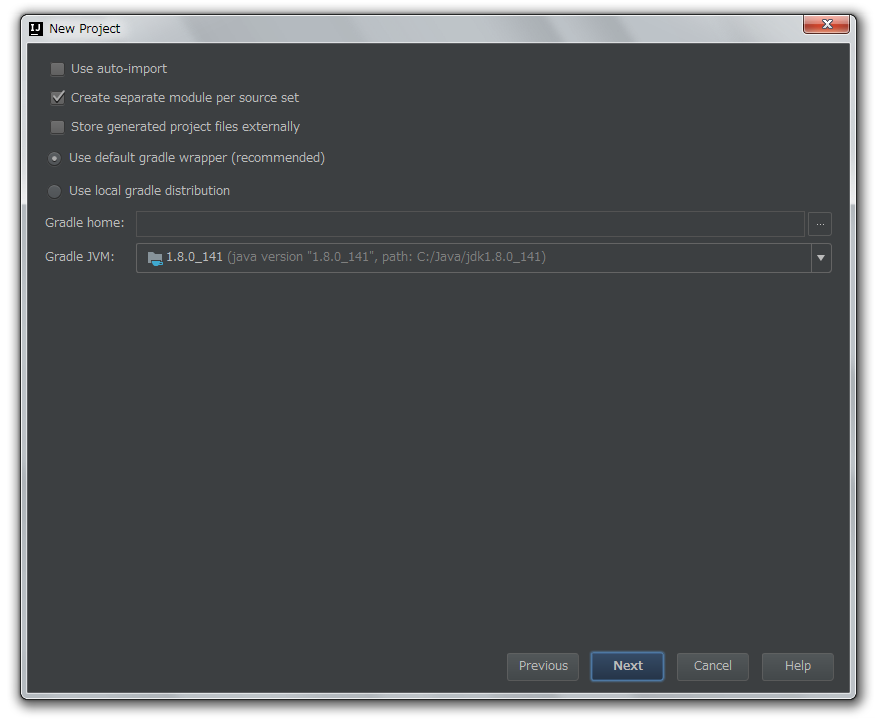
Gradle の設定をする画面が表示されます。何も変更せず「Next」ボタンをクリックします。
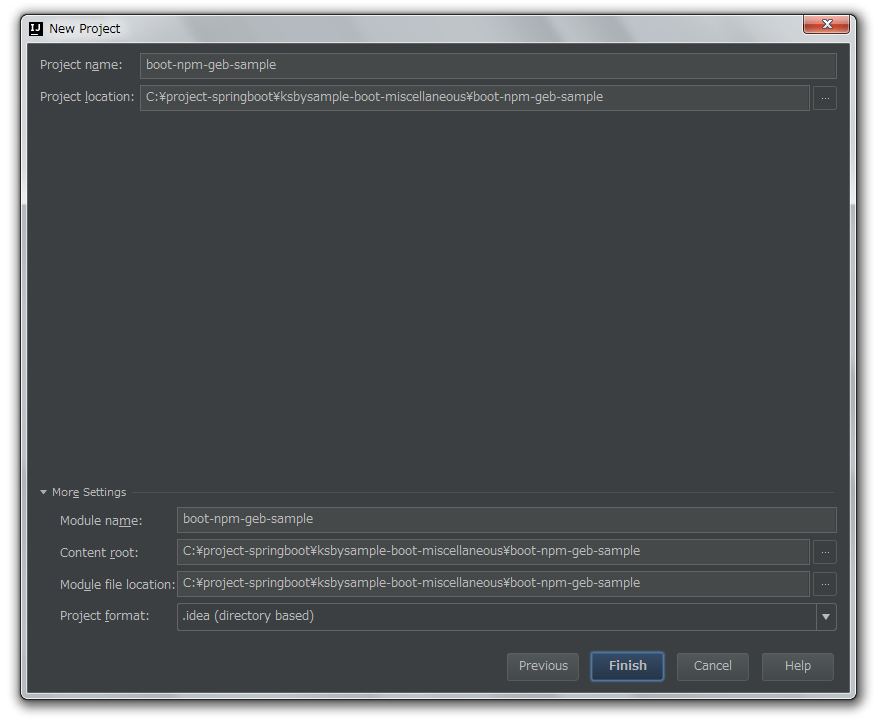
Project name、Project location を入力する画面が表示されます。以下の点を変更した後、「Finish」ボタンをクリックします。
- 「Project location」に “C:\project-springboot\ksbysample-boot-miscellaneous\boot-npm-geb-sample” を入力します。
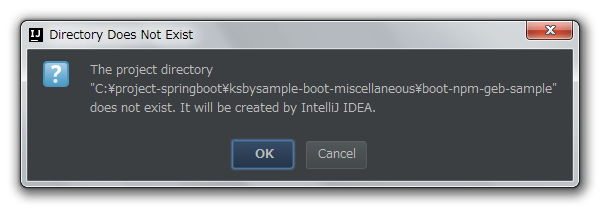
「Directory Does Not Exist」ダイアログが表示されますので「OK」ボタンをクリックします。
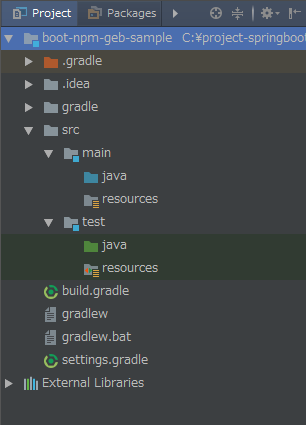
IntelliJ IDEA のメイン画面が表示されて Project Tool Window に以下のディレクトリ構造が表示されます。
※src/main/java や src/test/java に以下の画像のように色が付いていることを確認します。
build.gradle を変更する
build.gradle を リンク先の内容 に変更します。
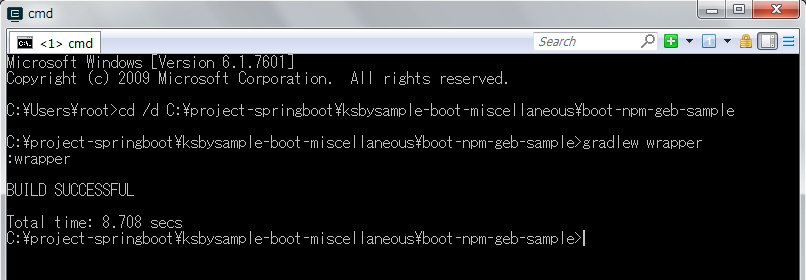
コマンドプロンプトを起動して gradlew wrapper コマンドを実行し、gradle を 3.5 へバージョンアップします。
Gradle Tool Window の左上にある「Refresh all Gradle projects」ボタンをクリックして更新します。
Gradle の設定を変更する
メイン画面のメニューから「File」->「Settings…」を選択して「Settings」ダイアログを表示します。
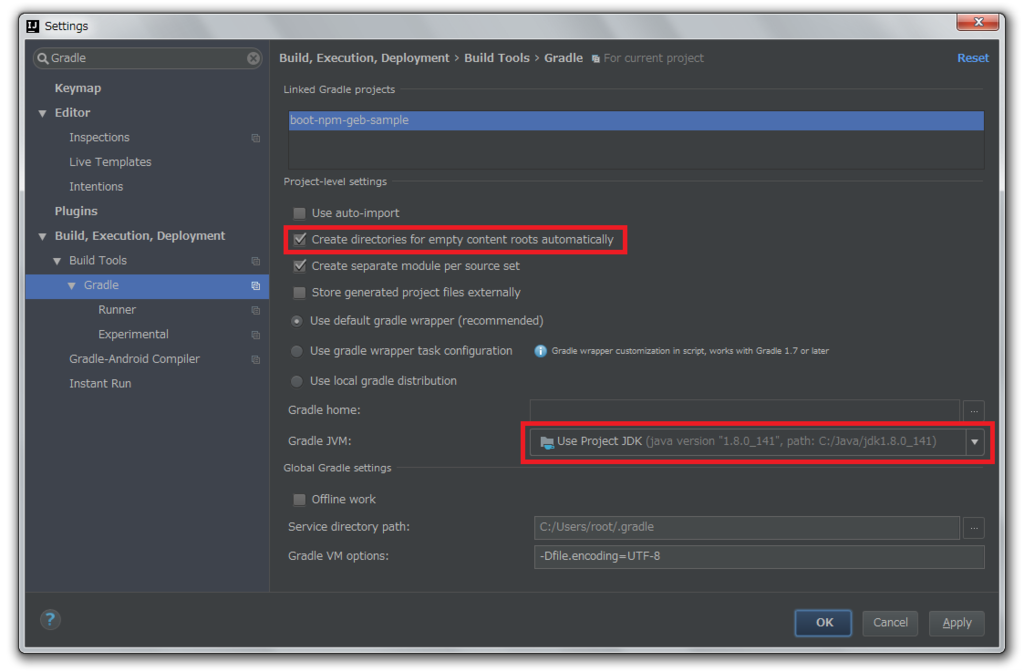
画面左上の検索フィールドに “Gradle” と入力して画面左側のツリーから「Build, Execution, Deployment」-「Build Tools」-「Gradle」を選択した後、以下の点を変更します。
- 「Create directories for empty content roots automatically」をチェックします。
- 画面右側の「Gradle JVM」で「Use Project JDK」を選択します。
「OK」ボタンをクリックして「Settings」ダイアログを閉じます。
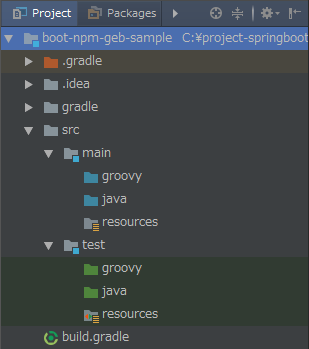
再度 Gradle Tool Window の左上にある「Refresh all Gradle projects」ボタンをクリックして更新します。src/man/groovy, src/test/groovy ディレクトリが自動作成されます。
Project language level を SDK default に変更する
メイン画面のメニューから「File」->「Project Structure…」を選択して「Project Structure」ダイアログを表示します。
画面左側のツリーから「Project Settings」-「Project」を選択し、画面右側で「Project language level」の設定を「SDK default」に変更します。
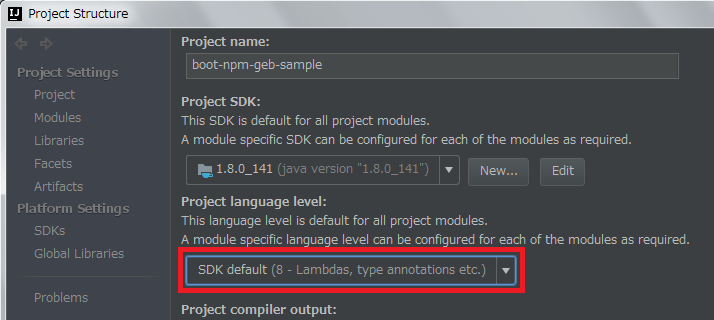
「OK」ボタンをクリックして「Project Structure」ダイアログを閉じます。
JUnit によるテスト実行時の spring.profiles.active を設定する
メイン画面のメニューから「Run」->「Edit Configurations…」を選択します。
「Run/Debug Configuraitons」ダイアログが表示されます。左側のツリーで「Defaults」-「JUnit」を選択した後、右側の画面の「VM options」の末尾に
-Dspring.profiles.active=unittestを追加します。
「OK」ボタンをクリックして「Run/Debug Configuraitons」ダイアログを閉じます。
src/main/resources の下に static, templates ディレクトリを作成する
- Project Tool Window で src/main/resources の下に static, templates ディレクトリを作成します。
ksbysample-webapp-lending からファイルをコピーする
以下の画像の階層のパッケージを作成します。
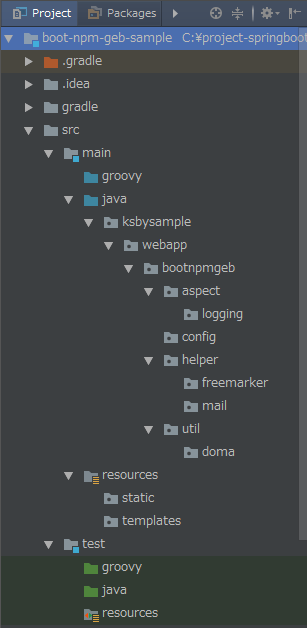
ksbysample-webapp-lending から以下のファイルをコピーします。
※リンクのあるファイルはリンク先の内容に変更します。
■src/main/java
- /ksbysample/webapp/lending/Application.java
→ /ksbysample/webapp/bootnpmgeb/Application.java - /ksbysample/webapp/lending/aspect/logging/ControllerAndEventNameLogger.java
→ /ksbysample/webapp/bootnpmgeb/aspect/logging/ControllerAndEventNameLogger.java - /ksbysample/webapp/lending/aspect/logging/LoggingControllerName.java
→ /ksbysample/webapp/bootnpmgeb/aspect/logging/LoggingControllerName.java - /ksbysample/webapp/lending/aspect/logging/LoggingEventName.java
→ /ksbysample/webapp/bootnpmgeb/aspect/logging/LoggingEventName.java - /ksbysample/webapp/lending/aspect/logging/MethodLogger.java
→ /ksbysample/webapp/bootnpmgeb/aspect/logging/MethodLogger.java - /ksbysample/webapp/lending/aspect/logging/RequestAndResponseLogger.java
→ /ksbysample/webapp/bootnpmgeb/aspect/logging/RequestAndResponseLogger.java - /ksbysample/webapp/lending/config/ApplicationConfig.java
→ /ksbysample/webapp/bootnpmgeb/config/ApplicationConfig.java - /ksbysample/webapp/lending/config/DomaConfig.java
→ /ksbysample/webapp/bootnpmgeb/config/DomaConfig.java - /ksbysample/webapp/lending/config/WebMvcConfig.java
→ /ksbysample/webapp/bootnpmgeb/config/WebMvcConfig.java - /ksbysample/webapp/lending/config/WebSecurityConfig.java
→ /ksbysample/webapp/bootnpmgeb/config/WebSecurityConfig.java - /ksbysample/webapp/lending/helper/freemarker/FreeMarkerHelper.java
→ /ksbysample/webapp/bootnpmgeb/helper/freemarker/FreeMarkerHelper.java - /ksbysample/webapp/lending/helper/freemarker/EmailHelper.java
→ /ksbysample/webapp/bootnpmgeb/helper/freemarker/EmailHelper.java - /ksbysample/webapp/lending/util/doma/ComponentAndAutowiredDomaConfig.java
→ /ksbysample/webapp/bootnpmgeb/util/doma/ComponentAndAutowiredDomaConfig.java - /ksbysample/webapp/lending/util/doma/SelectOptionsUtils.java
→ /ksbysample/webapp/bootnpmgeb/util/doma/SelectOptionsUtils.java
- /ksbysample/webapp/lending/Application.java
続く。。。
長くなったので2回に分けます。
ソースコード
.gitignore
# built application files
*.apk
*.ap_

# files for the dex VM
*.dex

# Java class files
*.class

# generated files
**/bin/
**/gen/

# Local configuration file (sdk path, etc)
local.properties

# Eclipse project files
.classpath
.project

# Proguard folder generated by Eclipse
**/proguard/

# Intellij project files
*.iml
*.ipr
*.iws
**/.idea/
**/out/

#Gradle
.gradletasknamecache
**/.gradle/
**/build/
**/bin/
build.gradle
group 'ksbysample'
version '1.5.4-RELEASE'

buildscript {
    ext {
        springBootVersion = '1.5.4.RELEASE'
    }
    repositories {
        mavenCentral()
        maven { url "https://plugins.gradle.org/m2/" }
    }
    dependencies {
        classpath("org.springframework.boot:spring-boot-gradle-plugin:${springBootVersion}")
        // for Error Prone ( http://errorprone.info/ )
        classpath("net.ltgt.gradle:gradle-errorprone-plugin:0.0.10")
    }
}

apply plugin: 'java'
apply plugin: 'eclipse'
apply plugin: 'idea'
apply plugin: 'org.springframework.boot'
apply plugin: 'groovy'
apply plugin: 'net.ltgt.errorprone'
apply plugin: 'checkstyle'
apply plugin: 'findbugs'
apply plugin: 'pmd'

sourceCompatibility = 1.8
targetCompatibility = 1.8

task wrapper(type: Wrapper) {
    gradleVersion = '3.5'
}

[compileJava, compileTestGroovy, compileTestJava]*.options*.compilerArgs = ['-Xlint:all,-options,-processing,-path']
compileJava.options.compilerArgs += ['-Xep:RemoveUnusedImports:WARN']

// for Doma 2
// JavaクラスとSQLファイルの出力先ディレクトリを同じにする
processResources.destinationDir = compileJava.destinationDir
// コンパイルより前にSQLファイルを出力先ディレクトリにコピーするために依存関係を逆転する
compileJava.dependsOn processResources

idea {
    module {
        inheritOutputDirs = false
        outputDir = file("$buildDir/classes/main/")
    }
}

configurations {
    // for Doma 2
    domaGenRuntime
}

checkstyle {
    configFile = file("${rootProject.projectDir}/config/checkstyle/google_checks.xml")
    toolVersion = '8.0'
    sourceSets = [project.sourceSets.main]
}

findbugs {
    toolVersion = '3.0.1'
    sourceSets = [project.sourceSets.main]
    ignoreFailures = true
    effort = "max"
    excludeFilter = file("${rootProject.projectDir}/config/findbugs/findbugs-exclude.xml")
}

tasks.withType(FindBugs) {
    // Gradle 3.3以降 + FindBugs Gradle Plugin を組み合わせると、"The following errors occurred during analysis:"
    // の後に "Cannot open codebase filesystem:..." というメッセージが大量に出力されるので、以下の doFirst { ... }
    // のコードを入れることで出力されないようにする
    doFirst {
        def fc = classes
        if (fc == null) {
            return
        }
        fc.exclude '**/*.properties'
        fc.exclude '**/*.xml'
        fc.exclude '**/META-INF/**'
        fc.exclude '**/static/**'
        fc.exclude '**/templates/**'
        classes = files(fc.files)
    }
    reports {
        xml.enabled = false
        html.enabled = true
    }
}

pmd {
    toolVersion = "5.8.1"
    sourceSets = [project.sourceSets.main]
    ignoreFailures = true
    consoleOutput = true
    ruleSetFiles = rootProject.files("/config/pmd/pmd-project-rulesets.xml")
    ruleSets = []
}

repositories {
    mavenCentral()
}

dependencyManagement {
    imports {
        // BOM は https://repo.spring.io/release/io/spring/platform/platform-bom/Brussels-SR3/
        // の下を見ること
        mavenBom("io.spring.platform:platform-bom:Brussels-SR3") {
            bomProperty 'guava.version', '22.0'
            bomProperty 'thymeleaf.version', '3.0.6.RELEASE'
            bomProperty 'thymeleaf-extras-springsecurity4.version', '3.0.2.RELEASE'
            bomProperty 'thymeleaf-layout-dialect.version', '2.2.2'
            bomProperty 'thymeleaf-extras-data-attribute.version', '2.0.1'
            bomProperty 'thymeleaf-extras-java8time.version', '3.0.0.RELEASE'
        }
    }
}

bootRepackage {
    mainClass = 'ksbysample.webapp.lending.Application'
}

dependencies {
    def spockVersion = "1.1-groovy-2.4"
    def domaVersion = "2.16.1"
    def lombokVersion = "1.16.18"
    def errorproneVersion = "2.0.15"
    def powermockVersion = "1.7.0"

    // dependency-management-plugin によりバージョン番号が自動で設定されるもの
    // Appendix A. Dependency versions ( http://docs.spring.io/platform/docs/current/reference/htmlsingle/#appendix-dependency-versions ) 参照
    compile("org.springframework.boot:spring-boot-starter-web")
    compile("org.springframework.boot:spring-boot-starter-thymeleaf") {
        exclude group: "org.codehaus.groovy", module: "groovy"
    }
    compile("org.springframework.boot:spring-boot-starter-data-jpa")
    compile("org.springframework.boot:spring-boot-starter-freemarker")
    compile("org.springframework.boot:spring-boot-starter-mail")
    compile("org.springframework.boot:spring-boot-starter-security")
    compile("org.springframework.boot:spring-boot-devtools")
    compile("org.springframework.session:spring-session")
    compile("com.google.guava:guava")
    compile("org.apache.commons:commons-lang3")
    compile("org.codehaus.janino:janino")
    compile("com.h2database:h2")
    testCompile("org.springframework.boot:spring-boot-starter-test")
    testCompile("org.springframework.security:spring-security-test")
    testCompile("org.yaml:snakeyaml")
    testCompile("org.mockito:mockito-core")

    // dependency-management-plugin によりバージョン番号が自動で設定されないもの、あるいは最新バージョンを指定したいもの
    compile("com.integralblue:log4jdbc-spring-boot-starter:1.0.1")
    testCompile("org.dbunit:dbunit:2.5.3")
    testCompile("com.icegreen:greenmail:1.5.5")
    testCompile("org.assertj:assertj-core:3.8.0")
    testCompile("org.spockframework:spock-core:${spockVersion}")
    testCompile("org.spockframework:spock-spring:${spockVersion}")
    testCompile("com.google.code.findbugs:jsr305:3.0.2")

    // for lombok
    compileOnly("org.projectlombok:lombok:${lombokVersion}")
    testCompileOnly("org.projectlombok:lombok:${lombokVersion}")

    // for Doma
    compile("org.seasar.doma:doma:${domaVersion}")
    domaGenRuntime("org.seasar.doma:doma-gen:${domaVersion}")

    // for Error Prone ( http://errorprone.info/ )
    errorprone("com.google.errorprone:error_prone_core:${errorproneVersion}")
    compileOnly("com.google.errorprone:error_prone_annotations:${errorproneVersion}")

    // PowerMock
    testCompile("org.powermock:powermock-module-junit4:${powermockVersion}")
    testCompile("org.powermock:powermock-api-mockito:${powermockVersion}")
}

bootRun {
    jvmArgs = ['-Dspring.profiles.active=develop']
}

test {
    jvmArgs = ['-Dspring.profiles.active=unittest']
}

// for Doma-Gen
task domaGen {
    doLast {
        // まず変更が必要なもの
        def rootPackageName = 'ksbysample.webapp.bootnpmgeb'
        def daoPackagePath = 'src/main/java/ksbysample/webapp/bootnpmgeb/dao'
        def dbUrl = 'jdbc:h2:mem:bootnpmgebdb'
        def dbUser = 'sa'
        def dbPassword = ''
        def tableNamePattern = '.*'
        // おそらく変更不要なもの
        def importOfComponentAndAutowiredDomaConfig = "${rootPackageName}.util.doma.ComponentAndAutowiredDomaConfig"
        def workDirPath = 'work'
        def workDaoDirPath = "${workDirPath}/dao"

        // 作業用ディレクトリを削除する
        clearDir("${workDirPath}")

        // 現在の Dao インターフェースのバックアップを取得する
        copy() {
            from "${daoPackagePath}"
            into "${workDaoDirPath}/org"
        }

        // Dao インターフェース、Entity クラスを生成する
        ant.taskdef(resource: 'domagentask.properties',
                classpath: configurations.domaGenRuntime.asPath)
        ant.gen(url: "${dbUrl}", user: "${dbUser}", password: "${dbPassword}", tableNamePattern: "${tableNamePattern}") {
            entityConfig(packageName: "${rootPackageName}.entity", useListener: false)
            daoConfig(packageName: "${rootPackageName}.dao")
            sqlConfig()
        }

        // 生成された Dao インターフェースを作業用ディレクトリにコピーし、
        // @ComponentAndAutowiredDomaConfig アノテーションを付加する
        copy() {
            from "${daoPackagePath}"
            into "${workDaoDirPath}/replace"
            filter {
                line ->
                    line.replaceAll('import org.seasar.doma.Dao;', "import ${importOfComponentAndAutowiredDomaConfig};\nimport org.seasar.doma.Dao;")
                            .replaceAll('@Dao', '@Dao\n@ComponentAndAutowiredDomaConfig')
            }
        }

        // @ComponentAndAutowiredDomaConfig アノテーションを付加した Dao インターフェースを
        // dao パッケージへ戻す
        copy() {
            from "${workDaoDirPath}/replace"
            into "${daoPackagePath}"
        }

        // 元々 dao パッケージ内にあったファイルを元に戻す
        copy() {
            from "${workDaoDirPath}/org"
            into "${daoPackagePath}"
        }

        // 作業用ディレクトリを削除する
        clearDir("${workDirPath}")
    }
}

/* -----------------------------------------------------------------------------
 * メソッド定義部
 ---------------------------------------------------------------------------- */

void clearDir(String dirPath) {
    delete dirPath
}
Application.java
package ksbysample.webapp.bootnpmgeb;

import org.springframework.boot.SpringApplication;
import org.springframework.boot.autoconfigure.SpringBootApplication;
import org.springframework.boot.autoconfigure.data.jpa.JpaRepositoriesAutoConfiguration;
import org.springframework.boot.autoconfigure.orm.jpa.HibernateJpaAutoConfiguration;
import org.springframework.context.annotation.ComponentScan;
import org.springframework.context.annotation.ImportResource;
import org.springframework.session.config.annotation.web.http.EnableSpringHttpSession;

import java.text.MessageFormat;
import java.util.Arrays;
import java.util.Collections;
import java.util.HashSet;
import java.util.Set;

/**
 * ???
 */
@ImportResource("classpath:applicationContext-${spring.profiles.active}.xml")
@SpringBootApplication(exclude = {JpaRepositoriesAutoConfiguration.class, HibernateJpaAutoConfiguration.class})
@ComponentScan("ksbysample")
@EnableSpringHttpSession
public class Application {

    ..........
@EnableRedisHttpSession→@EnableSpringHttpSessionに変更します。@EnableGlobalMethodSecurity(prePostEnabled = true)を削除します。
ControllerAndEventNameLogger.java
    @Around(value = "execution(* ksbysample.webapp.bootnpmgeb.web..*.*(..)) && @annotation(loggingEventName)"
            , argNames = "pjp, loggingEventName")
    public Object logginControllerAndEventName(ProceedingJoinPoint pjp, LoggingEventName loggingEventName)
            throws Throwable {
        ..........
execution(* ksbysample.webapp.lending.web..*.*(..))→execution(* ksbysample.webapp.bootnpmgeb.web..*.*(..))に変更します。
MethodLogger.java
    @SuppressWarnings({"PMD.UnusedPrivateMethod"})
    @Pointcut("execution(* ksbysample.webapp.bootnpmgeb.web..*.*(..))"
            + "&& @within(org.springframework.stereotype.Controller)")
    private void pointcutControllerMethod() {
    }

    @SuppressWarnings({"PMD.UnusedPrivateMethod"})
    @Pointcut("execution(* ksbysample.webapp.bootnpmgeb.service..*.*(..))"
            + "&& @within(org.springframework.stereotype.Service)")
    private void pointcutServiceMethod() {
    }
execution(* ksbysample.webapp.lending.web..*.*(..))→execution(* ksbysample.webapp.bootnpmgeb.web..*.*(..))に変更します。execution(* ksbysample.webapp.lending.service..*.*(..))→execution(* ksbysample.webapp.bootnpmgeb.service..*.*(..))に変更します。
RequestAndResponseLogger.java
    private static final String POINTCUT_ALL_CLASS_AND_METHOD_UNDER_APPLICATION_PACKAGE
            = "execution(* ksbysample.webapp.bootnpmgeb..*.*(..))";
execution(* ksbysample.webapp.lending..*.*(..))→execution(* ksbysample.webapp.bootnpmgeb..*.*(..))に変更します。
ApplicationConfig.java
package ksbysample.webapp.bootnpmgeb.config;

import org.springframework.boot.autoconfigure.jdbc.DataSourceBuilder;
import org.springframework.boot.context.properties.ConfigurationProperties;
import org.springframework.context.MessageSource;
import org.springframework.context.annotation.Bean;
import org.springframework.context.annotation.Configuration;
import org.springframework.validation.Validator;
import org.springframework.validation.beanvalidation.LocalValidatorFactoryBean;

import javax.sql.DataSource;

/**
 * ???
 */
@Configuration
public class ApplicationConfig {

    private final MessageSource messageSource;

    /**
     * @param messageSource {@link MessageSource} bean
     */
    public ApplicationConfig(MessageSource messageSource) {
        this.messageSource = messageSource;
    }

    /**
     * Controller クラスで直接 {@link Validator} を呼び出すために Bean として定義している
     * また Hibernate Validator のメッセージを ValidationMessages.properties ではなく
     * messages.properties に記述できるようにするためにも使用している
     *
     * @return new {@link LocalValidatorFactoryBean}
     */
    @Bean
    public Validator mvcValidator() {
        LocalValidatorFactoryBean localValidatorFactoryBean = new LocalValidatorFactoryBean();
        localValidatorFactoryBean.setValidationMessageSource(this.messageSource);
        return localValidatorFactoryBean;
    }

    /**
     * @return Tomcat JDBC Connection Pool の DataSource オブジェクト
     */
    @Bean
    @ConfigurationProperties("spring.datasource.tomcat")
    public DataSource dataSource() {
        return DataSourceBuilder.create()
                .type(org.apache.tomcat.jdbc.pool.DataSource.class)
                .build();
    }

}
- 以下の Bean のみ残します。
- mvcValidator Bean
- dataSource Bean
WebSecurityConfig.java
package ksbysample.webapp.bootnpmgeb.config;

import org.springframework.boot.autoconfigure.security.SecurityProperties;
import org.springframework.context.annotation.Configuration;
import org.springframework.core.annotation.Order;
import org.springframework.security.config.annotation.web.builders.HttpSecurity;
import org.springframework.security.config.annotation.web.configuration.WebSecurityConfigurerAdapter;

/**
 * ???
 */
@Configuration
@Order(SecurityProperties.ACCESS_OVERRIDE_ORDER)
public class WebSecurityConfig extends WebSecurityConfigurerAdapter {

    @Override
    protected void configure(HttpSecurity http) throws Exception {
        http.authorizeRequests()
                // 認証の対象外にしたいURLがある場合には、以下のような記述を追加します
                // 複数URLがある場合はantMatchersメソッドにカンマ区切りで対象URLを複数列挙します
                // .antMatchers("/country/**").permitAll()
                //
                // この Web アプリケーションでは Spring Security を CSRF対策で使用したいだけなので、
                // 全ての URL を認証の対象外にする
                .antMatchers("/**").permitAll()
                .anyRequest().authenticated();
    }

}
履歴
2017/07/22
初版発行。
Java SE を 8u131 → 8u141 へ、IntelliJ IDEA を 2017.1.5 → 2017.2 へ、Git for Windows を 2.13.2 → 2.13.3 へバージョンアップ
※ksbysample-webapp-lending プロジェクトを開いた状態でバージョンアップしています。
Java SE を 8u131 → 8u141 へバージョンアップする
Oracle の Java SE Downloads を見ると 8u141 がダウンロードできるようになっていました。以下のページに説明があります。
- [Java] JDK 8u141, 7u151, and 6u161 Released!
https://orablogs-jp.blogspot.jp/2017/07/jdk-8u141-7u151-and-6u161-released.html
8u141 へバージョンアップします。
- [Java] JDK 8u141, 7u151, and 6u161 Released!
jdk-8u141-windows-x64.exe をダウンロードして C:\Java\jdk1.8.0_141 へインストールした後、環境変数 JAVA_HOME のパスを C:\Java\jdk1.8.0_141 へ変更します。
コマンドプロンプトから
java -versionを実行し、1.8.0_141に変更されていることを確認します。
開いているプロジェクトを閉じて「Welcome to IntelliJ IDEA」ダイアログを表示します。
ダイアログ下部の「Configure」-「Project Defaults」-「Project Structure」を選択します。
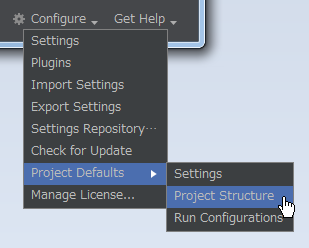
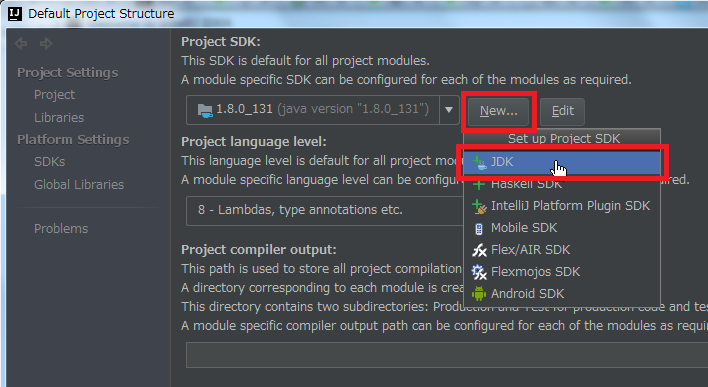
「Default Project Structure」ダイアログが表示されます。画面左側で「Project Settings」-「Project」を選択後、画面右側の「Project SDK」の「New…」ボタンをクリックし、表示されるメニューから「JDK」を選択します。
「Select Home Directory for JDK」ダイアログが表示されます。今回も環境変数 JAVA_HOME のディレクトリが選択された状態で表示されませんでした。C:\Java\jdk1.8.0_141 を選択した後、「OK」ボタンをクリックします。

「Default Project Structure」ダイアログに戻るので、今度は「Project SDK」の「Edit」ボタンをクリックします。

画面左側で「Platform Settings」-「SDKs」が選択された状態になるので、画面右上の入力フィールドで “1.8” → “1.8.0_141” へ変更します。

次に中央のリストから「1.8.0_131」を選択した後、リストの上の「-」ボタンをクリックして削除します。

「OK」ボタンをクリックして「Default Project Structure」ダイアログを閉じます。
「Welcome to IntelliJ IDEA」ダイアログに戻ったら、ksbysample-webapp-lending プロジェクトを開きます。
IntelliJ IDEA のメイン画面が開いたら、メニューから「File」-「Project Structure…」を選択します。
「Project Structure」ダイアログが表示されます。以下の画像の状態になっているので、

「Project SDK」と「Project language level」を選択し直します。

「OK」ボタンをクリックして「Project Structure」ダイアログを閉じます。
メイン画面に戻ると画面右下に「Indexing…」の表示が出るので、終了するまで待ちます。

clean タスク実行 → Rebuild Project 実行 → build タスクを実行して、"BUILD SUCCESSFUL" のメッセージが出力されることを確認します。
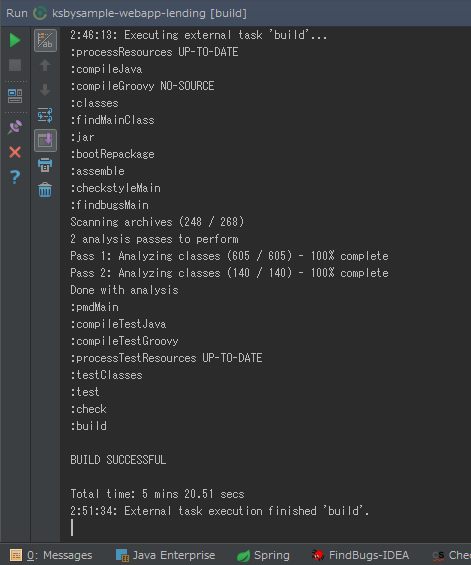
Project Tool Window で src/test を選択した後、コンテキストメニューを表示して「Run ‘All Tests’ with Coverage」を選択し、テストが全て成功することを確認します。

特に問題は発生しませんでした。8u141 で開発を進めます。
IntelliJ IDEA を 2017.1.5 → 2017.2 へバージョンアップする
IntelliJ IDEA の 2017.2 がリリースされたのでバージョンアップします。
2017.2 (Jul 18)
https://www.jetbrains.com/idea/whatsnew/#v2017-2IntelliJ IDEA 2017.2 is Here: Smart, Sleek, and Snappy
https://blog.jetbrains.com/idea/2017/07/intellij-idea-2017-2-is-here-smart-sleek-and-snappy/
※上の Java SE のバージョンアップからの続きで ksbysample-webapp-lending プロジェクトを開いた状態でバージョンアップしています。
IntelliJ IDEA のメインメニューから「Help」-「Check for Updates…」を選択します。
「Platform and Plugin Updates」ダイアログが表示されます。左下に「Update and Restart」ボタンが表示されていますので、「Update and Restart」ボタンをクリックします。

Plugin の update も表示されました。「Error-prone Compiler Integration」はバージョンアップすると動かなくなりますので、これだけチェックを外して「Update and Restart」ボタンをクリックします。

Patch がダウンロードされて IntelliJ IDEA が再起動します。
Patch 適用後「Complete Installatioin」ダイアログが表示されます。表示された設定はそのままで「OK」ボタンをクリックします。

IntelliJ IDEA が起動すると画面下部に「Indexing…」のメッセージが表示されますので、終了するまで待機します。

C:\Users\root の下に .IntelliJIdea2017.1 フォルダが残っているので削除します。
Gradle Tool Window のツリーを見ると「Tasks」の下に「other」しかない状態になっているので、左上にある「Refresh all Gradle projects」ボタンをクリックして更新します。

clean タスク実行 → Rebuild Project 実行 → build タスクを実行して、"BUILD SUCCESSFUL" のメッセージが出力されることを確認します。

Project Tool Window で src/test を選択した後、コンテキストメニューを表示して「Run ‘All Tests’ with Coverage」を選択し、テストが全て成功することを確認します。

テスト成功時のアイコンが変わっていますね。
Git for Windows を 2.13.2 → 2.13.3 へバージョンアップする
Git for Windows の 2.13.3 がリリースされていたのでバージョンアップします。
https://git-for-windows.github.io/ の「Download」ボタンをクリックして Git-2.13.3-64-bit.exe をダウンロードします。
Git-2.13.3-64-bit.exe を実行します。
「Git 2.13.3 Setup」ダイアログが表示されます。[Next >]ボタンをクリックします。
「Select Components」画面が表示されます。「Git LFS(Large File Support)」だけチェックした状態で [Next >]ボタンをクリックします。
「Adjusting your PATH environment」画面が表示されます。中央の「Use Git from the Windows Command Prompt」が選択されていることを確認後、[Next >]ボタンをクリックします。
「Choosing HTTPS transport backend」画面が表示されます。「Use the OpenSSL library」が選択されていることを確認後、[Next >]ボタンをクリックします。
「Configuring the line ending conversions」画面が表示されます。「Checkout Windows-style, commit Unix-style line endings」が選択されていることを確認した後、[Next >]ボタンをクリックします。
「Configuring the terminal emulator to use with Git Bash」画面が表示されます。「Use Windows'default console window」が選択されていることを確認した後、[Next >]ボタンをクリックします。
「Configuring extra options」画面が表示されます。「Enable file system caching」だけがチェックされていることを確認した後、[Install]ボタンをクリックします。
インストールが完了すると「Completing the Git Setup Wizard」のメッセージが表示された画面が表示されます。中央の「View Release Notes」のチェックを外した後、「Finish」ボタンをクリックしてインストーラーを終了します。
コマンドプロンプトを起動して git のバージョンが
git version 2.13.3.windows.1になっていることを確認します。
git-cmd.exe を起動して日本語の表示・入力が問題ないかを確認します。

特に問題はないようですので、2.13.3 で作業を進めたいと思います。
Spring Boot + npm + Geb で入力フォームを作ってテストする ( その1 )( 概要 )
概要
記事一覧はこちらです。
下記の概要の Web アプリケーションを作成します。
- 今回は以下の方法を知るためにサンプルを作成します。
- Spring Boot のプロジェクトに npm を使用して Bootstrap や AdminLTE の CSS のライブラリをインストールする方法
- webpack を使用して各画面の js ファイルを生成する方法
- MySQL, PostgreSQL ではなく H2 Database を使用し、Flyway を使用してテーブルを作成する方法(別途 DB のソフトをインストールすることなく試せるサンプルを作成できるようになりたい)
- Geb でテストを作成する方法
- Web で webpack に関する記事を見ていると CSS, Javascript, 画像ファイル等の複数ファイルを1ファイルにまとめてるのが本来の使い方のようなのですが、今回は CSS や画像ファイル等 Javascript 以外のファイルは1つにまとめずに npm-scripts でコピーするだけにし、Javascript のファイルだけ webpack で1つにまとめます。
- 以下の仕様の入力フォームを作成します。
- 入力画面1 → 入力画面2 → 入力画面3 → 確認画面 → 完了画面、の5画面構成にします。
- 確認画面から修正したい項目がある入力画面へ戻れるようにします。
- 入力されたデータは入力画面1~3、確認画面を遷移している時はセッションに保存します。
- 確認画面で確認ボタンが押されたら DB に保存してメールを送信した後、完了画面へ遷移します。
- 画面は Bootstrap + AdminLTE で作成します。AdminLTE は本来管理画面向けですが、この2つを組み合わせて npm でインストールするサンプルが欲しいので、この組み合わせで作成します。
- jQuery は 3 系ではなく AdminLTE が使用している 2 系にします。
- これまでは Bootstrap, jQuery, AdminLTE を build.gradle にスクリプトを書いてインストールしていましたが、今回は Node.js をインストールして npm + npm-scripts でインストールします。
- Javascript は webpack を使用して各画面毎の js ファイルを生成するようにします。
- 画面のテストは Geb を使用してみます。Selenide にするか迷いましたが、個人的に Groovy を気に入っているので Geb を試すことにしました。
- Project は ksbysample-boot-miscellaneous/boot-npm-geb-sample に作成します。
- 構成要素は、以下の想定です。
- Spring Boot 1.5
- Spring Session(Redis は使用せず
spring.session.store-type=hash_mapで設定します) - Thymeleaf 3
- Doma 2
- FreeMarker
- Bootstrap
- AdminLTE
- jQuery
- H2 Database
- Flyway
- 以下の順序で進める予定です。
- Project の作成
- Node.js のインストール
- Bootstrap, AdminLTE のインストール
- URL の決定
- 画面の HTML + Controller クラスの作成
- テーブルの作成、Flyway によるテーブル作成処理の作成
- 入力画面の作成
- 確認画面の作成
- 完了画面の作成
- Geb によるテストの作成
履歴
2017/07/20
初版発行。
2017/08/13
* DB のマイグレーションツールを Liquibase → Flyway に変更しました。
Spring Boot + npm + Geb で入力フォームを作ってテストする ( 大目次 )
GitHub は https://github.com/ksby/ksbysample-boot-miscellaneous
- その1 ( 概要 )
- その2 ( Project の作成 )
- その3 ( Project の作成2 )
- その4 ( nodist + Node.js のインストール )
- その5 ( Bootstrap, AdminLTE, Font Awesome, Ionicons のインストール )
- その6 ( URL の決定 )
- その7 ( webpack + browser-sync をインストールする )
- その8 ( 各画面の HTML を作成する )
- その9 ( 各画面の HTML を作成する2 )
- その10 ( 各画面の HTML を作成する3 )
- その11 ( PostCSS で common.css を minify する + autoprefixer, stylelint を導入する )
- 番外編 ( IntelliJ IDEA 2017.2 の新機能 Run Dashboard を試してみる )
- その12 ( HTML を Thymeleaf テンプレートファイルにする + Controller クラスを作成する )
- その13 ( HTML を Thymeleaf テンプレートファイルにする + Controller クラスを作成する2 )
- その14 ( browser-sync --> Tomcat 連携してファイル変更時に自動リロードで反映される環境を構築してみる )
- 番外編 ( browser-sync + http-proxy-middleware で https の環境を構築する )
- その15 ( Flyway のインストール + Spring Security 使用時に H2 Console に接続する + IntelliJ IDEA の Database Tools で in-memory モードの H2 Database に接続する )
- その16 ( H2 Database に Flyway でテーブルを作成する )
- その17 ( 入力画面1を作成する )
- その18 ( 入力画面1を作成する2 )
- その19 ( 入力画面1を作成する3 )
- その20 ( 入力画面1を作成する4 )
- その21 ( 入力画面1を作成する5 )
- その22 ( 入力画面2を作成する )
- その23 ( 入力画面2を作成する2 )
- その24 ( 入力画面2を作成する3 )
- その25 ( 入力画面2を作成する4 )
- その26 ( 入力画面2を作成する5 )
- その27 ( 入力画面2を作成する6 )
- その28 ( Spring Boot を 1.5.4 → 1.5.7 へ、error-prone を 2.0.15 → 2.1.1 へバージョンアップする )
- 番外編 ( ModelMapper メモ書き )
- その29 ( Geb をインストールする )
- その30 ( Geb を 2.0 へバージョンアップする+Firefox headless モードを使用する )
- その31 ( テスト対象のブラウザに Headless Chrome と HtmlUnit を追加する+Chrome, Firefox, HtmlUnit で連続テストする gradle タスクを作成する )
- その32 ( npm の admin-lte package から jQuery がなくなっていたので対応する )
- 番外編 ( webpack で jQuery だけバンドルしないで外部ファイルを利用するには? )
- その33 ( ESLint を導入する )
- その34 ( Geb でテストを作成する )
- その35 ( Geb でテストを作成する2 )
- その36 ( Node.js を 6.11.1 → 8.9.1 へ、npm を 4.0.5 → 5.5.1 へバージョンアップする )
- その37 ( Jest で jQuery を利用したモジュールのテストを書く )
- その38 ( IntelliJ IDEA から Jest のテストを実行する )
- その39 ( Spring Boot を 1.5.7 → 1.5.9 へバージョンアップする )
- その40 ( Form.js のテストを Jest で書く )
- その41 ( IntelliJ IDEA で Javascript を debug する )
- その42 ( Form.js のテストを Jest で書く2 )
- その43 ( Jest で jQuery.ajax の処理のテストを書く )
- その44 ( Jest で setTimeout の処理のテストを書く )
- 番外編 ( Jest + axios + Nock, xhr-mock でテストを書いてみる )
- 番外編 ( MobX を使用してみる )
- 番外編 ( MobX を使用してみる2 )
- その45 ( gradle の build タスク実行時に Javascript の build+テスト を実行する )
- その46 ( Spring Boot を 1.5.9 → 1.5.10 へ、error-prone を 2.1.3 → 2.2.0 へ、Geb を 2.0 → 2.1 へバージョンアップする )
- その47 ( Node.js を 8.9.1 → 8.9.4 へ、npm を 5.5.1 → 5.6.0 へバージョンアップする )
- その48 ( 入力画面3を作成する )
- その49 ( 入力画面3を作成する2 )
- その50 ( 入力画面3を作成する3 )
- その51 ( 入力画面3を作成する4 )
- その52 ( 入力画面3を作成する5 )
- その53 ( Gradle を 3.5 → 4.6 へバージョンアップする )
- その54 ( webpack を 3.8.1 → 4.9.1 へバージョンアップする )
- その55 ( PMD を 5.8.1 → 6.4.0 へバージョンアップする )
- その56 ( PMD を 5.8.1 → 6.4.0 へバージョンアップする2 )
- その57 ( build.gradle に記述する BOM を Spring IO Platform のものから Spring Boot のものに変更する )
- その58 ( 確認画面を作成する )
- その59 ( 確認画面を作成する2 )
- その60 ( 確認画面を作成する3 )
- その61 ( 確認画面を作成する4 )
- その62 ( 確認画面を作成する5 )
- その63 ( MockMvc#perform 呼び出し時に .with(csrf()) を付けていなくてもテストが成功していた理由とは? )
- その64 ( 入力画面3を作成する6、@SpringBootTest のテストは Spock+Groovy より JUnit4+Groovy の方が速い? )
- その65 ( Gradle を 4.6 → 4.8.1 へ、Checkstyle を 8.8 → 8.11 へ、PMD を 6.4.0 → 6.5.0 へ、error-prone を 2.2.0 → 2.3.1 へバージョンアップする )
- その66 ( Node.js を 8.9.4 → 8.11.3 へ、npm を 5.6.0 → 6.2.0 へ+ Javascript のライブラリをバージョンアップする )
- その67 ( Prettier のインストール+Jest Each を試してみる )
- その68 ( Spring Boot を 1.5.10 → 1.5.14 へバージョンアップする )
- その69 ( 再び eslint-config-airbnb-base をインストールする )
- その70 ( 完了画面を作成する )
- その71 ( Geb で入力画面1~3→確認画面→完了画面を通したテストを作成する )
- 番外編 ( gradle-processes を利用して Geb のテスト前に Spring Boot の Web アプリを自動起動する )
- その72 ( Windows で本番稼働させるためのディレクトリ作成、jar ファイル配置、bat ファイル作成、サービス登録、動作確認 )
- 感想
- その73 ( Spring Boot を 1.5.14 → 2.0.4 へバージョンアップする )
- 番外編 ( IntelliJ IDEA に Rainbow Brackets Plugin をインストールする )
- その74 ( FindBugs 3.0.1 → SpotBugs 3.1.3 に切り替える )
- その75 ( コネクションプーリング用ライブラリを Tomcat connection pool → HikariCP に切り替える )
- その76 ( Spring Boot Actuator を導入する )
- その77 ( RequestAndResponseLogger クラスの Cookie ログは name, value だけ出力するように変更する+SESSION Cookie の secure 属性を true にするには? )
- その78 ( PMD を 6.5.0 → 6.6.0 へバージョンアップする+gradle-processes を導入する )
ここからフレームワーク(Spring Boot 2.1.x 等)や各種ライブラリのバージョンアップ編です。
- その79 ( webdriver-binaries-gradle-plugin を利用して WebDriver の個別ダウンロードを不要にする )
- その80 ( nodist を 0.8.8 → 0.9.1 へ、Node.js を 8.11.4 → 10.15.3 へ、npm を 6.2.0-next.1 → 6.9.0 へバージョンアップする )
- その81 ( eslint を 4.19.1 → 5.16.0 へ、windows-build-tools を 3.1.0 → 5.1.0 へ、jest を 23.4.1 → 24.7.1 へ、postcss-cli を 4.1.1 → 6.1.2 へバージョンアップする )
- その82 ( Gradle を 4.8.1 → 5.3.1 へ、Spring Boot を 2.0.4 → 2.1.4 へバージョンアップする )
- その83 ( Checkstyle を 8.11 → 8.19 へ、PMD を 6.6.0 → 6.13.0 へバージョンアップ+JUnit 5 の導入+ Oracle JDK 8u202 → AdoptOpenJDK 11.0.2+9 へ、error-prone を 2.3.1 → 2.3.3 へバージョンアップする)
ここからモジュールやツールの 2020/05 時点の最新バージョンアップ編です。
- Spring Boot + npm + Geb で入力フォームを作ってテストする ( その84 )( WebDriver を最新バージョンに上げる )
- Spring Boot + npm + Geb で入力フォームを作ってテストする ( その85 )( Node.js を 10.15.3 → 12.16.3 へ、npm を 6.9.0 → 6.14.5 へバージョンアップする )
- Spring Boot + npm + Geb で入力フォームを作ってテストする ( その86 )( eslint を 5.16.0 → 6.8.0 へ、jest を 24.7.1 → 26.0.1 へバージョンアップし、windows-build-tools を 5.1.0 → 4.0.0 へバージョンダウンする )
- Spring Boot + npm + Geb で入力フォームを作ってテストする ( その87 )( postcss-cli を 6.1.2 → 7.1.1 へ、prettier を 1.16.4 → 2.0.5 へ、stylelint を 9.10.1 → 13.3.3 へバージョンアップする )
- Spring Boot + npm + Geb で入力フォームを作ってテストする ( その88 )( Gradle を 5.3.1 → 6.4 へバージョンアップする )
- Spring Boot + npm + Geb で入力フォームを作ってテストする ( その89 )( Spring Boot を 2.1.4 → 2.2.7 へバージョンアップする )
- Spring Boot + npm + Geb で入力フォームを作ってテストする ( その90 )( Checkstyle を 8.19 → 8.32 へ、SpotBugs を 1.6.9 → 4.0.2 へ、PMD を 6.13.0 → 6.23.0 へ、error-prone を 2.3.3 → 2.3.4 へバージョンアップする )
- Spring Boot + npm + Geb で入力フォームを作ってテストする ( その91 )( Doma 2 を 2.28.0 → 2.34.0 へバージョンアップする+domaGen タスクを doma-codegen-plugin を利用したものに作り直す )
- Spring Boot + npm + Geb で入力フォームを作ってテストする ( その92 )( http-proxy-middleware の createProxyMiddleware 関数の引数 context には Proxy させない URI を後に書く )
ここからモジュールやツールの 2021/10 時点の最新バージョンアップ編です。
- Spring Boot + npm + Geb で入力フォームを作ってテストする ( その93 )( WebDriver を最新バージョンに上げる )
- Spring Boot + npm + Geb で入力フォームを作ってテストする ( その94 )( Node.js を 12.16.3 → 14.18.0 へバージョンアップする )
- Spring Boot + npm + Geb で入力フォームを作ってテストする ( その95 )( eslint を 6.8.0 → 7.32.0 へ、jest を 26.0.1 → 27.2.4 へバージョンアップする )
- Spring Boot + npm + Geb で入力フォームを作ってテストする ( その96 )( postcss を 7.0.29 → 8.3.8 へ、postcss-cli を 7.1.1 → 9.0.1 へ、prettier を 2.0.5 → 2.4.1 へ、stylelint を 13.3.3 → 13.13.1 へバージョンアップする )
- Spring Boot + npm + Geb で入力フォームを作ってテストする ( その97 )( webpack を 4.43.0 → 5.56.0 へバージョンアップする )
- Spring Boot + npm + Geb で入力フォームを作ってテストする ( その98 )( Gradle を 6.4 → 6.9.1 へ、Spring Boot を 2.2.7 → 2.4.10 へ、Geb を 3.4 → 4.1 へバージョンアップする )
- Spring Boot + npm + Geb で入力フォームを作ってテストする ( その99 )( Gradle を 6.9.1 → 7.2 へ、Spring Boot を 2.4.10 → 2.5.4 へ、Geb を 4.1 → 5.0 へバージョンアップする )
- Spring Boot + npm + Geb で入力フォームを作ってテストする ( その100 )( Gradle を 6.9.1 → 7.2 へ、Spring Boot を 2.4.10 → 2.5.4 へ、Geb を 4.1 → 5.0 へバージョンアップする2 )
- Spring Boot + npm + Geb で入力フォームを作ってテストする ( その101 )( Spring Boot を 2.5.4 → 2.5.5 へバージョンアップするが、Eclipse Adoptium OpenJDK(Eclipse Temurin)を 11.0.12+7 → 17+35 へバージョンアップするのは一旦諦める )
- Spring Boot + npm + Geb で入力フォームを作ってテストする ( その102 )( SpotBugs を 4.0.2 → 4.4.1 へ、PMD を 6.23.0 → 6.39.0 へ、error-prone を 2.3.4 → 2.9.0 へバージョンアップする )
- Spring Boot + npm + Geb で入力フォームを作ってテストする ( その103 )( Eclipse Adoptium OpenJDK(Eclipse Temurin)を 11.0.12+7 → 17+35 へバージョンアップする )
- Spring Boot + npm + Geb で入力フォームを作ってテストする ( その104 )( Checkstyle を 8.32 → 9.0.1 へバージョンアップする )
Spring Boot 1.4.x の Web アプリを 1.5.x へバージョンアップする ( 感想 )
記事一覧はこちらです。
1.4系 → 1.5 系へのバージョンアップでは、ほとんど変更する点はありませんでした。
Thymeleaf を 2.1.5 → 3.0.6 へバージョンアップしましたが、HTML をそのままで解釈できるようになって本当に使いやすくなりました。タグの末尾に必ず “/” を付ける必要がなくなったし、個人的には新機能 Fragment Expressions が気に入りました。Spring Boot 1.5 系ではまだデフォルトでサポートされていませんが、Thymeleaf を使用するのであれば 3 系を使用することをお薦めします!
PMD は CheckStyle, FindBugs とチェック内容が重複するところもありますが、別の観点からも指摘してくれるので入れた方がよいですね。ただしデフォルトのままでは不要な点も大量に指摘してくるので、設定のカスタマイズは必須だと思います。このカスタマイズが結構面倒でした。。。
JUnit4 でテストを書く時も Groovy で書いた方が便利だとは思いませんでした。また Groovy SQL が便利すぎます。ユニットテストを Java で書くことは今後ないんじゃないだろうか、という気がします。
さて、次に何をやるかは考え中です。。。