共有ライブラリを管理するために Sonatype の Nexus Repository Manager OSS を使用する ( 大目次 )
- その1 ( 概要 )
- その2 ( Windows 版の Nexus Repository Manager OSS をインストールする )
- その3 ( Nexus Repository Manager OSS の画面を一通り見てみる )
- その4 ( IntelliJ IDEA の Project Defaults を設定する )
- その5 ( 簡単なライブラリを作成して Nexus に登録してみる )
- 番外編 ( IntelliJ IDEA を 2016.1.3 → 2016.2 へバージョンアップ )
- その6 ( 登録した ksbysample-library-simpleutils ライブラリを Spring Boot のプロジェクトから利用してみる )
- その7 ( ksbysample-library-simpleutils ライブラリをアップロードし直した時の挙動と、1.0-SNAPSHOT で呼び出せるのかを確認する )
- 番外編 ( Java SE を 8u92 → 8u102 へ、Git for Windows を 2.9.0 → 2.9.2 へバージョンアップ )
- その8 ( build.gradle に 1.0-SNAPSHOT のバージョンで記述している時にライブラリを更新するとすぐに反映されるのか? )
- その9 ( 1.0-SNAPSHOT のバージョンのまま Nexus にアップロードできるのか? )
- その10 ( 1.0-RELEASE で Nexus にアップロードする )
- その11 ( Nexus を 3.0.0-03 → 3.0.1-01 へバージョンアップする )
- 番外編 ( build.gradle にコマンドを書いて実行する )
- 番外編 ( IntelliJ IDEA を 2016.2 → 2016.2.1 へバージョンアップ )
- その12 ( 他のライブラリに依存するライブラリを作成する )
- その13 ( 利用するライブラリが依存しているライブラリの別バージョンを build.gradle で指定したらどうなるのか? )
- 番外編 ( IntelliJ IDEA を 2016.2.1 → 2016.2.2 へバージョンアップ )
- その14 ( sources と javadoc をアップロードする )
- その15 ( pom ファイルに name, description を追加する )
- 番外編 ( Gradle のバージョンを 3.0 に上げてみようとしたら Spring Boot 1.4.0 以降が必要でした )
- 番外編 ( IntelliJ IDEA を 2016.2.2 → 2016.2.4 へバージョンアップ )
- 番外編 ( Java SE を 8u102 → 8u112 へ、Git for Windows を 2.9.2 → 2.10.2 へバージョンアップ )
- 番外編 ( IntelliJ IDEA を 2016.2.4 → 2016.3 へバージョンアップ )
- 番外編 ( IntelliJ IDEA 2016.3 の新機能を試してみる )
- その16 ( Nexus を 3.0.1-01 → 3.1.0-04 へバージョンアップする )
- その17 ( Nexus へコンポーネントを登録する専用 User を作成する )
- その18 ( Spring Framework に依存するライブラリを作成する )
- その19 ( Spring Framework に依存するライブラリを作成する2 )
- その20 ( Spring Framework に依存するライブラリを作成する3 )
- その21 ( Spring Framework に依存するライブラリを作成する4 )
- その22 ( Spring Framework に依存するライブラリを作成する5 )
- その23 ( Spring Framework に依存するライブラリを作成する6 )
- 番外編 ( IntelliJ IDEA を 2016.3 → 2016.3.2 へ、Git for Windows を 2.10.2 → 2.11.0 へバージョンアップ )
- その24 ( Nexus を 3.1.0-04 → 3.2.0-01 へバージョンアップする )
- その25 ( Windows 版 Nexus 3 インストール手順 )
- その26 ( Linux のサーバに Nexus Repository Manager OSS をインストールする )
共有ライブラリを管理するために Sonatype の Nexus Repository Manager OSS を使用する ( その26 )( Linux のサーバに Nexus Repository Manager OSS をインストールする )
概要
共有ライブラリを管理するために Sonatype の Nexus Repository Manager OSS を使用する ( その25 )( Windows 版 Nexus 3 インストール手順 ) の続きです。
- 今回の手順で確認できるのは以下の内容です。
- VirtualBox+Vagrant をインストールして Linux の仮想サーバを構築し、Unix 版の Nexus Repository Manager OSS をインストールして使用してみます。
- Linxu のディストリビューションは CentOS を使用します。
- vagrant の仮想サーバは C:\work\vagrant の下に作成します。
参照したサイト・書籍
目次
- Oracle VM VirtualBox のインストール
- Vagrant のインストール
- CentOS の仮想サーバを構築する
- Unix 版 Nexus Repository Manager OSS をインストールする
- JDK をインストールする
- 動作確認
- サービスとして登録・起動する
- ksbysample-library-depend-spring ライブラリをアップロードしてみる
- 次回は。。。
手順
Oracle VM VirtualBox のインストール
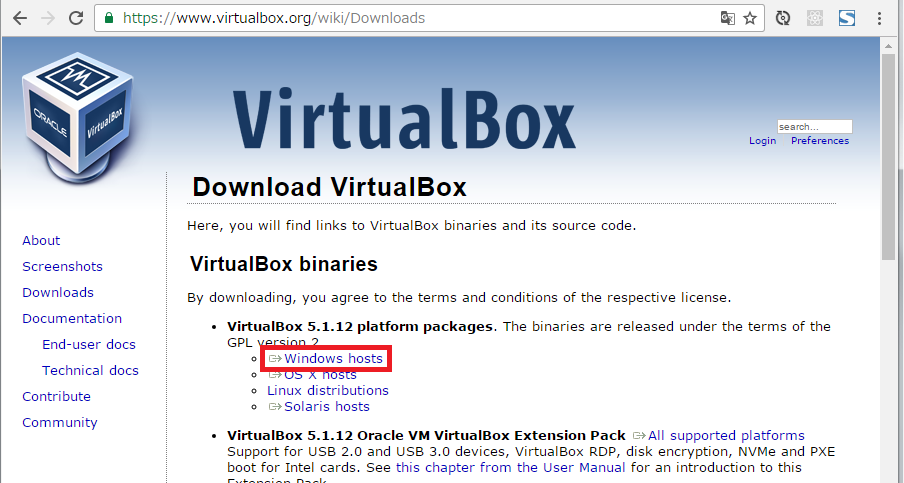
Download VirtualBox のページの「Windows hosts」リンクをクリックし、VirtualBox-5.1.12-112440-Win.exe をダウンロードします。
VirtualBox-5.1.12-112440-Win.exe を実行します。
「Oracle VM VirtualBox 5.1.12 Setup」ダイアログが表示されます。「Next >」ボタンをクリックします。
「Custom Setup」画面が表示されます。「Location」を
C:\virtualbox\に変更した後、「Next >」ボタンをクリックします。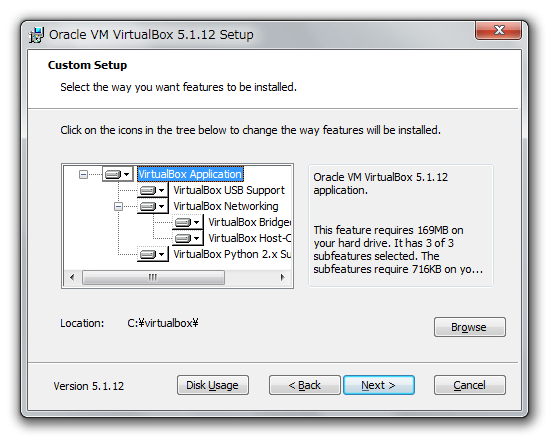
次の画面が表示されます。チェックの状態を以下の画像の通り変更した後、「Next >」ボタンをクリックします。
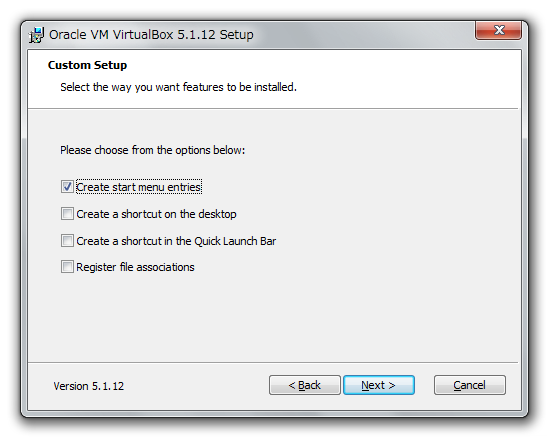
※「Create start menu entries」だけチェックを残したのは、仮想サーバの情報を確認するために VirtualBox の管理画面を見たい場合があるためです。
「Warning: Network Interfaces」画面が表示されます。「Yes」ボタンをクリックします。
「Ready to Install」画面が表示されます。「Install」ボタンをクリックします。
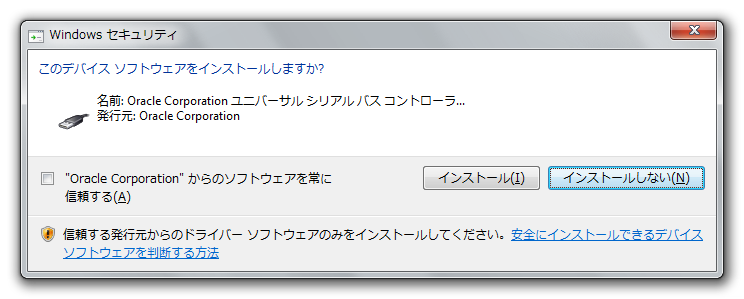
インストールの途中で以下のようなダイアログが3回表示されますので都度「インストール」ボタンをクリックします。
インストールが完了すると「Oracle VM VirtualBox 5.1.12 installation is complete」画面が表示されます。「Start Oracle VM VirtualBox 5.1.12 after installation」のチェックボックスを外した後、「Finish」ボタンをクリックします。
Vagrant のインストール
DOWNLOAD VAGRANT のページの Windows の「Universal (32 and 64-bit)」のリンクをクリックし、vagrant_1.9.1.msi をダウンロードします。
「Vagrant Setup」ダイアログが表示されます。「Next」ボタンをクリックします。
「End-User License Agreement」画面が表示されます。「I accept the terms in the License Agreement」をチェックした後、「Next」ボタンをクリックします。
「Destination Folder」画面が表示されます。
C:\vagrant\に変更した後、「Next」ボタンをクリックします。「Ready to install Vagrant」画面が表示されます。「Install」ボタンをクリックします。
インストールが完了すると「Completed the Vagrant Setup Wizard」画面が表示されます。「Finish」ボタンをクリックします。
PC の再起動を求めるダイアログが表示されるので、「YES」ボタンをクリックして再起動します。
CentOS の仮想サーバを構築する
C:\work\vagrant フォルダを作成します。
C:\work\vagrant の下に boxes フォルダを作成します。
Vagrantbox.es のページの以下の画像の赤枠の box ファイルの URL をコピーします。

コピーした URL をブラウザのアドレスバーにペーストして box ファイル centos-7-x86_64.box をダウンロードし、C:\work\vagrant\boxes の下に保存します。
vagrant box addコマンドでダウンロードした box ファイルを追加します。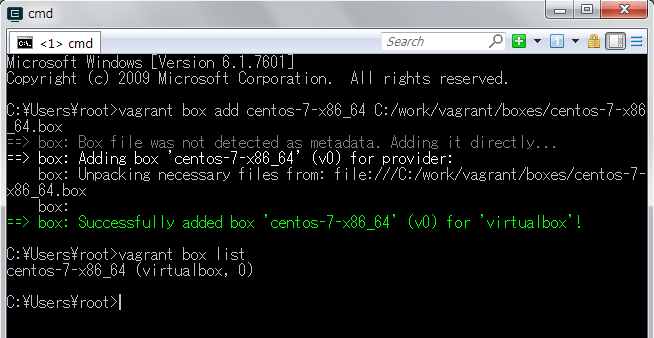
C:\work\vagrant の下に nexus-server フォルダを作成します。
vagrant initコマンドで Vagrantfile を作成します。作成された時点の Vagrantfile は リンク先のその1の内容 です。
Vagrantfile をエディタで開き リンク先のその2の内容 に変更します。今はメモリを 2GB に増やすだけです。
vagrant upコマンドを実行して仮想サーバを起動します。

起動した仮想サーバに ssh でアクセスしたいので、ssh.exe が入っている C:\Git\usr\bin を環境変数 PATH に追加します。
vagrant sshコマンドで仮想サーバに接続できることを確認します。
Unix 版 Nexus Repository Manager OSS をインストールする
Download Nexus Repository OSS ( http://www.sonatype.com/download-oss-sonatype ) のページにアクセスします。
ページ内の「nexus-3.2.0-01-unix.tar.gz」リンクをクリックしてダウンロードします。

ダウンロードした nexus-3.2.0-01-unix.tar.gz を C:\work\vagrant\nexus-server に移動します。
vagrant sshで接続して /opt の下にインストールします。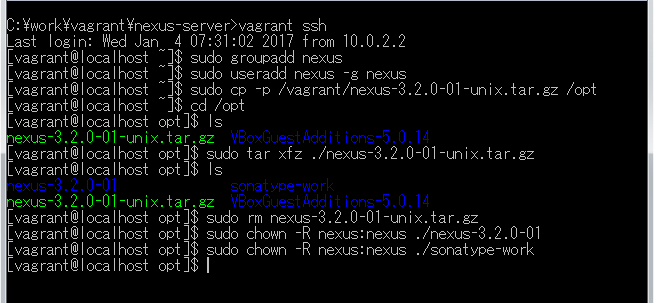
JDK をインストールする
nexus runを実行しようとしてみたところエラーメッセージが出ました。/opt/nexus-3.2.0-01/bin の下を見たところ Windows 版にあった jre ディレクトリが存在しませんでしたので、別途インストールします。
Java SE Development Kit 8 Downloads の「Java SE Development Kit 8u112」の「jdk-8u112-linux-x64.tar.gz」リンクをクリックしてダウンロードします。
ダウンロードした jdk-8u112-linux-x64.tar.gz を C:\work\vagrant\nexus-server に移動します。
以下のコマンドを実行し、jdk-8u112-linux-x64.tar.gz を展開して /opt/jdk1.8.0_112 を作成した後、/opt/java というシンボリックリンクを作成します。
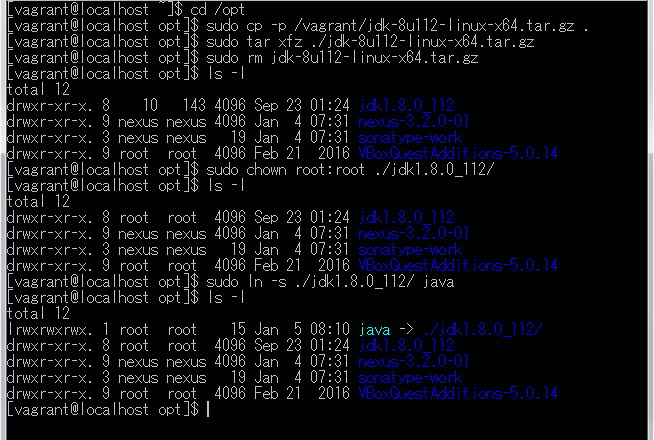
/etc/profile.d の下に java.sh を作成し、リンク先の内容 を記述します。記述後は以下のようになります。

Ctrl+D を押してログアウトした後、再度
vagrant sshで接続してjava -versionでバージョン情報が表示されることを確認します。
動作確認
※動作確認前に Windows 版 nexus のサービスは停止しています。
http://localhost:8081/ でアクセスした時に仮想サーバの nexus の管理画面にアクセスできるよう Vagrantfile を リンク先のその3の内容 に変更します。
vagrant halt→vagrant upを実行して仮想サーバを再起動します。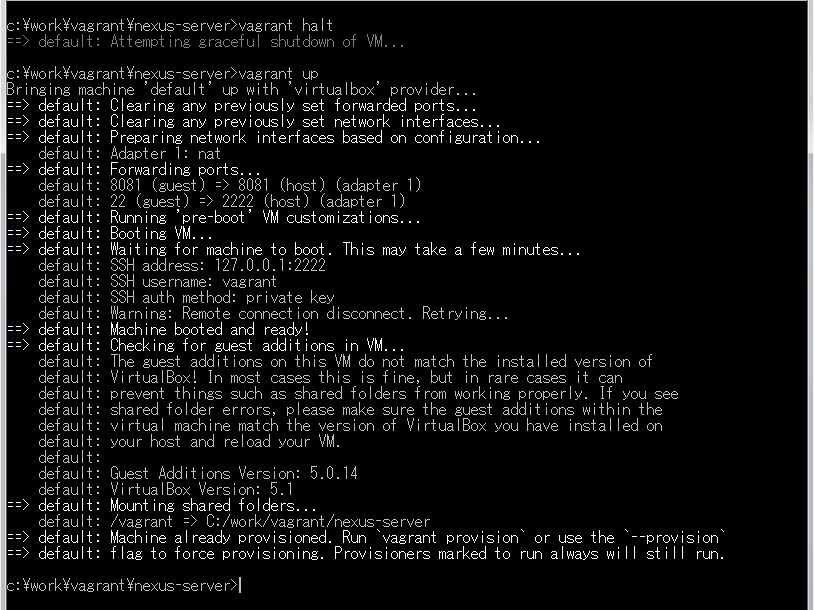
nexus runを実行します。
(.....しばらくログが出力され続けます.....)

http://localhost:8081/ にアクセスして管理画面が表示されることを確認します。
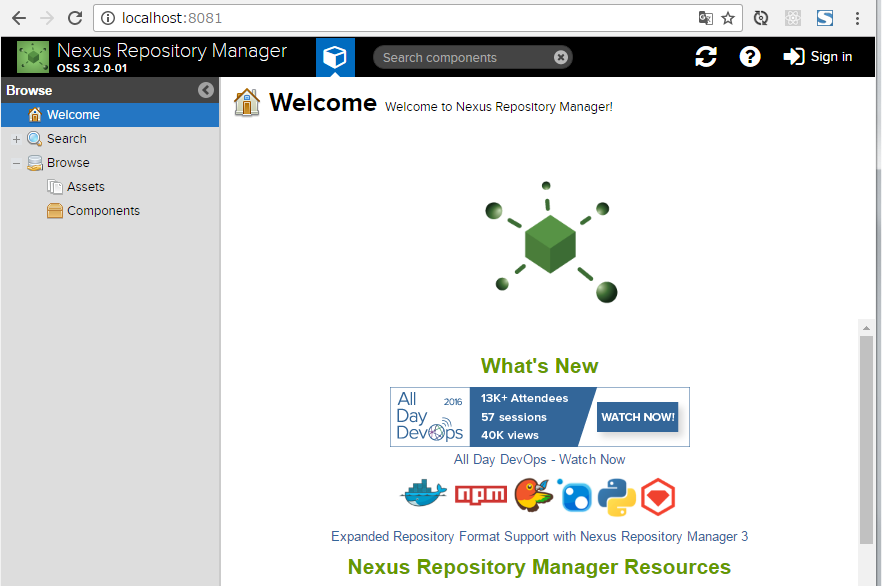
Ctrl+C を押して nexus を停止します。
サービスとして登録・起動する
/opt/nexus-3.2.0-01 → /opt/nexus のシンボリックリンクを作成します。

/etc/systemd/system/ の下に nexus.service を作成し、リンク先の内容 を記述します。
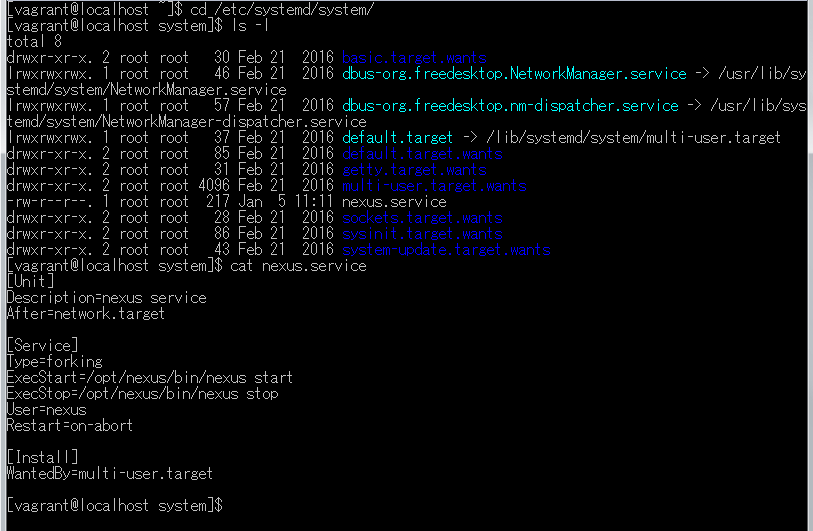
systemctl コマンドで nexus を起動します。

http://localhost:8081/ にアクセスして管理画面が表示されることを確認します。
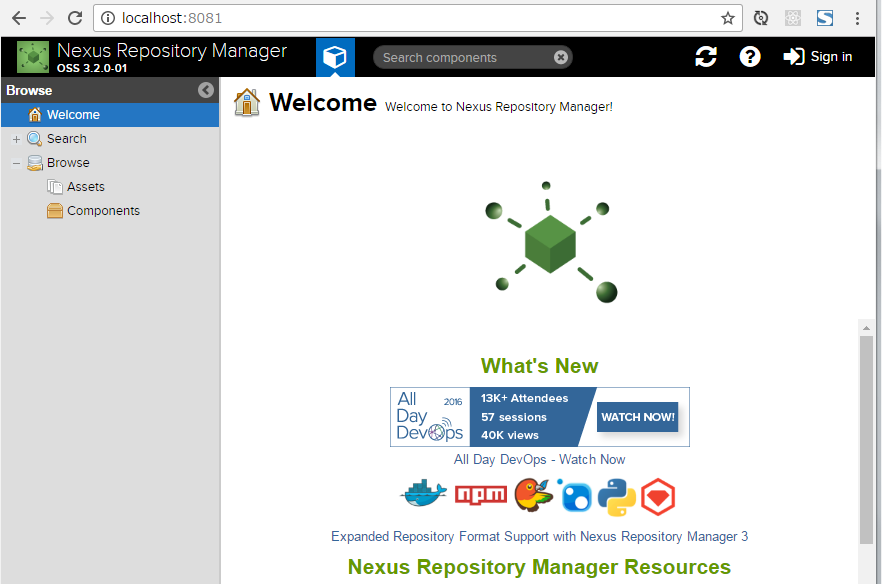
サーバ起動後に nexus が自動起動されるか確認します。
vagrant halt→vagrant upを実行して仮想サーバを再起動します。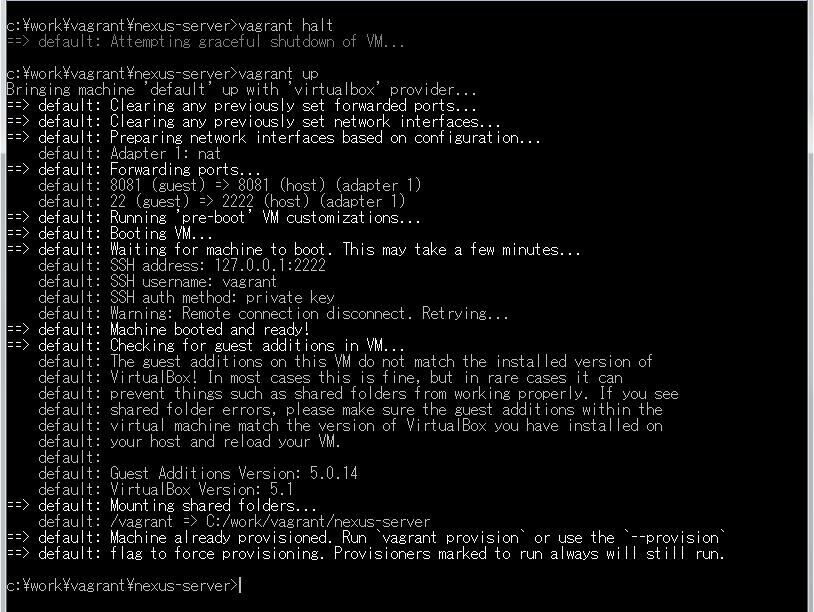
vagrant sshで接続して nexus が起動していることを確認します。また http://localhost:8081/ にアクセスして管理画面が表示されることも確認します。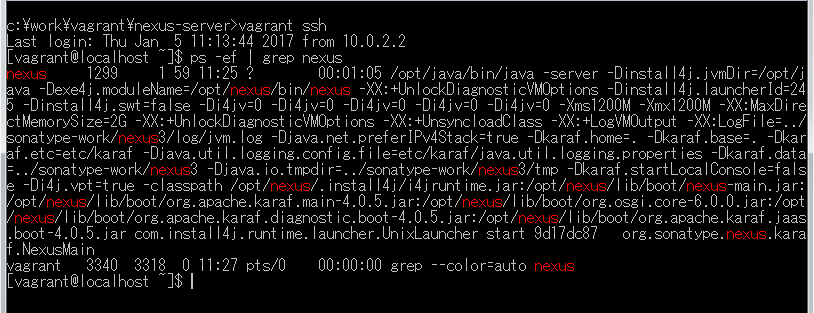
ksbysample-library-depend-spring ライブラリをアップロードしてみる
IntelliJ IDEA で ksbysample-library-depend-spring プロジェクトを開きます。
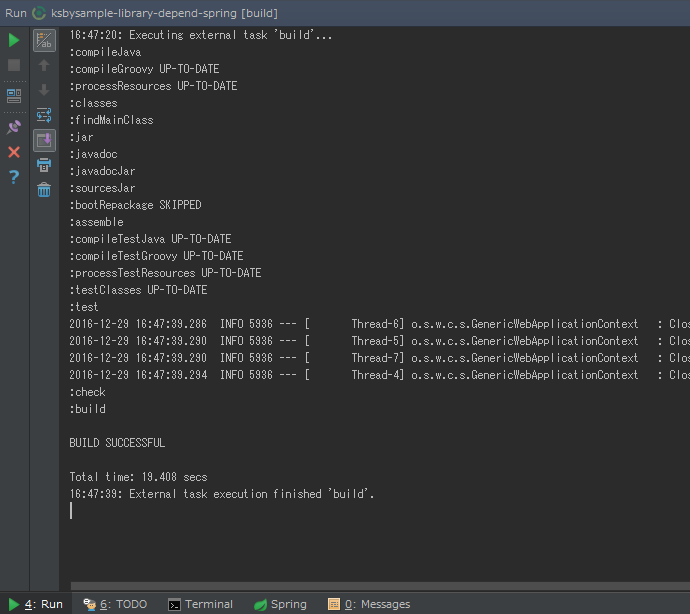
uploadArchives タスクを実行して登録します。BUILD SUCCESSFUL が表示されることが確認できます。

nexus の管理画面を見ると ksbysample-library-depend-spring ライブラリが登録されていることが確認できます。

次回は。。。
目次を作成して感想を書いて締める予定です。
ソースコード
Vagrantfile
■その1
# -*- mode: ruby -*-
# vi: set ft=ruby :

# All Vagrant configuration is done below. The "2" in Vagrant.configure
# configures the configuration version (we support older styles for
# backwards compatibility). Please don't change it unless you know what
# you're doing.
Vagrant.configure("2") do |config|
  # The most common configuration options are documented and commented below.
  # For a complete reference, please see the online documentation at
  # https://docs.vagrantup.com.

  # Every Vagrant development environment requires a box. You can search for
  # boxes at https://atlas.hashicorp.com/search.
  config.vm.box = "centos-7-x86_64"

  # Disable automatic box update checking. If you disable this, then
  # boxes will only be checked for updates when the user runs
  # `vagrant box outdated`. This is not recommended.
  # config.vm.box_check_update = false

  # Create a forwarded port mapping which allows access to a specific port
  # within the machine from a port on the host machine. In the example below,
  # accessing "localhost:8080" will access port 80 on the guest machine.
  # config.vm.network "forwarded_port", guest: 80, host: 8080

  # Create a private network, which allows host-only access to the machine
  # using a specific IP.
  # config.vm.network "private_network", ip: "192.168.33.10"

  # Create a public network, which generally matched to bridged network.
  # Bridged networks make the machine appear as another physical device on
  # your network.
  # config.vm.network "public_network"

  # Share an additional folder to the guest VM. The first argument is
  # the path on the host to the actual folder. The second argument is
  # the path on the guest to mount the folder. And the optional third
  # argument is a set of non-required options.
  # config.vm.synced_folder "../data", "/vagrant_data"

  # Provider-specific configuration so you can fine-tune various
  # backing providers for Vagrant. These expose provider-specific options.
  # Example for VirtualBox:
  #
  # config.vm.provider "virtualbox" do |vb|
  #   # Display the VirtualBox GUI when booting the machine
  #   vb.gui = true
  #
  #   # Customize the amount of memory on the VM:
  #   vb.memory = "1024"
  # end
  #
  # View the documentation for the provider you are using for more
  # information on available options.

  # Define a Vagrant Push strategy for pushing to Atlas. Other push strategies
  # such as FTP and Heroku are also available. See the documentation at
  # https://docs.vagrantup.com/v2/push/atlas.html for more information.
  # config.push.define "atlas" do |push|
  #   push.app = "YOUR_ATLAS_USERNAME/YOUR_APPLICATION_NAME"
  # end

  # Enable provisioning with a shell script. Additional provisioners such as
  # Puppet, Chef, Ansible, Salt, and Docker are also available. Please see the
  # documentation for more information about their specific syntax and use.
  # config.vm.provision "shell", inline: <<-SHELL
  #   apt-get update
  #   apt-get install -y apache2
  # SHELL
end
■その2
  config.vm.provider "virtualbox" do |vb|
  #   # Display the VirtualBox GUI when booting the machine
  #   vb.gui = true
  #
    # Customize the amount of memory on the VM:
    vb.memory = "2048"
  end
■その3
  # Create a forwarded port mapping which allows access to a specific port
  # within the machine from a port on the host machine. In the example below,
  # accessing "localhost:8080" will access port 80 on the guest machine.
  # config.vm.network "forwarded_port", guest: 80, host: 8080
  config.vm.network "forwarded_port", guest: 8081, host: 8081
config.vm.network "forwarded_port", guest: 8081, host: 8081を追加します。
java.sh
JAVA_HOME=/opt/java
PATH=$PATH:$JAVA_HOME/bin
nexus.service
[Unit]
Description=nexus service
After=network.target

[Service]
Type=forking
ExecStart=/opt/nexus/bin/nexus start
ExecStop=/opt/nexus/bin/nexus stop
User=nexus
Restart=on-abort

[Install]
WantedBy=multi-user.target
履歴
2017/01/05
初版発行。
共有ライブラリを管理するために Sonatype の Nexus Repository Manager OSS を使用する ( その25 )( Windows 版 Nexus 3 インストール手順 )
概要
- 今回の手順で確認できるのは以下の内容です。
- Windows 版 Nexus 3 ( 3.1以降 ) のインストール手順をまとめます。
- 3.1 以降の正式バージョンがリリースされた後にクリーンインストールの手順をまとめていなかったので、今回はクリーンインストールの手順を記述します。
- 2017/1/3 時点でダウンロード可能な最新版 nexus-3.2.0-01-win64.zip を使用します。
- インストール先は C:\nexus です。
参照したサイト・書籍
- Documentation Nexus Repository Manager 3.2 - Chapter 2. Installation and Running
https://books.sonatype.com/nexus-book/reference3/install.html
目次
- nexus-3.2.0-01-win64.zip をダウンロードする
- C:\nexus ディレクトリを作成する
- nexus-3.2.0-01-win64.zip を解凍し、ディレクトリ・ファイル一式を移動する
nexus /runを実行する- サービスを登録して起動する
- 動作確認
- メモ書き
手順
nexus-3.2.0-01-win64.zip をダウンロードする
Download Nexus Repository OSS ( http://www.sonatype.com/download-oss-sonatype ) のページにアクセスします。
ページ内の「nexus-3.2.0-01-win64.zip」リンクをクリックしてダウンロードします。

C:\nexus ディレクトリを作成する
- C:\ の下に nexus ディレクトリを作成します。
nexus-3.2.0-01-win64.zip を解凍し、ディレクトリ・ファイル一式を移動する
nexus-3.2.0-01-win64.zip を解凍します。解凍すると nexus-3.2.0-01, sonatype-work の2つのフォルダが作成されます。
nexus-3.2.0-01, sonatype-work の2つのフォルダを C:\nexus の下に移動します。移動後の C:\nexus の下のディレクトリ構成は以下のようになります。

nexus /run を実行する
nexus /runを実行し、Started Sonatype Nexus OSS 3.2.0-01が出力されることを確認します。


nexus の初回起動時のログを見ていると、初めて見るソフトもあって面白いです。
- Jetty が使用されている。
- Apache Shiro というものが使用されている ( このソフトは初めて聞きました )。
- OrientDB というものが使用されている ( このソフトも初めて聞きました )。
- Ehcache が使用されている。
- elasticsearch が使用されている。
- Quartz Scheduler というものが使用されている ( このソフトも初めて聞きました )。
Ctrl+C を押して、起動した nexus を停止します。
サービスを登録して起動する
コマンドプロンプトを「管理者として実行...」で起動した後、
nexus /install nexusを実行しサービスを登録します。

「サービスの開始」リンクをクリックして起動します。

動作確認
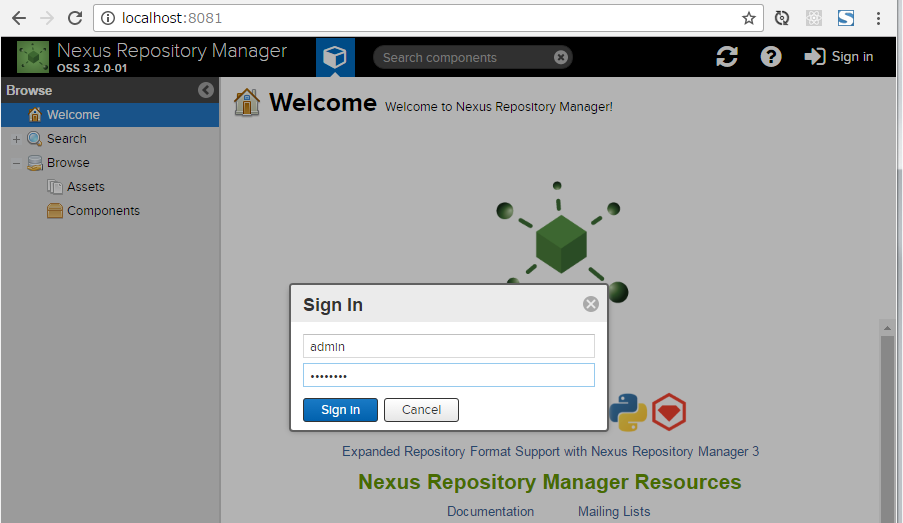
http://localhost:8081/ にアクセスして管理画面が表示されることを確認します。

admin / admin123 でログインできることを確認します。

メモ書き
nexus 起動時の JavaVM のオプションを変更するには?
C:\nexus\nexus-3.2.0-01\bin の下にある nexus.vmoptions を編集します。nexus /run 実行直後は以下の内容でした。
-Xms1200M
-Xmx1200M
-XX:MaxDirectMemorySize=2G
-XX:+UnlockDiagnosticVMOptions
-XX:+UnsyncloadClass
-XX:+LogVMOutput
-XX:LogFile=../sonatype-work/nexus3/log/jvm.log
-Djava.net.preferIPv4Stack=true
-Dkaraf.home=.
-Dkaraf.base=.
-Dkaraf.etc=etc/karaf
-Djava.util.logging.config.file=etc/karaf/java.util.logging.properties
-Dkaraf.data=../sonatype-work/nexus3
-Djava.io.tmpdir=../sonatype-work/nexus3/tmp
-Dkaraf.startLocalConsole=false
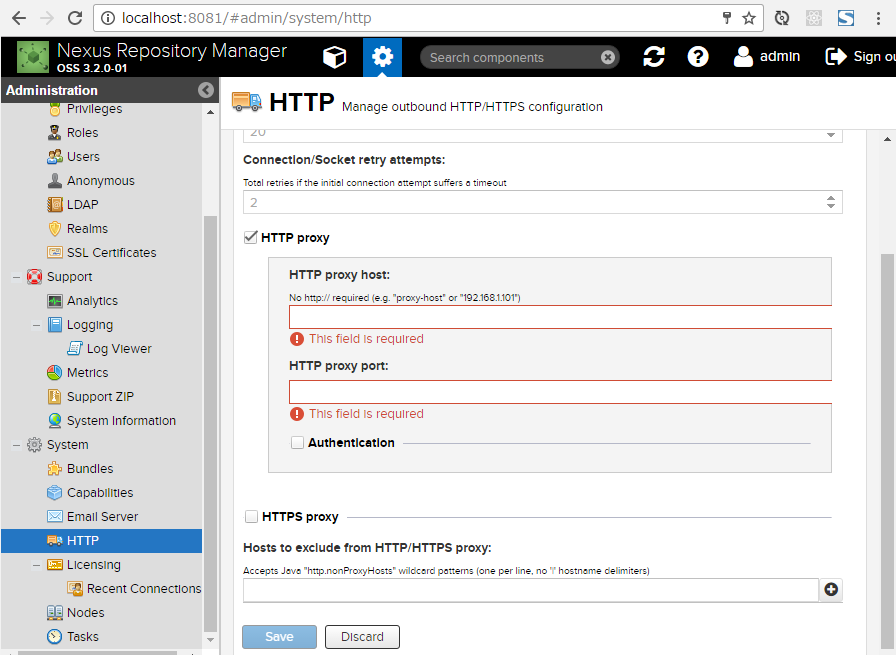
nexus から Maven Central Repository へアクセスする際に Proxy サーバがある場合には?
管理画面から設定します。
ソースコード
履歴
2017/01/03
初版発行。
共有ライブラリを管理するために Sonatype の Nexus Repository Manager OSS を使用する ( その24 )( Nexus を 3.1.0-04 → 3.2.0-01 へバージョンアップする )
概要
- 今回の手順で確認できるのは以下の内容です。
- Download Nexus Repository OSS ( http://www.sonatype.com/download-oss-sonatype ) から nexus-3.2.0-01-win64.zip がダウンロード可能になっていましたので、Nexus を 3.1.0-04 → 3.2.0-01 へバージョンアップします。
- 3.2.0 の Release Notes は Nexus Repository Manager 3.2.0 Release Notes ( https://support.sonatype.com/hc/en-us/articles/115000309927-Nexus-Repository-Manager-3-2-0-Release-Notes ) です。
参照したサイト・書籍
目次
- nexus-3.2.0-01-win64.zip をダウンロードする
- nexus のサービスを停止する
- サービスを削除する
- nexus-3.2.0-01-win64.zip を解凍し C:\nexus にコピーする
- サービスを登録して起動する
- 動作確認
- C:\nexus\nexus-3.1.0-04 を削除する
手順
nexus-3.2.0-01-win64.zip をダウンロードする
Download Nexus Repository OSS ( http://www.sonatype.com/download-oss-sonatype ) のページにアクセスします。
ページ内の「nexus-3.2.0-01-win64.zip」リンクをクリックしてダウンロードします。

nexus のサービスを停止する
管理ツールのサービスを開いてサービス一覧から「nexus」を選択した後、「サービスの停止」リンクをクリックしてサービスを停止します。

サービスを削除する
コマンドプロンプトを「管理者として実行...」で起動した後、
nexus.exe /uninstall nexusを実行しサービスを削除します。

nexus-3.2.0-01-win64.zip を解凍し C:\nexus にコピーする
nexus-3.2.0-01-win64.zip を解凍します。解凍すると nexus-3.2.0-01, sonatype-work の2つのフォルダが作成されます。
nexus-3.2.0-01, sonatype-work の2つのフォルダを C:\nexus の下にコピーします。
サービスを登録して起動する
「管理者として実行...」で起動しているコマンドプロンプトから
nexus.exe /install nexusを実行しサービスを登録します。

「サービスの開始」リンクをクリックして起動します。

動作確認
http://localhost:8081/ にアクセスして管理画面が表示されることを確認します。

コンポーネント一覧にもこれまで登録していたものが表示されています。

C:\nexus\nexus-3.1.0-04 を削除する
- C:\nexus\nexus-3.1.0-04 を削除します。
ソースコード
履歴
2017/01/03
初版発行。
共有ライブラリを管理するために Sonatype の Nexus Repository Manager OSS を使用する ( 番外編 )( IntelliJ IDEA を 2016.3 → 2016.3.2 へ、Git for Windows を 2.10.2 → 2.11.0 へバージョンアップ )
IntelliJ IDEA を 2016.3 → 2016.3.2 へバージョンアップする
IntelliJ IDEA の 2016.3.1 が出ていることには気付いていてバージョンアップしなければと思っていましたが、いざバージョンアップしようとしたら 2016.3.2 がリリースされていました。2016.3.2 へバージョンアップします。
IntelliJ IDEA 2016.3.1 Release Notes
https://confluence.jetbrains.com/display/IDEADEV/IntelliJ+IDEA+2016.3.1+Release+NotesIntelliJ IDEA 2016.3.2 Release Notes
https://confluence.jetbrains.com/display/IDEADEV/IntelliJ+IDEA+2016.3.2+Release+Notes
※ksbysample-nexus-repomng/ksbysample-library-depend-spring プロジェクトを開いた状態でバージョンアップしています。
IntelliJ IDEA のメインメニューから「Help」-「Check for Updates...」を選択します。
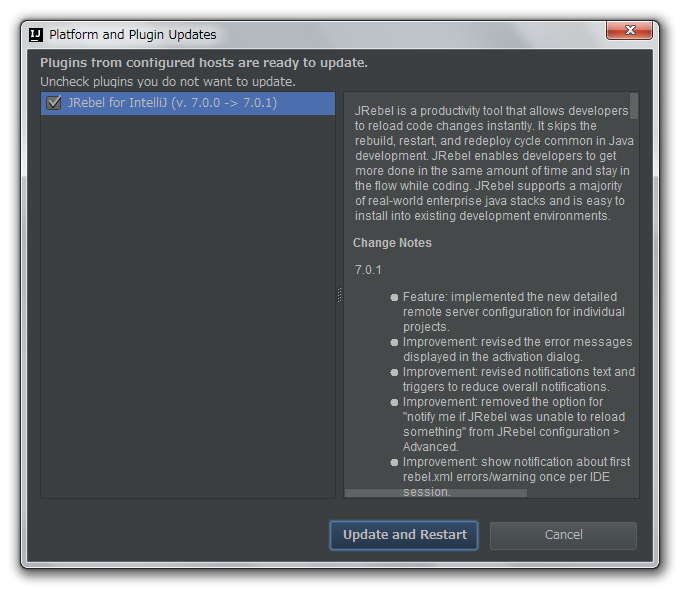
「Platform and Plugin Updates」ダイアログが表示されます。左下に「Update and Restart」ボタンが表示されていますので、「Update and Restart」ボタンをクリックします。

JRebel for IntelliJ の update も表示されたので、チェックしたまま「Update and Restart」ボタンをクリックします。
Patch がダウンロードされて IntelliJ IDEA が再起動した後、画面下部に「Indexing...」のメッセージが表示されますので、終了するまで待機します。

処理が終了すると Gradle projects View のツリーの表示が other グループしかない初期の状態に戻っていますので、左上の「Refresh all Gradle projects」ボタンをクリックして更新します。更新が完了すると build グループ等が表示されます。
clean タスク実行 → Rebuild Project 実行をした後、build タスクを実行して "BUILD SUCCESSFUL" のメッセージが表示されることを確認します。
Project View で src/test を選択した後、コンテキストメニューを表示して「Run 'All Tests' with Coverage」を選択し、テストが全て成功することを確認します。

Git for Windows を 2.10.2 → 2.11.0 へバージョンアップする
Git for Windows も 2.11.0 がリリースされていたのでバージョンアップします。
https://git-for-windows.github.io/ の「Download」ボタンをクリックして Git-2.11.0-64-bit.exe をダウンロードします。
Git-2.11.0-64-bit.exe を実行します。
「Git 2.11.0 Setup」ダイアログが表示されます。[Next >]ボタンをクリックします。
「Select Components」画面が表示されます。全てのチェックが外れたままであることを確認した後、[Next >]ボタンをクリックします。
「Adjusting your PATH environment」画面が表示されます。中央の「Use Git from the Windows Command Prompt」が選択されていることを確認後、[Next >]ボタンをクリックします。
「Configuring the line ending conversions」画面が表示されます。「Checkout Windows-style, commit Unix-style line endings」が選択されていることを確認した後、[Next >]ボタンをクリックします。
「Configuring the terminal emulator to use with Git Bash」画面が表示されます。「Use Windows'default console window」が選択されていることを確認した後、[Next >]ボタンをクリックします。
「Configuring extra options」画面が表示されます。「Enable file system caching」だけがチェックされていることを確認した後、[Next >]ボタンをクリックします。
「Configuring experimental options」画面が表示されます。全てのチェックが外れたままであることを確認した後、[Install]ボタンをクリックします。
インストールが完了すると「Completing the Git Setup Wizard」のメッセージが表示された画面が表示されます。中央の「View ReleaseNotes.html」のチェックを外した後、「Finish」ボタンをクリックしてインストーラーを終了します。
コマンドプロンプトを起動して git のバージョンが 2.11.0 になっていることを確認します。

git-cmd.exe の起動も問題ないようですので、このまま 2.11.0 で作業を進めたいと思います。

共有ライブラリを管理するために Sonatype の Nexus Repository Manager OSS を使用する ( その23 )( Spring Framework に依存するライブラリを作成する6 )
概要
- 今回の手順で確認できるのは以下の内容です。
- ksbysample-library-depend-spring を導入してもデフォルトでは動作せず、ksbysample.library.request-and-response-logger.enabled=true を設定した時だけ動作するように変更します。
参照したサイト・書籍
目次
- RequestAndResponseLoggerAutoConfiguration クラスで ksbysample.library.request-and-response-logger.enabled=true が設定されていなければ Bean を生成しないようにする
- Nexus に登録する
- ksbysample-webapp-demo プロジェクトで動作を確認する
- 次回は。。。
手順
RequestAndResponseLoggerAutoConfiguration クラスで ksbysample.library.request-and-response-logger.enabled=true が設定されていなければ Bean を生成しないようにする
ksbysample-library-depend-spring プロジェクトを開きます。
バージョンを 1.1.0-RELEASE に変更します。build.gradle を リンク先の内容 に変更します。
src/main/java/ksbysample/library/dependspring/config の下の RequestAndResponseLoggerAutoConfiguration.java を リンク先の内容 に変更します。
テストします。src/test/java/ksbysample/library/dependspring/config の下の RequestAndResponseLoggerAutoConfigurationTest.java を リンク先の内容 に変更します。
テストを実行します。RequestAndResponseLoggerAutoConfigurationTest クラスのクラス名の左側に表示されているアイコンをクリックしてコンテキストメニューを表示後「Run 'RequestAndResponseLoggerAutoCo...'」を選択します。
テストは全て成功し、デフォルト状態ではログは出力されず、
ksbysample.library.request-and-response-logger.enabled=trueを定義すればログが出力されることが確認できます。

Nexus に登録する
clean タスク実行 → Rebuild Project 実行をした後 build タスクを実行して、エラーが出ないことを確認します。

Gradle projects View から uploadArchives タスクを実行します。BUILD SUCCESSFUL が表示されて正常に Nexus に登録されました。

Nexus の管理画面を見ると、登録されていることが確認できます。

ksbysample-webapp-demo プロジェクトで動作を確認する
ksbysample-library-depend-spring プロジェクトを閉じて ksbysample-webapp-demo プロジェクトを開きます。
build.gradle を リンク先のその1の内容 に変更します。変更後、Gradle projects View の左上にある「Refresh all Gradle projects」ボタンをクリックして反映します。
bootRun タスクを実行して Tomcat を起動した後、http://localhost:8080/sample にアクセスします。まだ
ksbysample.library.request-and-response-logger.enabled=trueを設定していないので、request, response のログが出力されません。
Tomcat を停止します。
build.gradle を リンク先のその2の内容 に変更します。
再度 bootRun タスクを実行して Tomcat を起動した後、http://localhost:8080/sample にアクセスします。今度は request, response のログが出力されます。

Tomcat を停止します。
動作確認が完了したので、commit します。また feature/3-issue ブランチを develop, master ブランチへマージして、Issue #3 をクローズします。
次回は。。。
- Nexus 3 の正式版 ( 3.1 以降 ) のインストールは 3.0.x からのバージョンアップとして記述していたので、Windows版Nexus のインストール方法をまとめ直します。
- VirtualBox+Vagrant をインストールして Linux の仮想サーバを構築し、Unix 版の Nexus Repository Manager OSS をインストールして使用してみます。
ソースコード
ksbysample-library-depend-spring/build.gradle
group 'ksbysample.library'
version '1.1.0-RELEASE'
- version の値を
1.0.0-RELEASE→1.1.0-RELEASEに変更します。
RequestAndResponseLoggerAutoConfiguration.java
package ksbysample.library.dependspring.config;

import ksbysample.library.dependspring.intercepter.RequestAndResponseLogger;
import org.apache.commons.lang3.StringUtils;
import org.springframework.aop.Advisor;
import org.springframework.aop.aspectj.AspectJExpressionPointcut;
import org.springframework.aop.support.DefaultPointcutAdvisor;
import org.springframework.beans.factory.annotation.Value;
import org.springframework.boot.autoconfigure.condition.ConditionalOnProperty;
import org.springframework.boot.autoconfigure.condition.ConditionalOnWebApplication;
import org.springframework.context.annotation.Bean;
import org.springframework.context.annotation.Configuration;

@Configuration
public class RequestAndResponseLoggerAutoConfiguration {

    private static final String REQUESTMAPPING_EXPRESSION = "@annotation(org.springframework.web.bind.annotation.RequestMapping)";

    @Value("${ksbysample.library.request-and-response-logger.execution:}")
    private String execution;

    @Bean
    @ConditionalOnWebApplication
    @ConditionalOnProperty(value = {"ksbysample.library.request-and-response-logger.enabled"}, havingValue = "true")
    public Advisor requestAndResponseLoggerAdvisor() {
        AspectJExpressionPointcut pointcut = new AspectJExpressionPointcut();
        String expression = StringUtils.EMPTY;
        if (StringUtils.isNotBlank(this.execution)) {
            expression = this.execution + " && ";
        }
        expression += REQUESTMAPPING_EXPRESSION;
        pointcut.setExpression(expression);
        return new DefaultPointcutAdvisor(pointcut, new RequestAndResponseLogger());
    }

}
@ConditionalOnProperty(value = {"ksbysample.library.request-and-response-logger.enabled"}, havingValue = "true")を追加します。
RequestAndResponseLoggerAutoConfigurationTest.java
package ksbysample.library.dependspring.config;

import ksbysample.library.dependspring.Application;
import org.junit.Before;
import org.junit.Rule;
import org.junit.Test;
import org.junit.experimental.runners.Enclosed;
import org.junit.runner.RunWith;
import org.springframework.beans.factory.annotation.Autowired;
import org.springframework.boot.test.OutputCapture;
import org.springframework.boot.test.SpringApplicationConfiguration;
import org.springframework.test.context.TestPropertySource;
import org.springframework.test.context.junit4.SpringJUnit4ClassRunner;
import org.springframework.test.context.web.WebAppConfiguration;
import org.springframework.test.web.servlet.MockMvc;
import org.springframework.test.web.servlet.setup.MockMvcBuilders;
import org.springframework.web.context.WebApplicationContext;

import static org.assertj.core.api.Assertions.assertThat;
import static org.springframework.test.web.servlet.request.MockMvcRequestBuilders.get;
import static org.springframework.test.web.servlet.result.MockMvcResultMatchers.status;

@RunWith(Enclosed.class)
public class RequestAndResponseLoggerAutoConfigurationTest {

    public static abstract class TestBase {

        public MockMvc mvc;

        @Autowired
        private WebApplicationContext context;

        @Rule
        public OutputCapture capture = new OutputCapture();

        @Before
        public void setUp() throws Exception {
            this.mvc = MockMvcBuilders.webAppContextSetup(this.context)
                    .build();
        }

    }

    @RunWith(SpringJUnit4ClassRunner.class)
    @SpringApplicationConfiguration(classes = Application.class)
    @WebAppConfiguration
    public static class デフォルトの設定でのテスト extends TestBase {

        @Test
        public void ログが出力されない() throws Exception {
            mvc.perform(get("/test"))
                    .andExpect(status().isOk());
            assertThat(capture.toString()).doesNotContain("[req][info  ] REQUEST_URI = /test");
            assertThat(capture.toString()).doesNotContain("[res][info  ] RESPONSE_STATUS = 200");
        }

    }

    @RunWith(SpringJUnit4ClassRunner.class)
    @SpringApplicationConfiguration(classes = Application.class)
    @WebAppConfiguration
    @TestPropertySource(properties = {
            "ksbysample.library.request-and-response-logger.enabled=true"
    })
    public static class enabledプロパティ設定時のテスト extends TestBase {

        @Test
        public void ログが出力される() throws Exception {
            mvc.perform(get("/test"))
                    .andExpect(status().isOk());
            assertThat(capture.toString()).contains("[req][info  ] REQUEST_URI = /test");
            assertThat(capture.toString()).contains("[res][info  ] RESPONSE_STATUS = 200");
        }

    }

    @RunWith(SpringJUnit4ClassRunner.class)
    @SpringApplicationConfiguration(classes = Application.class)
    @WebAppConfiguration
    @TestPropertySource(properties = {
            "ksbysample.library.request-and-response-logger.enabled=true"
            , "ksbysample.library.request-and-response-logger.execution=execution(* ksbysample.library.dependspring..*.*(..))"
    })
    public static class executionプロパティ設定時のテスト_出力される設定 extends TestBase {

        @Test
        public void ログが出力される() throws Exception {
            mvc.perform(get("/test"))
                    .andExpect(status().isOk());
            assertThat(capture.toString()).contains("[req][info  ] REQUEST_URI = /test");
            assertThat(capture.toString()).contains("[res][info  ] RESPONSE_STATUS = 200");
        }

    }

    @RunWith(SpringJUnit4ClassRunner.class)
    @SpringApplicationConfiguration(classes = Application.class)
    @WebAppConfiguration
    @TestPropertySource(properties = {
            "ksbysample.library.request-and-response-logger.enabled=true"
            , "ksbysample.library.request-and-response-logger.execution=execution(* ksbysample.webapp.lending.web..*.*(..))"
    })
    public static class executionプロパティ設定時のテスト_出力されない設定 extends TestBase {

        @Test
        public void ログが出力されない() throws Exception {
            mvc.perform(get("/test"))
                    .andExpect(status().isOk());
            assertThat(capture.toString()).doesNotContain("[req][info  ] REQUEST_URI = /test");
            assertThat(capture.toString()).doesNotContain("[res][info  ] RESPONSE_STATUS = 200");
        }

    }

}
- 各クラスで同じ内容を定義をしていた部分を TestBase クラスを作成して共通化します。abstract class にしてテスト対象外になるようにします。
- 「デフォルトの設定でのテスト」テストクラスのメソッド名を
ログが出力される→ログが出力されないへ変更し、メソッド内で使用している assert 用メソッドをcontains→doesNotContainへ変更します。 ksbysample.library.request-and-response-logger.enabled=trueを定義した時にログが出力されることを確認するための「enabledプロパティ設定時のテスト」テストクラスを作成します。- 「executionプロパティ設定時のテスト出力される設定」「executionプロパティ設定時のテスト出力されない設定」テストクラスの @TestPropertySource アノテーションに
ksbysample.library.request-and-response-logger.enabled=trueを追加します。
ksbysample-webapp-demo/build.gradle
■その1
dependencies {
    compile('org.springframework.boot:spring-boot-starter-web')
    testCompile('org.springframework.boot:spring-boot-starter-test')

    compile('ksbysample.library:ksbysample-library-simpleutils:1.0-RELEASE')
    compile('ksbysample.library:ksbysample-library-depend-nospring:1.1-RELEASE')
    compile('ksbysample.library:ksbysample-library-depend-spring:1.1.0-RELEASE')
}
ksbysample.library:ksbysample-library-depend-springのバージョン番号を1.0.0-RELEASE→1.1.0-RELEASEに変更します。
■その2
dependencies {
    ..........
}

bootRun {
    jvmArgs = ['-Dksbysample.library.request-and-response-logger.enabled=true']
}
履歴
2016/12/29
初版発行。
共有ライブラリを管理するために Sonatype の Nexus Repository Manager OSS を使用する ( その22 )( Spring Framework に依存するライブラリを作成する5 )
概要
- 今回の手順で確認できるのは以下の内容です。
- 1.4 系のプロジェクトに 1.3.8 ベースの ksbysample-library-depend-spring ライブラリを導入すると Spring Boot はどのバージョンが使用されるのか確認します。
参照したサイト・書籍
目次
- 1.4 系のプロジェクト ksbysample-webapp-demo14 を作成する
- ksbysample-library-depend-spring ライブラリ導入時のログが出ることを確認する
- gradlew dependencies コマンドで依存関係を確認する
手順
1.4 系のプロジェクト ksbysample-webapp-demo14 を作成する
今回は IntelliJ IDEA から Spring Initializr を利用してプロジェクトを作成した後、build.gradle に Spring IO Platform の bom 等を追加します。
IntelliJ IDEA の「Welcome to IntelliJ IDEA」ダイアログから「Create New Project」メニューをクリックします。

「New Project」ダイアログが表示されます。画面左側の一覧から「Spring Initializr」を選択してから以下の画像の内容を入力後、「Next」ボタンをクリックします。

Group、Artifact 等を入力する画面が表示されます。以下の画像の内容を入力後、「Next」ボタンをクリックします。

Spring のプロダクトを選択する画面が表示されます。以下の画像のプロダクトをチェックした後、「Next」ボタンをクリックします。


Project name と Project location を入力する画面が表示されます。以下の画像の内容になっていることを確認した後、「Finish」ボタンをクリックします。

「Import Module from Gradle」ダイアログが表示されます。「Create directories for empty roots automatically」をチェックした後、「OK」ボタンをクリックします。

IntelliJ IDEA の 2016.3 ではプロジェクト作成直後に画面右側に「Gradle」アイコン&文字が表示されないので、一旦 IntelliJ IDEA を再起動します。
build.gradle を リンク先の内容 に変更します。変更後、Gradle projects View の左上にある「Refresh all Gradle projects」ボタンをクリックして反映します。
src/main/java/ksbysample/webapp/demo14 の下に TestController.java を作成し、リンク先の内容 を記述します。
ksbysample-library-depend-spring ライブラリ導入時のログが出ることを確認する
Gradle projects View から bootRun タスクを実行し、Tomcat を起動します。
ブラウザを起動し http://localhost:8080/test にアクセスすると、request, response のログが出力されることが確認できました。1.4 系のプロジェクトでも動作しますね。

gradlew dependencies コマンドで依存関係を確認する
コマンドプロンプトを起動しカレントディレクトリを c:\project-springboot\ksbysample-nexus-repomng\ksbysample-webapp-demo14 へ移動した後、gradlew dependencies コマンドを実行してみます。
今回は org.springframework.boot:spring-boot-starter-web:1.3.8.RELEASE -> 1.4.2.RELEASE (*) と出力されており、1.4.2 が使用されていました。ライブラリ側のバージョンではなく、メインプロジェクト側のバージョンが使用されるようです。
compile - Dependencies for source set 'main'.
+--- org.springframework.boot:spring-boot-starter-web: -> 1.4.2.RELEASE
|    +--- org.springframework.boot:spring-boot-starter:1.4.2.RELEASE
|    |    +--- org.springframework.boot:spring-boot:1.4.2.RELEASE
|    |    |    +--- org.springframework:spring-core:4.3.4.RELEASE
|    |    |    \--- org.springframework:spring-context:4.3.4.RELEASE
|    |    |         +--- org.springframework:spring-aop:4.3.4.RELEASE
|    |    |         |    +--- org.springframework:spring-beans:4.3.4.RELEASE
|    |    |         |    |    \--- org.springframework:spring-core:4.3.4.RELEASE
|    |    |         |    \--- org.springframework:spring-core:4.3.4.RELEASE
|    |    |         +--- org.springframework:spring-beans:4.3.4.RELEASE (*)
|    |    |         +--- org.springframework:spring-core:4.3.4.RELEASE
|    |    |         \--- org.springframework:spring-expression:4.3.4.RELEASE
|    |    |              \--- org.springframework:spring-core:4.3.4.RELEASE
|    |    +--- org.springframework.boot:spring-boot-autoconfigure:1.4.2.RELEASE
|    |    |    \--- org.springframework.boot:spring-boot:1.4.2.RELEASE (*)
|    |    +--- org.springframework.boot:spring-boot-starter-logging:1.4.2.RELEASE
|    |    |    +--- ch.qos.logback:logback-classic:1.1.7
|    |    |    |    +--- ch.qos.logback:logback-core:1.1.7
|    |    |    |    \--- org.slf4j:slf4j-api:1.7.20 -> 1.7.21
|    |    |    +--- org.slf4j:jcl-over-slf4j:1.7.21
|    |    |    |    \--- org.slf4j:slf4j-api:1.7.21
|    |    |    +--- org.slf4j:jul-to-slf4j:1.7.21
|    |    |    |    \--- org.slf4j:slf4j-api:1.7.21
|    |    |    \--- org.slf4j:log4j-over-slf4j:1.7.21
|    |    |         \--- org.slf4j:slf4j-api:1.7.21
|    |    +--- org.springframework:spring-core:4.3.4.RELEASE
|    |    \--- org.yaml:snakeyaml:1.17
|    +--- org.springframework.boot:spring-boot-starter-tomcat:1.4.2.RELEASE
|    |    +--- org.apache.tomcat.embed:tomcat-embed-core:8.5.6
|    |    +--- org.apache.tomcat.embed:tomcat-embed-el:8.5.6
|    |    \--- org.apache.tomcat.embed:tomcat-embed-websocket:8.5.6
|    |         \--- org.apache.tomcat.embed:tomcat-embed-core:8.5.6
|    +--- org.hibernate:hibernate-validator:5.2.4.Final
|    |    +--- javax.validation:validation-api:1.1.0.Final
|    |    +--- org.jboss.logging:jboss-logging:3.2.1.Final -> 3.3.0.Final
|    |    \--- com.fasterxml:classmate:1.1.0 -> 1.3.3
|    +--- com.fasterxml.jackson.core:jackson-databind:2.8.4
|    |    +--- com.fasterxml.jackson.core:jackson-annotations:2.8.0 -> 2.8.4
|    |    \--- com.fasterxml.jackson.core:jackson-core:2.8.4
|    +--- org.springframework:spring-web:4.3.4.RELEASE
|    |    +--- org.springframework:spring-aop:4.3.4.RELEASE (*)
|    |    +--- org.springframework:spring-beans:4.3.4.RELEASE (*)
|    |    +--- org.springframework:spring-context:4.3.4.RELEASE (*)
|    |    \--- org.springframework:spring-core:4.3.4.RELEASE
|    \--- org.springframework:spring-webmvc:4.3.4.RELEASE
|         +--- org.springframework:spring-aop:4.3.4.RELEASE (*)
|         +--- org.springframework:spring-beans:4.3.4.RELEASE (*)
|         +--- org.springframework:spring-context:4.3.4.RELEASE (*)
|         +--- org.springframework:spring-core:4.3.4.RELEASE
|         +--- org.springframework:spring-expression:4.3.4.RELEASE (*)
|         \--- org.springframework:spring-web:4.3.4.RELEASE (*)
\--- ksbysample.library:ksbysample-library-depend-spring:1.0.0-RELEASE
     +--- org.springframework.boot:spring-boot-autoconfigure:1.3.8.RELEASE -> 1.4.2.RELEASE (*)
     +--- org.springframework.boot:spring-boot-starter-web:1.3.8.RELEASE -> 1.4.2.RELEASE (*)
     +--- org.aspectj:aspectjweaver:1.8.9
     +--- org.apache.commons:commons-lang3:3.5 -> 3.4
     \--- com.google.guava:guava:20.0 -> 17.0
ソースコード
ksbysample-webapp-demo14/build.gradle
buildscript {
    ext {
        springBootVersion = '1.4.2.RELEASE'
    }
    repositories {
        mavenCentral()
        maven { url "http://repo.spring.io/repo/" }
    }
    dependencies {
        classpath("org.springframework.boot:spring-boot-gradle-plugin:${springBootVersion}")
        classpath("io.spring.gradle:dependency-management-plugin:0.6.1.RELEASE")
    }
}

apply plugin: 'java'
apply plugin: 'eclipse'
apply plugin: 'org.springframework.boot'
apply plugin: 'io.spring.dependency-management'

jar {
    baseName = 'ksbysample-webapp-demo14'
    version = '0.0.1-SNAPSHOT'
}
sourceCompatibility = 1.8
targetCompatibility = 1.8

repositories {
    maven { url "http://localhost:8081/repository/maven-public" }
}

dependencyManagement {
    imports {
        mavenBom 'io.spring.platform:platform-bom:Athens-SR1'
    }
}

dependencies {
    compile('org.springframework.boot:spring-boot-starter-web')
    runtime('org.springframework.boot:spring-boot-devtools')
    testCompile('org.springframework.boot:spring-boot-starter-test')

    compile('ksbysample.library:ksbysample-library-depend-spring:1.0.0-RELEASE')
}
- buildscript の以下の点を変更します。
- Spring Boot は 1.4.3 がリリースされていますが Spring IO Platform の最新版で対応しているのは 1.4.2 なので、springBootVersion の値を
1.4.3.RELEASE→1.4.2.RELEASEに変更します。 - repositories に
maven { url "http://repo.spring.io/repo/" }を追加します。 - dependencies に
classpath("io.spring.gradle:dependency-management-plugin:0.6.1.RELEASE")を追加します。
- Spring Boot は 1.4.3 がリリースされていますが Spring IO Platform の最新版で対応しているのは 1.4.2 なので、springBootVersion の値を
apply plugin: 'io.spring.dependency-management'を追加します。あと以前はapply plugin: 'spring-boot'でしたがapply plugin: 'org.springframework.boot'に変わっていますね。- repositories 内に書くレポジトリを
mavenCentral()→maven { url "http://localhost:8081/repository/maven-public" }へ変更します。 dependencyManagement { imports { mavenBom 'io.spring.platform:platform-bom:Athens-SR1' } }を追加します。- dependencies に
compile('ksbysample.library:ksbysample-library-depend-spring:1.0.0-RELEASE')を追加します。
TestController.java
package ksbysample.webapp.demo14;

import org.springframework.stereotype.Controller;
import org.springframework.web.bind.annotation.RequestMapping;
import org.springframework.web.bind.annotation.ResponseBody;

@Controller
@RequestMapping("/test")
public class TestController {

    @RequestMapping
    @ResponseBody
    public String index() {
        return "test";
    }

}
履歴
2016/12/28
初版発行。